A little more than a month ago I purchased my second fiero. In pieces, it will all have to be reassembled along with the fact that there was no engine in it. I looked into many possible engine swaps for the car and after finding a lot of information I decided on either going with a 3800 or 3.4 DOHC. Then I stumbled onto a 3.4 DOHC on craigslist and my mind was decided and thus the beginning of my 3.4 DOHC build. The engine has been rebuilt and is in great condition along with a box of parts I got with it. I will have to do a little extra work on the cradle because the last engine that was in the car. It hasn't been driven since 1995 and upon contacting the owner from that time, I learned there used to be a Chevy 350 in it from v8archie's kit. This explained some weird welded brackets on the cradle. Either way, there's the background, lets get started on the build. The engine is out of a 1995 Monte Carlo. Most everything for the engine is there except a flywheel and clutch for a manual getrag. My first step has been removing the engine cradle. I recently got that out with minimal difficulty. I am waiting on a clutch before I can put anything back in the car but i'm going to clean up the tranny, cradle, and engine compartment first. Any suggestions on what clutch to go with for a DOHC? Just started the swap but I will keep it updated as work progresses.
[This message has been edited by 86Fieroman (edited 11-27-2013).]
When I did mine I used West Coast Fiero's High performance 9-11/16" Pressure Plate and 9-11/16" Organic / Organic Disk and it was fine with the 5 speed Isuzu box that used to be mated to the 4 banger in the car. Clutch had a nice feel to it, no chatter and held just fine. For a street car I thought it was fine. Lots of info about my swap on my web site.
------------------ Anything I might say is probably worth what you paid for it, so treat it accordingly!
thanks for the quick reply ltlfrari. I have actually already read your whole website and printed the story off. You do have lots of useful information on there. I was just wondering about other clutches as well. I've heard good things about wfc clutches and spec clutches too. If I went with spec what stage should I get or are there other off-brand clutches that work well too?
Well after some research i believe i will go with spec stage III clutch and hopefully have it in before the end of the year. In the mean time I will have to look into wiring and engine mounts, I do not want to have to notch the decklid.
I seem to recall someone (maybe Darth Fiero) used Dodge mounts to get the engine to sit lower than it would otherwise. Can't recall if her still had to notch the deck lid hinge or not though. I suspect so but perhaps not as much as would be need otherwise. Search might find it, I'm too lazy (and tired!).
------------------ Anything I might say is probably worth what you paid for it, so treat it accordingly!
Okay, thanks. Tesmith, after using those mounts did you have to notch the decklid at all? And would I still be able to use the dog bone if I wanted? I already have one that should work with the engine, you can see it on the floor in one of pictures. As for clutches, if you can shift faster with a 9 1/8, does that potentially mean the 9 11/16 will last longer before you have to replace it or is there no connection between the two?
I had to pretty much fab up all 4 mounts, but after it was done, the bottom of the oil pan is flush with the bottom of the cradle. No deck lid notching necessary, but I did have to cut the RH hinge for clearance (well, it was already cut to clear the V8 that was in there).
Don't mount the dog bone to the aluminum front cover. Many have done that and many have broken the cover. I have never understood why GM allows transverse engines to move so much. I mounted mine at the 3 original Fiero points (2 transaxle and one at the front of the engine) with an additional one behind the AC compressor like it was in the 94 Grand Prix I pulled the accessories from. I even used the GP mount (modified to get everything as low as possible). Minimal movement, and no more vibration than the 2.8 had.
As for clutches, if you can shift faster with a 9 1/8, does that potentially mean the 9 11/16 will last longer before you have to replace it or is there no connection between the two?
Shifting faster has to do with the diameter and moment of inertia of the clutch disk.
Wear life has to do with the volume and type of material that you're wearing away.
I asked a lot of questions when I did my swap. I also made my harness and ditched the stock DOHC relay center. If you need to look anything up, use this search in Google.
site:fiero.nl 3.4 DOHC
Copy it just like that and paste it in google. You can also PM me.
Rob
[This message has been edited by qwikgta (edited 12-11-2013).]
ltlfrari's wiring information is very good. I used it and the schematics for my Fiero (86 SE) and the 91-93 DOHC ECM (found on the net) to do mine. I started with a LARGE sheet of art paper (shamelessly stolen from my daughter) and drew up my own schematic, basically mirroring what ltlfrari did an dadding my own touches. By doing this, I became familiar with how it all worked and what had to go where, as well as was able to add my own notations and scribbles that I could follow. I was ecstatic when the car fired on the first try!. I haven't had to go back in and change anything. I did make the main section too long, but I stuffed it under the battery tray.
I left the coil packs and battery in the stock locations on my swap.
------------------ 1986 SE Aero coupe.
3.4 DOHC swap is complete and running, now just have to finish the rest of the car...
You can run a newer LQ-1 with the older wiring. I bought a 91-93 crate motor, and a 94 complete motor from the junkyard for all of the external parts. I used a 91-93 ECM and built the harness per ltlfrari's instructions. the 94-95 engines work with the older ECM by simply omitting the 24X crank sensor and the cam sensor. You can leave them in place to plug the holes. Everything else is the same and the harness is easier. I don't know anything about the 96-97 setups.
I did discover that the front covers (both plastic and aluminum ones) are different. I had to get a 91-93 alternator because the 94-95 alt had a larger mounting bracket configuration. Everything else switched over just fine.
------------------ 1986 SE Aero coupe.
3.4 DOHC swap is complete and running, now just have to finish the rest of the car...
But since your LQ1 isn't a 91 - 93 you have to use the 95 wiring.
I had a 96 OBDII motor, that I ran as a 91 OBDI. I used a 91 5-speed harness and ECM. I did have to pull some of the wires off the 96 harness because some of the sensors had different ends. I could have used the 91 stuff, but since I already had the 96 sensors why spend the money. Built my harness on the kitchen table, using the data from the 60"degree DOHC site (no longer around). I did have to ask a few questions but in the end the motor started right up, no codes and ran great. I did get my ECM re-flashed by GM Tuners.
Thank you all for the useful information. Last saturday I went to the junk yard and got a cruise control module (it was -2 degrees with a -15 degree windchill, great day for junkyarding) so now i will be able to hook that up. I also pulled a complete harness off of a 96 lumina 3.1. I am noticing the differences in the harness and will have to do a bit of splicing for the different connector ends but overall it is still in one piece which is more that I can say about my other harness I had. Is it possible to run a newer, 96, ecm with the 95 motor, or is that just pointless extra work. I have both ecm's so either would work. Also how did everyone go about the clutch switch so the car doesn't die when you depress the clutch? And what about the difference in rpm that will be displayed on the fiero dash because I have read the the DOHC sends more pulses than the 3.8 would, thus giving an un-true high rpm read on the dash? Thanks again.
What are the plans for wiring? You are going to ditch that under hood fuse box right?
I think you're talking about the RS Electrical Center, in which case it should be removed. In fact once the 3.4 DOHC has been connected to the C500 and C203 and unnecessary wires removed, there should be nothing more attached to it.
quote
Originally posted by tesmith66:
I had to pretty much fab up all 4 mounts, but after it was done, the bottom of the oil pan is flush with the bottom of the cradle. No deck lid notching necessary, but I did have to cut the RH hinge for clearance (well, it was already cut to clear the V8 that was in there).
Don't mount the dog bone to the aluminum front cover. Many have done that and many have broken the cover. I have never understood why GM allows transverse engines to move so much. I mounted mine at the 3 original Fiero points (2 transaxle and one at the front of the engine) with an additional one behind the AC compressor like it was in the 94 Grand Prix I pulled the accessories from. I even used the GP mount (modified to get everything as low as possible). Minimal movement, and no more vibration than the 2.8 had.
In which case your engine sits about 1-1.5" lower than stock, not bad, but I'd question if it's worth it. The same places still had to be clearanced, just not as much. But if you have to clearance them anyway, it doesn't add more work to need to remove more material from the hinge. However the stock 2.8 mounts are not enough for the DOHC in my opinion, and your mounts are probably cheaper than the Fiero poly mounts, and just as strong, so in terms of cost-benefit I think your mounts are better.
quote
Originally posted by 86Fieroman:
Thank you all for the useful information. Last saturday I went to the junk yard and got a cruise control module (it was -2 degrees with a -15 degree windchill, great day for junkyarding) so now i will be able to hook that up. I also pulled a complete harness off of a 96 lumina 3.1. I am noticing the differences in the harness and will have to do a bit of splicing for the different connector ends but overall it is still in one piece which is more that I can say about my other harness I had. Is it possible to run a newer, 96, ecm with the 95 motor, or is that just pointless extra work. I have both ecm's so either would work. Also how did everyone go about the clutch switch so the car doesn't die when you depress the clutch? And what about the difference in rpm that will be displayed on the fiero dash because I have read the the DOHC sends more pulses than the 3.8 would, thus giving an un-true high rpm read on the dash? Thanks again.
I don't have cruise control, but I seem to remember you needing to do some additional wiring in order to get the DOHC cruise control to work, as it is not vacuum based like the Fiero is. You can run the 96-97 PCM but I'm not sure if it's worth the additional work. First, you'll need a 94-97 engine to do it. Next, the 96-97 PCM was never offered with a manual trans (But they get the 3800s to run with manuals so I'm sure it can be flashed). The 91-93 ECU/wiring would definitely be a lot easier. I'm running a 94-95 PCM/harness and it works well and wasn't any additional work really. I do have some issues with it however. The motor will stall coming to a stop half the time if I don't blip the throttle real quick (No clutch switch), and my SES lamp is on all of the time except immediately following a stall, then it goes out. But when the SES lamp is off, the motor runs terrible. I diagnosed it once but decided it won't be fixed anytime soon (I forgot what it was, something in the DIS module). Fairly minor issues considering the engine runs really well, and to me it was worth it to get the SFI.
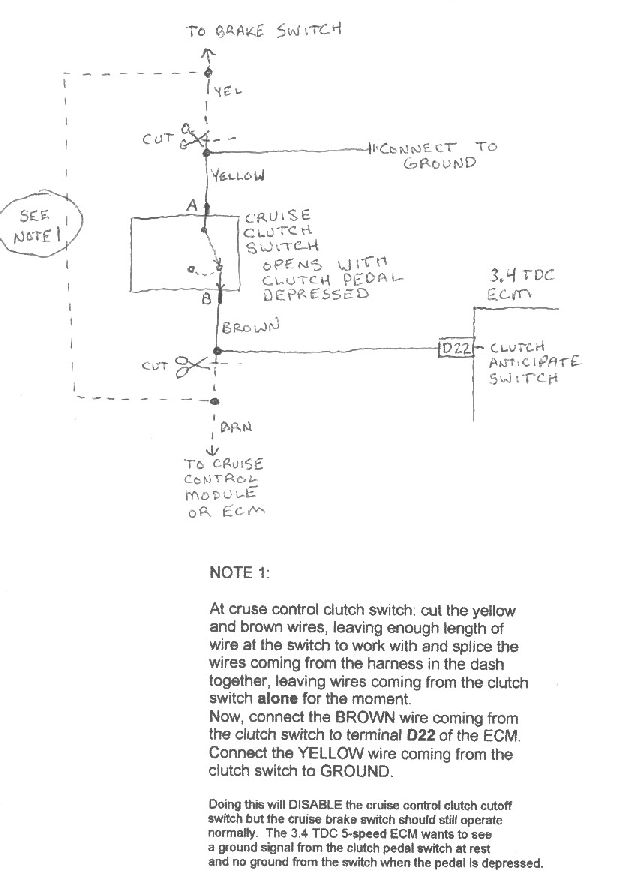
Here is the wiring for a clutch switch (Used only for 91-93 "9396" ECU's, thanks to GM Tuners for the image). Note your engine still might want to stall with the clutch switch, it's a common problem. I've found using the later (94-97) fuel injectors helps this quite a bit.
As for the tach, it's quite easy, run the white wire from the C pin on the largest DIS plug directly to C500 C3 (Also white), and that will run the tach perfectly assuming your car was a V6 to begin with.
OK, now I'm confused about the clutch switch. Some say D22 wants +12V when the clutch is depressed and some say it wants to see ground UNTIL the clutch is pressed. Which is it?
------------------ 1986 SE Aero coupe.
3.4 DOHC swap is complete and running, now just have to finish the rest of the car...
OK, now I'm confused about the clutch switch. Some say D22 wants +12V when the clutch is depressed and some say it wants to see ground UNTIL the clutch is pressed. Which is it?
ahhh.... the ol' "D22 question". I will toss another "wrench" into this one. I had a 91 5-spd ECM and Harness off a 91 Cutlass. (I pulled the Getrag 282 also). If you look at the wire diagram for the 91 w/ 5spd there is NO wire at D22, none. When I was doing my research, I would pull up a diagram for the 91-93 (OBDI) cars. The diagram was for a 92-93, if you look in the lower corner of the diagram it has a 92 on it. I actually had to purchase a 91 Cutlass Service Manual (the thick 2 inch book) and when I went to the wiring section, the diagram looked just like the 92-93 except for the D22. The D22 was shown but only for the automatic cars, not the 5 spd cars. On all the other pics I found on the net, the D22 wire was shown but it never specified "auto/manual".
I asked the "D22" question a few times and got a lot of advice about it. But the bottom line - on my application w/ a 91 ECM and Harness, I didn't even use the D22. It was not wired up to my system at all and my car ran great. No stalls at stoplights, no stalls when I stopped the car or pushed in the clutch, no issues at all.
I know this does not help, but you can take this from me, not someone who "thinks" they know. In my application I had no D22 wire and no codes/problems.
**Edit - I also did not have CC or A/C on my car, not sure if this is relevent **
Rob
[This message has been edited by qwikgta (edited 12-19-2013).]
I'm running the 91-93 ECM and have my D22 hooked up like Darth's diagram. I was having stall issues before and after, then lost an injector and replaced them with Ford yellowtops. Stall issue AND the rich running associated with the failing injector are gone- although I have yet to get the car on the road to give it the daily driver test.
I wouldn't be surprised if that fixes it, I've suspected for a long time it was injector-related, as even the cars with the clutch switch hooked up still occasionally stalled on decel . Like I said I've found that using the 94-97 injectors helps quite a bit. But having the clutch switch hooked up, if possible, certainly wouldn't hurt.
D22 is for the clutch switch. However, the majority of TDC's were automatics, and thus didn't have a D22 wire or circuit. The ECU for the automatics also did not use, or expect to see, a clutch switch. So when you do your swap (If you care to hook it up), you'll need to add the wire to D22, run it per that diagram, and have your PROM burned to a manual code.
I imagine it's also possible to have Ryan (GM Tuners) burn the chip to where the IAC is held slightly more open on decel approaching idle. This is something you'd need to ask him about though.
Well I now have my clutch too so I have everything I need to head to the garage and hopefully get my motor mounted. I got a spec stage 3. More details and pictures to come soon.
I had a SPEC Stage III on my V8, and it was pretty harsh on takeoff, but held like crazy. I went with a factory 9-11/16" clutch (I believe it was a Grand Prix 3.1 turbo unit). It works smooth and good- up until 6000 RPM or so- then starts to slip. Gonna take it easy until I get 1000 miles or so on it and then see what's up. Probably should have kept the Stage III or maybe gone with a Stage IV. My goal is to make this car a daily driver, so I was looking for new car smooth.
Good luck and post lots of pics. Ask away with all of your questions and we'll do our best to help.
------------------ 1986 SE Aero coupe.
3.4 DOHC swap is complete and running, now just have to finish the rest of the car...
Update. I got out to the garage the other day and got a few good hours of work in. First thing I did was grind off all of the weird brackets from the previous engine that was in there. It all came off fairly well although there is one spot that I will have to weld a piece back in. Next I worked on the transmission mounts. Here's the original mount before taking all of the rubber off of it. Then I put the new motor mounts in and figured that they would both sit downward like so, that way the engine would be lowered like I want it to be. However, when i did this to both sides I realized that the distance between the mounts has now changed so I would have to modify the brackets somehow if I wanted the transmission to fit in the mounts. I don't think I did this the correct way because now I think my engine will have a slight tip toward the firewall, which is the last thing I want so someone please comment how they did theirs. My way around this was re-drilling a hole in the rear transmission mount lower down, and then placing the mount the other way so where the bolt comes out that goes onto the transmission bracket is essential exactly where the bolt would have came through before. I figured I would have to do this to both sides but then I got it to go on after only doing it to the rear, which makes me think it is wrong since the mounts are each sitting a different way. Here's some pictures of how it worked out. Let me know how any of you did your mounts. Finally before i left I got the flywheel mounted and torqued on, which was definitely the easiest part of the day.
Well i really wanted to dig in on this swap and get it all done by June but again, life got in the way. Now a month behind schedule probably but I finally found a few free days to get out to the garage and work on it. First thing to do was get the transmission mounts working properly. I did it a little different than what I've seen other people do but it does work. The mounts are actually in the brackets horizontally instead of vertically, you can check out the pictures below. After getting that lined up it was on to the front motor mount, which seems like it will be the hardest one to do. Does anyone have any pictures of exact measurements of what they did for this mount? In my cradle the mounting point on the cradle was actually cut off so I will have to fabricate a bracket and weld a mounting point onto the cradle too. Since I don't have to use the stock mounting point on the cradle would there be an easier way to do it? Either way I moved on to the fourth mount that I wanted to add. This seemed very easy actually. After grinding off the bracket to make it flat, all that was needed was a piece of angle iron welded onto the frame. It''ll get completely welded when I take the engine back out of the cradle because there was the possible risk of melting the rubber doing it while it is on. Either way that can almost be considered done. The engine actually can support itself in the cradle now, but I still need to figure out the front engine mount. Finally, I decided to pull out the gas tank to drain out the 20 year old gasoline. Luckily the tank was pretty much full. which made it impossible to rust on the inside of the tank like I've seen on my other car. After a little while that was out along with the heat shield for the manifold to make it easier to get the engine in. Slow progress but hopefully I'll find more time to get out and work on it. Let me know anything I might be missing or what anyone did for their front engine mounts. Thanks. Pictures below.
Here's the modified mount, strengthened it with a reinforcing plate and had to drill new holes.
Here is the gas tank out. Looks extremely clean inside and out although I'll still repaint the outside so the rust on the edge doesn't get worse.
Here is my new fourth motor mount. I thought it worked out fairly well.
And here is where the front motor mount will have to go. A ruler with a hole in is actually bolted in to see where it will hang. Will there be plenty of clearance for the driveshaft and exhaust if I choose to route it that way?
And finally here is the engine sitting in the cradle.
I did my mounts like that. I even made the fourth mount from the original mount like you did and it all works fine.
I popped the axle in to make sure I had clearance for the other front mount. Looks like you're doing exactly as I did there, too. Mine also has the rear alternator mount integrated into it.
Lookin' good!
------------------ 1986 SE Aero coupe.
3.4 DOHC swap is complete and running, now just have to finish the rest of the car...
I finally got a complete v6 wiring harness from a fiero so now I can work on that. Haven't had time to work for a while but I'll try to get working on it more often so I can maybe have this thing running come summer sometime.
Well after an extremely busy summer and fall season, I am proud to announce the the project is now first on the list again! I brought the car home from a relatives garage where I was previously working on it at, and now that a section of the shed is sectioned off, I have a new place to work. Some slight progress has been made. I have the engine back out, I analyzed how much farther back the right decklid hinge needs to be cut and that will get done. I may remove the dog bone mount entirely and skip that, as with four mounts total I believe I should be fine without a dog bone, what are all of your opinions on that? I also have recently removed the intake and valve covers and they will be repainted. I am going to work on painting those parts soon, along with beginning the wiring stage, since I cannot really work on lines or anything like that with the engine out. Here of some current pictures of where I am at. I did find something that concerned me when taking off the valve covers. In the far left chamber, not the one the magnet is in in this picture but the one to the left of that, I found some small metal shavings. Now this chamber seems to be sectioned off from the rest but it still worries me where they may have came from. I know the previous owner had the whole engine apart and such so maybe it came from something he did? I am not sure. More updates soon.