Not sure this is 100% the same as yours as I see a couple of differences, but it seems to be very close and usually it's just a wiring colour change for different production years. I know most of these mirrors with similar connectors have very similar wiring schematics.
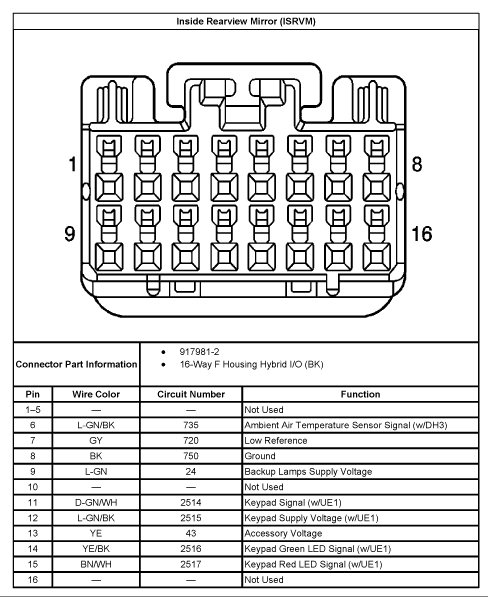
For your auto-dim to work you will need to connect pin 8 (black) to ground and pin 13 (yellow or pink) to ign +12v. You do not want the mirror on a constant +12v because that will leave it on all the time and it will drain your battery.
If the mirror has a compass it will be built in and it will work with only the power connected as above.
If you want your mirror to automatically shut off the auto-dim feature when you put the car in reverse you have to connect pin 9 (light green) to the +12v in the reverse lamp circuit.
If the mirror has temp display you will need to connect the appropriate temp sensor to pins 6 ( light green/black for sensor +12v) and 7 (Grey for sensor GND)
The rest will not be used without supporting equipment from the vehicle it was originally installed in (OnStar, Cell phone integration, etc.)
You can bench test basic mirror operation by connecting a 12V source to the power and GND circuits.
- Covering the light imput sensor will simulate a dark road and the mirror should be clear
- Un-covering the light imput sensor and shinging a flashlight on the mirror should cause it to dim
- Covering the light sensor back up with your finger should cause it to go back to clear
- With the flashlight on the light sensor and the mirror dim if you connect +12v to pin 9 (light green) the mirror should un-dim. This simulates the mirror being undimmed with high ambient light when going in reverse. Likewise removing the +12v should cause the mirror to dim again
[This message has been edited by Ry86GT (edited 07-18-2013).]


