II have an 86 4 cyl fero.. I need to change the water pump but do not know if I need to remove the pully first and if so what is the bolt that holds the pulley on? Is it Torx internal, hex internal and what size. This would not be a problem If I can remove the pump prior to the pulley. It looks like the rear most bolt may not be accessible. Not sure.
You can remove pump with pulley on. Metric tools, nothing special. Remove battery and plastic shield first. Swap pulley on bench. Get loaner tool from auto parts store.
I used a GM pulley puller, removed the pully first then the water pump mounting bolts. Now, in order to do this, I cut the center section of my battery tray out, that way I had room for the wrenches for the puller. Granted, cutting the center out was a cheesy way of doing this but it worked for me, it was easier to get at the water pump bolts.
Sorry, cannot remember the exact sizes, be real careful of the tensioner though, as me how I know.
'87-88 had the tensioner, '84-86 tension is through the alternator.
Oh yes, my bad, I forgot, thanks for covering for me, you're great!
Easy mistake. I have changed pumps on both an '84 and an '88. I also swapped out the tensioner on an 87. BTW, for the waterpump, it was pretty easy to get it out without any special tools. I did the '84 in the driveway and the '88 in the garage. not hard. The '84 was great because the parts store swapped the pulley at no cost. The 88, well, I had to borrow a tool and to it myself. eh... not hard, just took some extra time.
BTW, for the OP, don't use the pulley that comes with the pump (if it comes with one).
BTW, I did not remove the waterpump block from the engine block. I removed the water pump from the waterpump block. To do so, I removed the bolts behind the pulley.
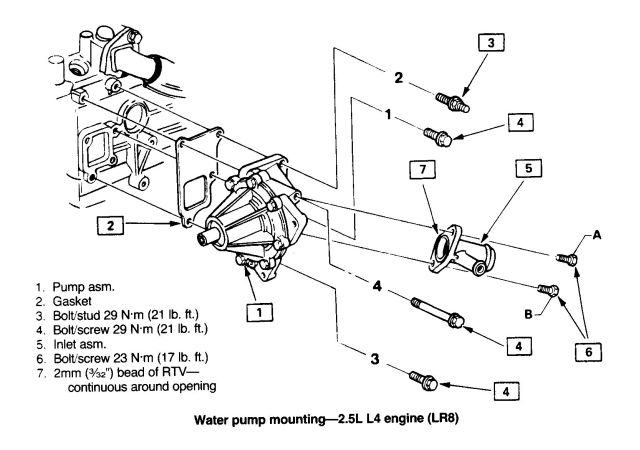
I got the pump out without removing the pulley by removing the battery tray and skinning a few knuckles. Pulley was real tight but I got it off with my dad's old (American made; from the 40's perhaps) puller after an overnight soak in some PB Blaster. Now to try to decide on torque for the pump to the pump block housing. Some places say 7 ft lbs, others say 20 or 22 ft lbs. They were real tight (well over 7 ft lbs to break loose) . Came out easily (finger tight) once broken loose with no sign of the RTV sealer on the bolts as is recommended in the assembly. They were half inch bolt heads though not metric. The pump did not seem bad though. No sign of bad bearings or loose shaft but leak was coming from somewhere si I figured it best to change it out.
What is the required torque for pump to housing? I bought permatex blue for both sided of the gasket and the bolts too I guess. A half inch wrench fit the bolt heads and a 13 mm was too loose. I did not check the threads but these fit into the housing. Maybe several variations were used.
I am waiting my verification on the site for download of the manuals. When I bought my 1986 6 cyl I got the shop manual from GM for fiero that year. Bout 2 inches thick and has as many errors as the Haynes and Chilton! Many of the part sections are general GM not fiero specific. It says see the spec table for 4 cyl water pump torque values and does not supply the table!
Guess I'll tke the rtv blue back and get the tack stuff. I always use a piece of thread to tie each or every other bolt hole to the gasket bolt hole. Especially useful for horizontal gaskets like valve cover or oil pan gaskets where you cannot use bolts to do it. One of the manuals mentioned to coat the bolt threads. RTV should do something there but not sure about the tack stuff.
I got the pump out without removing the pulley by removing the battery tray and skinning a few knuckles. Pulley was real tight but I got it off with my dad's old (American made; from the 40's perhaps) puller after an overnight soak in some PB Blaster. Now to try to decide on torque for the pump to the pump block housing. Some places say 7 ft lbs, others say 20 or 22 ft lbs. They were real tight (well over 7 ft lbs to break loose) . Came out easily (finger tight) once broken loose with no sign of the RTV sealer on the bolts as is recommended in the assembly. They were half inch bolt heads though not metric. The pump did not seem bad though. No sign of bad bearings or loose shaft but leak was coming from somewhere si I figured it best to change it out.
I'm assuming you removed just the pump itself and not the housing that attaches to the block. I'm saying that because I had a water pump that was leaking on a Duke and it turned out to be leaking from where the housing meets the block. Since you say you didn't see any signs of a leak, you may want to check the housing to block seal. IIRC, there is not gasket, just RTV.
Are you sure it is the water pump and not the tensioner bearing?
Hmmm. Great point! I will definitely check that! Holy man if I woulda went through all the trouble of changing the WP and still hear "Chirp, chirp"!! That woulda been wrench throwing material!
Thanks a ton for the heads up! +'s for you if not already!
Hmmm. Great point! I will definitely check that! Holy man if I woulda went through all the trouble of changing the WP and still hear "Chirp, chirp"!! That woulda been wrench throwing material!
Thanks a ton for the heads up! +'s for you if not already!
That was the problem on my '87. The tensioner broke right off when I went to move the belt It was a very minor noise, but this was on the convertible fiero and so I heard it with the top down. I had a leaky water pump on an '88 2.5, but no noise.
hope it works. I bought a sheet of cork, cut a gasket for the bolted region and applied a 1/8 " bead of black RTV to the cover also surrounding the bolt holes, pressed the gasket onto the cover, then pushed the bolts thru to keep the gasket in place and "reseated" the gasket with my fingers. About an hour later I put another bead onto the cork and smoothed it flat on the cork with a plastic putty knife, At this point I had RTV fully covering the cork gasket on both sides of the cork. I put a thick bead on the oil pan lip, moved the cover into place, and applied another thick bead between and just inside the oil pan lip, pushed it in as best I could using my finger in a wiping motion and moved the cover down into position by inserting the pulley hub to center the timing cover. Then I started the bolts until seated and tightened all the bolts just enough to assure contact, alternating sides like for a car wheel. I tightened them enough to assure contact all around in this pattern with a 1/4 " ratchet holding it like a "T bar". This morning I will go out and finish lightly torqueing them with the 1/4 inch rachet. I was going to treat the oil pan to timing cover interface the same way using cork but since there was no way to tighten that interface I used only the RTV there. Hope I got enough!!. Also hope I got those two faces clean enough. I used a razor bade and small wire brush to removel as much of the RTV as I could. Then I used paper towel and 320 grit paper to fully clean traces of the RTV from the pan. I ground the lip of the timing cover with a power wire brush so it is probably pretty clean. I got them "RTV free" but wish I had used some laquer thinner to better wipe the surfaces. . I don't know who designed this pan to cover interface but he or she is an idiot!. I don't know how tough it is to install the oil pan but that might be the best way to get a good seal on this interface. It is tough to install the timing cover "high"enough" to lower it down to seal the pan region with RTV while on the car and having the crank shaft to contend with and limit the travel allowing no real space to apply the RTV as it is installed. If this thing leaks I feel sure it will only be on the oil pan interface so I should not have to try to remove the timing cover RTV "WELD" in the inaccessible regions while in the car. It was tough enough removing the RTV cover to oil pan RTV seal. Boy is that stuff tough to remove. .
hope it works. I bought a sheet of cork, cut a gasket for the bolted region and applied a 1/8 " bead of black RTV to the cover also surrounding the bolt holes, pressed the gasket onto the cover, then pushed the bolts thru to keep the gasket in place and "reseated" the gasket with my fingers. About an hour later I put another bead onto the cork and smoothed it flat on the cork with a plastic putty knife, At this point I had RTV fully covering the cork gasket on both sides of the cork. I put a thick bead on the oil pan lip, moved the cover into place, and applied another thick bead between and just inside the oil pan lip, pushed it in as best I could using my finger in a wiping motion and moved the cover down into position by inserting the pulley hub to center the timing cover. Then I started the bolts until seated and tightened all the bolts just enough to assure contact, alternating sides like for a car wheel. I tightened them enough to assure contact all around in this pattern with a 1/4 " ratchet holding it like a "T bar". This morning I will go out and finish lightly torqueing them with the 1/4 inch rachet. I was going to treat the oil pan to timing cover interface the same way using cork but since there was no way to tighten that interface I used only the RTV there. Hope I got enough!!. Also hope I got those two faces clean enough. I used a razor bade and small wire brush to removel as much of the RTV as I could. Then I used paper towel and 320 grit paper to fully clean traces of the RTV from the pan. I ground the lip of the timing cover with a power wire brush so it is probably pretty clean. I got them "RTV free" but wish I had used some laquer thinner to better wipe the surfaces. . I don't know who designed this pan to cover interface but he or she is an idiot!. I don't know how tough it is to install the oil pan but that might be the best way to get a good seal on this interface. It is tough to install the timing cover "high"enough" to lower it down to seal the pan region with RTV while on the car and having the crank shaft to contend with and limit the travel allowing no real space to apply the RTV as it is installed. If this thing leaks I feel sure it will only be on the oil pan interface so I should not have to try to remove the timing cover RTV "WELD" in the inaccessible regions while in the car. It was tough enough removing the RTV cover to oil pan RTV seal. Boy is that stuff tough to remove. .
hope it works. I bought a sheet of cork, cut a gasket for the bolted region and applied a 1/8 " bead of black RTV to the cover also surrounding the bolt holes, pressed the gasket onto the cover, then pushed the bolts thru to keep the gasket in place and "reseated" the gasket with my fingers. About an hour later I put another bead onto the cork and smoothed it flat on the cork with a plastic putty knife, At this point I had RTV fully covering the cork gasket on both sides of the cork. I put a thick bead on the oil pan lip, moved the cover into place, and applied another thick bead between and just inside the oil pan lip, pushed it in as best I could using my finger in a wiping motion and moved the cover down into position by inserting the pulley hub to center the timing cover. Then I started the bolts until seated and tightened all the bolts just enough to assure contact, alternating sides like for a car wheel. I tightened them enough to assure contact all around in this pattern with a 1/4 " ratchet holding it like a "T bar". This morning I will go out and finish lightly torqueing them with the 1/4 inch rachet. I was going to treat the oil pan to timing cover interface the same way using cork but since there was no way to tighten that interface I used only the RTV there. Hope I got enough!!. Also hope I got those two faces clean enough. I used a razor bade and small wire brush to removel as much of the RTV as I could. Then I used paper towel and 320 grit paper to fully clean traces of the RTV from the pan. I ground the lip of the timing cover with a power wire brush so it is probably pretty clean. I got them "RTV free" but wish I had used some laquer thinner to better wipe the surfaces. . I don't know who designed this pan to cover interface but he or she is an idiot!. I don't know how tough it is to install the oil pan but that might be the best way to get a good seal on this interface. It is tough to install the timing cover "high"enough" to lower it down to seal the pan region with RTV while on the car and having the crank shaft to contend with and limit the travel allowing no real space to apply the RTV as it is installed. If this thing leaks I feel sure it will only be on the oil pan interface so I should not have to try to remove the timing cover RTV "WELD" in the inaccessible regions while in the car. It was tough enough removing the RTV cover to oil pan RTV seal. Boy is that stuff tough to remove. .
Bill, how do you manage to post the same exact message multiple times over three years?
06-16-2013 07:28 AM 03-15-2016 06:32 AM 09-18-2016 12:26 PM
I have no idea Somehow when I go to the forum and log in, it reposts my last post or something. Yesterday and again today I have been trying to get info on priming or sealing the base plastic for a fiero paint job.