I'm making this thread to document my progress on my 4.9 swap, and hopefully avoid some mistakes.
I call myself a rookie, as I have never swapped an engine that was not designed from the factory to be there. However, I feel confident that I can do this as I have been tinkering with cars since around 93 when I got my first (85 tempo). I have worked professionally as a mechanic, although it has been some time since I left the field.
My car is an 87 GT, v6 auto. My engine is a 95 deville 4.9 78k my trans is a 92 seville 3.33 80k my harness is a 94 deville from the yard
I'm almost done working the engine into shape with new gaskets all around and some paint. this is what it currently looks like. I still need to make the idler and tensioner pulley. Also I plan to run two fron seville manifolds to a "y" pipe similar to many builds I've seen here. I do have access to a mandrel bender.
this is my harness as I got it
this is my harness now. I decided that it would be best for me to just strip the whole harness down so that I can be totally familiar with every wire and every connector, if for no other reason than to get myself back into the swing of wire reading routing and connector disassembly. every wire is tagged as it was removed from the connector, and compared to my diagrams to ensure correct origional placement and color coding. this was a yard harness so I had to double check it. Anyone could have messed with this harness over the years, and I had no history. As it turns out, it follows my 94 seville/eldo diagram perfectly with all colors matching. I have yet to deal with alternator/starter fuel pump etc. wires, but I do have the whole harness and fuse/relay center, so i think its all there wating for me. These little coils of wire. make me feel much better than the rats nest of loom, tape and body harness that were tangeled up all together, and I feel I can make some sense of it now. It will not be long until my fiero begins to be disassembeled. Probably my last tank of gas through this engine. I would like this harness to be as complete as I can get it before I start the fiero side, in an attempt to keep things as tidy as possible.
expect better pics to come, I do have a camera better than my phone somewhere...
[This message has been edited by gen2muchwork (edited 10-15-2012).]
Don't forget to run switched power to the power steering input of your ECM. The ECM will run the engine with reduced power if you don't. Also you will need to have your ECM programmed to ignore VATs.
Did you get a crimp tool for the ECM connections yet? The ECM terminals?
[This message has been edited by phonedawgz (edited 06-27-2012).]
Don't forget to run switched power to the power steering input of your ECM. The ECM will run the engine with reduced power if you don't. Also you will need to have your ECM programmed to ignore VATs.
Did you get a crimp tool for the ECM connections yet? The ECM terminals?
I have spoken via pm to stickpony about programming. I have the power steering wire in that mix of coiled wires. I have not purchased a crimp tool as of yet, but it is on the short list of things I need.
What I do need, and I bet you can help with this... my trans is a 92, and the pin out is different. i will need to update this plug to match. I think it is just a matter of 3-4 wires in one connector?
Are your 95 PCM pinouts different? 2240 PCM? If the tranny is wired different you will have to run a PCM that runs your engine AND your transmission. ie, you most likely will have to run a 92-93 PCM or maybe just the 92-93 PROM programming.
[This message has been edited by phonedawgz (edited 06-27-2012).]
Are your 95 PCM pinouts different? 2240 PCM? If the tranny is wired different you will have to run a PCM that runs your engine AND your transmission. ie, you most likely will have to run a 92-93 PCM or maybe just the 92-93 PROM programming.
This is the first I have heard of this. I see people here who have run a 94+ trans on a early harness, I did that assume thing when it came to going the other way. Perhaps that was a mistake. I have to double check, but I'm pretty sure I have the newer PCM. I have not looked at it much, just the wires so far. If it comes down to it, I have access to 2240 PCM at the yard, and they are reasonably priced. I thought I was doing myself a favor with the newer one.
I dont have the pcm in front of me yet, but I did take some time to cross check the diagrams that I do have, and besides a discrepancy between MAT and MAP, which I do belive to be a misprint on my 94 diagram, and the wires in place for the 2nd o2, I just fail to see the difference in wiring the engine for either computer. Am I missing something here?
The trans I need to look at more closely, it seems to match both diagrams but there must be something I'm missing if everyone else has had to re pin that 7 pin connector.
edit- I think I see the trans wires problems. there is a difference, and I need to double check this 7 pin connector but I see:
92 94 A F Vcc brk D D Vcc B C Vcc mod F A Shift A G B Shift B E E Ign.
and then the 7th is trans temp? C G?
[This message has been edited by gen2muchwork (edited 06-28-2012).]
If I want to run the later computer and harness, with the early trans, I need to have a signal from the trans temp sensor. This is the 7th wire that does not exist in the early round 7 pin connector. I never noticed there were only 6 wires pinned in there until now. Anyone have experience with this? possibly a good value that the ecu would like to see so I can put a resistor of a set value in there?
It has been one hot week. I did not manage to get very much done at all. I did however get to the yard and pulled some trans brackets from a 94 century that I think will work, and I yanked an ecu from an early pfi 4.9 that I should be able to use with the trans, if I decide to go that route.
[This message has been edited by gen2muchwork (edited 10-15-2012).]
It's been a while since I had anything to say. I'm back into making progress, by myself it has been slow, but at least it is not 120 degrees in the garage.
I removed the center console, ecu and bracket. I disconnected the harness and pulled it through to the engine bay
my fuel pump relay was not screwed in the firewall, and looks crappy. also found some glass... new rear window? I had suspected it anyways, I guess its a confirmation
up up up...
wheel wells off. what are these integral to the body structure?! lots of screws lol.
I have a bent cooling tube not from me. something I'll need to address soon.
Very minimal rust makes me happy
Down down down
rear cradle bolts came off very easily.
fronts did not!
nuts unscrewed, bolts are stuck in sleeve. I punched at the seam for the sleeve and got it split. Still stuck. It soaks for a while, we'll see what comes of this after my arms recover.
I really thought I was getting this out last night. so close. I'm kinda bummed out that I missed that cooling tube when I bought this. I really thought I inspected them well. the drivers side has a significant bend. pass. pass side isnt bad, possibly not at all. no pic of that yet
Got a chance to go to the junkyard yesterday afternoon, his turbo 911 needed a idle control valve, and we found something that will work.
While I was putting around I figured I'd pull a set of injectors for the 4.9. I'd been reading that the gen II or III bosch work with this swap, and are a vastly better design than the multitecs. hopefully that was correct info, but they were cheap. I pulled them from a crown vic. I think if they work they will be an improvement in reliablity and replacement cost.
Now I think I am going to have a sidebar project with the fiero and make an injector flow bench. I think I have most of the stuff just laying here. It would be neat to be able to clean and match a set of injectors myself, there are quite an abundance of these in the yards I frequent, or I might start finding some GenIII ones instead.
I've got fuel lines on my mind today. Anyone feel like discussing fuel line routing?
I've seen two common ways for this swap:
1. route lines toward passanger side along trunk, then forward to the fiero lines
2. route lines forward across transmission, then across the firewall to stock fiero lines.
I am not using the exhaust that crosses over the trans. I will have A/C if that makes a difference.
I'm leaning towards option #2, and I would like to find some quick disconnect stock type replacement, but I'm not sure if that is a viable option. I would be ok with the AN hoses and adapters as well, as a second choice for now.
Is there a disadvantage to either of these fuel line routes?
Ive always liked y-pipe installs over the crossover pipe installs myself, as it is a cleaner look and easier to work on.
option 2 sounds better to me.
did you get yoru harness issues sorted? did you deicde to sire in a resistor to fool the 94-95 ecm? or did you decide to get a 91-93 ecm?
Ive always liked y-pipe installs over the crossover pipe installs myself, as it is a cleaner look and easier to work on.
option 2 sounds better to me.
did you get yoru harness issues sorted? did you deicde to sire in a resistor to fool the 94-95 ecm? or did you decide to get a 91-93 ecm?
If I have my ducks in a row... I will be using the 91-93 ecm, ypipe single o2. But nothing is set in stone at this point.
I probably won't get much done this weekend, but I did go garage sale hunting and have expanded my modest shop.
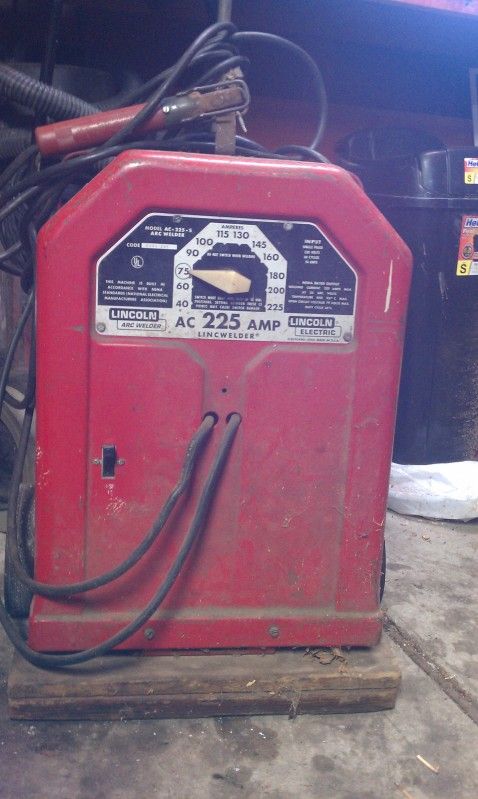
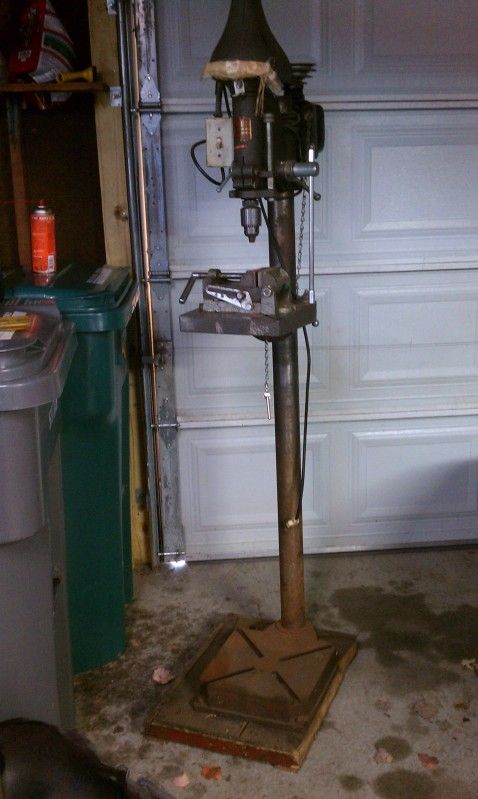
Lincoln 225 arc And
Wards drill press.
Good scores for me.
I paid $120 for both, I tested them and are great. What a deal. My wife is pissed I scratched the leather in her Hyundai moving it home though. Hence, not sure how much I get done this weekend
I guess I'm taking my time here, but I did manage to get my tensioner bracket cut out. I used fourpoint9's design. I have found it needed modification to fit. I used a thicker steel and eliminated the added bolt protrusion to the vertical bolt, since the thicker steel seems really overkill to begin with. I had to trim the alternator housing a bit. This does not bother me since I will be painting or polishing this housing and plan to always rebuild it myself, or just swap the front cover. It is a VERY close fit from the tensioner to the valve cover bolt, but it does fit without touching. I am satisfied with it.
with luck this weekend I will have my rockcrawl engine mount cut out and welded as well as cleaning up the alternator.
buddy just brought me these 3x3 angle. Way more than necessary but hey, why not? I'll be using this for the starter side engine mount with the energy suspension poly.
here are some more shots of the tensioner, I can grab a belt now and see how I did. Looks close.
cut a rough shape for the front side motor mount, roughly too tall I bet, but Its fun to use the sawzall and I cant make any big cuts till my other mount is made. Its a good excuse to cut some metal. my fingers are crossed to get the other mount cut out this weekend.
moving along, I got to the yard this weekend to stock up on nuts/bolts for my extras pile. Pulled off a power steering pump bracket to chop up. I needed to make a spacer for the alternator, I figured what could be a better spacer than the piece that was there to begin with. So I chopped of two sections. One for the alternator, one for the bracket.
installed one on horizontal, one on vertical shown in pic.
Then I had to tweak my a/c lines a little to clear the manifold. seems ok for now.
I'm not going to admit how many belts I had to try before I got one that fits... but this one does. its an 80 3/4"
and I managed to rustle up a dipstick tube for my trans. I found a caddy with the cradle hanging so it was super easy to pull, then I got distracted and left it somewhere in the yard so I had to pull another. I may have to do it again, it fits... but I think I pulled it off a caddy with a 4t60 non-E. noticed after I pulled it. but it was only $3.
So that was my weekend of fun, besides getting all of the moldy pears out of my gutters.
you can say that again thanks for providing the design, I found the link to it in the archives. Seriously though, I think I could lift the whole engine from it. Its a super sturdy design and I appreciate the time and effort you put into that.
I did modify a section by the valve cover to provide some clearance, just a little nip off the corner
My buddy who cut it out was cursing it though, I guess he had to manually delete the graph lines on it because the plasma cad cutter we used wanted to slice all of them too lol. Took him a while to do it, but it turned out nice.
I never found anyone else who used your design, have you seen any?
I sure didn't accomplish much this weekend in the garage, but I did get the alternator cleaned up to presentable.
I took a trip out to the yard to see what was out there this weekend. found one of those gentex mirrors everyone has been talkling about, I wish it was amber though.
Started thinking about fuel lines again when I passed by a sea of minivans. I picked a couple of those braided 3800 hoses. I'm not exactly sure if I am going to use them on the 4.9 but they were so cheap and easy to take out I couldn't resist.
Then I passed an 86 gold notch 2.5. I grabbed the thermostat housing. maybe I'll use it instead of the inline filler, I really like the thermostat under the cap deal, but I won't know if It looks right till I have it in there.
The 86 had some good panels, an ok armrest and some undamaged tail lights. It was rusty. @ warren/livernois parts galore.
Isn't this some sort of right of passage? We had a couple of brews, when I realized I never got this pic! (explains goofy smile)
I have some more pics to take from the work of this weekend... hopefully an update tonight.
I got out to the yard again. I returned with: another set of injectors, this time they are genIII all yellow ev1. an oil pressure sender and connector, mickey's directions say an 88 fiero, this one was out of a buick I think. P/N was supposed to be the same. we will see, the connector is correct at least. 3 wire coolant temp sensor and wires, I think it was out of a bonneville... I forgot to take a pic of that one. doh, again at least the connector is the right one 3 more rearviews with compass/temp + sensor, maybe to sell maybe to use. They are so affordable I find them hard to resist when I find nice ones.
And, I spent a bit of time poking around fuel lines on all sorts of cars just to get a feel for what has what that I could use. It was a brainstorming mission, I didn't really come up with anything definate, but I'm a lot more familiar with gm ford and chrysler fuel lines.
Tonight, I am going to clean some fuel injectors. be prepared to see some redneck injector cleaning in the future. It should prove to be entertaining I'm sure!
As promised, redneck injector cleaning (proud redneck):
I used only crap I had laying around. Air compressor chunk of hose metal elbow 2 hose clamps bottle of injector cleaner 9v battery old ev1 connector
basically, I just attached it all together filled my hose with injector cleaner, turned up the air and fire away.
Try as I may, I could not snap a shot of the actual firing of the injector. I pulsed it many times untill a happy spray pattern resulted. This worked very well for what it is, and cost $0.00. I admit, its not perfect but for my first attempt at cleaning injectors not too shabby, and 100 times better than throwing unknown injectors in. installed.
Installed CTS
and a pic of the oil press. sensor. I think its the right one...
Did I mention that my friend finished welding my front engine mount?
He welded it together backwards !! lol
so, I've got it cut back apart and will hopefully have it back together tonight. This time I'm hanging out while he does it. The good news is that his welds were great, something easily observed when cut apart.
I've also chopped up a 4cyl thermosat housing and will have him do that at the same time. Its not that nice of a piece, so If I find a nicer one I may make another, but it was the best available. they sure are rusty at the bottom of the hose outlet on the ones I've found lately.
OK, It's a good thing I've got some sort of sense of humor.
I got my bracket welded back up... its somewhere between 80-85 degrees. Not 90. 90 is essential to fit. It does not. We will try this again this week. If it wasn't free, I may be a little p'd off right now.
but...
I did have him zap my thermostat/waterneck together. It looks perfect and should fit without any problems.
Nobody said this was easy
Curious if anyone has some different ideas for mounting with an auto, before I have this bracket fixed. I see it on many manual swaps, but I don't see it on the auto swaps. Am I making a mistake?
You are going to want to run the Fiero thermostat so you can yank it out easy to fill the cooling system. While the Fiero thermostat fill neck removes the thermostat somewhat from the coolant flow into the heater core, it should be close enough to receive enough eddy flow to open it properly.
You are going to want to run the Fiero thermostat so you can yank it out easy to fill the cooling system. While the Fiero thermostat fill neck removes the thermostat somewhat from the coolant flow into the heater core, it should be close enough to receive enough eddy flow to open it properly.
Thats good. I was hoping and assuming I could use the fiero stat, but then I started thinking it might be too far from the heater outlet, thich was leading me back to the why did I do this if I cant pull the thermostat. Thanks!
Then I passed an 86 gold notch 2.5. I grabbed the thermostat housing. maybe I'll use it instead of the inline filler, I really like the thermostat under the cap deal, but I won't know if It looks right till I have it in there.
The 86 had some good panels, an ok armrest and some undamaged tail lights. It was rusty. @ warren/livernois parts galore.
I want that shift knob, the arm rests, and the dash. That dash looks like its in FANTASTIC shape! My corners are gone. Cracked and ruined. Also, working original deck lid switches are rare.
I want that shift knob, the arm rests, and the dash. That dash looks like its in FANTASTIC shape! My corners are gone. Cracked and ruined. Also, working original deck lid switches are rare.
I agree, it was a nice dash. The pocket was on the pass seat in fine condition, the armrest was under the hood. I put it inside to try and save it. If you can figure out a safe way from MI to Idaho I'd pull it for you. With the xmas season, I have relatives coming in from ST. Louis and might be able to get it that far...
Really there have been a few fieros in there that have been loved, then rusted away on their owners. Its sad to see.
On a side note, they must have really dragged or dropped this one good. all the rotors were like this: Yowza!
I have nothing interesting to add about my progress so far
[This message has been edited by gen2muchwork (edited 12-06-2012).]
Looks fantastic so far i might add. And thanks for the offer on the car parts. You and the parts just seems so far away! But that seriously was a really nice gesture. That's why i love the forum so much. Good luck to the "finish"
Its been oddly warm here lately, but that didn't make me go any faster I start vacation friday though! Here are some pics of what I'll be up to:
Got my bracket at 90 degrees
Borrowed this just in case it gets cold. A buddy of a buddy got this for free cleaning out stuff. my payment is moving it to my house over to another buddies when I'm done. What a deal! Currently I can only lift from the steel header on my garage with the door open. Now I get to keep it closed.
[This message has been edited by gen2muchwork (edited 12-19-2012).]
The happy couple is together and sitting on their new home
Front mount done, it needs welding (or not), but I'll do that when I add the dogbone soon.
2 steps forward one back... My exhaust will not work with this auto trans. The rear manifold is just tooo close to the vss for comfort. I took a trip out to parts galore and froze my butt off pulling a over trans crossover setup. ( $ - 34.00 and a sore back)
please come out without stripping... YES!
This is a happy sight for me.
I'm going to tackle some wiring now and get the basic routing of wires, vac, etc.. getting close!
I forgot to mention the scare I had with the engine lift that I borrowed. It must be low on oil. Almost lost the engine taking it off the stand. dropped almost 2 ft. once I removed the stand. yikes!!! my buddy can have it back.


 not from me. something I'll need to address soon.