I know this has been discussed in the past, but I wasn't able to find an answer to my question. It leaks majorly. I turn a corner and I get a shower. Let me tell you it's not really fun when you're trying to impress a girl with your car and she has a cold shower from water infiltrating by the sunroof. I've tried to fix my problem 3 or 4 times last year without any success.
How can I solve this problem WITHOUT drilling a hole into my rails? (This will only take the problem and putting it elsewhere and i'll end up with a rusting frame)
I have: -A brand new FieroStore sunroof weatherstrips -Brand new FieroStore sunroof rails -Instalation was done properly with revits and weatherstrip caulking in the corners -I've tried to shim the attaching device with metal plating to lower the height of the sunroof when closed. -I've even tried to put caulking on both sides of the rails.
I've tried the 5$ bill test (See the friction between the glass and the weatherstrip) and at some places, there was practically no friction at all. I suspect the infiltration is made from there. The weatherstrips profile even look concave (Wich seams awkward since it's lowering the contact pressure between the two). The thing wierd about this is that it is a brand new weatherstrip and it was always leaking.
So my question again: How can I solve this problem WITHOUT drilling a hole into my rails? Or a way to make that weatherstrip more "balloon" shaped? It is really something I want to fix cause sitting on a wet bench or having a shower isnt pleasent at all. I don't have my car available right now, it is parked, but as soon as I have it back home, I'll try solutions I have. I'm making it a priority for this summer.
This might sound a little off the wall, but I had a water leak years ago and a friend of mine told me to do this. Buy some round shoe laces, the kind that you find on work boots and hiking boots. Pry up the seal and install the laces under the seal on the outer side of the seal as shown by the arrows in the pic. I did this all the way around the seal.
This worked for me and has lasted well over the years.
Also is your latch loose or tight when you close and lock the panel in place? The latch is fixable by CAREFULLY bending the two tabs that sometimes will bend outward from the lock. These latches can break easily so be very gentle if you have to bend them back in.
EDIT to say that the laces were enough to push the seal up to contact the glass better.
[This message has been edited by LT188GT (edited 03-22-2012).]
This might sound a little off the wall, but I had a water leak years ago and a friend of mine told me to do this. Buy some round shoe laces, the kind that you find on work boots and hiking boots. Pry up the seal and install the laces under the seal on the outer side of the seal as shown by the arrows in the pic. I did this all the way around the seal.
This worked for me and has lasted well over the years.
Also is your latch loose or tight when you close and lock the panel in place? The latch is fixable by CAREFULLY bending the two tabs that sometimes will bend outward from the lock. These latches can break easily so be very gentle if you have to bend them back in.
I like that idea. Brilliant!
[This message has been edited by jwrape (edited 03-22-2012).]
What do you guys use between the roof and the metal sunroof tracks ? Silicone ? Urethane (as used for windshield ?
OEM set up has a sort of flimsy foam / rubber / plastic between the roof and the sunroof tracks that is usually beyond repair by the time we change the sunroof tracks.
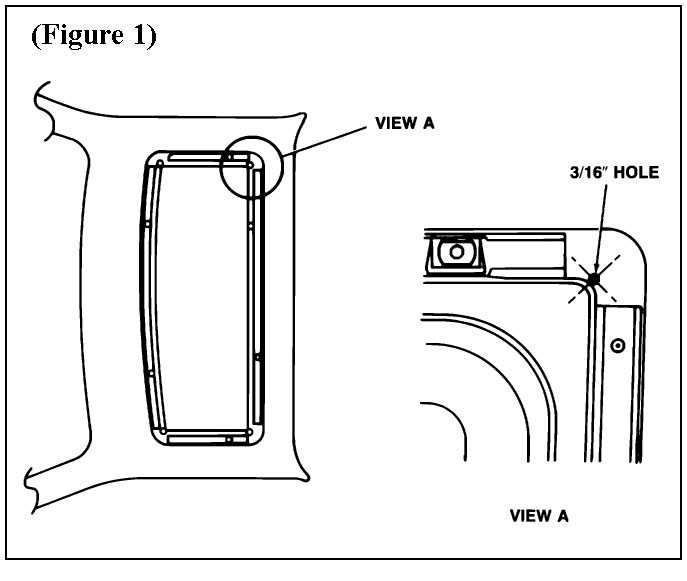
There is a technical service bulliten on leaking sun roofs in Fieros (they call them "vista Vents") and it does involve adding drainage holes. Here is the bulliten:
2. During the following drilling operations, it will be necessary to hold the weatherstrip out of the way to prevent damage. Using an electric drill motor and 3/16" drill bit, drill one hole (through the plastic roof outer panel only) in each corner of the weatherstrip cavity as shown in Figure 1, view A. 3. Reinstall the vista vent glass assembly to the vehicle and water test to insure an acceptable repair. 4. After water testing, remove the vista vent glass assembly and dry the roof inner panel by blowing compressed air through the holes in the roof outer panel. Apply a small amount of GM P/N 1052856 anti-corrosion compound (or equivalent) through the holes in the roof outer panel to protect the metal roof inner panel from corrosion caused by damage done during drilling operations.
If water leaks are noted at the hinge and latch locations, a new hardware nut is now available and provides improved appearance and sealing. (Refer to Bulletin 86-10-3.) The new hardware nut has an integral seal and no longer requires the use of bushings (Figure 2). Due to the lower profile and improved appearance, the new nut should be used in all locations (hinges and latches) when service operations on vista vents are performed. If the vista vent opening weatherstrip is damaged and requires replacement, it is important that the weatherstrip be properly installed and sealed that the weatherstrip be properly installed and sealed to the retainers and body panels.
The shaded areas shown in Figure 3 (view A and section A-A) show the correct locations and sealing patterns to be used when resealing or replacing weatherstrips. Use 3M 08011 weatherstrip adhesive (or equivalent) when resealing or replacing weatherstrips.
This might sound a little off the wall, but I had a water leak years ago and a friend of mine told me to do this. Buy some round shoe laces, the kind that you find on work boots and hiking boots. Pry up the seal and install the laces under the seal on the outer side of the seal as shown by the arrows in the pic. I did this all the way around the seal.
This worked for me and has lasted well over the years.
Also is your latch loose or tight when you close and lock the panel in place? The latch is fixable by CAREFULLY bending the two tabs that sometimes will bend outward from the lock. These latches can break easily so be very gentle if you have to bend them back in.
EDIT to say that the laces were enough to push the seal up to contact the glass better.
I'll have to try that one out. Thanks for the Idea. I can't really try in now since my car isn't at my place but for such a cheap measure, it will be one of the first I try. I've found a picture that ca probably help out with the explenation of the profile of the seal. To this link: Weatherstrips if you look under the "F" Letter, it really looks like my seal. It makes that concave awkward shape that when the glass goes down, it's barely toutching the seal. Therefore I would be better off puting the laces under it to make it "balloon" at the top for better contact.... right?
firejo24, This is exactly the method I don't want to use. :/ Still thank you for the info and for your time, but I'm just not willing to risk such a nice frame (In Canada) Just for drainage holes.
Search youtube for Buddycraigs vids. He shows in his own plain easy to understand way how to drill the holes. My sunroof use to be just like yours, drilled the holes and walla. No more wet t-shirt contest.
Hows your hardware look? Are the rubber gaskets around sunroof glass attaching hardware all in good shape? What do the front sunroof tabs look like? Are they nice and tight? Do they tabs have the factory coating on them?
I wanna say that I read somewhere that for some odd reason GM decided not to drill these holes on the fiero, they drilled them on other GM cars with moonroofs. I also wanna say that till now nobody can say why it is for sure that they dicided such. Perhaps it was trust in the seal, perhaps it was cost cutting? I would love to find out which it is...
First I took out the weatherstrip I had, ripped it (It had a little crack at one of the corners and I pulled too hard.) Cleaned all the tracks from old weatherstrip adhesive and then I've begin the testing:
Notes: All hardware is properly fixed, I used spacers under the latch to lower the glass (The way the adjustment is done by the Fiero Manual). The latch has been replaced for one that the little pins weren't bent. I have an other brand new weatherstrip that i've been using for the tests, has never seen rain and was never installed.
Tests:
#1 I put the new weatherstrip in place, at some place it was sealed, at other places there was no friction at all.
#2 I placed shoe laces against the roof pannel, on the tracks and under the weatherstrip. (It's like if you would install the weatherstrip normally, then pry the side of the seal to insert the shoe lace without removing the weatherstrip from the track.) Result: Nothing changed, the restrictions were the same everywhere as the test #1.
#3 I placed shoe laces between the tracks and the weatherstrip to raise the whole weatherstrip an make it balloon a little more. Result: Nothing changed, once again the restrictions were the same everywhere as the test #1 and #2.
#4 I placed speaker wire the same way as the shoe laces in test #3. Wire being more rigid and a little bigger, it should make it balloon even more. Result: Because the glass is on a pivot point (The front fastners on the glass), the glass was toutching the weatherstrip at the front too early to be able to reach the end of its rotation. In other word, the glass couldn't even fit! Then I've tried removing the front wires and then the glass could be inserted but couldn't rest properly on the weatherstrip. I removed the sides which helped for the placement but now I had a huge gap on the side because the back was raised.
I ended up removing everything cause nothing was working, put the weatherstrip like it's supposed to be normally but then I noticed strange things. The weatherstrip makes good contact in the front half of the sunroof and only on the 2 corners in the back. To show you what I have to work with, I took 2 pictures that is very explainatory of my problem. Keep in mind that this is a BRAND NEW weatherstrip, never used!
Here's the biggest gap I have:
Now, you can see its a big gap, but wait for the next picture....:
YOU CAN SEE THRU THE WEATHERSTRIP AND THE GLASS! :O It's deffinitely not normal. I have the same problem on the other side of the weatherstrip. The back though only misses a little bit of friction, not too much but the side are just bad!
Now I don't know what to do anymore, anybody has ideas or something?
Good luck, I've been fighting gap issues for 8 years now ever since installing a new seal (2 in fact, one from Fiero store, one from GMPartsDirect) and nothing anybody has said has had any effect. My friend's sunroof that fits fine in his car, has the same gap as mine when installed in my car.
[This message has been edited by FieroGTChile87 (edited 05-09-2012).]
As much as you're not helping my moral, as much it tells me not to keep my hopes up too much. :/
Oh, and I tried with 3 different sunroof glass, and it wouldn't make any difference.
So if it means it's not the glass, not the hardware, not the seal... (Cause I tried more than one of each) Then the only thing left in the equation is the tracks, the roof pannel or the frame itself. Right?
You could also try what I read awhile back here on the forums. Someone threaded a 1/4" or 3/8" soft nylon cord through the seal. (the seal is hollow) They said it work like a charm.
It looks asthough your not getting that gasket seated properly, when i got my fiero store gasket i had to trim alittle material off of eack outside corner for it to seat right. it kinda looked like they didnt quite trim it correctly
It looks asthough your not getting that gasket seated properly, when i got my fiero store gasket i had to trim alittle material off of eack outside corner for it to seat right. it kinda looked like they didnt quite trim it correctly
That actually has a good logic to it... I should take a look into that...
Played around with it a bit and I think I've found the flaw which is causing that. I looked up the sunroof panel that my father had for one of his cars, played around withe the gasket, rails and everything. Clearely the problem doesn't come from the gasket, but the roof panel.
What I'm thinking is that when I was prepping the car to be painted, there was some infiltration by the sunroof and the SMC was starting to rot. I used the dremel to remove what went bad and patched up the equivalent of what I just grinded. Maybe the problem is I didn't recreate the same arcs/angles as the stock roof cause I didn't put much attention into that since it would be "hidden". Therefore the tracks aren't in their correct position, neither the seal, neither the glass.
This is what I suspect because trimming, shimming or everything else I tried didn't work. I guess I will have to find a sunroof panel, sand it, repair it, paint it and be really meticulous about those grooves that the rails sits in.
So we will see how that goes later when I'll get the time. If this thread isn't archived when I will be done, I will post where I'm at.
Thanks a lot everyone for your help and ideas! Really appreciated!
OK the time has come for me to address MY leaky sunroof. Like Black Pegasus, I have a noticable gap between the glass and the rubber, but mine is at the LATCH EDGE. In the past I tried adding 1/8" spacers to the sunroof latch mechanism to drop it away from the body, but I still had a gap in the center and was afraid of busting the glass if I spaced it any more, so I got a strip of 3/8" thich x 5/8" wide rectangular neoprene and placed it along the back edge and about halfway down each side and that did the trick, but I can't open the sunroof without loosing the neoprene! So tonight I decided to pull it all apart and fix things.
My '88 GT has the four holes drilled in the corners and they do drain as they should, so that's one thing I don't have to deal with. When I pulled out my glass tonight, I noticed the tabs on the latch were bent... Anyway of straightening them without breaking them off? For now I'm gonna leave them alone and see if my idea for a permanent solution works.
I read in this thread that someone inserted a 1/4" or 3/8" soft nylon cord thru the hollow center section of the sunroof weatherstrip, so I'll stop at an auto part store and pick up about 8 foot of 5/16 OD fuel or vacuum line and try sliding that into my factory weatherstrip and see how she works. I'll post my findings later on this week...
WISH ME LUCK!
JOE 4RE
[This message has been edited by JOE 4RE (edited 06-17-2013).]
Well I removed my sunroof weatherstrip and was able to insert a 9/32" OD vacuum line and a 1/4" OD clear medical oxygen tube into the cavity. I don't know if by design there are two smaller cavities or due to years of being compressed a "center membrane" was formed but initially I had a heck of a time getting the vacuum line thru the weatherstirpping. As I worked and worked to get the tubing thru, the center tore loose and it became much easier to get the vacuum line thru. Upon discovering this trick, I used a long skinny flat-bladed screw driver to go ahead and break the center web so I had one large cavity to pull/push the vacuum line thru. Once I got the line thru the latch side, I took it down both sides to about an inch off the front corners. With the vacuum line in, I had a nice sealing bulge for the glass to seal against but noticed it was easily moved away from the roof opening so that's when I found the oxygen tubing would also fit and acted as a stop to prevent the vacuum line from moving.
I reinstalled the weatherstrriping and was very pleased with the way the rubber now had a nice raised buldge for the sunroof glass to seal against and I figured my problem was solved.... WRONG!! I guess the real problem is the tabs on my latch are bent and weak and the more seal I install, the more the tabs bend! I'm guessing the latch material is probably potmetal or something if it bends that easily. What are the chances of bending the tabs straight without breaking? And if they do straighten out, how strong will they be???
So now to address the real problem... THE LATCH. Is the latch a Fiero only part or was it used on other GM compacts as well? Anyone offer a repair kit or reproduction of the latch?
Since you are still having trouble you can try this and see if it helps. Get some Mobil 1 grease and apply a thin coat around the perimeter where the seal meets the glass. I know it sound crazy but I have used it in several different situations and it has worked.
My refrigerator door had a magnetized rubber seal and it no longer would hold the door shut. After lubing the rubber and letting it sit for a few days, I wiped off all of the excess and now the door will stay shut. I have a MGB with a convertible top and have applied the grease to the top where the top meets the frame to seal it. The lube is absorbed into the rubber and makes it more pliable.
Even though you have used new seals, they could be older than you expect. As the rubber seal ages, it loses its flexibility. The grease restores it and makes it more pliable.
I'm planning to install my sunroof seal soon after having it for about 2yrs now and decided to do a little research since I recall so many having problems with proper seal after installation and resulting leaks and wind noise. I have a Fiero Store seal and understand that the latch area appears to be the trouble spot most often.
Looking at my seal it is apparent that there is a front and a rear end as the corner radiuses are different in pairs. There is also about an 1/8" additional thickening on the mount surface of each corner which also differs in length along with the radiuses. Since the rear corners of the glass are lowest, it may help if the rear corner mount pads are trimmed a little in closing the latch area gap.
I've also read recently about use of a heat gun (non fiero app) to help soften the seal to help the glass form a print in the seal. Of course you would want to experiment with the old seal here to test the softening theory. I suppose adding a substantial amount of flexible (books, etc) weight on top of the glass and applying heat to the areas causing the glass to ride high might help solve the problems with glass height after seal replacement.
[This message has been edited by Joseph Upson (edited 12-13-2013).]
I suspect the real problem is that the glass has a curve to it and well, your roof doesn't (any more). Shimming the catch does not really work because it can pivot along the line of the two mounting bolts. I ended up making a shim with a 'leg' on it the pushed up against the front edge of the roof so that the catch really could not pivot. I got it to seal alter a lot of trial end error with a new weather strip but the rule now is, don't open the sun roof! I suspect the only real solution is to somehow get a curve back into the roof, especially along the back edge. I think that short of removing the roof, the only real way to do that would be to remove all the trim etc around the opening and then insert blocks of some sort between the roof panel and the metal roof of the chassis to force the roof back to a curve that matches the curve of the glass. That's all just theory though, maybe someone could try it but I'm not going to disturb my sunroofs unless I REALLY have to!
------------------ Anything I might say is probably worth what you paid for it, so treat it accordingly!
SUCCESS.... after years of not driving my Fiero very much due to a leaking sunroof, I FINALLY DISCOVERED THE PROBLEM.
Mine had a severe gap at the latch when closed that I was never able to get sealed. I removed the weatherstrip and inserted a section of vacuum hose thru the middle of the weatherstrip along the sides and back edge and reinstalled the weatherstrip but still had the gap. I removed the latch handle from the glass and noticed that the ears were bent, so I purchased and entire used assembly off eBay and replaced the latch handle on the glass WITH NO VISIBLE DIFFERENCE. I stuffed a bit more rubber gasketing material into the gap just to curb the water intrusion as well as not driving the car very much at all until I could find the solution.
Well after keeping her put up for well over a year, I finally got tired of not being able to enjoy her so I resolved myself to finding the problem once and for all. I pulled all the extra gasket material from the gap, removed the glass, removed the weatherstripping and removed the vacuum hose from the center of the SIDES of the weatherstrip (left the section along the back and about 3/4" around the corners toward the front ) and then reinstalled the weatherstrip and the glass panel into the opening. I depressed the latch keepers of the roof mounted bracket and inserted the latch ears into the slots and then tried latching the roof. It sounded like it was trying to latch but wasn't pulling down like it should. I looked closed at the ears to make sure they weren't bending and noticed that it looked like they were kicking out of the slots as the glass was trying to latch rather than staying in place and "camming" over. I removed the trim plate for a better view and sure enough they were being kicked out rather than rolling around like they should.
Since I had bought the ENTIRE roof latching assembly, I decided to try replacing the roof bracket as well to see if the "new" one would kick away like the old one. With the "new" one in place (minus the trim panel so I could see the latching action) I depressed the tabs, inserted the latch ears and VIOLA, THE PANEL LATCHED INTO PLACE TIGHTLY!!! I was almost afraid to unlatch the panel to replace the trim panel, but the trim panel went back on with the panel secured into position.
I hope this helps others who are having issues with their VistaRoof leaking!
GOOD LUCK ------------------ JOE 4RE '88 Fiero GT Med. Red Metallic loaded 5 speed
[This message has been edited by JOE 4RE (edited 09-11-2017).]
I don't know if anyone is still struggling with this or not. But ME AND MY DAD FINALLY FIXED MINE!!!
Mine had a pretty nasty leak. After a lot of trial and error we were able to find the problem. I peeled off the old seal and found that the sunroof tracks were pretty much rusted all the way through in spots. Causing the seal to be uneven. So i ordered new tracks and a new seal. Threw em in... And it wasn't much better. Then my dad had a great idea! To test the seal with the air compressor. So we put the glass back on, grabbed the air compressor. And started blowing on the edge of the glass (where the glass meets the seal) blowing from the outside feeling from the inside to check for leaks. We found a couple. I don't really remember where. So we shimmed the low spots underneath the tracks with washers. And that took care of most of them. I think there was still a low spot under the latch though. So we ended up shimming the latch too. I think the rusted tracks had a lot to do with it. And i think over time from the sun hitting the fiberglass roof it just tweaks a bit. I don't think it was an issue withe the latch bending. Or the seal. I don't think i even had to replace mine. but yeah... FIXED!!!
I don't think it was an issue withe the latch bending. Or the seal.
That's no surprise... as rainwater shouldn't enter the cabin even with the sunroof latched up in the open position. I drive in the rain all the time with my sunroof open. No water comes in.
Nine times out of ten it's plugged (or non-existent) drain holes at the four corners of the sunroof which cause a water infiltration problem.
I had been plagued with a leaking sunroof. I had to replace the seat material a couple of years ago (a long story) and asked the upholstery shop to replace the headliner and cure the leak while they were working on the car. They assured me that the problem was solved, that they had sprayed it with a high pressure hose, etc., so I retrieved the car expecting that my new headliner would not be ruined. Next rain, the headline was damp, sagged a bit, but went back into place when it dried out. I was just a bit distressed with the situation. So I tried several methods to keep the sunroof from leaking and only drove in nice weather. I found that Saran Wrap was perfect when stretched across the entire sunroof - two long strips. It doesn't stick and leaves no residue. So.... I started looking for a permanent solution. Someone on this forum mention the "dollar bill" test. Close a dollar bill in the sunroof and if you can pull it out with little to no resistance, you have a potential leak in that area. It came out easily in the area that I had noted the leak but most of the rest did show some resistance. Then I read on this forum that putting a leather boot lace under the rubber seal would do the trick. I used nylon cord of the diameter of a leather boot lace tucked under the seal. The dollar bill now showed resistance all the way around. Next rain storm (get wonderful ones here in New Orleans) there was no leak. Since have had several pretty severe storms plus driving in reasonably heavy rain. No leak! Happy Fiero owner. Thanks to the person who originally posted this solution.
Close a dollar bill in the sunroof and if you can pull it out with little to no resistance, you have a potential leak in that area.
It's great that your sunroof leak now appears to be resolved, but...
quote
Originally posted by Patrick:
...rainwater shouldn't enter the cabin even with the sunroof latched up in the open position. I drive in the rain all the time with my sunroof open. No water comes in.
This might sound a little off the wall, but I had a water leak years ago and a friend of mine told me to do this. Buy some round shoe laces, the kind that you find on work boots and hiking boots. Pry up the seal and install the laces under the seal on the outer side of the seal as shown by the arrows in the pic. I did this all the way around the seal.
This worked for me and has lasted well over the years.
Also is your latch loose or tight when you close and lock the panel in place? The latch is fixable by CAREFULLY bending the two tabs that sometimes will bend outward from the lock. These latches can break easily so be very gentle if you have to bend them back in.
EDIT to say that the laces were enough to push the seal up to contact the glass better.
That's a clever idea! I will share this with my uncle when I visit him tomorrow for the installation of the rack and bed cover from 4Wheelonline onto his truck. He's been dealing with the sunroof leak on his Fiero since last month.
This might sound a little off the wall, but I had a water leak years ago and a friend of mine told me to do this. Buy some round shoe laces, the kind that you find on work boots and hiking boots. Pry up the seal and install the laces under the seal on the outer side of the seal as shown by the arrows in the pic. I did this all the way around the seal.
This worked for me and has lasted well over the years.
Also is your latch loose or tight when you close and lock the panel in place? The latch is fixable by CAREFULLY bending the two tabs that sometimes will bend outward from the lock. These latches can break easily so be very gentle if you have to bend them back in.
EDIT to say that the laces were enough to push the seal up to contact the glass better.
Thanks! This worked like a charm for me this past weekend!
I used a length of 1/16" ID x 1/8" OD silicone surgical tubing under the seal. It compresses well and doesn’t stay damp after getting wet. Cost is about $6.50 USD per 10 foot length which is enough to complete one sunroof.
i now have the same poorly fit seal problem on my 87 gt. as far as i can tell it is down to the fact im a moron? my glass sat flush with the roof and now sits proud and doesnt seal