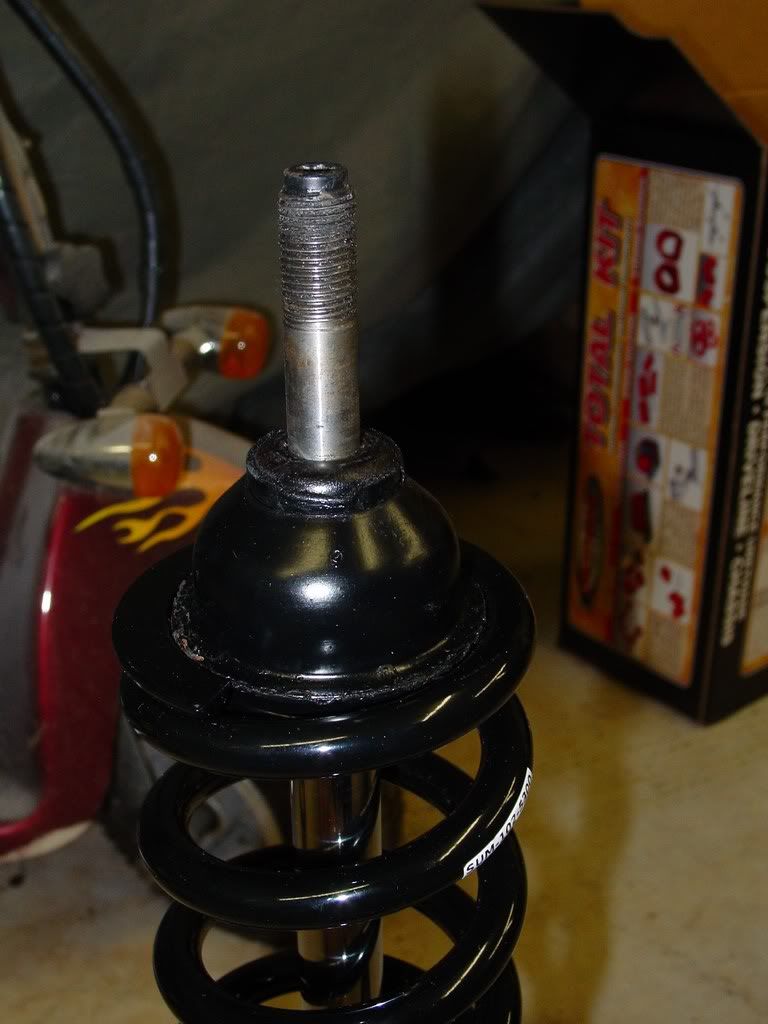
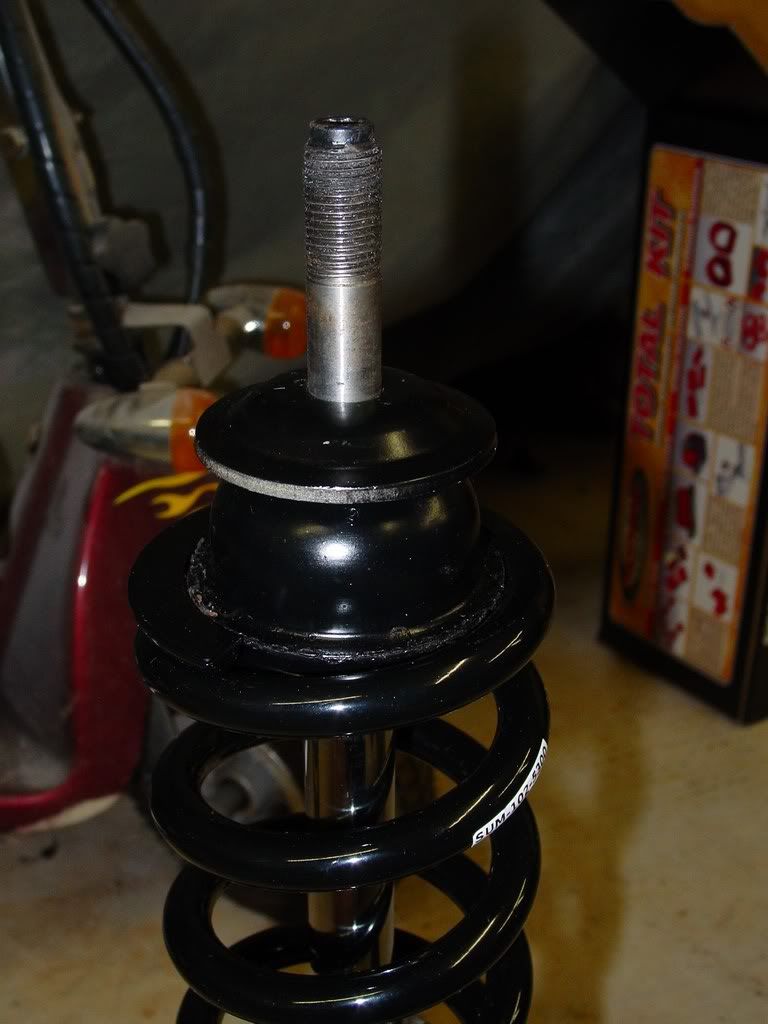
Next was the sleeve length and placement. I could go with a 5inch sleeve and keep a small part of the factory placed perch to seat the sleeve on, or I could remove the factory perch completely and let the sleeve rest on the bottom of the strut. After much deliberating I opted for the 7 inch sleeve resting on the bottom of the strut for strength and to cover more of the strut shaft for asthetics, as well as greater adjustability with my lowering pereferances. So I fought with Summit to try to get a sleeve from one of their vendors that I would NOT have to pay shipping on and was $10 cheaper then Coleman's, but for some reason they could not get the parts. So I went with Coleman Racing sleeves, the ID diameter was a clear 2.04 that would fit on my KYBs. Jegs was a bit cheaper on shipping , so I opted to buy from them. I thought about a 8inch sleeve for further asthetics, but time to get the part became a factor when Jegs said they had the 7in sleeve in stock, but the 8 in had a 6+ day wait. Ordered coleman part Number 420-701 (7in 2.04ID) FYI : Jegs part number is 193-420-701 ($101 shipped for the pair)
Pics of the part numbers
Jegs part #
[This message has been edited by redraif (edited 03-27-2012).]
Just a bump so its not lost in the achives.... I still need it for some info and date references
------------------ 1984 Indy Fiero SE Pace Car Replica #770 "SE" Stormtrooper Edition Rescued, resuscitated and reversibly modified! (I'm so not done yet!) Poly all round & Black Drag DR-34s Frt: 225/45 on 18x8 (47 offset w/ 8-9mm spacer) 1.5 coils cut off 1984 WS6 springs Rear: 265/35 on 18x8.5 (45 offset) Coil-overs w/ 10 inch 300lb springs & 7 inch sleeve
Thanks! I'm still around. The indy is still the same. Have some big plans, but due to much,much chaos.... things have been put on the back burner.
I have recently gotten the remainder of the parts I needed to start the mods. New body pieces to mod instead of the original indy pieces . Fbody front lower fender vents, Paul Angels rear quarter side vents and deck lid cowl (mustang style), JimmyS cowl hood scoop and gfx flares, areo nose and dead nose to do the skittime nose mod, new door glass via new power everything doors, smooth molding rear bumper to finish off the conversion. Might do a side marker light delete and move them to the front of the wheel well with mini side markers... still on the fence with the black or white bumpstrip.
Interior ... repairing the indy seats with donor pieces... then I plan to have russ88 do the darkgrey pieces recovered in light grey to match the rest of the interior. I might have just found a new dash without cracks.... then some floormats.... lol...
I will drop the car a bit more and go with solid rear cradle mounts to compliment the poly everywhere else. A poly dog bone.... a brake conversion if I can find the right one....and can afford it . Some engine detailing and maybe a differnt head with a bit of performance till the duke dies.
So that's the basics.... lol!
$ is the hold up.... like with anything else.... but it wil happen no worries! Maybe I will even do a build thread
[This message has been edited by redraif (edited 08-15-2013).]
I had a lot of stuff hapen at home and my write up covering the greasable fittings got put on hold due to lack of time. I have the pics of the process and all though and still plan to do the write up.
I can't shed any light on the difference b/w 88's & pre 88's. I have only worked on my 84 and with kybs. I have not checked the diameter in konis either. I had a friend that got a deal on the kybs, so that' why I went that way.
------------------ 1984 Indy Fiero SE Pace Car Replica #770 "SE" Stormtrooper Edition Rescued, resuscitated and reversibly modified! (I'm so not done yet!) Poly all round & Black Drag DR-34s Frt: 225/45 on 18x8 (47 offset w/ 8-9mm spacer) 1.5 coils cut off 1984 WS6 springs Rear: 265/35 on 18x8.5 (45 offset) Coil-overs w/ 10 inch 300lb springs & 7 inch sleeve
You have a nice write up here. It is nice seeing all of the pictures. By chance did I miss the pictures of the greasable fittings?
Well thanks to CarDomain doing and update that scrambled everyones pages.... I can't push the greasable fitting write up through like I intended. I had it 99% done and they updated things and now the pictures are pulled out and the words are misordered and all broken into multiple posts. What a mess. Hoping a fix is coming soon so I can get back on it!
[This message has been edited by redraif (edited 09-15-2014).]
bump to keep it out of the achives. Esp since CarDomain has destroyed everything I did there.... All the history gone. At least I can keep this for others to use!
It does not have to be kybs. The key is to match the inside diameter of the coil over sleeve to the outside diameter of the strut. The spring will also have to be matched so it does not rub the coil over sleeve, but still fit nicely on the coil seat that rides on the coil over sleeve.
If the 86 shares the same suspension as the 84, you should be good. I'm not sure when the changes occurred in the rear suspension. I would not want to say one way or the other and be wrong.
[This message has been edited by redraif (edited 08-05-2014).]
Nice write-up. I also wanted to share my recent DIY (on-the-cheap) coil-over mod with this thread.
The Coleman sleeve and adjuster kits mentioned in the OP aren't $101 for the pair anymore (they are now $137.98 for the pair) and they aren't always in stock at Jeg's. Instead, I found some Allstar ALL64143 sleeve kits from Amazon.com for $38.99 each (77.98 for the pair) which will fit over the KYB struts if you modify the sleeves themselves a bit (there are some raised portions inside the sleeve that need to be sanded down a bit - this can be done with a dremel and sandpaper roll).
I bought the 10" tall 325lb Summit springs for my Fiero ($83.94 for the pair).
I also bought some Energy Suspension 9.6118R upper spring pads (install between the spring and the upper strut plate) for $10.81 for the pair from Amazon.com as well.
You'll need to remove the stock jounce bumper (bump stop limiter) from your stock Fiero strut boots if you want to reuse them since the Fiero strut boots won't fit inside the 2.5" ID coil-over springs. If you want strut boots, the only thing I've found that will fit are the Bilstein "Service-7" blue strut boots sold here: http://www.maximummotorspor...over-strut-P975.aspx, but I don't think the OE Fiero jounce bumpers will fit inside these strut boots (but you can get some aftermarket ones if you want them).
My Fiero has a 3800 Series 2 Turbocharged V6 and 4T60-E automatic trans. The 325 lb rate springs seem to be a very good match for it offering much improved handling without hardly any loss of ride quality over a stock Fiero GT spring. I will admit the stock Fiero GT rear springs I was using seemed overloaded with the increased weight of my powertrain, which was producing an instability issue during hard cornering and evasive maneuvers at highway speeds.
-ryan
------------------ OVERKILL IS UNDERRATED Custom GM OBD1 & OBD2 Tuning | Engine Conversions & more | www.gmtuners.com
[This message has been edited by Darth Fiero (edited 08-04-2014).]
And thank you for adding the additional info and sources. It helps to know there are better cost alternatives available. If I can edit my original post with part source info, do you mind if I insert your finds?
[This message has been edited by redraif (edited 08-05-2014).]
And thank you for adding the additional info and sources. It helps to know there are better cost alternatives available. If I can edit my original post with part source info, do you mind if I insert your finds?
Please feel free to update your original post with the new information.
I also bought some Energy Suspension 9.6118R upper spring pads (install between the spring and the upper strut plate) for $10.81 for the pair from Amazon.com as well.
I've got Fiero Store lowering springs mounted on all four corners on my '88 Formula, but I don't feel the rear has dropped enough, and IMO none of the springs are quite stiff enough for autocross.
I have a question regarding the upper strut plate. Is it advisable with this modification to fabricate something to help keep the top of the springs centered within the upper strut plates? Or is the "nub" of the retainer plate (as shown below) sufficient when positioned within the top of the springs?
The Energy Suspension 9.6118R poly spring pads will keep the coil over spring centered on and from rubbing on the metal parts of the upper strut mounting plate.
[This message has been edited by Darth Fiero (edited 08-05-2014).]
The Energy Suspension 9.6118R poly spring pads will keep the coil over spring centered on and from rubbing on the metal parts of the upper strut mounting plate.
Will that only occur if the "nub" of the top plate is facing downwards? In other words, do those pads rely on the "nub" being in the middle of them to help keep the springs centered?
As you're no doubt aware, the "nub" is often pointed upwards so as to return the strut to a more normalized position after the suspension has been lowered... as was discussed HERE. So I'm wondering if the top plates are installed in this manner, will the spring pads you recommended still keep the springs centered? It appears to me that it wouldn't still work if installed this way, so that's why I'm double-checking and asking all these questions.
[This message has been edited by Patrick (edited 08-05-2014).]
Will that only occur if the "nub" of the top plate is facing downwards? In other words, do those pads rely on the "nub" being in the middle of them to help keep the springs centered?
As you're no doubt aware, the "nub" is often pointed upwards so as to return the strut to a more normalized position after the suspension has been lowered... as was discussed HERE. So I'm wondering if the top plates are installed in this manner, will the spring pads you recommended still keep the springs centered? It appears to me that it wouldn't still work if installed this way, so that's why I'm double-checking and asking all these questions.
The upper strut mounting plate "nub" is supposed to be installed facing down, not up. The poly spring pads center on that nub, and those pads center the spring.
That having been said, I suppose you could either glue the poly pad to the upside down strut mount to keep it centered OR you could search thru Energy Suspension's catalog and see if they make a spring pad that will center the coil-over spring off the strut rod itself (they have many different design and style spring pads they sell).
[This message has been edited by Darth Fiero (edited 08-05-2014).]
The upper strut mounting plate "nub" is supposed to be installed facing down, not up.
Oh... I know! However, there's a slight possibility that there is some benefit from flipping that plate over in regards to the strut's performance with a lowered suspension.
quote
Originally posted by Darth Fiero:
The poly spring pads center on that nub, and those pads center the spring.
Okay, that's what I suspected. Thanks for the clarification.
quote
Originally posted by Darth Fiero:
That having been said, I suppose you could... search thru Energy Suspension's catalog and see if they make a spring pad that will center the coil-over spring off the strut rod itself (they have many different design and style spring pads they sell).
Thanks Darth, I'll take a look.
EDIT: I had a look at This page, but it appears there's nothing with a small enough center hole. Oh well, at least I know what's available.
[This message has been edited by Patrick (edited 08-05-2014).]
Nice write-up. I also wanted to share my recent DIY (on-the-cheap) coil-over mod with this thread.
The Coleman sleeve and adjuster kits mentioned in the OP aren't $101 for the pair anymore (they are now $137.98 for the pair) and they aren't always in stock at Jeg's. Instead, I found some Allstar ALL64143 sleeve kits from Amazon.com for $38.99 each (77.98 for the pair) which will fit over the KYB struts if you modify the sleeves themselves a bit (there are some raised portions inside the sleeve that need to be sanded down a bit - this can be done with a dremel and sandpaper roll).
I bought the 10" tall 325lb Summit springs for my Fiero ($83.94 for the pair).
I also bought some Energy Suspension 9.6118R upper spring pads (install between the spring and the upper strut plate) for $10.81 for the pair from Amazon.com as well.
You'll need to remove the stock jounce bumper (bump stop limiter) from your stock Fiero strut boots if you want to reuse them since the Fiero strut boots won't fit inside the 2.5" ID coil-over springs. If you want strut boots, the only thing I've found that will fit are the Bilstein "Service-7" blue strut boots sold here: http://www.maximummotorspor...over-strut-P975.aspx, but I don't think the OE Fiero jounce bumpers will fit inside these strut boots (but you can get some aftermarket ones if you want them).
My Fiero has a 3800 Series 2 Turbocharged V6 and 4T60-E automatic trans. The 325 lb rate springs seem to be a very good match for it offering much improved handling without hardly any loss of ride quality over a stock Fiero GT spring. I will admit the stock Fiero GT rear springs I was using seemed overloaded with the increased weight of my powertrain, which was producing an instability issue during hard cornering and evasive maneuvers at highway speeds.
-ryan
Ryan, I purchased the Allstar ALL64143 sleeve kits and am working on putting them on my KYB struts. I've installed the sleeve, adjuster and spring but am wondering if I've got the other pieces in the correct order.
Ryan, I purchased the Allstar ALL64143 sleeve kits and am working on putting them on my KYB struts. I've installed the sleeve, adjuster and spring but am wondering if I've got the other pieces in the correct order.
Is the order correct in the picture? Thanks
Everything looks like it is in the correct order in the picture you posted. However, I did not use the upper spring mount (cone shaped black item in your picture that mounts on the strut above the spring and jounce bumper) that came with the Allstar kit in my conversion. If you use the upper spring mount provided in the kit, you may experience increased ride height (especially if using 10" or taller springs) and you won't be able to use the Energy Suspension coil spring isolator pads.
You can also remove the factory upper spring perch that you have shown in your picture. All you need is the upper strut mounting plate. While the upper spring mounting plate does have mounting holes in it, you can tap in some 5/16" diameter carriage bolts so you won't have to worry about holding the heads of standard bolts with a wrench when you tighten down the strut plate to strut tower mounting nuts. You'll need 2x 1" long and 1x 1 1/2" long carriage bolts for each strut mounting plate. The longer bolt installs closest to the engine while the two shorter bolts install closest to the outer body panel. Make sure you get new nuts and washers as the factory nuts are metric and won't work with SAE threads.
[This message has been edited by Darth Fiero (edited 08-08-2014).]
Everything looks like it is in the correct order in the picture you posted. However, I did not use the upper spring mount (cone shaped black item in your picture that mounts on the strut above the spring and jounce bumper) that came with the Allstar kit in my conversion. If you use the upper spring mount provided in the kit, you may experience increased ride height (especially if using 10" or taller springs) and you won't be able to use the Energy Suspension coil spring isolator pads.
You can also remove the factory upper spring perch that you have shown in your picture. All you need is the upper strut mounting plate. While the upper spring mounting plate does have mounting holes in it, you can tap in some 5/16" diameter carriage bolts so you won't have to worry about holding the heads of standard bolts with a wrench when you tighten down the strut plate to strut tower mounting nuts. You'll need 2x 1" long and 1x 1 1/2" long carriage bolts for each strut mounting plate. The longer bolt installs closest to the engine while the two shorter bolts install closest to the outer body panel. Make sure you get new nuts and washers as the factory nuts are metric and won't work with SAE threads.
Went through and did a few cleans ups (grammer and spelling). Figure I would give it a bump. Maybe soon CarDomain will have a fix and I can get the rest of my writeups posted!
I know this is an old thread but I'm going to need it eventually.
If I was planning on building my own coil overs AND upgrading to new struts at the same time, exactly what would I need to acquire (from the bone yard, store, Jegs, etc) so that I could make these before tearing into the car? Ideally, I'd like to be able to remove the wheels, jack up the car, unbolt the old setup and bolt in the new.....period. No disassembly/assembly at the point of installation as 1) I'd probably do it on the rack at the tire shop so I could get an immediate alignment and 2) since I'm not terribly handy with tools, I could take my time building the coil overs at my leisure. (I do much better when I'm not in a hurry and if I was missing a part or a tool, I could get it at my leisure.)
OK so I do not understand how DIY coil overs would let me adjust the ride height. I see the ring the spring is perched on but wouldn't adjusting that just make the ride stiffer or softer?
OK so I do not understand how DIY coil overs would let me adjust the ride height. I see the ring the spring is perched on but wouldn't adjusting that just make the ride stiffer or softer?
I'm not good at explaining these things, but.... The aftermarket spring itself is what sets the stiffness or softness, which is predetermined by the manufacturer when they choose and coil the wire. Mine are 300lb. This can not be adjusted and remains the same no matter the cars ride height. The spring will only compress so far based on vehicle weight and forces exerted on it.
As for ride height....
Think of a nut and bolt. The strut with threaded sleeve becomes the bolt, the threaded spring perch is effectively the nut. The body of the car rests on this perch or nut with the spring acting like a dampener between the two. Granted the strut works as a motion dampener as well. But that not important to this explanation
Now the spring (dampener between nut/perch and body) is a fixed length and height when not in motion. It is compressed by the weight of the car. Then outside forces will move the body. The spring helps control this movement. But anyway... for simplicity sake... forget what it does in motion, think of it simply stationary and fixed. When stationary, it acts like a fixed spacer between the body and nut/perch.
So in simple terms... You move the nut (perch) up and down on the bolt (sleeved strut), so the fixed spacer (spring) between nut and body does what? It moves up and down with the nut, effectively moving the body up and down with it. This is what adjusts ride height.
That's my dumb a tempt to explain. Lol! Hope it helps....
------------------ Please forgive my typos, I'm typically posting via cell.
1984 Indy Fiero SE Pace Car Replica #770 "SE" Stormtrooper Edition Rescued, resuscitated and reversibly modified! (I'm so not done yet!) Poly all round & Black Drag DR-34s Frt: 225/45 on 18x8 (47 offset w/ 8-9mm spacer) 1.5 coils cut off 1984 WS6 springs Rear: 265/35 on 18x8.5 (45 offset) Coil-overs w/ 10 inch 300lb springs & 7 inch sleeve
I know this is an old thread but I'm going to need it eventually.
If I was planning on building my own coil overs AND upgrading to new struts at the same time, exactly what would I need to acquire (from the bone yard, store, Jegs, etc) so that I could make these before tearing into the car? Ideally, I'd like to be able to remove the wheels, jack up the car, unbolt the old setup and bolt in the new.....period. No disassembly/assembly at the point of installation as 1) I'd probably do it on the rack at the tire shop so I could get an immediate alignment and 2) since I'm not terribly handy with tools, I could take my time building the coil overs at my leisure. (I do much better when I'm not in a hurry and if I was missing a part or a tool, I could get it at my leisure.)
Apologies that missed your post. I was not notified or missed the email. I just saw it today...
I would get the new parts I mentioned in the thread. The sleeve, perch, spring and get a new set of struts if you plan to upgrade. Modify the new struts and install the sleeve and perch. As for the fiero parts... procure from a junk yard all the parts I used in the reassembled unit. And reassemble the assembly as I did mine. Then all you have to do is jack up the car and drop your existing assembly from above.
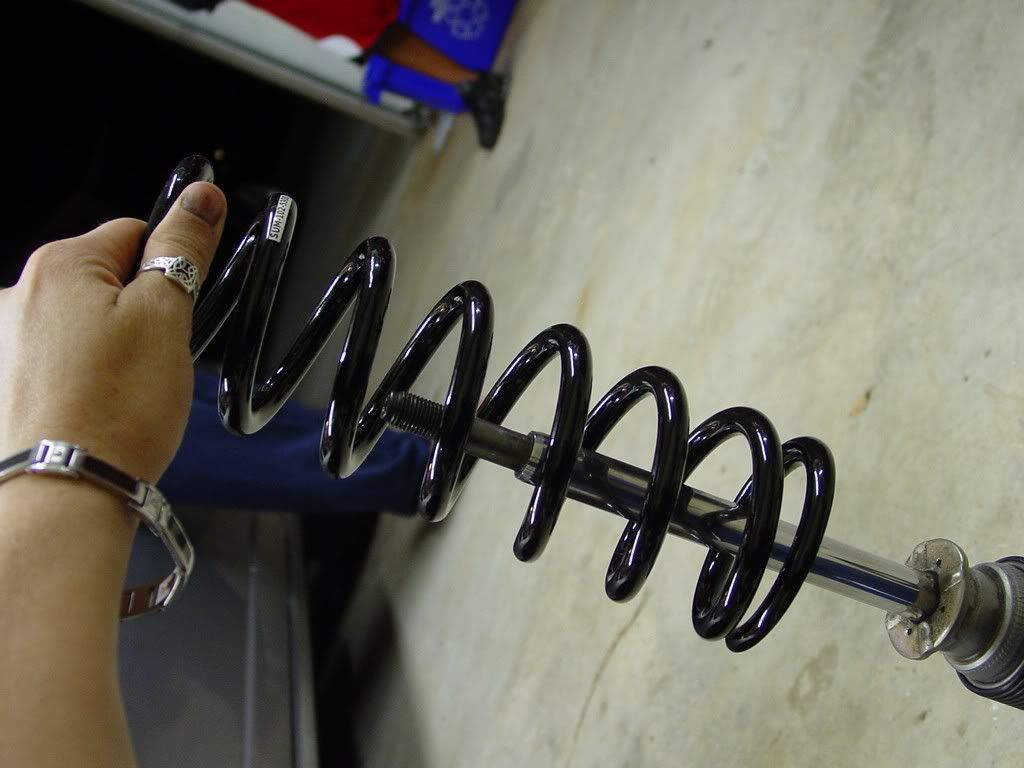
New: 1. Get a new set of struts: you will cut of the spring seat/ perch. I reused my newish KYBs 2. Get your new coil over springs: I used Summit's 300lb/in 10 inch length with 2.5 inch ID part number SUM-102-5300 3. Get your sleeve kit: I went with Coleman Racing sleeves, coleman part Number 420-701 (7in long 2.04ID) FYI : Jegs part number is 193-420-701
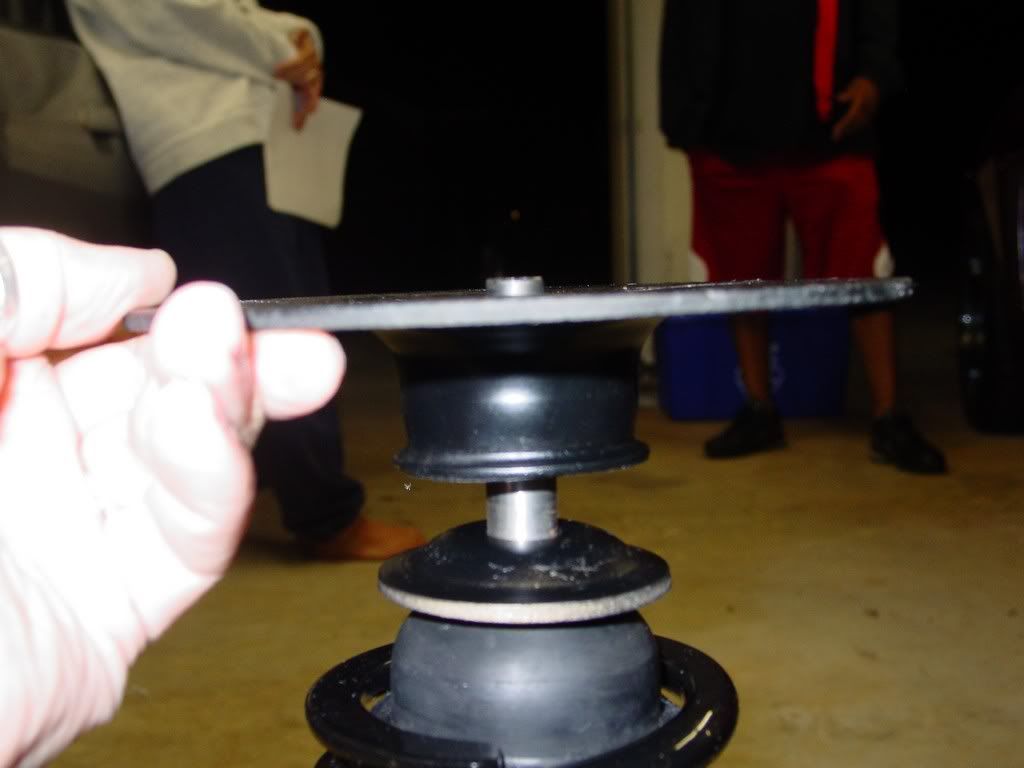
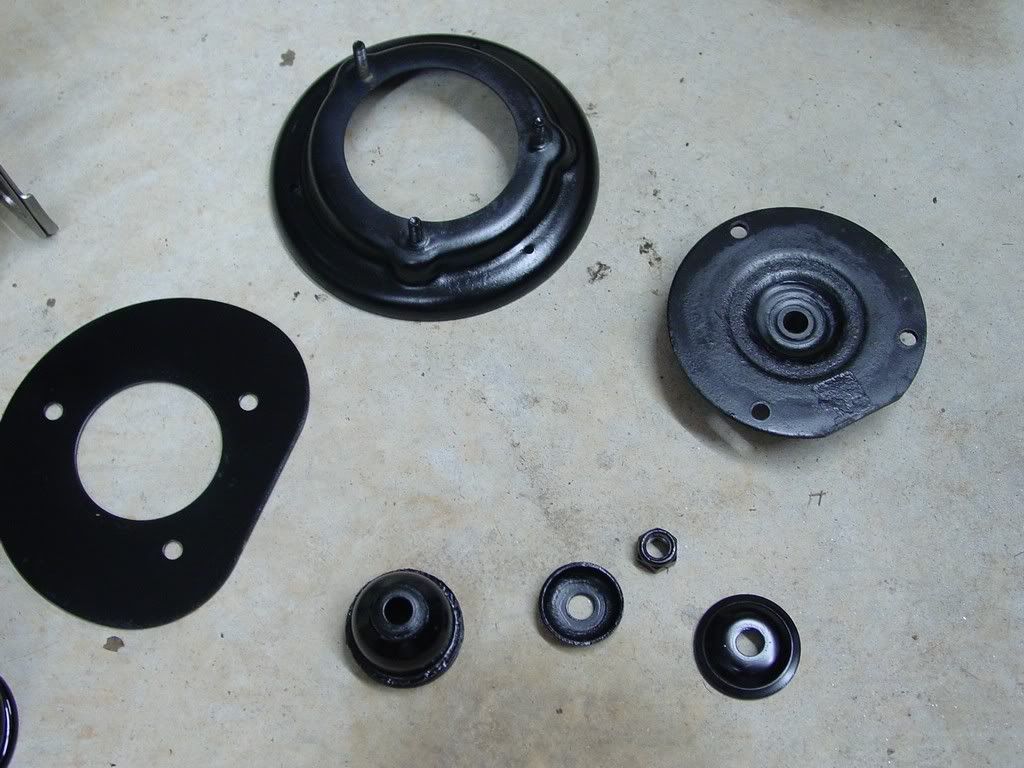
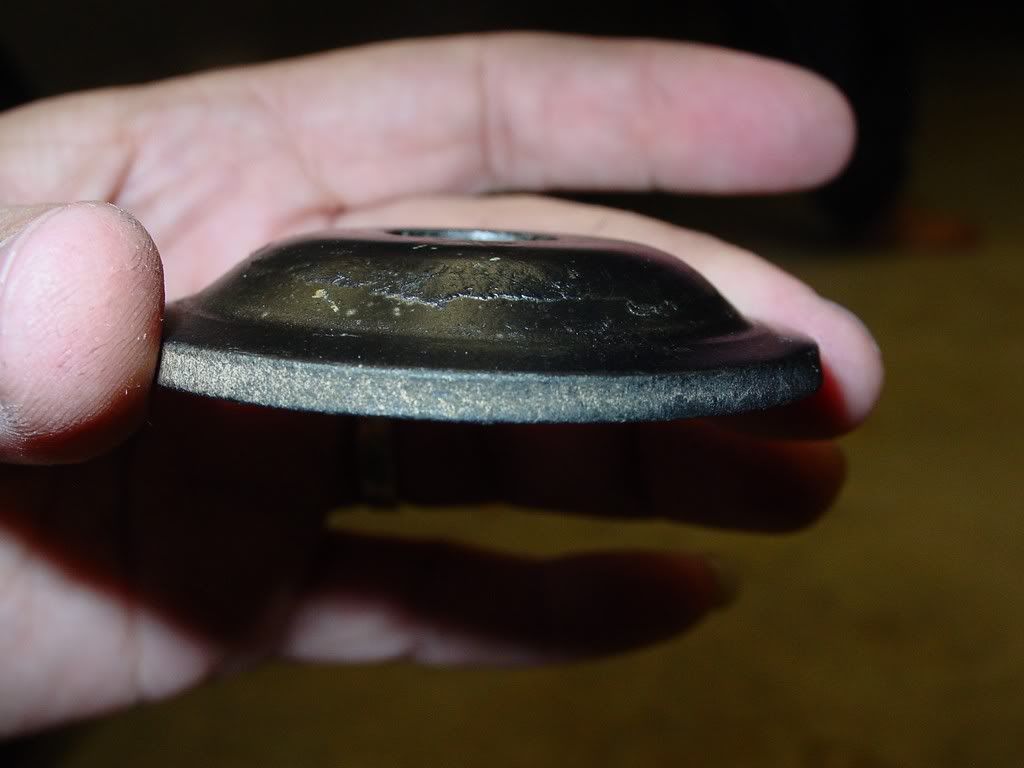
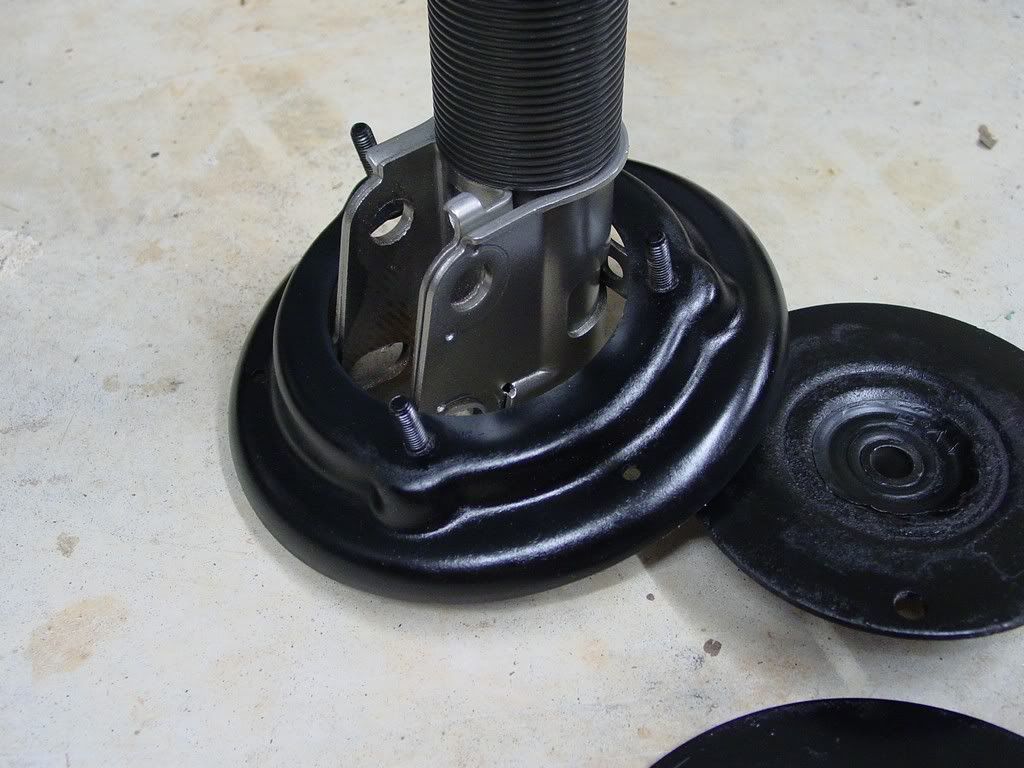
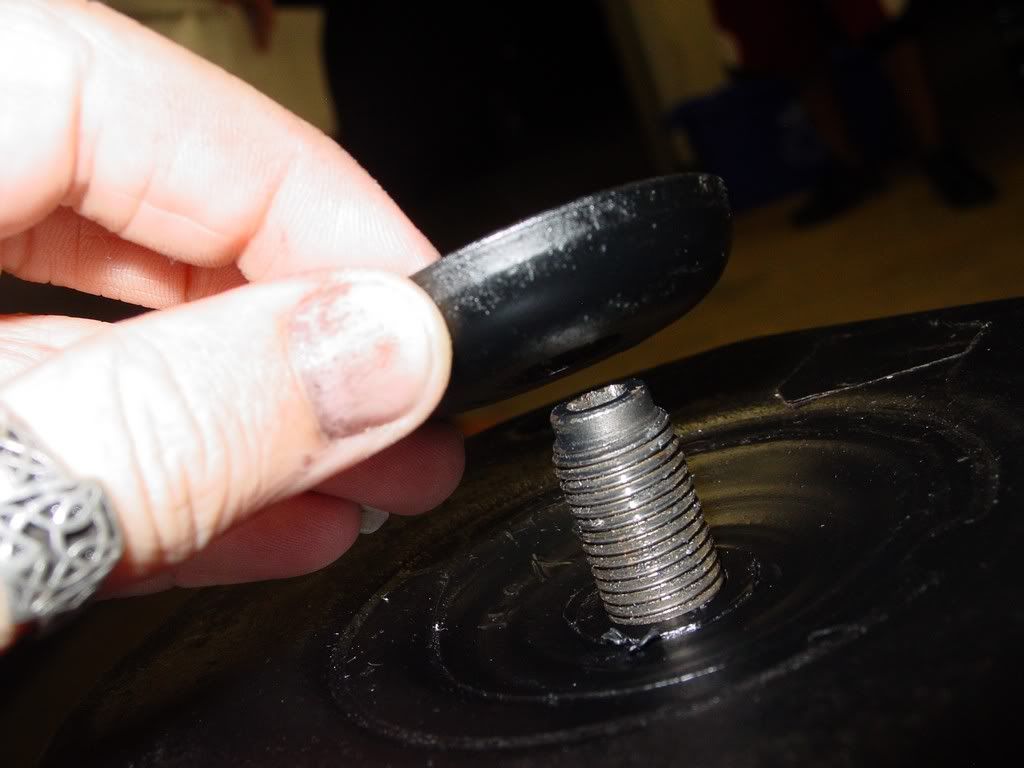
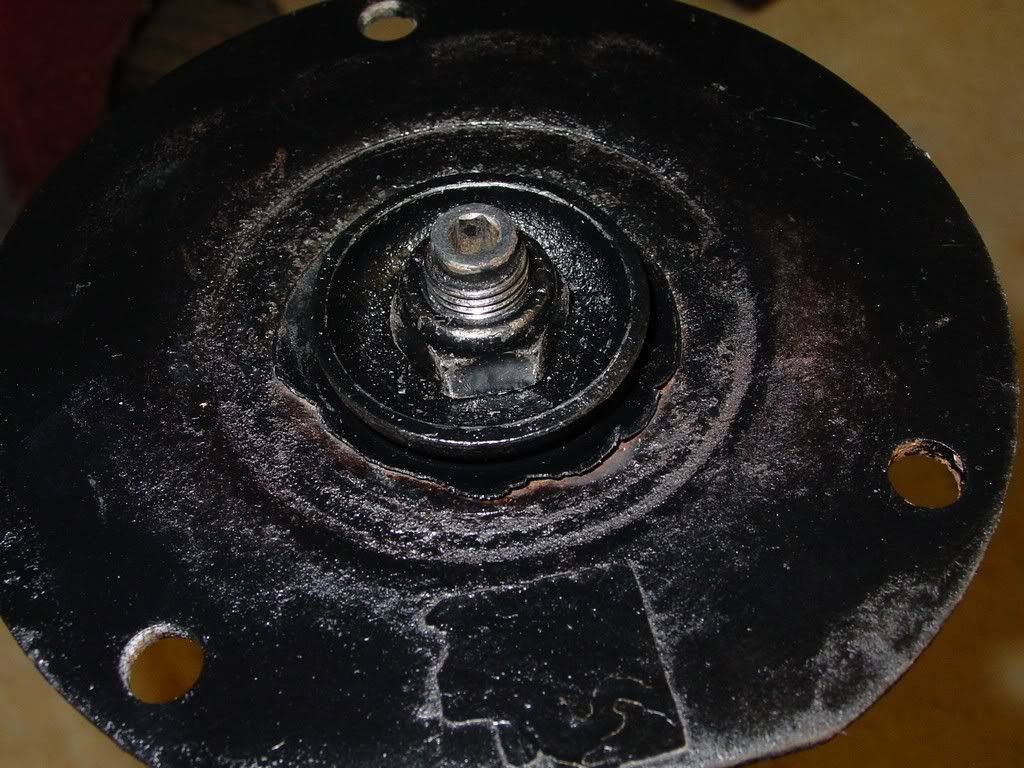
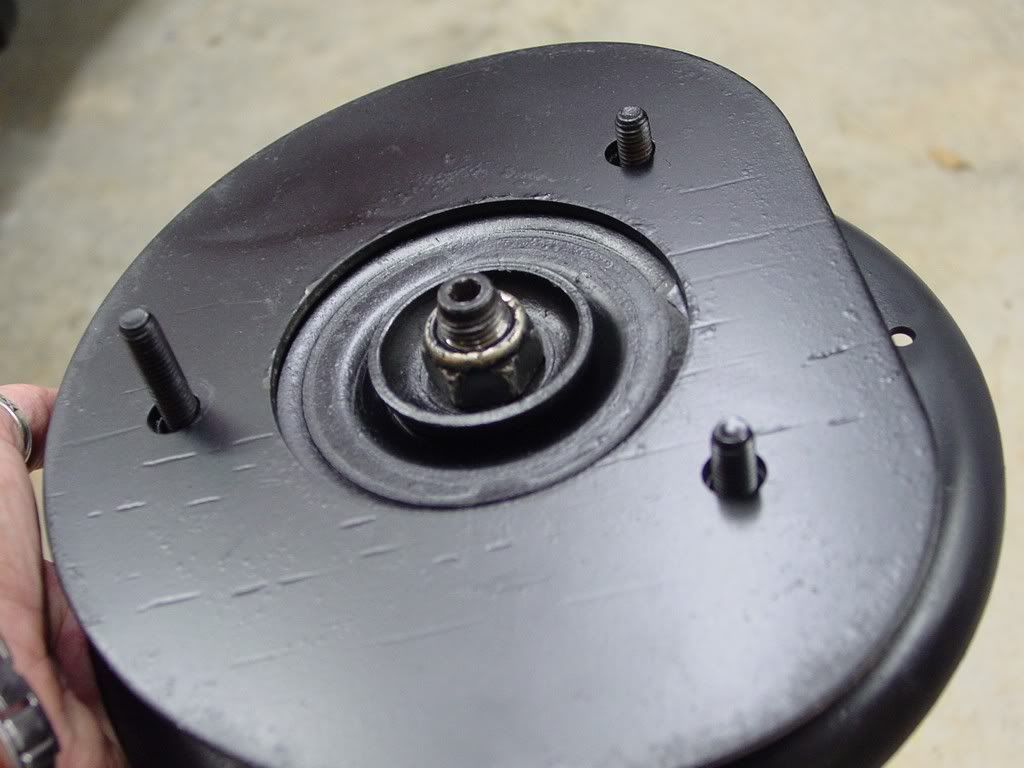
Fiero parts boneyard or new your choice: Look back at the beginning of this thread and I detail these parts in single pics... left to right and top to bottom 1. flat Top plate (3 holes) 2. factory spring perch top (three studs sticking up) 3. coil spring retainer plate (three holes with centered spring locator) 4. dust boot rubber bushing (strut dust cover removed) 5. cupped top strut washer (where the strut bolt mounts) 6. strut bolt 7. strut shaft washer (sits on the dust boot top)
Here are all the parts going together to help you see them used....
quote
Originally posted by redraif:
ok now reordering things...
****THIS IS THE CORRECT WAY TO PUT THE PARTS ON THE STRUT*****
Spring on first as before....
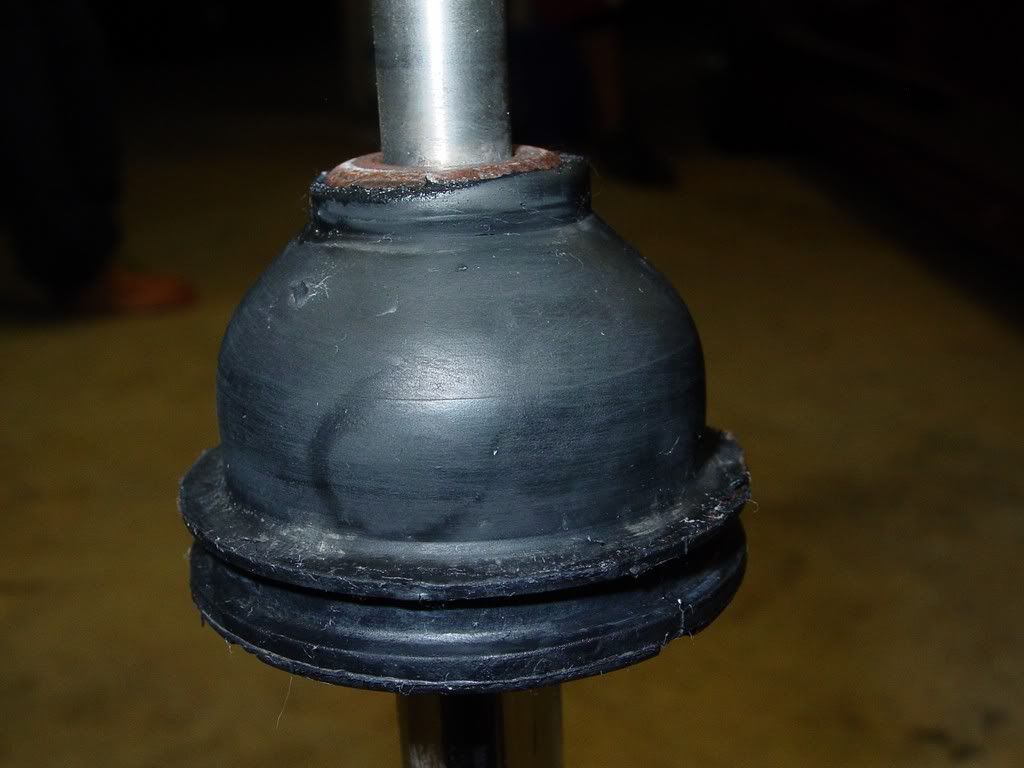
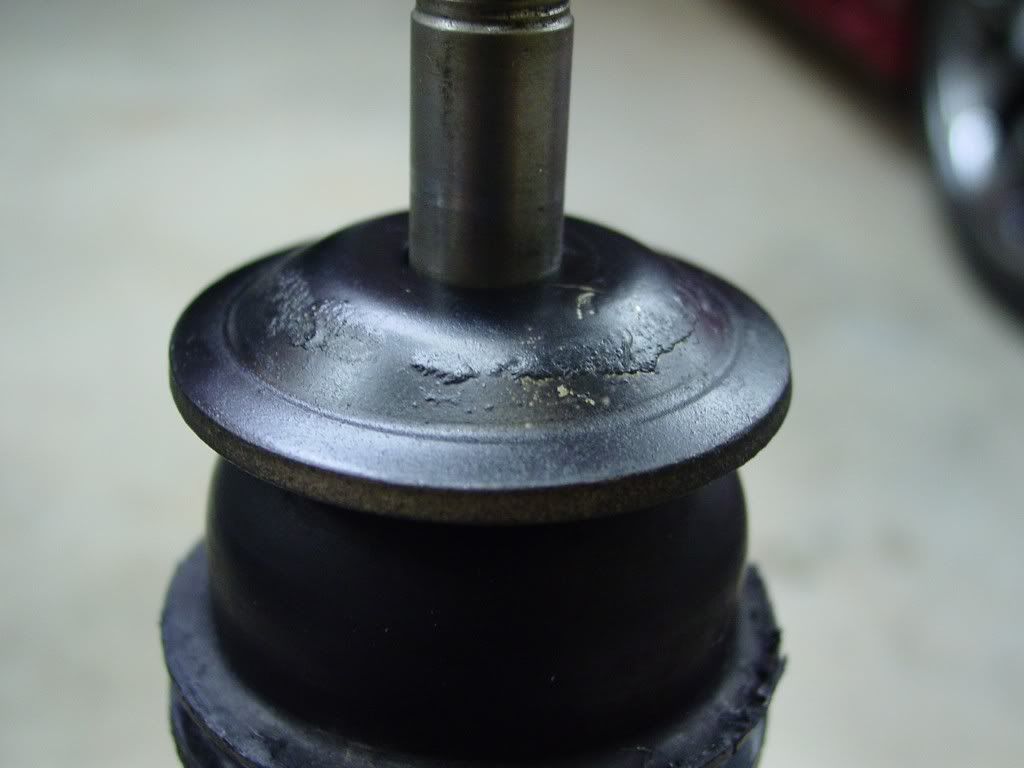
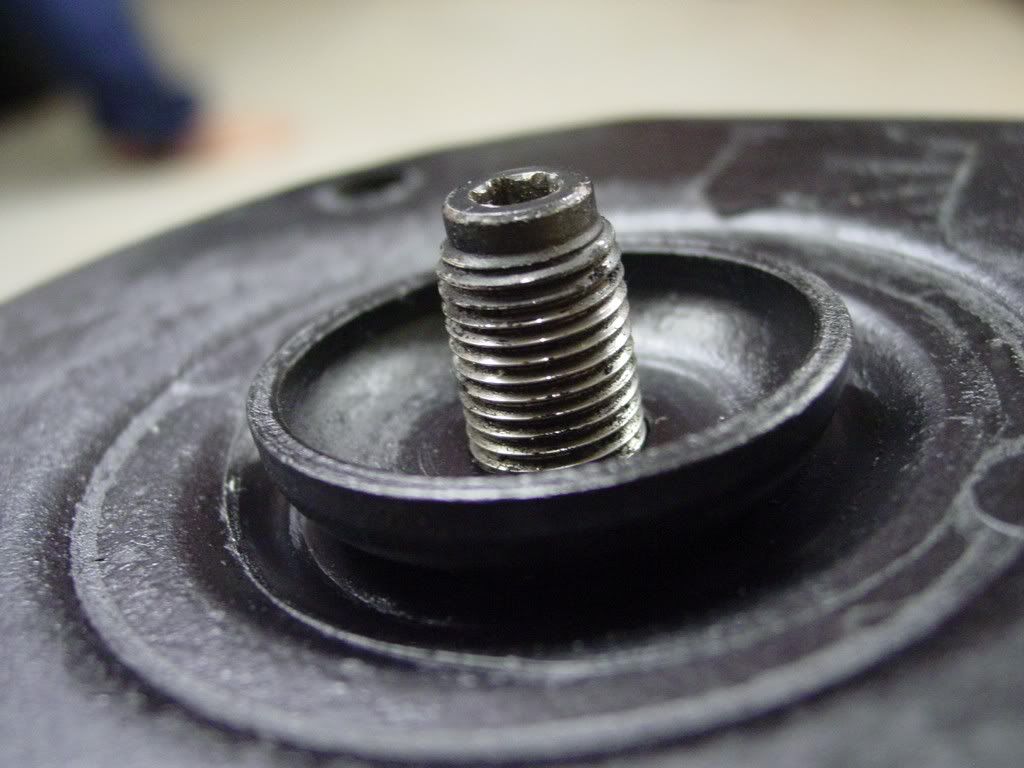
Dust boot... oriented with the dome side up
then washer oriented with the dome side up!
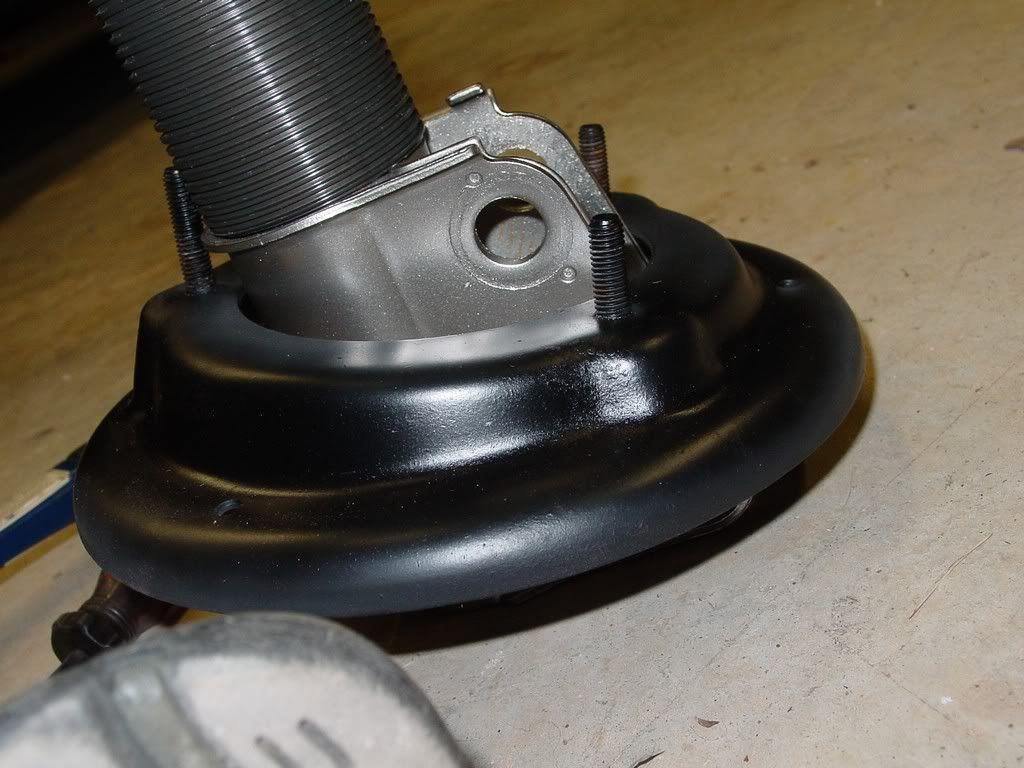
Add the upper spring perch with the 3 studs drapped on the strut bottom. Studs face up! It wont fit on after the top spring retainer plate is on and the hole is not large enough to slip over the bottom ot the strut...
There is a "correct" way to face this piece. longer stud goes to the back of the strut...
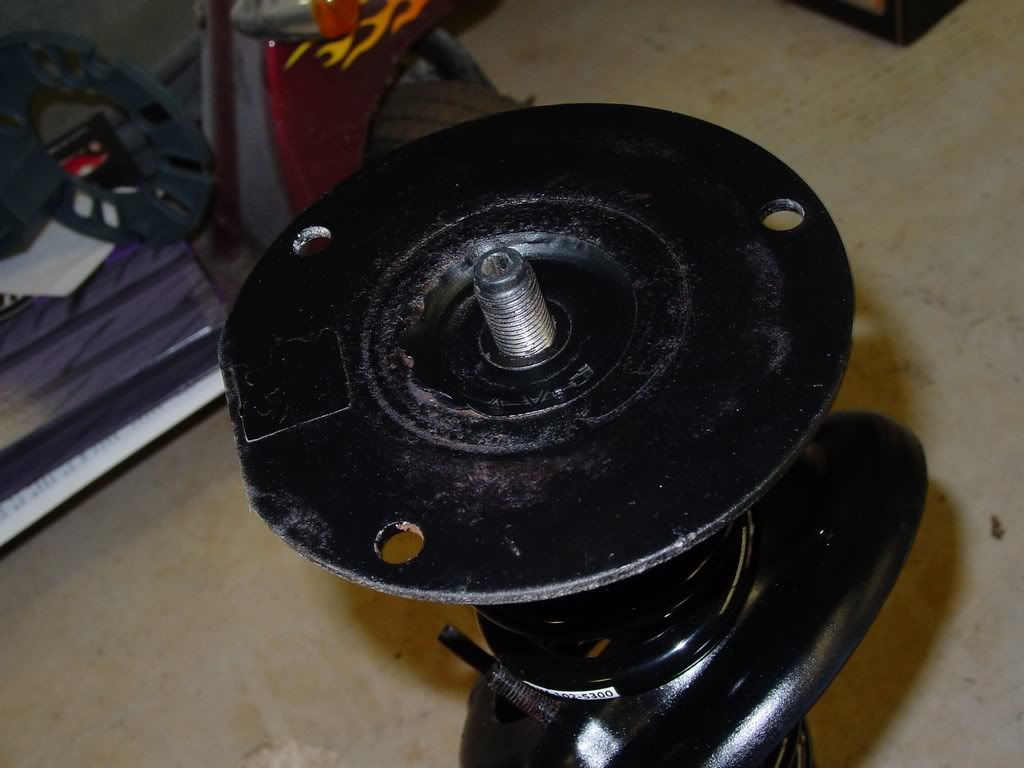
now the top spring retainer plate. Flat side up!
Ahhh now that is a usable amount of threads! Victory!
quote
Originally posted by redraif:
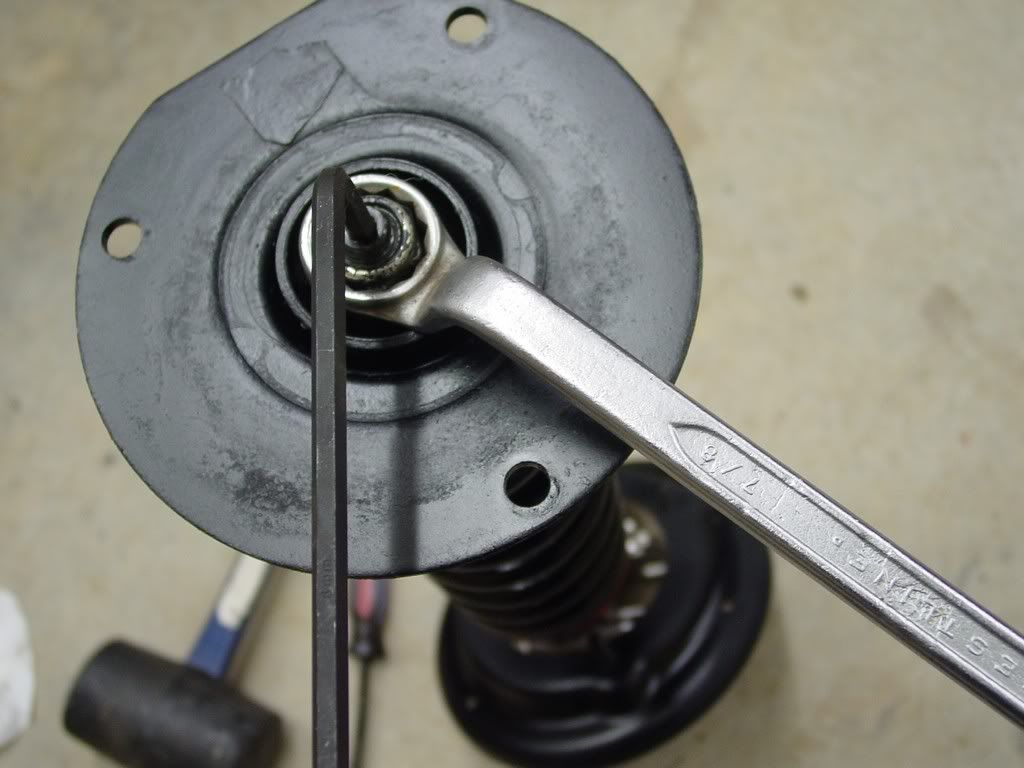
Now to button things up
Now the smaller washer... cup side up!
the nut...
The allen 6mm and the 7/8 wrench.... worked AWESOME. Piece of cake.
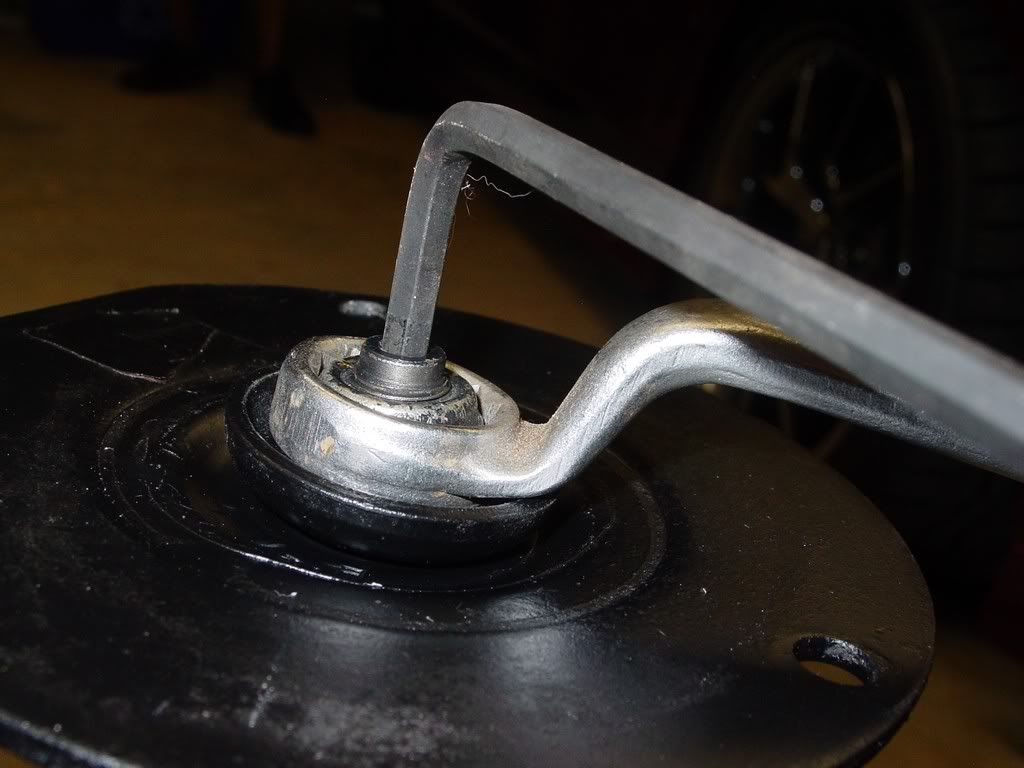
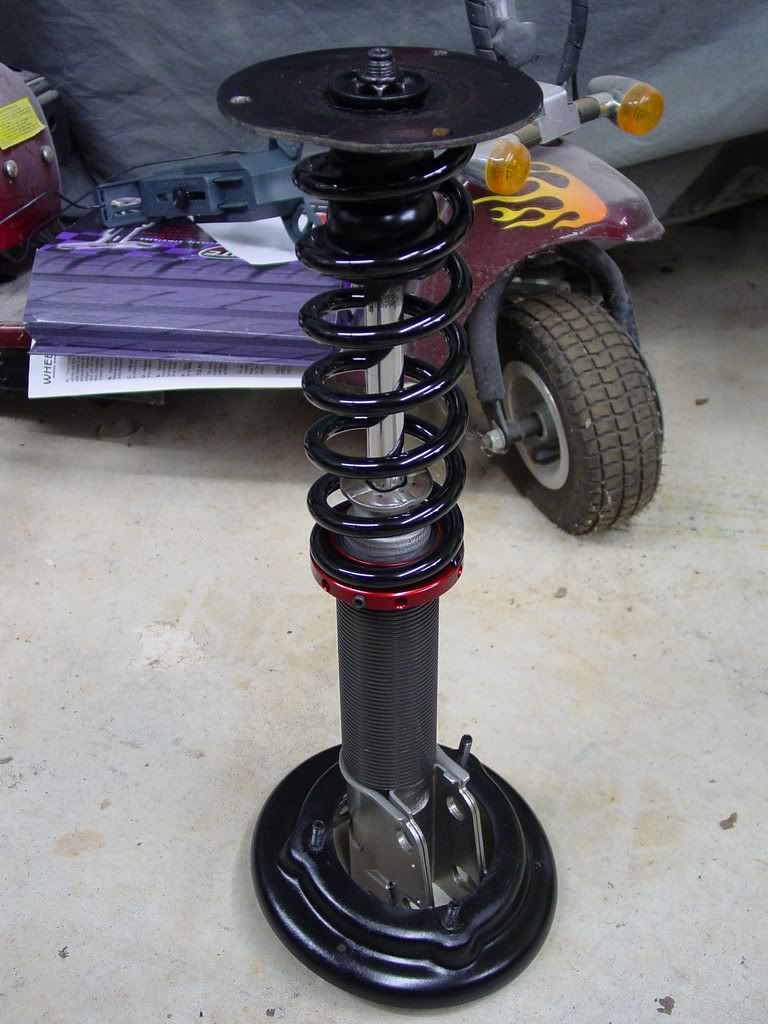
Finally things were looking right!
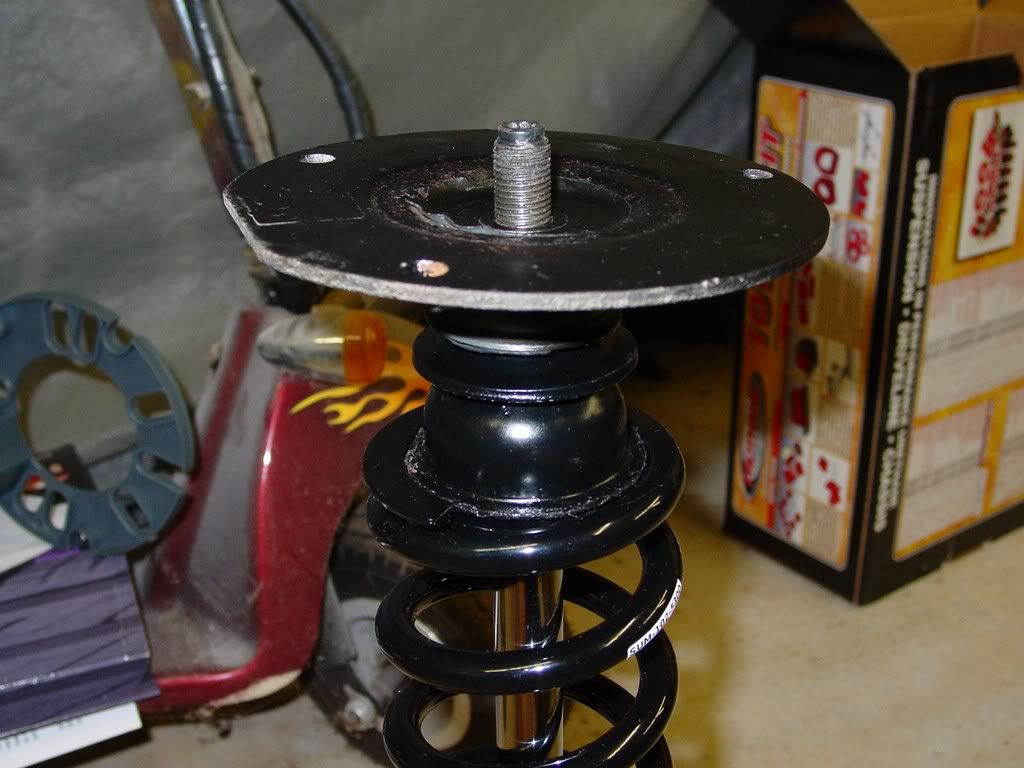
The whole assembly is now ready to reinstall. Leaving the spring perch down till go time
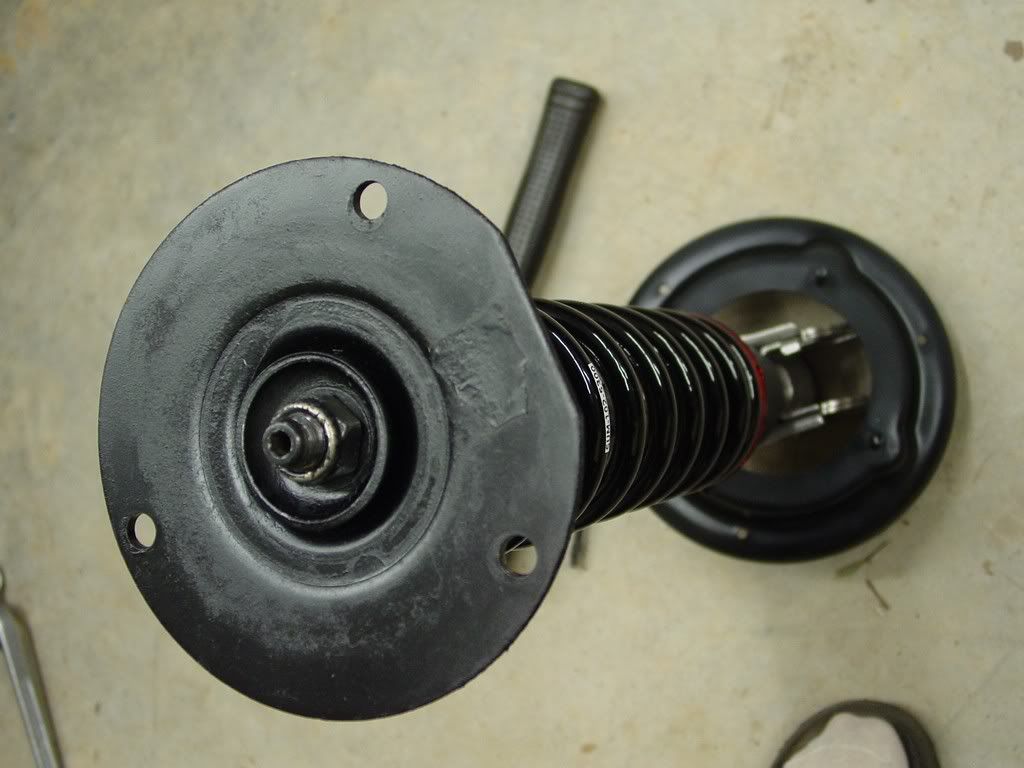
Notice how everything is lining up in the pic... flat side is to the outside of the... toward the side of the strut that bolts to the spindle.
But for referance...I will add the top most plate. Again... flat side is to the outside of the car... toward the side of the strut that bolts to the spindle.
here is the perch up and the nuts just barely on for the heck of it, so you can see how it all looks together before its on the car.
Time for bed... hopefully more tomorrow... depends on the seawall and dock replacement though!
Again sorry I missed your post...
[This message has been edited by redraif (edited 10-19-2015).]
I'm not good at explaining these things, but.... The aftermarket spring itself is what sets the stiffness or softness, which is predetermined by the manufacturer when they choose and coil the wire. Mine are 300lb. This can not be adjusted and remains the same no matter the cars ride height. The spring will only compress so far based on vehicle weight and forces exerted on it.
As for ride height....
Think of a nut and bolt. The strut with threaded sleeve becomes the bolt, the threaded spring perch is effectively the nut. The body of the car rests on this perch or nut with the spring acting like a dampener between the two. Granted the strut works as a motion dampener as well. But that not important to this explanation
Now the spring (dampener between nut/perch and body) is a fixed length and height when not in motion. It is compressed by the weight of the car. Then outside forces will move the body. The spring helps control this movement. But anyway... for simplicity sake... forget what it does in motion, think of it simply stationary and fixed. When stationary, it acts like a fixed spacer between the body and nut/perch.
So in simple terms... You move the nut (perch) up and down on the bolt (sleeved strut), so the fixed spacer (spring) between nut and body does what? It moves up and down with the nut, effectively moving the body up and down with it. This is what adjusts ride height.
That's my dumb a tempt to explain. Lol! Hope it helps....
Nope. It still seems like that would make the springs stiffer and not affect the ride height. But! I will take your word for it that it does the exact opposite :P Maybe it will make sense when I build my own. Right after I buy new wheels and tires. Which will happen after I finish rebuilding my AC system. Which I will start on in a couple weeks. It's going to take a thousand years to finish this car!
I do not understand how DIY coil overs would let me adjust the ride height. I see the ring the spring is perched on but wouldn't adjusting that just make the ride stiffer or softer?
quote
Originally posted by Internet-man:
It still seems like that would make the springs stiffer and not affect the ride height.
So if you're holding one of the rear springs over your head, it's stiffer than if you're holding it down by your knees? If you say so.
The tops of the springs are what the sprung-weight of the car sits on. If the springs are raised, the car is raised. What is it you're thinking is preventing the car from being raised if the springs are moved up by using the adjustment collars? Do you believe the shocks/struts themselves are somehow preventing the car from increasing its ride height when the spring adjustment collars are moved higher?
[This message has been edited by Patrick (edited 11-05-2015).]
are the 88 struts the same as these from the 84 era? I was thinking that I was told the 88s changed somehow.. Have you heard this? If doing a coilover project, will 84-87 struts fit an 88?


 and date references