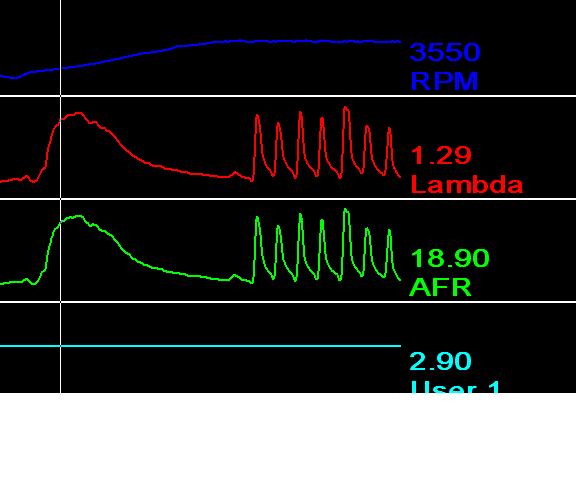
Here is what good tuning equipment can do to help you hone in on a good tune, below is a screen shot from a test run with the Zeitronix wideband O2 datalogger, immediately left of the white line at the beginning of the upward slope in the AFR graph is a small dip that represents about 12.5 AFR, at the same time the corrasponding rpm graph is showing an increase which signifies throttle tip in. The two together represent the initial power enrichment followed by a lean condition indicating an area needed additional fueling.
The other values; TPS, EGT, and MAP are not present because I had not connected those sensors for vaious reasons (mostly fatigue and frustration) and I really wanted to get the O2 function for an immediate status of the tune. The squiggly lines to the far right are the result of the rev limiter kicking in of which there are at least two and it took the use of Tunercat which is a bit more high yield data oriented along with TunerproRT which is quite broad spectrum oriented and requires more sifting to get to the necessary table for adjustment.
Afterwards the engine reved all the way to the new 7000 rpm limit. In the video which will be linked to as soon as the server releases it you will see the rich exhaust condition with puffs of smoke. After the injector size was dialed in which I actually over estimated for easy adjustment to reduce pulse width due to the higher than stock fuel pressure for the 30 lb/hr injectors, the revs got better however it took nearly zeroing the PE vs. TPS% to reveal that it was the culprit for the rich puffs during revs. I haven't fine tuned that area yet but I got rid of the smoke.
Hopefully when this monster of a project I have created is completed I'll be able to go through a tuning proceedure with the TGP code that will help give others a good bit of guidance on how to approach the tuning process.
[This message has been edited by Joseph Upson (edited 11-01-2007).]
It may take a few hours for the video to be cleared for viewing.
The video is a composite of four clips in progression. The popping sound is the result of a problem with the camera.
I'm not sure if the hot cam sound is the result of the state of tune or the reground cam.
The glass packs located at the exhaust tips didn't sound hot at all when they were installed and I believe their size may have had something to do with it. If the car wasn't so loud I would run it without mufflers but dual turbos have proven for the second time to be much, much louder than a single turbo and it would make since when you consider two 2.25" exhaust pipes vs. one 2.5" single exhaust split into two at the rear, also the 3.9 flows a good bit of volume through each bank.
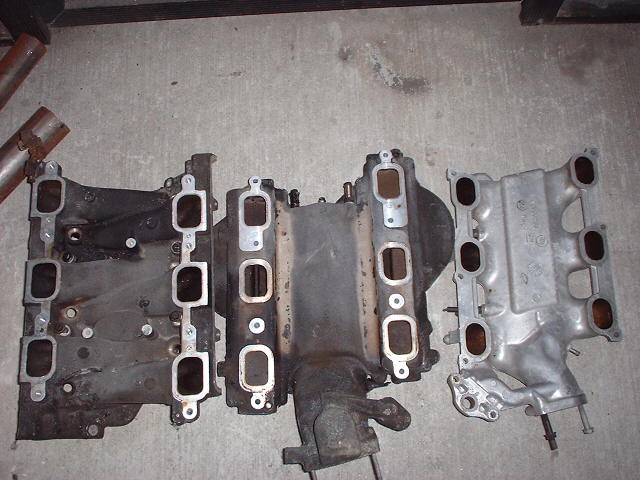
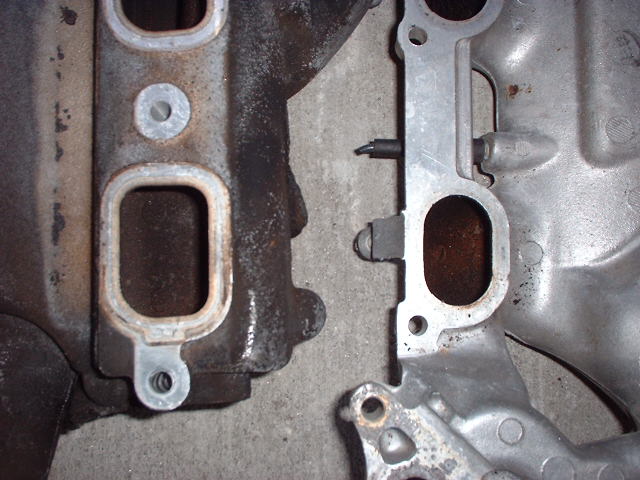
Someone asked me about the intake manifold underside some time ago, here is a picture of the 3900 V6 lower and upper intake manifold on the left and the 3400 upper maifold on the right, as you can see the port size is considerably larger for the 3900, the upper intake ports are the same length as the 3400 ports however they differ in width and taper of the oval. I doubt any further intake work would increase performance on the 3900 except polishing the entire length. In order to use the narrow 3800 SC fuel injectors on the 3900 you would have to clearance the runner area near the injector port; those performing the 3500 intake upgrade to the 3400 use the narrow injectors with the 3400 fuel rail because the 3500 and 3900 rails are returnless and taller preventing its use with the earlier injectors.
The higher flowing short injectors for the newer engines can be acquired from the GM 8100 big block 30lb/hr @ 42.3 psi and some GM Marine engines and boosted cadillac motors 42 lb/hr @ ? psi. That's the set I would like to upgrade to when I can afford them. The stock 3900 injectors are 27.8 lb/hr and the non VVT 3500 injectors ~24 lb/hr.
I'm hoping the flow capability of the 3900 will result in a more pronounced power increase under boost. I'll be sure to get better video next time however crappy the current example is you have to thank me for not making it worse by adding back ground music to further magnify amateur video skills.
[This message has been edited by Joseph Upson (edited 11-03-2007).]
Back at it. The surprise problems that kept me from test driving previously have hopefully been resolved:
Two oil leaks. High oil pressure at the turbos addressed with a central restrictor. Air filters and blow-off valve filter installed. Brakes bled.
I'll clean up the wires in the engine bay later and may even take another harness and start all over in the car. The gauges will be added after the test drive; EGT, Oil temp, Fuel pressure, A/F, and boost.
The stock oil pressure gauge is a little erratic and doesn't show a pressure much higher than about the mid point but the rebuilt turbo was smoking a little and after a few high revs the brand new turbo started to smoke suggesting that the oil pressure is much higher than the gauge is registering considering the oil feed is divided between two turbos and on previous setups the single turbo didn't have a problem without the use of a restrictor. My oil return hoses are 5/8" which should be plenty. Hopefully the restrictor will fix the problem. I'm not sure what the stock pressure is for the engine but I would think it's relatively high given the increased size of the oil pump needing to provide enough pressure to maintain six additional leak points due to the squirters and the hydraulicly operated variable camshaft.
it might be just the camera angle but your turbo looks to have a tilt to it .if the return line is doing anything but point straight down , you will get oil past your seals . are you waiting till you drive it till you hook up the vacuum feed to the BOV ?that looks like the bosche unit i am using and it wont work without the vac line . i am very impressed by your work , especially since you seem to do a lot of it outside .
Sounds good - other than that really annoying popping sound from the camera.
I'm thinking at stock 3900 6-speed swap would be a seriously sweet upgrade for a daily driver Fiero who wants more power, but isn't looking to build a strip terror.
it might be just the camera angle but your turbo looks to have a tilt to it .if the return line is doing anything but point straight down , you will get oil past your seals . are you waiting till you drive it till you hook up the vacuum feed to the BOV ?that looks like the bosche unit i am using and it wont work without the vac line . i am very impressed by your work , especially since you seem to do a lot of it outside .
The turbos are positioned properly, despite the moderate oil pressure gauge reading smoking turbos after revving especially with a brand new one is a strong indication that oil pressure is to high at the turbo since the oil drain is not plugged and the return hose is 5/8" which is plenty. That blow off valve is a Bosch unit and the hose curving over it is connected to it.
Last night while trying to iron out the power enrichment problem causing the engine to bogg down during rev attempts I didn't see any smoke from the turbo that continued to smoke after the restrictor was installed suggesting that enough oil may have leaked into the turbine area causing a prolonged burn off.
I'll have to check again during daylight. I certainly don't want to have to take a turbo off for a swap.
So far EGT is running at 650-750 degrees but that will increase when I actually drive it so I'll watch and hope that it stays below 1400 deg.
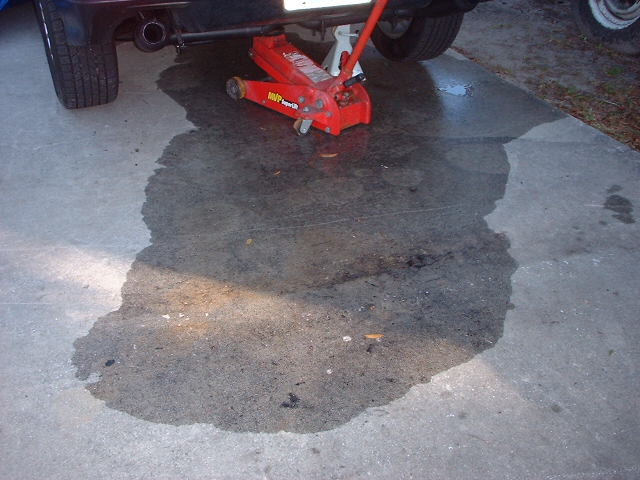
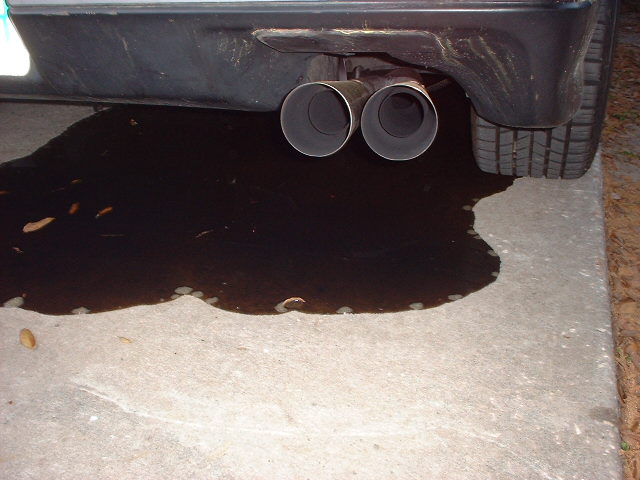
It's always something, I got up Monday morning and walked outside to find what you see in the picture on pavement. It's amazing how many clamps were tightened that eventually wound up needing to be retightened. About a gallon or so of coolant seaped out at the coolant inlet over night.
I did not accomplish the goal but I made tremendous progress that should result in a spirited test drive the next time I return home. For those of you unfortunate Moates emulator users like myself who have run into problems and not enough help getting the equipment to work properly, here is what I found after finally succeeding at getting the APU1 to connect to the ecm;
Since I could not get the TunerproRT program that was registered with the emulator to work with the Turbo Grand Prix code, I tried Datamaster which provided a DETAILED explination on how to insure your USB port is configured properly, after which I was able to connect to the ecm using it. During that time a sudden movement of the ALDL cable at the plug caused a disconnect of the ALDL stream revealing a poor connection at the ALDL plug although it was fully inserted, which was then corrected.
I then proceeded to do another driver install using a direct approach through Systems and Hardware under control panel as opposed to popping the disc into the computer again and discovered that the driver had not been updated as previously stated initially. Although I can't datalog and emulate at the same time yet as the instructions state I can do, I did acquire the needed link to the ecm which revealed that there is no varying input from the MAP sensor corrasponding with throttle changes. The value remains steady and that's why the car could not be driven because after the pump shot ran out the engine headed toward stall due to leaning out.
Previous to this discovery I had been able to connect to the ecm with the Beretta 3.1 code installed along with the 1 Bar MAP and the MAP input can be seen changing in unison with the TPS value. It took a while for me to slow down and recall that I had problems in the past with my 2 Bar MAP but never took the time to confirm that it was the culprit since no code had been set and I thought maybe I needed to make table adjustments to work with the 2 Bar in addition to tripping the switch in the chip.
It is also crucial to have more than one chip editing program, I had to use Tunerpro and Tunercat to track down all of the rev limiters. I also noticed a hiccup on one of the chip burns where a couple of values were more than four times greater than what they should have been in one of the PE tables.
I came very close to quitting on this thing because of the number of setbacks I encountered, they were disproportionate I felt and certainly unusual given how much thought and care I took along the way. Hopefully it pays off in the end. When it did rev properly it did so fiercely so I doubt the flywheel weight will be much of an issue. The next session I will have a video camera and will provide a good clean quality video of what I'm working with and what it can do.
so many questions for ya... ill save them for when your done with it all.....
DAMN GOOD JOB! keep it up. i know it sucks having set backs. im right there with ya, blown coolant hoses, no where to add coolant, slave cyl woes, fiberglass plenum vacuum leaks(who woulda guessed that was going to happen?), crazy map readings, alt wiring solutions, and so on
Someone asked me about the intake manifold underside some time ago, here is a picture of the 3900 V6 lower and upper intake manifold on the left and the 3400 upper maifold on the right, as you can see the port size is considerably larger for the 3900, the upper intake ports are the same length as the 3400 ports however they differ in width and taper of the oval. I doubt any further intake work would increase performance on the 3900 except polishing the entire length. In order to use the narrow 3800 SC fuel injectors on the 3900 you would have to clearance the runner area near the injector port; those performing the 3500 intake upgrade to the 3400 use the narrow injectors with the 3400 fuel rail because the 3500 and 3900 rails are returnless and taller preventing its use with the earlier injectors.
The higher flowing short injectors for the newer engines can be acquired from the GM 8100 big block 30lb/hr @ 42.3 psi and some GM Marine engines and boosted cadillac motors 42 lb/hr @ ? psi. That's the set I would like to upgrade to when I can afford them. The stock 3900 injectors are 27.8 lb/hr and the non VVT 3500 injectors ~24 lb/hr.
I'm hoping the flow capability of the 3900 will result in a more pronounced power increase under boost. I'll be sure to get better video next time however crappy the current example is you have to thank me for not making it worse by adding back ground music to further magnify amateur video skills.
The ports on the SFI manifold look small compared to the 3900. But the SFI ports dwarf the stock V6 2.8 intake ports. The 3900 ports look twice the size of the stock 2.8?
so many questions for ya... ill save them for when your done with it all.....
DAMN GOOD JOB! keep it up. i know it sucks having set backs. im right there with ya, blown coolant hoses, no where to add coolant, slave cyl woes, fiberglass plenum vacuum leaks(who woulda guessed that was going to happen?), crazy map readings, alt wiring solutions, and so on
I believe it will be worth the trouble in the end because of what little I was able to get out of it for an idea of what kind of potential it has. I wish I had the test drive attempt on video. The turbos spooling up in harmony was just plain awesome and to impressive to ignore, it was like two fine instruments playing the same note together, they were just as audible as the turbo in a big rig with the exhaust open. I'm going to add a balance pipe in an effort to try and get a better tone quality along with some special exhaust tips.
You can use the wiring scheme in this thread that was provided by AJ for the alternator, I thought mine would take some special tricks to use but I wired it just like the Fiero alternator and it works fine.
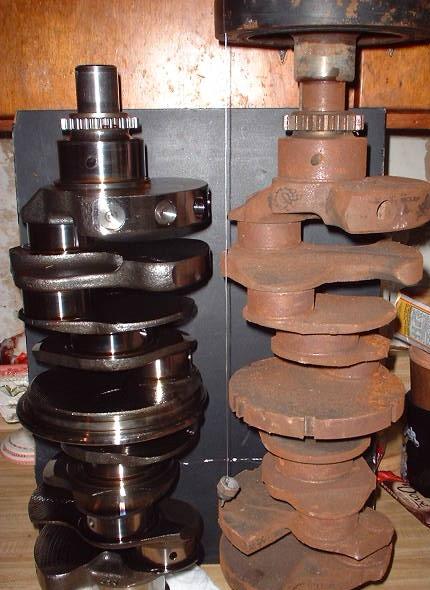
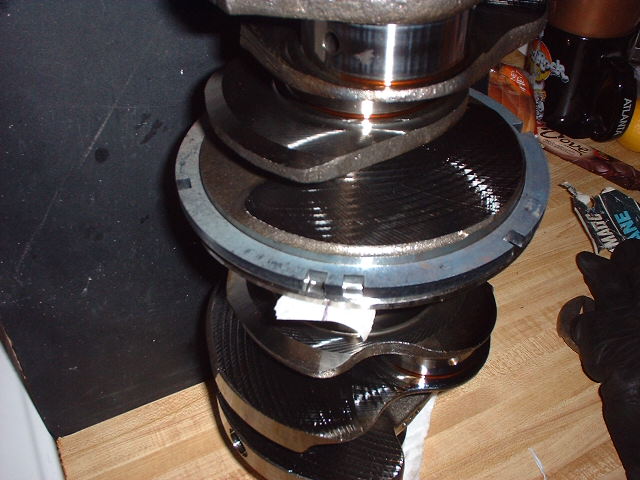
Finally got the 7x reluctor wheel installed so I can start putting the engine back together for mounting on the cradle and building the turbo plumbing. The steel crank is about 15 lbs heavier than the cast iron crank. I used the balancer from the fiero to help line up the 7x ring on the steel crank after removing the stock ring, by lining up a make shift plumb bob on a front wheel drive engine crank then installing the balancer on the steel crank, marking it for the notch location then heating and installing the ring which fits tight after it cools off. I still installed two set screws for added security.
Now I can button it back up.
I noticed you said the stock crank was iron, correct? I am assuming you added the steel crank for performance? do you have to do anything to the stock 3900 crank to put it in a fiero?
[This message has been edited by Madess (edited 12-28-2007).]
I concur on the sound of two turbos spooling, it's music for the soul. Now if I could only get to work on the car to fix that header gasket leak. *smack*
*whacked out on paint fumes from a moldy bathroom problem project*
------------------ '86 Fiero GT 3.4 - broke again '96 Talon TSi AWD - 11.9 @ 116, sorta broke again '90 Camaro IROC-Z twin-turbo - sorta broke again '95 Kawi GPZ1100 - 10 second daily driver, heh
I noticed you said the stock crank was iron, correct? I am assuming you added the steel crank for performance? do you have to do anything to the stock 3900 crank to put it in a fiero?
The stock crank for some of the 3500s and all of the lesser iron block 60 degree engines are iron to my knowledge, the newer VVT engines 3500-3900 have steel stock cranks.
It will be a few months before I can get back to the car, but I have a video camera now so I'll be able to post some respectable run time.
[This message has been edited by Joseph Upson (edited 01-06-2008).]
so If you get a motor that already has the steel crank, you don't have to fool with it, and just slap in the motor, or do you have to do anything to the crank.
so If you get a motor that already has the steel crank, you don't have to fool with it, and just slap in the motor, or do you have to do anything to the crank.
You don't have to do anything to the crank, however you will have to add an external crank trigger assembly which can be purchased from the 60 degree V6 forum store at a very reasonable price. I originally started with the 3500 and because experience with the newer engines was so little at the time, the first thing we needed to address was how to incorporate the earlier DIS ignition system requiring a 7x crankshaft signal to the sensor instead of the multi pulse signal produced by the 3500-3900 engines.
I took the internal route and someone else the external route both of which work. merlot and his 3500 swap is another perfect example of the newer engine install and actually the first fully functioning example of a Fiero with the latest design 60 degree GM engine that I'm aware of. It's practically the same as the earlier aluminum head engines except you'll need to replace the electric throttle body and develope a returnless fuel system which is easy. My approach to that is not as clean as what I have seen however it does give me the added advantage of an adjustable fuel pressure regulator.
For anyone wanting more power, having no concern for the OE engine look I see no reasonable support for continuing to install the iron head 3.4L given how well the ecm conversion to DIS ignition is documented and the level of support on the forum to help with the process. The aluminum head engines bone stock offer a tremendous upgrade pound for pound vs. the 3.4L and naturally aspirated 3800 without a serious expense in adaptation parts. I think merlots video clip of his 3500 test run is very telling about the capabilities of the newer motors.
Hopefully I'll be able to get my heap to behave for a dyno run in the next few months to drive the final nail soundly into and through the coffin and heart of iron head motors.
Do you have or can share with us who are considering this swap any information and pictures of the axles you uses, modifications to outer CV and any problems encountered. I understand that a lot of research goes into such a transmission swap and some of this info seems classified buy others but any info would be appreciated. Thanks.
Do you have or can share with us who are considering this swap any information and pictures of the axles you uses, modifications to outer CV and any problems encountered. I understand that a lot of research goes into such a transmission swap and some of this info seems classified buy others but any info would be appreciated. Thanks.
Joe, I'm familiar with your set up using the SAAB intermediate shaft and the custom axles. I just wanted to know if some one tried some thing different with G6 axles. Buy the way I was wondering about using a 3800 NA flywheel from 2000 Camaro or Firebird since they are pretty thick. If they aren't thick enough then a custom made spacer for the back of flywheel to the crank mounting surface would be needed to achieve the 1.62" thick of G6 flywheel. Also needed is longer flywheel bolts and ring gear or starter relocation may be necessary. What you think about this flywheel mod?
Joe, I'm familiar with your set up using the SAAB intermediate shaft and the custom axles. I just wanted to know if some one tried some thing different with G6 axles. Buy the way I was wondering about using a 3800 NA flywheel from 2000 Camaro or Firebird since they are pretty thick. If they aren't thick enough then a custom made spacer for the back of flywheel to the crank mounting surface would be needed to achieve the 1.62" thick of G6 flywheel. Also needed is longer flywheel bolts and ring gear or starter relocation may be necessary. What you think about this flywheel mod?
You really need to get in touch with the member doing the 3800 6spd swap, I would rather not get to involved with the tranny issues here with so many engine related milestones left to accomplish. The RWD flywheel was mentioned however I do not recall all of the details. Any other questions regarding the F40 you think I might be able to help with PM me. Once I started the engine swap the transmission info was set aside for more focus on what hadn't been done before involving the engine.
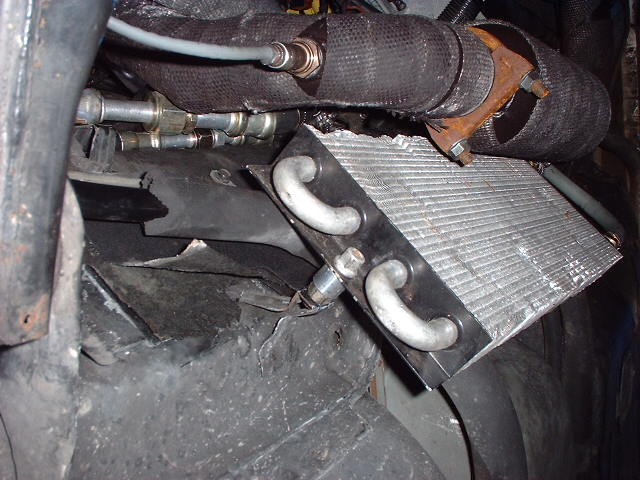
I'm finally closing in on the next start attempt. So far the exhaust has been rerouted to the lower front of the cradle instead of over the tranny for the forward turbo and the glasspacks reversed so that the louvers face the direction of flow this time. The forward turbo has been rebuilt however it still has more play than it should but hopefully not so much that it can't be used until I get a center section with better bearing bores. I relocated the oil filter to a better location and found a spot for the 400 hp rated oil cooler, hope I need it. All that's left is redoing the intake plumbing, installing the new 2 Bar MAP sensor and tuning. I'll post video if everything goes well enough. There's actually desent space between the cooler and the muffler and the heat wrap should add further protection.
[This message has been edited by Joseph Upson (edited 03-15-2008).]
I think you'll probably find that location too close to the exhaust. It might be ok, since it is in front of the exhaust, and while the car is moving it should get decent airflow, but when you're in traffic (and I know Tampa has plenty) with the cooler above the exhaust, you may wind up heating the oil, rather than cooling it. Unfortunately with something that size you have a limited number of locations you can physically put it.
If that location doesn't work, would it fit behind the lower quarter panel? You could get a quarter panel scoop, duct the opening to the cooler, then allow the discharge to vent through the engine compartment.
I'm pretty confident it'll work fine, it's not as close as it appears in the picture and the heat wrap is pretty effective. There is also a sandwhich cooler as part of the OE filter mount that has coolant circulating through it and to insure its performing properly I have an oil temp gauge so as long as temps are less than 220 I'll know it's working since previous experience revealed that temps with a turbo get as high as 240..
I had a selector cable get damaged by the heat so that thwarted another test drive attempt. I figured out the 5 spd Getrag selector cable is longer than the 4 spd selector cable and is better for the 6 spd. The damaged cable is from Advance autoparts and is narrow with no heat insulation which had more to do with why it was damaged since it really didn't touch anything unusually hot.
In the video the idle dropped so low near the beginning that you can hear either the gears in the 6spd transmission or the dual mass flywheel itself oscillating and making the clacking noise that can be heard over the exhaust. I did get a little test driving in a few days ago and 6th gear really pulled the rpms down, hope the mileage is as good as it should be.
I used a fairly inexpensive mini DV camera as can be seen by my 3 mo/old nephews cameo on a tape I tried to tape over.
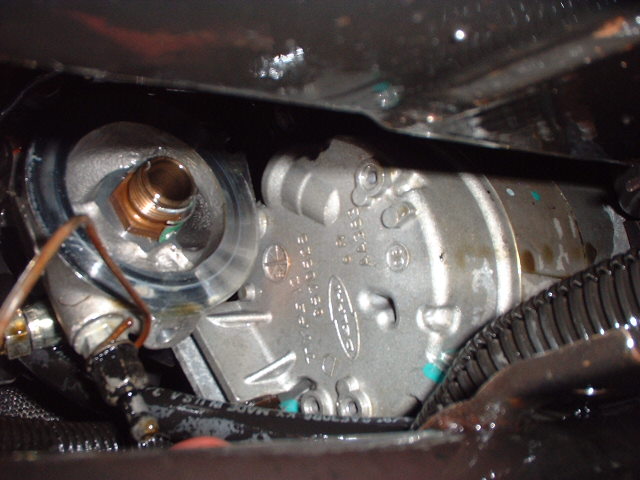
Two days ago I had a near disaster, GM used an odd thread pattern on the oil filter nipple and I used a strip of aluminum can to help tighten the bypass adaptor on it. The 3.9 VVT motor has an apparently high volume and pressure oil pump to compensate for pressure drop across the oil squirters and hydraulic cam phaser and one good 6k plus rev in the drive way blew the adaptor off the mount and pumped a few quarts of oil on the drive way and doused the forward glasspack, it's a blessing it didn't flash over and even more of a blessing it happened in the driveway instead of the highway where temps would have been high enough for it to do just that.
I knew better than to rig that adaptor filter and I also knew my inboard turbo had excessive play after I rebuilt it and I ignored both instances and paid a heavy price, about two days fixing it and $40. The 20/50 oil didn't help pressure wise, my intermittent sending unit is pegged out as far right as it can go indicatting the oil pressure must be pretty high for this engine.
[This message has been edited by Joseph Upson (edited 03-19-2008).]
You're definitely lucky that cable got melted. That would have royally sucked going down the road. Make sure you douse that wrap with plenty of brake parts cleaner and let it dry real well before you go for a spin. I'd hate to hear about the car going up in flames.
You may want to check that the oil pressure sender is working correctly, when the sender circuit goes "open" the gauge will peg all the way right. The sender is a 0 ohm @ 0 psi, 90 ohm @ 80 (I think) psi. If the needle moves past the end of the markings, the circuit is probably open.
Good luck.
Are you kidding, I've taken one to many chances already, I took the contaminated wrap off. The oil pressure sender is bad no ifs ands or butts about it, I just went out and heard my fuel pump running, unplugged the oil sending switch and the pump shut off. It was a used bad part that I tried in place of the previous sensor that fluctuates.
why are you using such heavy oil ?i bet GM recomends 5/30 .my honda uses 5/20 .most modern motors are not designed for such heavy oils as 20/50 .the turbo doesnt need it either .looks like you are getting close to fully functional ,keep at it .
why are you using such heavy oil ?i bet GM recomends 5/30 .my honda uses 5/20 .most modern motors are not designed for such heavy oils as 20/50 .the turbo doesnt need it either .looks like you are getting close to fully functional ,keep at it .
The heavy oil was used to help confirm an oil pressure sensor/gauge problem as opposed to an engine problem after the initial pan of 5/30 posted fading oil pressure and appeared to be a bit thinner and dirty than normal with possible fuel contamination and resent literature that I read did not discourage 20/50 use. It's temporary.
A follow up to what happened at the end of my last trip home to finish the install. There was some debate on the Z24 forum (another 60 degree related site) regarding tuning the TGP code to different engines and injector sizes. The debate was regarding reducing the base pulse constant (BPC) until the engine idled smoothly vs. not reducing it at all and adjusting other tables. My test drive experience which I haven't posted video of because my tag is visible yielded the following;
BPC adjusted based on displacement and injector flow, vs. BPC reduced until idle improved maximally, indicated on test drive that adjusting according to idle quality is a bad idea. The engine leaned out and back fired with the idle oriented BPC and ran better with the calculated BPC although I believe the engine was still lean (didn't have gauge connected), it did not backfire with the calculated BPC. The idle oriented adjustment value was about 46, the calculated vlaue is 69 and stock 8F code value is 105. The boost gauge registered 3psi but It didn't feel like it suggesting it was too lean.
I believe the best approach will be to go with the calculated value and proceed to the idle VE and other related VE tables to iron out idle quality. I will also upgrade to TunercatRT for realtime tuning since I suspect potential bugs in TunerproRT in addition to the rev limit adjustment which functions in reverse, that might be contributing to tuning problems. The Zeitroix WBO2 was an excellent investment because I could see the change in my AFR on the graph at idle as I was adjusting BPC.
Since my camshaft has been reground for high end and the stock cam performance has a peak HP output at 6000 rpm my mid range to high rpm is probably very lean since the stock code was written for a less efficient engine with a peak HP output a few 100 rpm lower. I did not have the time to datalog while driving the car since my Laptop battery is dead and my inverter is over engineered to shut off (which it does frequently) if it doesn't see the input voltage it wants through the little 22 yo cig lighter wires. A direct link to the battery should take care of that when I return home.
A more positive note for performance upgrades is a very likely production Forged piston option. The LS1 and 3900 share the same cylinder bore, are within .003" piston pin diameter, have floating pistons and piston compression heights close enough to keep compression near the 9:1 range using the LS1 piston that is paired with the 6.098" rod. It has been discovered that GM advertises 5.9" rods in the 3900 however a machine shop doing work for another member measured ~5.84" which produced a compression height of 1.305" when I calculated it for the 3900 which has a 9.8:1 compression ratio. The LS1 piston option I measured came out to 1.332" lowering compression and it can be changed based on the piston option.
So it would take a slight wrist pin bushing hone to accept the .945 pin, bushings have to be honed for proper pin fit anyway according to a machinist, and then valve reliefs would need to be cut. I priced a set of 8 forged mahle pistons complete with rings and pins a couple of weeks ago for about $460 from Jegs, the pistons are also lighter than the stock 3900 pistons. I would expect to pay more than twice that amount for the same in a custom set for the 3900. The ability to purchase parts off the shelf is a must.
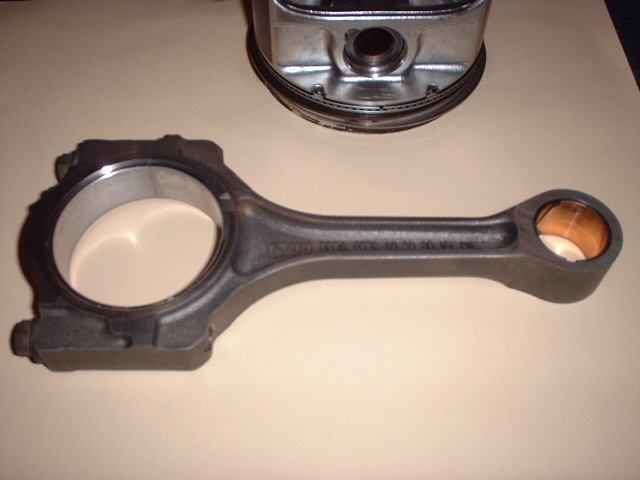
Stock 3900 rod
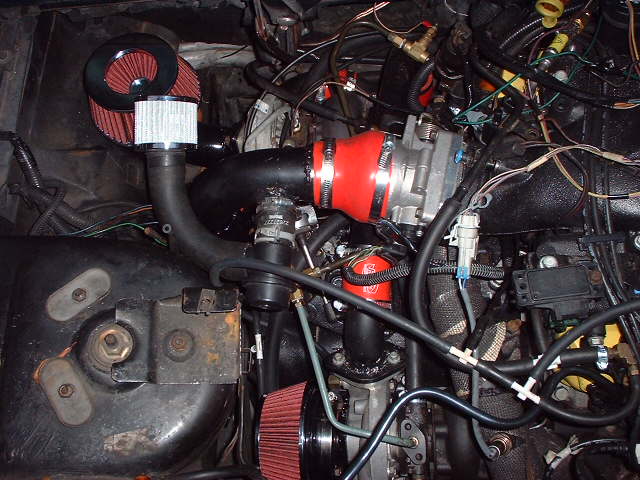
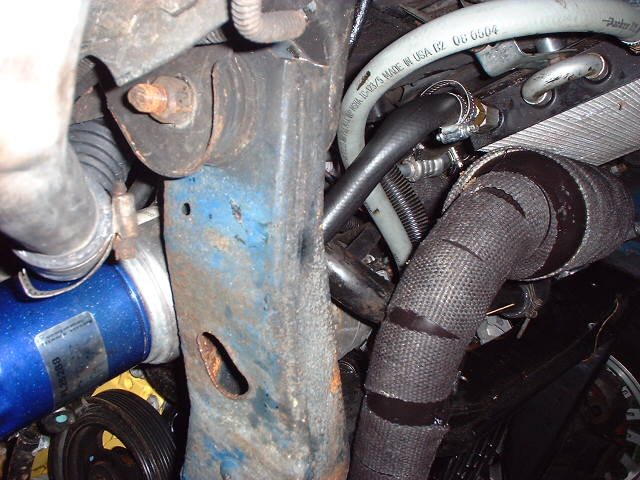
I removed the excess plumbing associated with the cancelled intercooler that was replaced with water injection. I'll have to do something about the "snakes" in the bay also.
I added a 5 volt regulator for the alternator but have heard the 12 volt feed should be fine, I don't have the information to confirm either for the 07 Uplander alternator since I didn't see a significant change in voltage reading with either. I also added a large heat sink to the regulator which gets very hot.
Hoping to make another trip home this month to try and get it finished and dynoed
[This message has been edited by Joseph Upson (edited 04-08-2008).]
Thanks, unfortunately the 5v regulator follows the previous 12v feed that I understand from someone elses charging system thread has likely destroyed my regulator explaining quite convincingly why I consistently see 13.1v or less as the engine runs. I tell you its been a hard road with this swap, first crank sensor problems, then MAP sensor trouble, turbo and oil bypass adaptor hassle and now the "joy" of learning my near brand new 125 amp alternator is a paper weight. I'm sure it contributed heavily to tuning difficulties with the inconsistant voltage output.
I am very grateful however that my troubles have taken place in the driveway though, Amen to that.
I did a search and found that replacements will not take a bite out of my wallet and that the 3900 comes with two pulley options; 58 and 60 mm so I'll opt for the 60 in the event I don't already have it since I intend to rev as high as 6500 rpm or more if the camshaft grind justifies it.
[This message has been edited by Joseph Upson (edited 04-08-2008).]
what happened to the alt? the regulator killed it? how? why? damn i hope thats not my fault!
mine seems to be working great..... if i disconnect the regulator the voltage drops, reconnect and it spikes back up
low voltage changes the baud rate too...found that out today. and a bad injector driver ground makes things interesting too.
with higher than normal voltage the car runs rich, bogs and is a pos....with low voltage it goes lean and things just arent right. its the ahppy medium were after that seems so hard to get. side note...i thought my wiring looked hectic....wow man i dont know what id do in your position...soo many vacuum lines and wiring....makes my head spin
got any pics of your rear motor mount? ive got two on the front, one to the cradle and one to the trunk and still have some movement...i need the back of the engine secured, but i dont want to put a mount from the rear of the engine to the body/firewall....i dont see space for one to the cradle...
It wasn't you as far as the alternator is concerned and as far as others that may have suggested it they were only trying to help. I was intending to warn you about it. It was the initial direct 12volt connection from the stock alts plug that did it. I actually got the 5 volt reference from you and the guys on the 60 degree forum. The wires in the engine bay really aren't that bad, the relay harness is laying over the intake and there is an injector being used to plug an intake hole that I might leave in that location as a 7th injector that has the plug and wires attached to it to prevent it from getting lost if it gets blown out and a few other wires I just haven't tucked away yet because I still need to finish their connection properly so they hang out as a reminder. The vacuum hoses feed two wastegates, my vacuum gauge, MAP sensor, fuel pressure reg and brake booster.
Back to the alternator, I'm pretty certain now that lack of charge was compounding the tune problem because it backfired on the last test drive and was sluggish. I have an extra alternator from my 3500 but I believe it's a few amps less on output, I'm hoping I can get a part to repair the bad one.
My engine and trans doesn't move or have an upper mount because it's solid mounted but I'm considering going to the GM poly rear wheel drive interlocking tranny mount in place of the solid mounts.
[This message has been edited by Joseph Upson (edited 04-08-2008).]