Hadn't mentioned this before, but perhaps it could be interesting to others. I wanted the map pockets to be removable, sometimes need them for practical reasons, other times prefer the clean look. To do this I put magnets under the carpet and on the backside of the map pocket. Here's a little video showing it in action:
[This message has been edited by liv4God (edited 10-20-2017).]
Ok, now THAT is a cool feature. If not for just being able to dump and clean them easily. Something I wish I had incorporated into my door panels before having them reupholstered.
I love ideas like this, as they are thinking outside the box, unique, and useful. Great job!
Finally did the HVAC/radio bezel! Decided to just make it myself using the original and some hobby plastic. Then covered it with the carbon fiber wrap to match the rest of the bezzels. It came out pretty well and I'm pleased with the result. Here's how it looked when finished:
And then once installed in the car:
[This message has been edited by liv4God (edited 10-27-2017).]
Ok, now THAT is a cool feature. If not for just being able to dump and clean them easily. Something I wish I had incorporated into my door panels before having them reupholstered.
I love ideas like this, as they are thinking outside the box, unique, and useful. Great job!
Thanks JohnWPB! If I remember correctly I saw you used the Fiero Store speaker door panels which looked like a great option as well
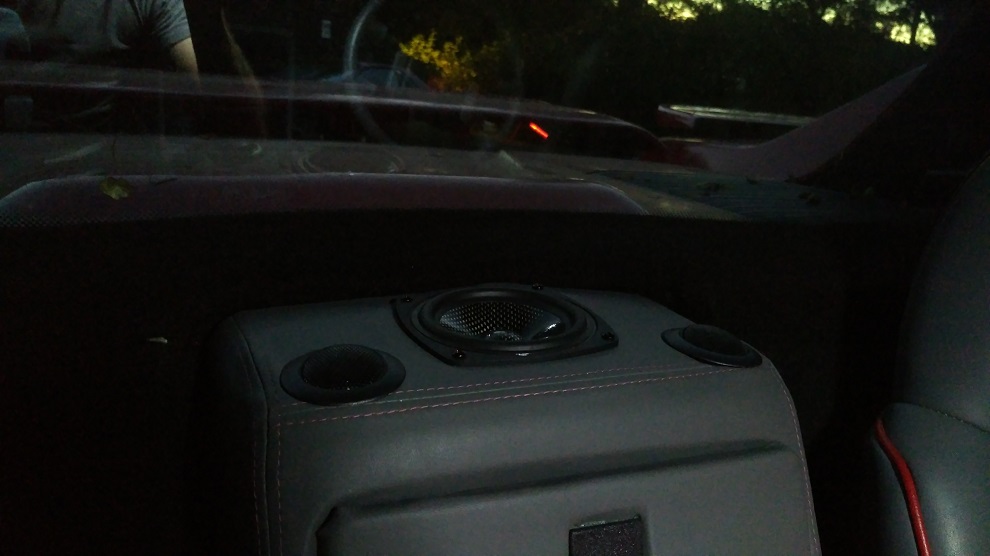
Got a nice carbon fiber domed mid woofer to go above the center glove box. Previously I had a 6.5" speaker, which was really too large for the real estate so I had made a litttle box atop the compartment. (See images on first post if this doesn't make sense.) This new speaker is a 4.5" and will fit perfectly even with a mini enclosure. Not to mention the carbon fiber will match the dash bezels!
The hole cut out for the speaker atop the glove box.
The new carbon fiber speaker
Built an enclosure out of PVC pipe
Finished mini enclosure stuffed with polyfill
Test fitting and mounting in the hole
Next to add cut out the holes for the tweeters and then the whole glove box console will need to be vinyl wrapped.
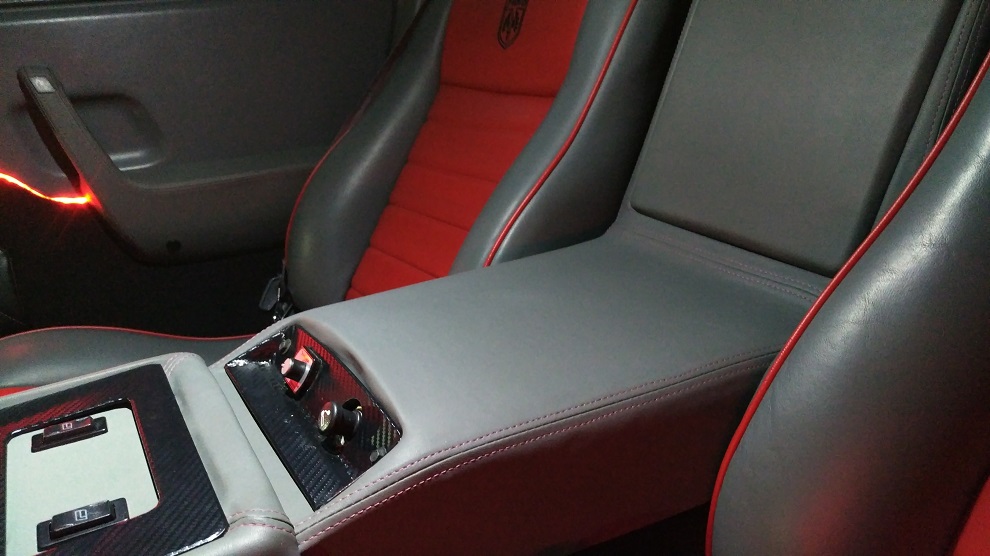
After a few months break on this car, I have done some more work. Vinyl sun visors, and center console/glove box thing. The vinyl did a good job with integrating the speakers. Also hooked up the LED strips to operate with the door. A little video showing the LEDs in action: LED Video
Some pictures:
[This message has been edited by liv4God (edited 10-20-2017).]
Hadn't mentioned this before, but perhaps it could be interesting to others. I wanted the ma pockets to be removable, sometimes need them for practical reasons, other times prefer the clean look. To do this I put magnets under the carpet and on the backside of the map pocket. Here's a little video showing it in action: https://youtu.be/gd8JI_qDwP4
Thanks hnthomps! It has worked out quite well so far
quote
on your double din stereo, where did you get the fiero logo and graphics? was it hard to download?
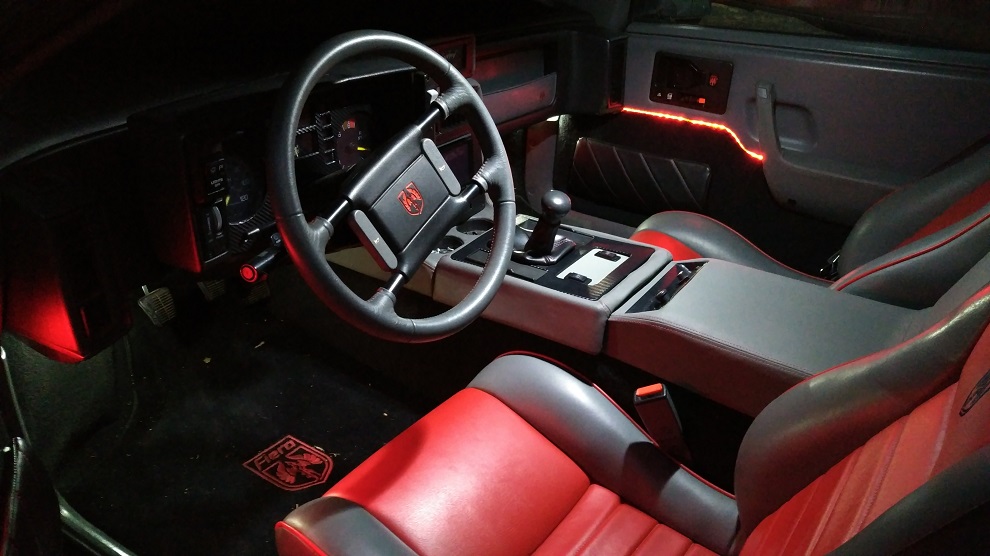
I found the logo online by searching "Fiero Logo" or "Fiero Pegasus" and then I got the Pontiac as well. I changed the colors and background in MS Paint and added the two images together. To put it on the Stereo I had it on a USB and then downloaded it onto the stereo. Pioneer has an option to use your own picture as the background, so I just had to select it from the usb.
I've made a few different ones and occasionally change them out. My latest one utilizes Trivet's design which I have on my nose badge. I overlaid it with some smoke for a cool look.
Could tou go into more detail in what leds you used in the doors and how tou tucked then so neatly into that tiny groove?
Sure, the LEDs I bought on ebay. Something like this if I remember correctly. I bought 1 meter lengths and cut to size. 1 on each door and 1 under the dash on both sides, so 4 total. The door has an upside down shelf just wide enough for the LEDs to set on where it transitions from the vinyl to the carpet. I pulled back the stock carpet a bit and cut it slightly to reveal the shelf better because the carpet goes right up to it and then takes some of the space needed for the LEDs. I used super glue to hold the LEDs in place because the sticky back that comes on the LEDs loses its strength after a short time. I had the LEDs before redoing the interior. While redoing the interior I changed the door carpet and also widened the door panel about 1/4 inch to accommodate a window motor that makes crank handles use motor instead. Putting that additional width and the new carpet which was more fluffy really made the LEDs tucked in nicely. Before they were ok, but stuck out a little at the end.
I bought this controller unit from Parts Express where I can choose different colors, patterns etc. I leave it on red usually since it matches my car, but there are plenty of customization options.
Sweet! I actually have 50+ feet of led strip in bulk rolls just like that. I just cant screw my eyes out that far for the pics to be clear lol. Im having a really hard time with this arduino deal. Im starting to think our old puter its just that... old. The andriod app isnt helping either... Im not smart in that way to figure this out. I may have to get someone program it for me. When i tested it out like you said the pattern was all messed up and blinked the sequence non stop. Btw stay AWAY from chinese copies. That may be the real issue here.
Finally got the original code on the arduino. How do you add the tap turn support in there? Can i just paste it before the original and reload the whole thing or do i add it at the end and reload?
Sweet! I actually have 50+ feet of led strip in bulk rolls just like that. I just cant screw my eyes out that far for the pics to be clear lol. Im having a really hard time with this arduino deal. Im starting to think our old puter its just that... old. The andriod app isnt helping either... Im not smart in that way to figure this out. I may have to get someone program it for me. When i tested it out like you said the pattern was all messed up and blinked the sequence non stop. Btw stay AWAY from chinese copies. That may be the real issue here.
jaredmurray88, I think the problem is my fault! After adding the tap support there was a bug where it would flash continually. I fixed it, but forgot to upload the fix on GitHub. I just put the fix up. That may very well be the problem you were having! If you get the code that's on GitHub now it should work and will have the tap control built in!
Just got home and uploaded the new code to the arduino and it works! The tap to pass is sweet, I can't wait to see it all hooked up! What did you do to mount and protect the arduino? It looks pretty delicate to just mount as is. I've seen cases to put it in on fleabay as well as the relays but they look kinda clunky and not too durable themselves being acrylic and all the open ports for wires.. I guess you could just glue the gaps shut with hot glue but that does solve the clunky part haha.
Just got home and uploaded the new code to the arduino and it works! The tap to pass is sweet, I can't wait to see it all hooked up! What did you do to mount and protect the arduino? It looks pretty delicate to just mount as is. I've seen cases to put it in on fleabay as well as the relays but they look kinda clunky and not too durable themselves being acrylic and all the open ports for wires.. I guess you could just glue the gaps shut with hot glue but that does solve the clunky part haha.
Glad to hear it's working now! I made a mounting plate out of a sheet of metal, cut to about 4"x5" Then test fitted all the components, Arduino, relays, fuse, mode switch, etc and marked where to drill mounting holes. I drilled out the holes and put rubber grommets in between the metal plate and the electronics to avoid shorting. I made a top the same size and put it together. There are no walls so I don't have to worry about cooling. I mounted it in the back trunk along the rear wall under the carpet so there's nothing pushing against the sides anyway. As long as its firmly mounted and things aren't bumping it, the Arduino works well. My box came out to about 1"*4"*5". It's not small, but not huge either. Fits nicely in the trunk and no one would ever know it's there. The acrylic cases would probably work fine, as long as you have something to protect it. I'll see if I can find some pictures to post
[This message has been edited by liv4God (edited 10-16-2017).]
I know it was a while ago you did it, but how did you do the headlining ?
I am about to do that on my fiero, and was planning to clean the old roof and then use contact glue (or maybe spray contact glue) to mount grey foam backed fabric, did you do it like that ? did you take any pictures ?
I've made a few different ones and occasionally change them out. My latest one utilizes Trivet's design which I have on my nose badge. I overlaid it with some smoke for a cool look.
Wow! I love it. I have the same (or very similar) Pioneer stereo, and I am thinking of adding a double DIN to my 87. Thanks for posting the image, I will be using it now
I'm interested in recovering my seats. May I ask your cost? I've had the headliner, visors, carpets and door panels recovered. Seats would be next but I'd like some figure to haggle the installer with. I am going entirerly stock with this rebuild (1988 Formula, 48,000+ miles...........Wriggley
Repulsiv, You are right on how to do the headliner. I would recommend spray glue. 3M has a headliner glue that works pretty well, I used it once and it was foregiving when working with it, but I was not happy with its lifespan overall. (Started to come down again after a few years) Since then I have used Permatex body shop, which tacks up very quickly, so not really any room for mistakes when working with it, but the end result is great and lasts much longer. I used it for the several headliners now and door panel carpet as well. It can be purchased from any auto parts store like Autozone. Orange can with dark blue cap. 1 can will suffice for a headliner. I didn't get any pictures at that time, I tend to forget to take pictures while working and then remember once I finished. However, I have another Fiero which I am planning to do the headliner on this weekend. I will do my best to get pictures or video.
Trivet, Thanks! And thanks for your cool nose badges!
Wriggley, Sounds like your interior is coming along well and real snazzy! I'd love to see some pictures. Mine is a Formula too For the seats, I got the upholstery done by Mr. Mikes Upholstery. He specializes in Fiero seats, his quality is first rate and fit is perfect. He also has many customization options. For those reasons I chose his work, but the price is accordingly to those perks. The pair cost $499 plus shipping, so probably like 540ish. I would think a stock reupholstery by a local shop would be less, but I can't give a definite price.