Pennock's Fiero Forum
  General Fiero Chat
  New Project, 3800SC Formula Build (Page 2)

Post New Topic  Post A Reply
Email This Page to Someone! | Printable Version

This topic is 2 pages long:  1   2 
Previous Page | Next Page
next newest topic | next oldest topic
New Project, 3800SC Formula Build by hinesb1890
Started on: 03-24-2013 07:21 PM
Replies: 73 (2954 views)
Last post by: hinesb1890 on 01-27-2014 11:26 PM
hinesb1890
Member
Posts: 684
From: Cranston, RI, USA
Registered: Jan 2009


Feedback score:    (15)
Leave feedback

Rate this member

Report this Post06-17-2013 08:57 PM Click Here to See the Profile for hinesb1890Click Here to visit hinesb1890's HomePageSend a Private Message to hinesb1890Edit/Delete MessageReply w/QuoteDirect Link to This Post
I was checking out my new mounts today and it looks like the holes don't quite line up


Any thoughts? Should I just drill out one of the holes into an oval like on the stock mount? And does it matter which one I do? I also noticed that the holes are not aligned parallel to the edge, I don't know if it is meant to be that way but the stock ones are straight.
IP: Logged
hinesb1890
Member
Posts: 684
From: Cranston, RI, USA
Registered: Jan 2009


Feedback score:    (15)
Leave feedback

Rate this member

Report this Post06-26-2013 09:51 PM Click Here to See the Profile for hinesb1890Click Here to visit hinesb1890's HomePageSend a Private Message to hinesb1890Edit/Delete MessageReply w/QuoteDirect Link to This Post
Quick update, installed my new Rodney floating cradle nuts today. Still waiting on the block and in the meantime I have been working on rebuilding and cleaning up the heads

IP: Logged
hinesb1890
Member
Posts: 684
From: Cranston, RI, USA
Registered: Jan 2009


Feedback score:    (15)
Leave feedback

Rate this member

Report this Post06-30-2013 06:15 PM Click Here to See the Profile for hinesb1890Click Here to visit hinesb1890's HomePageSend a Private Message to hinesb1890Edit/Delete MessageReply w/QuoteDirect Link to This Post
Well I had high hopes for Saturday and it turned out to be pretty crappy. I FINALLY got my block back from the shop so I was excited to start getting things back together.


Here's a look at the sleeve


First thing I did was to get the block on its stand and after a quick look over I started the rebuilding process. I wish I would have looked a little harder though because it wasn't until after I installed the cam and lifters that I noticed there were small holes in the NEW sleeve


There is a third one farther down the cylinder. So now I get to take my block back to the shop and complain because not only has it been twice the time they told me it would take, the sleeve is damaged. Now I am another week behind and I wasted a half a day for nothing. I took the rest of the day to put my heads back together with new seals and freshly lapped valves and give them a second coast of paint.


Tomorrow morning I will be back at the machine shop so hopefully turnaround will be quick (it better be!) In other news I sent my clutch disc back to Spec where they are going to fix the hub for me so hopefully that will fix the shifting issues.

IP: Logged
hercimer01
Member
Posts: 2289
From: Rockford IL.
Registered: Mar 2008


Feedback score:    (9)
Leave feedback

Rate this member

Report this Post07-02-2013 01:03 AM Click Here to See the Profile for hercimer01Send a Private Message to hercimer01Edit/Delete MessageReply w/QuoteDirect Link to This Post
 
quote
Originally posted by hinesb1890:

I was checking out my new mounts today and it looks like the holes don't quite line up


Any thoughts? Should I just drill out one of the holes into an oval like on the stock mount? And does it matter which one I do? I also noticed that the holes are not aligned parallel to the edge, I don't know if it is meant to be that way but the stock ones are straight.


Are those FieroX mounts?
Mine lined up pretty good except for the rear one. I had to modify the holes for that.
I would just blow out the holes, were not making super huge horse power.

------------------

Project Genisis Lo Budget 3800SC swap

88 Coupe under construction

IP: Logged
hinesb1890
Member
Posts: 684
From: Cranston, RI, USA
Registered: Jan 2009


Feedback score:    (15)
Leave feedback

Rate this member

Report this Post07-02-2013 03:54 PM Click Here to See the Profile for hinesb1890Click Here to visit hinesb1890's HomePageSend a Private Message to hinesb1890Edit/Delete MessageReply w/QuoteDirect Link to This Post
The bracket is from fieroflyer and the poly mount is from Rodney, I will just need to sort it out and modify accordingly when it comes time to mount it. I wasn't sure how much expanding the holes would affect rigidity
IP: Logged
hinesb1890
Member
Posts: 684
From: Cranston, RI, USA
Registered: Jan 2009


Feedback score:    (15)
Leave feedback

Rate this member

Report this Post07-15-2013 12:53 AM Click Here to See the Profile for hinesb1890Click Here to visit hinesb1890's HomePageSend a Private Message to hinesb1890Edit/Delete MessageReply w/QuoteDirect Link to This Post
Here are some updates from the weekend, I finally got my block back (again) and this time it looks good so I started putting things back together. First here is a goody that came in the mail


Spec sent me a new clutch disc to replace my old one which had a backwards center hub, all I had to do ship mine back

Here my crank is about to go in on some fresh bearings


Pretty cylinders!


Pistons installed and here is where she sits!


Next will come a fresh coat of paint and I need to locate some new connecting rod bolts to replace the old tty ones
IP: Logged
hinesb1890
Member
Posts: 684
From: Cranston, RI, USA
Registered: Jan 2009


Feedback score:    (15)
Leave feedback

Rate this member

Report this Post07-17-2013 07:56 PM Click Here to See the Profile for hinesb1890Click Here to visit hinesb1890's HomePageSend a Private Message to hinesb1890Edit/Delete MessageReply w/QuoteDirect Link to This Post
More updates from today... first I got my new set of connecting rod cap bolts on, then I was able to paint the block


While that was drying I worked on painting my fuel rail and injectors with a satin black


Then with the block dry enough I was able to get the timing cover and water pump on


Sorry about the overexposed picture, I keep forgetting my camera and have been using my phone, I will get some nicer pictures up later... Otherwise things are moving along nicely and it is great to finally see things going together!
IP: Logged
hinesb1890
Member
Posts: 684
From: Cranston, RI, USA
Registered: Jan 2009


Feedback score:    (15)
Leave feedback

Rate this member

Report this Post07-27-2013 10:52 PM Click Here to See the Profile for hinesb1890Click Here to visit hinesb1890's HomePageSend a Private Message to hinesb1890Edit/Delete MessageReply w/QuoteDirect Link to This Post
Here are some updates from today, it's actually starting to look like an engine again!


And here is how it looked at the end of the day!


Im still working on painting the valve covers and deciding how they are going to look, I need to order some new rocker arm bolts and a few more things and then it'll be complete.. more to come!
IP: Logged
Tweeder
Member
Posts: 1026
From: Kitimat, BC, Canada
Registered: Aug 2012


Feedback score: N/A
Leave feedback

Rate this member

Report this Post07-28-2013 12:56 AM Click Here to See the Profile for TweederSend a Private Message to TweederEdit/Delete MessageReply w/QuoteDirect Link to This Post
Nice but how in the hell were you able to keep it white during assembly as well as in the future?

------------------
86 SE Convertible 3800sc 4t65e HD.

IP: Logged
TheKingOfBattle
Member
Posts: 47
From: Holly Ridge, NC
Registered: Mar 2012


Feedback score: (1)
Leave feedback

Rate this member

Report this Post07-28-2013 04:13 AM Click Here to See the Profile for TheKingOfBattleSend a Private Message to TheKingOfBattleEdit/Delete MessageReply w/QuoteDirect Link to This Post
 
quote
Originally posted by Tweeder:

Nice but how in the hell were you able to keep it white during assembly as well as in the future?


I was thinking the same thing, but I like it. Sweet build.
IP: Logged
hinesb1890
Member
Posts: 684
From: Cranston, RI, USA
Registered: Jan 2009


Feedback score:    (15)
Leave feedback

Rate this member

Report this Post07-28-2013 12:32 PM Click Here to See the Profile for hinesb1890Click Here to visit hinesb1890's HomePageSend a Private Message to hinesb1890Edit/Delete MessageReply w/QuoteDirect Link to This Post
 
quote
Originally posted by Tweeder:

Nice but how in the hell were you able to keep it white during assembly as well as in the future?


During assembly wasn't hard because everything is cleaned already, we will see how it goes in the future but the engine enamel cleans really easily... I'm ok with taking a little risk
IP: Logged
PFF
System Bot
FieroMaster88
Member
Posts: 7680
From: Mattawan, MI
Registered: Nov 2000


Feedback score:    (43)
Leave feedback


Total ratings: 168
Rate this member

Report this Post07-28-2013 12:58 PM Click Here to See the Profile for FieroMaster88Send a Private Message to FieroMaster88Edit/Delete MessageReply w/QuoteDirect Link to This Post
 
quote
Originally posted by Tweeder:

Nice but how in the hell were you able to keep it white during assembly as well as in the future?


Same thought I had but it looks awesome!

------------------

88 Coupe: 2.0L Turbo 4 Cylinder, W2A, T25 Turbo.
84 Indy #64: Restoration Project, Super Duty 4 swap

IP: Logged
BV MotorSports
Member
Posts: 4821
From: Oak Hill, WV
Registered: May 2001


Feedback score:    (7)
Leave feedback


Total ratings: 189
Rate this member

Report this Post07-29-2013 12:49 AM Click Here to See the Profile for BV MotorSportsSend a Private Message to BV MotorSportsEdit/Delete MessageReply w/QuoteDirect Link to This Post
Love the storm trooper motif!
IP: Logged
ltlgt88
Member
Posts: 448
From: round lake, il
Registered: Aug 2010


Feedback score: N/A
Leave feedback

Rate this member

Report this Post08-25-2013 11:32 AM Click Here to See the Profile for ltlgt88Send a Private Message to ltlgt88Edit/Delete MessageReply w/QuoteDirect Link to This Post
The car going to be ready for power tour next year cuz?
IP: Logged
fieroguru
Member
Posts: 12128
From: Champaign, IL
Registered: Aug 2003


Feedback score:    (45)
Leave feedback


Total ratings: 258
Rate this member

Report this Post08-25-2013 12:09 PM Click Here to See the Profile for fieroguruSend a Private Message to fieroguruEdit/Delete MessageReply w/QuoteDirect Link to This Post
Looks good, but there are several bare metal spots that will be visible and will start to rust almost immediately.

I normally try to bring the paint under the gasket surface by 1/16" so there are no exposed bare metal spots.
IP: Logged
hinesb1890
Member
Posts: 684
From: Cranston, RI, USA
Registered: Jan 2009


Feedback score:    (15)
Leave feedback

Rate this member

Report this Post08-27-2013 12:21 AM Click Here to See the Profile for hinesb1890Click Here to visit hinesb1890's HomePageSend a Private Message to hinesb1890Edit/Delete MessageReply w/QuoteDirect Link to This Post
 
quote
Originally posted by fieroguru:

Looks good, but there are several bare metal spots that will be visible and will start to rust almost immediately.

I normally try to bring the paint under the gasket surface by 1/16" so there are no exposed bare metal spots.


I was hesitant to over-paint things when I had the engine all apart but if I did it again I would definitely do this, I may touch it up since I still have extra paint left over
IP: Logged
hinesb1890
Member
Posts: 684
From: Cranston, RI, USA
Registered: Jan 2009


Feedback score:    (15)
Leave feedback

Rate this member

Report this Post08-27-2013 12:32 AM Click Here to See the Profile for hinesb1890Click Here to visit hinesb1890's HomePageSend a Private Message to hinesb1890Edit/Delete MessageReply w/QuoteDirect Link to This Post

hinesb1890

684 posts
Member since Jan 2009
It has been a little while but I have some more updates, I had to take a break to finish the school semester and then I was on vacation for a little but now I am back! I am trying to move things along and I finally have the engine and transmission back on the cradle...


A little bit of a shaky set up trying to move the cradle off the hoist but it all worked out fine


I took a break from the engine to work on some changed to my car that need to get done before I put the engine back in... larger break booster set up and rodney master clutch cylinder, both taken from the donor car. I still need to install my SS brake lines and hoses and switch the fuel pump over.


That's all for now!
IP: Logged
hinesb1890
Member
Posts: 684
From: Cranston, RI, USA
Registered: Jan 2009


Feedback score:    (15)
Leave feedback

Rate this member

Report this Post08-28-2013 08:04 PM Click Here to See the Profile for hinesb1890Click Here to visit hinesb1890's HomePageSend a Private Message to hinesb1890Edit/Delete MessageReply w/QuoteDirect Link to This Post
I was able to get a little more done today, I got my engine and transmission positioned and torqued on the cradle and worked more on my car to get it ready for the engine. I removed the old cruise control and installed new SS brake lines and hoses in the back and also installed a SS clutch line.


I still have to switch the fuel pump over, remove the torsion bars, and add a few things to the engine and it should be ready to start reinstalling
IP: Logged
sco77
Member
Posts: 711
From: MD
Registered: Nov 2011


Feedback score: (1)
Leave feedback

Rate this member

Report this Post08-28-2013 09:03 PM Click Here to See the Profile for sco77Send a Private Message to sco77Edit/Delete MessageReply w/QuoteDirect Link to This Post
Awesome build, I love it. But not to scare you or anything but have you done a lot of research about rebuilding these engines? These bottom ends seem to have a small success rate for lasting when rebuilt.

------------------
86 Fiero GT 4spd - L67 swap: VS cam, GenV. Needs exhaust (ETA 9/13) Build Progress
98 GTP - Some mods

IP: Logged
hinesb1890
Member
Posts: 684
From: Cranston, RI, USA
Registered: Jan 2009


Feedback score:    (15)
Leave feedback

Rate this member

Report this Post08-28-2013 10:08 PM Click Here to See the Profile for hinesb1890Click Here to visit hinesb1890's HomePageSend a Private Message to hinesb1890Edit/Delete MessageReply w/QuoteDirect Link to This Post
 
quote
Originally posted by sco77:

Awesome build, I love it. But not to scare you or anything but have you done a lot of research about rebuilding these engines? These bottom ends seem to have a small success rate for lasting when rebuilt.


I haven't read anything about that, what is it that fails? You may have me a little nervous now haha
IP: Logged
sco77
Member
Posts: 711
From: MD
Registered: Nov 2011


Feedback score: (1)
Leave feedback

Rate this member

Report this Post08-28-2013 10:31 PM Click Here to See the Profile for sco77Send a Private Message to sco77Edit/Delete MessageReply w/QuoteDirect Link to This Post
 
quote
Originally posted by hinesb1890:


I haven't read anything about that, what is it that fails? You may have me a little nervous now haha


I'm not too sure exactly but it may only be due to engines that have spun bearings so it might not apply to you, it's something to do with the rod end I believe.

------------------
86 Fiero GT 4spd - L67 swap: VS cam, GenV. Needs exhaust (ETA 9/13) Build Progress
98 GTP - Some mods

IP: Logged
PFF
System Bot
hinesb1890
Member
Posts: 684
From: Cranston, RI, USA
Registered: Jan 2009


Feedback score:    (15)
Leave feedback

Rate this member

Report this Post08-28-2013 11:45 PM Click Here to See the Profile for hinesb1890Click Here to visit hinesb1890's HomePageSend a Private Message to hinesb1890Edit/Delete MessageReply w/QuoteDirect Link to This Post
I think mine should be ok, I didn't check the rods to make sure they were perfect circles but it's also not a high mileage engine. I will be gentle on it to start and hopefully no issues will arise... thanks for the heads up!
IP: Logged
ltlgt88
Member
Posts: 448
From: round lake, il
Registered: Aug 2010


Feedback score: N/A
Leave feedback

Rate this member

Report this Post09-08-2013 01:24 AM Click Here to See the Profile for ltlgt88Send a Private Message to ltlgt88Edit/Delete MessageReply w/QuoteDirect Link to This Post
 
quote
Originally posted by hinesb1890:

I took a break from the engine to work on some changed to my car that need to get done before I put the engine back in... larger break booster set up and rodney master clutch cylinder, both taken from the donor car. I still need to install my SS brake lines and hoses and switch the fuel pump over.


That's all for now!


Hey Cuz let me know how this goes thinking about doing it to the GT...

Start thinking about June...might be one of the best years for you to make a couple of stops...Concord, NC, Knoxville, TN, Charelston, WV, and Norwalk, OH are the first 4 and the closest to you with a good day drive at each end!...

PS do you have my couple of interior parts yet to ship out?...did you part out the tail light lenses too?
IP: Logged
hinesb1890
Member
Posts: 684
From: Cranston, RI, USA
Registered: Jan 2009


Feedback score:    (15)
Leave feedback

Rate this member

Report this Post10-14-2013 08:34 PM Click Here to See the Profile for hinesb1890Click Here to visit hinesb1890's HomePageSend a Private Message to hinesb1890Edit/Delete MessageReply w/QuoteDirect Link to This Post
Here is a long overdue update, I have just been lazy with uploading but I have been getting some work done... my next job was to switch the fuel pumps, like everything else there was a surprise!


This is out of the donor car and the fuel tank was rusty inside as well, my stock fuel sending unit and the inside of my tank were spotless! I ended up ordering a new fuel pump but I had to modify the sending unit to fit it properly.


The unit barely fit in the tank with the different shaped filter but I got it in, I also decided to repaint my fuel tank while it was out...


All ready to go in!


My engine is also all back together and here is how it sits


Today I started test fitting the harness which is the last thing to get figured out before it goes back in... more to come!
IP: Logged
hinesb1890
Member
Posts: 684
From: Cranston, RI, USA
Registered: Jan 2009


Feedback score:    (15)
Leave feedback

Rate this member

Report this Post11-02-2013 05:24 PM Click Here to See the Profile for hinesb1890Click Here to visit hinesb1890's HomePageSend a Private Message to hinesb1890Edit/Delete MessageReply w/QuoteDirect Link to This Post
More work done today and a little bit of a milestone as I finally got the engine in its new home for test fitting. Here are some pictures of how it went… not bad for one person!


The end is in sight!
IP: Logged
Big Paul
Member
Posts: 446
From: Cedar Rapids, Iowa
Registered: Sep 2010


Feedback score: (3)
Leave feedback

Rate this member

Report this Post11-04-2013 11:56 PM Click Here to See the Profile for Big PaulSend a Private Message to Big PaulEdit/Delete MessageReply w/QuoteDirect Link to This Post
After rebuilding a moped engine with white parts, there is no way I would put white on another engine! But I guess if you are up for the challenge, I think it looks awesome!

Also, PM sent.
IP: Logged
hinesb1890
Member
Posts: 684
From: Cranston, RI, USA
Registered: Jan 2009


Feedback score:    (15)
Leave feedback

Rate this member

Report this Post11-05-2013 07:51 AM Click Here to See the Profile for hinesb1890Click Here to visit hinesb1890's HomePageSend a Private Message to hinesb1890Edit/Delete MessageReply w/QuoteDirect Link to This Post
 
quote
Originally posted by Big Paul:

After rebuilding a moped engine with white parts, there is no way I would put white on another engine! But I guess if you are up for the challenge, I think it looks awesome!

Also, PM sent.


If painting it white is my only mistake then I will be very happy! Pm replied as well

IP: Logged
hinesb1890
Member
Posts: 684
From: Cranston, RI, USA
Registered: Jan 2009


Feedback score:    (15)
Leave feedback

Rate this member

Report this Post11-17-2013 04:42 PM Click Here to See the Profile for hinesb1890Click Here to visit hinesb1890's HomePageSend a Private Message to hinesb1890Edit/Delete MessageReply w/QuoteDirect Link to This Post
Update from the weekend: I am very close to starting it up for the first time there are only a few small things in the way. I am having an issue with one of the serpentine belts being too small to get on, the fluids need to be filled back up, a few more wiring things, and it hopefully it won't implode!! I don't have any pictures unfortunately but it doesn't look too different, hopefully I will have a video next weekend!
IP: Logged
hinesb1890
Member
Posts: 684
From: Cranston, RI, USA
Registered: Jan 2009


Feedback score:    (15)
Leave feedback

Rate this member

Report this Post11-29-2013 04:28 PM Click Here to See the Profile for hinesb1890Click Here to visit hinesb1890's HomePageSend a Private Message to hinesb1890Edit/Delete MessageReply w/QuoteDirect Link to This Post
SHES ALIVE!!!!!!!!!!!!

After two cranks it fired right up and sounded excellent, threw no codes, and it was a joyous event! Then I walked around to find almost a quart of oil on the ground haha. So it was a short lived victory for now. After looking around a bit I can't say for sure where the oil was coming from. It was definitely coming from around the oil filter housing somewhere but I couldn't nail down a source. I will have to take a look at it tomorrow since the freezing temps are hard to bear. Once I get it sorted I will definitely throw up a video for all to enjoy. Stay tuned!

IP: Logged
DKcustoms
Member
Posts: 1071
From: Central NY
Registered: Oct 2013


Feedback score:    (15)
Leave feedback

Rate this member

Report this Post11-29-2013 09:52 PM Click Here to See the Profile for DKcustomsSend a Private Message to DKcustomsEdit/Delete MessageReply w/QuoteDirect Link to This Post
I am working on a 3800 swap myself, and I want to keep the factory 4 speed for cost issues at the moment.

1. Does the factory 4 speed bolt up to the 3800? I think its a 60* bellhousing if I'm not mistaken.
2. Is an oil filter adapter mandatory for this swap on our cars? I have an 86 SE if that makes a difference.

*I have the 3800-4speed flywheel, as well as the air conditioner delete pulley and low-mount alternator/power steering delete pulley.
IP: Logged
hinesb1890
Member
Posts: 684
From: Cranston, RI, USA
Registered: Jan 2009


Feedback score:    (15)
Leave feedback

Rate this member

Report this Post11-30-2013 06:40 PM Click Here to See the Profile for hinesb1890Click Here to visit hinesb1890's HomePageSend a Private Message to hinesb1890Edit/Delete MessageReply w/QuoteDirect Link to This Post
 
quote
Originally posted by DKcustoms:

I am working on a 3800 swap myself, and I want to keep the factory 4 speed for cost issues at the moment.

1. Does the factory 4 speed bolt up to the 3800? I think its a 60* bellhousing if I'm not mistaken.
2. Is an oil filter adapter mandatory for this swap on our cars? I have an 86 SE if that makes a difference.

*I have the 3800-4speed flywheel, as well as the air conditioner delete pulley and low-mount alternator/power steering delete pulley.


I believe the 4 speed bolts up, there are a few oil filter set ups I have seen, your best bet is to just do a search and you will find all the answers you need since it is such a documented swap (and I don't know all the answers )
IP: Logged
PFF
System Bot
hinesb1890
Member
Posts: 684
From: Cranston, RI, USA
Registered: Jan 2009


Feedback score:    (15)
Leave feedback

Rate this member

Report this Post11-30-2013 06:53 PM Click Here to See the Profile for hinesb1890Click Here to visit hinesb1890's HomePageSend a Private Message to hinesb1890Edit/Delete MessageReply w/QuoteDirect Link to This Post

hinesb1890

684 posts
Member since Jan 2009
After filling up the coolant I noticed my water pump was leaking out the bearing so I installed a new one


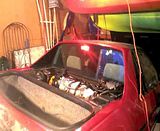
I also found the source of the oil leak, the machine shop didn't replace the oil jacket plug so I had a hole in my block! In the picture below it is the hole in the middle to the right of the alternator...


Finally after all the leaks were fixed I was able to get it started and let it run for a while I seem to have a small exhaust leak where my crossover meets the p-log and my temporary oil plug was still dripping but all in all it went well! I still need to find a place to stick my ICM too, any suggestions there? I am thinking somewhere around where the dog bone will be. Here is my video of it starting up! This is technically the third start but the first two involved spewing oil so they didn't last too long

IP: Logged
ltlgt88
Member
Posts: 448
From: round lake, il
Registered: Aug 2010


Feedback score: N/A
Leave feedback

Rate this member

Report this Post12-06-2013 12:12 AM Click Here to See the Profile for ltlgt88Send a Private Message to ltlgt88Edit/Delete MessageReply w/QuoteDirect Link to This Post
Congrats Cuz...glad to see you made it that far! my dad (your uncle) would be proud to see this!
IP: Logged
hinesb1890
Member
Posts: 684
From: Cranston, RI, USA
Registered: Jan 2009


Feedback score:    (15)
Leave feedback

Rate this member

Report this Post01-27-2014 11:26 PM Click Here to See the Profile for hinesb1890Click Here to visit hinesb1890's HomePageSend a Private Message to hinesb1890Edit/Delete MessageReply w/QuoteDirect Link to This Post
Bump because it has been a while… I was finally able to drive it this past weekend after I ran into some issues with the brakes. I didn't drive too far just up and down the street but it felt pretty good (I got it up to about 40). There are still some loose ends to tie up including the exhaust but I am excited to be this close to having it on the road! The clutch has a bit of chatter going on so I am hoping that will smooth out a bit. I will try to update with some more pictures this weekend to show where I am at with it!

[This message has been edited by hinesb1890 (edited 01-27-2014).]

IP: Logged
Previous Page | Next Page

This topic is 2 pages long:  1   2 
next newest topic | next oldest topic

All times are ET (US)

Post New Topic  Post A Reply
Hop to:

Contact Us | Back To Main Page

Advertizing on PFF | Fiero Parts Vendors
PFF Merchandise | Fiero Gallery | Ogre's Cave
Real-Time Chat | Fiero Related Auctions on eBay


Copyright (c) 1999, C. Pennock