Pennock's Fiero Forum
  General Fiero Chat
  3400/3500 Swap Information

Post New Topic  Post A Reply
Email This Page to Someone! | Printable Version


next newest topic | next oldest topic
3400/3500 Swap Information by Bridgetown
Started on: 02-11-2013 06:03 PM
Replies: 31 (12921 views)
Last post by: ericjon262 on 12-23-2019 08:49 PM
Bridgetown
Member
Posts: 1210
From: Alberta
Registered: Feb 2007


Feedback score: (2)
Leave feedback

Rate this member

Report this Post02-11-2013 06:03 PM Click Here to See the Profile for BridgetownSend a Private Message to BridgetownEdit/Delete MessageReply w/QuoteDirect Link to This Post
In an effort to try to give something back to the forum that I have taken from for many years. I have decided to try to compile as much information as possible into one location regarding the Gen III 3400/3500 (non VVT) swap. So here goes.

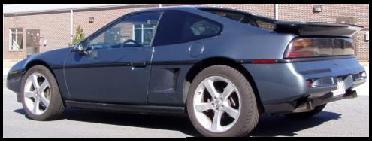
Firstly, I am in no way an expert on this, or any, engine swap. However, I have had my 3400 Fiero running for several years, and it has gone through many changes. Along the way I have learned some things, and I will try to highlight them here. Hopefully this will help some people attempting one of these engine swaps. There are other members on here that have more experience and knowledge on this swap, and I would welcome and encourage them to share here as well.
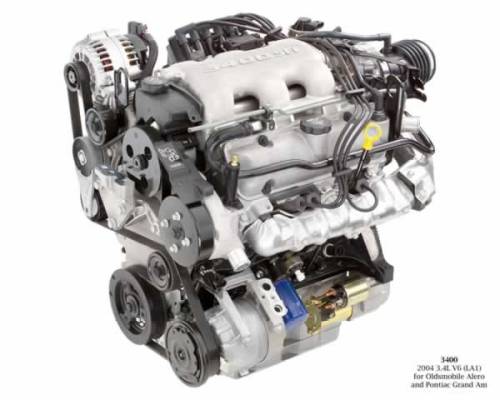
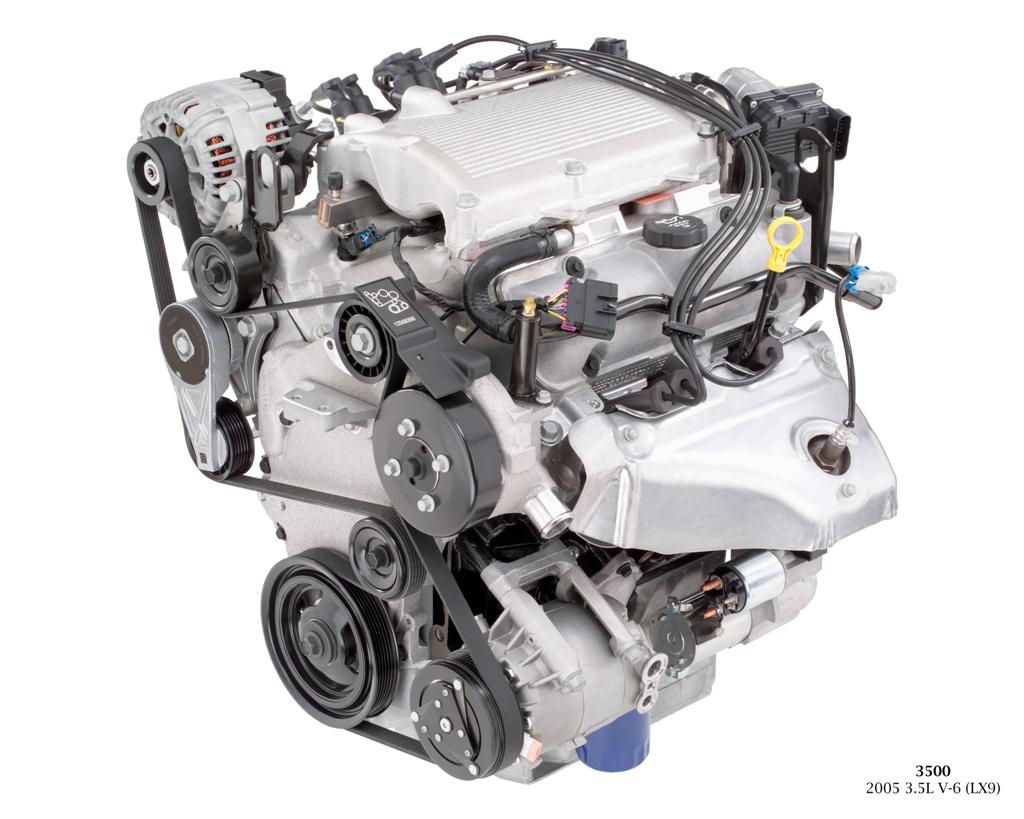
THE ENGINES:
I won't get into specifics here. Bassically I am centering this thread on the 3400 LA1 and 3500 LX9 engines; and to a lesser extent the newer Equinox LNJ 3400. If you would like to get more details on these engines then what you find here. The best place I would reccomend is this forum: http://60degreev6.com/forum/forum.php
Basically, what these engines offer to the Fiero enthusiest is a very simple, easy to work on, reliable, and low cost engine swap, with a good upgrade in power, and potential for much more power down the road. Yes, I said relaiable, and I will come back to that later.
These engines get very good milage when installed into a Fiero. I can average up to 35mpg highway if desired. They bolt directly to the Fiero transmissions, with little to no modification.
These engines are plentiful, and can be found nearly anywhere in North America. They have good aftermarket support, not great, but good. Also, they have a large cross section of parts interchangeability between versions. They also have a very nice exhaust note. There is quite a bit of hosepower hiding in these engines, that can be had just from mixing and matching parts.
These engines are also pretty lightweight compared to the majority of other popular Fiero swaps. In most cases these engines come in below 350 pounds, when installed into Fieros. For an Iron block V6, that is not bad. They are noticeably lighter then the Fieros 2.8L.
The only issue to really mention as a flaw in these engines is the lower intake manifold gasket failure. This set of gaskets seperate the engine oil and coolant between the cylinder banks in the engine. The factory gaskets were plastic and wore out for various reasons. If these fail, damage to the engine will likely occur if the engine is ran for any period of time. Do yourself a favor and replace these gaskets on the engine with the upgraded metal ones. This can be done with the engine installed, but is, like most things easier if done prior to install. It is a pretty simple proceedure, requireing only basic tools and skill. Do this, and these engines will run for a very long time, and take an incredible amount of punishment.

Performance:
The biggest horsepower bottlenecks on these engines are the intakes and exhausts. I would start there first. The factory exhaust manifolds are the worse of the two.
These engines respond very well to cams and cylinder head portwork. The stock bottom end is very robust and typically only needs to be upgraded when large amounts of boost are added to the engine. The stock pistons can handle mild boost (less then 10 psi), this has been shown numerous times. Forged pistons and rods are available, and to my knowledge, nobody has found the limit of those yet. These engines have been built well into the 400hp range.

Engine Info/support:
http://wot-tech.com/shop/
http://60degreev6.com/
http://www.fullthrottlev6.com/forums/index.php
http://www.tcemotorsports.c...m_frontpage&Itemid=1
http://www.ftpp.net/V6Main.htm
http://www.milzymotorsports.com/

3400 LA1

3500 LX9

3400 LNJ


TRANSMISSIONS

Like I mentioned before, these engines have the same bellhousing pattern as the Fiero 2.8L (60 degree). So, for the most part any transmission that bolts to the 2.8L will also work with the 3400/3500. To my knowledge, the LA1/LX9 were never offered from GM with a manual transmission. If you are going to mate these engines to a manual transmission, you will need the nuetrally balanced flywheel from an '88 Fiero. Here is a list of manual tranmissions that will work with these engines:

Fiero Getrag 5 speed
Fiero Isuzu 5 speed
Fiero Muncie 4 speed
92-94 fwd Getrag
F40 6 speed
F23 5 speed

ENGINE MANAGEMENT

The usual wiring required for any swap is also necessary for the 3400/3500. One nice feature of these engines is that they can be ran on either the OBD1 or OBD2 systems. OBD1 is the least amount of wiring and utilizes the well supported 7730 ecu. I ran my 3400 off of OBD1,OBD1.5, and OBD2. I would not reccomend the OBD1.5 system, as it is unsupported due to its mostly un-tunable flash format. I would reccomend the OBD2 system, it runs smoother, gets slightly better milage, and requires less tuning to get started.
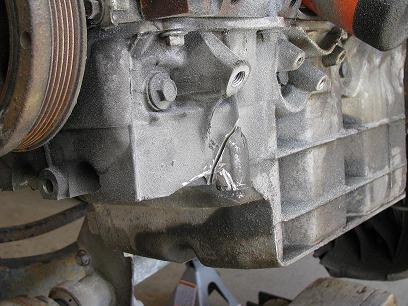
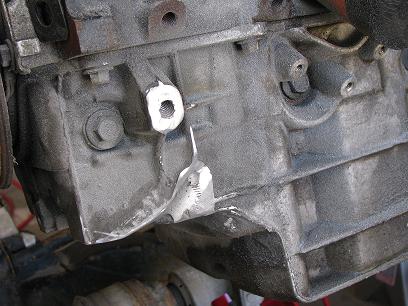
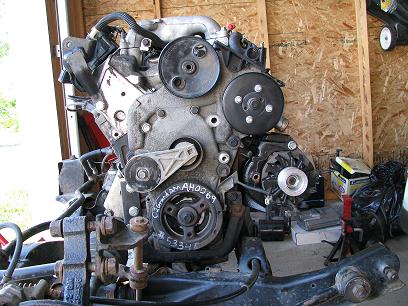
One thing to mention is that if you plan to swap the LX9, or LNJ you will need an externally mounted 7x crank sensor (available from TCE).
Pictured here


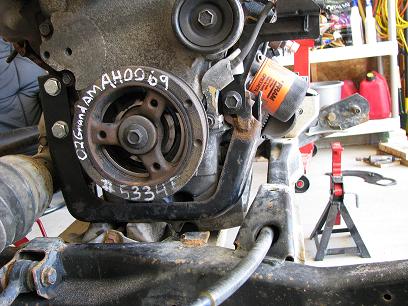
On these engines (LX9/LNJ) you will also need to swap out the crank pulley for a 3400 style and attach the 24x crank sensor that resides behind it.


On some LX9/LNJ engines you will need to change the coil packs to the older 3400 style.


The cam position sensor on the LX9/LNJ will need to be replaced with the 3400 style.


ECU/Wiring Support:

http://www.gmtuners.com/
http://westersgarage.eidnet.ca/
http://www.reddevilriver.com/
http://wot-tech.com/shop/

ENGINE MOUNTS

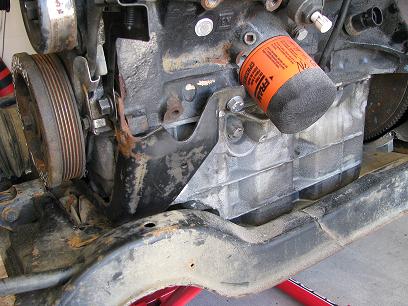
One nice feature of these engines is that there is no need to modify the cradle to accomodate the engine mounting. If you are mounting the 3400/3500 to the Manual transmission already in your Fiero you will need no transmission mounts. You may need modified transmission mounts if you are upgrading the transmission to the F40 or F23 for instance. The engine mounting is very similar to how the Fiero 2.8L mounts. The '88 2.8L Fiero engine mount will work with some slight modifications.
There is a small amount of the aluminum oil pan to be ground down. The rear-most bolt hole on the mount needs to be relocated up and forward slightly. You could just elongate the hole but it doesn't leave much material. I welded on some aditional plateing and redrilled the hole.


If you have the older style 2.8L Fiero bracket it will fit the LNJ with no modifications (and likely the LX9 and LA1)


For the dogbone mount you have two options. Relocate the alternator ( More info on that later) and use the stock mount on the Fiero. Which is what I did.


I ended up adding aditional support to the dogbone bracket down the road but i don't have a picture of it.

**Edit** Here is a pic of the additional bracing I added to the Fiero dogbone bracket. I cut up one of the 3400 egine lift point brackets.


The second option is to relocate the mount to the drivers side and keep the factory alternator location. If you do keep the alternator in its factory location it will require some of the decklid be notched out to clear it and some trimming around the strut tower.


Notched decklid


ENGINE PLUMBING

The engine coolant plumbing is a pretty straight forward affair. The drivers side coolant hose I used is from a Chevy Astro that needs some minor trimming at the lower end.


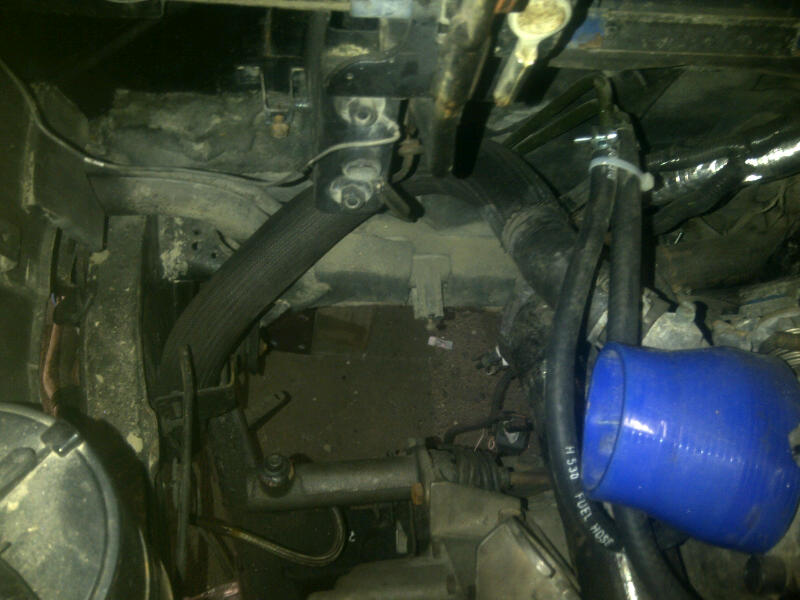
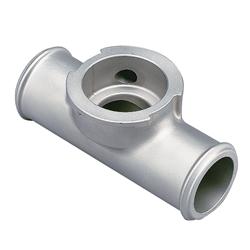
On the passenger side I used some odds and ends I had lying around, along with a "T" from an older Sunfire, which my expansion tank feeds into. Here is a pic of the passenger side coolant hose on my setup.

In the pic you can see the "Y" allowing the expansion tank to drain into the system.

Air is bled from the system into the expansion tank (mounted in old battery box). The bleed line comes off of the thermostat neck on the drivers side and is routed across the valvecover over to the passenger side. There are other ways to setup the expansion tank, that's just how I did mine. Here is a picture of how I mounted and plumbed my expansion tank.


The heater feeds both exit to the rear of the engine (when mounted into a Fiero) For '86 (I think) and down Fieros, one needs to be re-routed, on the newer Fieros the coolant lines moved. (Mabey someone can clarify this) My solution was simply to shorten the one metal feed that comes off the coolant Tree on the passanger front corner of the engine so it stops about midway down the valve cover. Then I put a flare on the end to help grip the rubber hose and clamped it.
The other feed comes off of the thermmostat housing and exits towards the Fieros trunk. This line need no modifications as it lines up good with the Fieros connection.
This picture should help a bit.


FUEL DELIVERY

The 3400 fuel lines are very easy. The engine comes with two fuel lines, a feed and return line. They have rubber ends with a "Quick connect" fitting. This connector is not that "quick" unless you have the special tool to remove it. With patience it can be disconnected with a small pick. The ones on the engine are the "female" side of the connection. The "male" portion can simply be cut off from the fuel lines of the donor vehicle. Try to leave at least 1"-1.5" past the flare on the connection to connect a rubber fuel line to. Again I added a small flare at the very back of the metal tube and used two special fuel line hose clamps on each line. Then plugged them back in.
Here is what the "male" side looks like from the donor vehicle after it is cut off.


Alternately, the newer 3100 engines have a fuel rail with the "male" ends on the hardlines that supply the fuel rail. This is the opposite of the 3400. These could be connected directly with double clamped fuel hose. You will need to swap the injectors from your engine over to the 3100 rail as well.
You can see the 3100 rail in this pic.

This is a good solution for LX9/LNJ swaps as these engines have a "returnless" system requireing you to swap out the fuel rail to the older "return" style rail.

An even better (looking) solution is to buy the quick connect to AN adapter and build some custom braided fuel lines. I am working on this now and will post pics when I'm finished.
Here is what the adapter looks like.


BELT ROUTING

In my opinion if you are not going to need AC in your car. Then I would re-route the belt to the low mount alternator setup. The main benifit is this allows you to use the stock dogbone location; also avoiding having to trim the shock tower and notch the decklid to clear the alternator. To do this you need the AC bracket from an early 3100 equipt car. The bracket is not on all 3100's but there were quite a few. The 3100 AC bracket replaces the 3400/3500 AC bracket and the alternator mounts to it. A good portion of the 3100 AC bracket gets cut off as well. I'm am about 90% certain the '88 Fiero alternator will bolt to this bracket, however, I did mine many years ago now and I cannot say for sure. The alternator will need a new pulley to bring the belt into alignment. The stock tensioner from the 3400 is relocated, and the power steering pump is removed and replaced with an idler pulley. The idler I used was from a spare parts bin I had. Most people use this idler: http://www.rockauto.com/cat...reinfo.php?pk=347145

Here are a few pics to explain things better.


EXHAUST

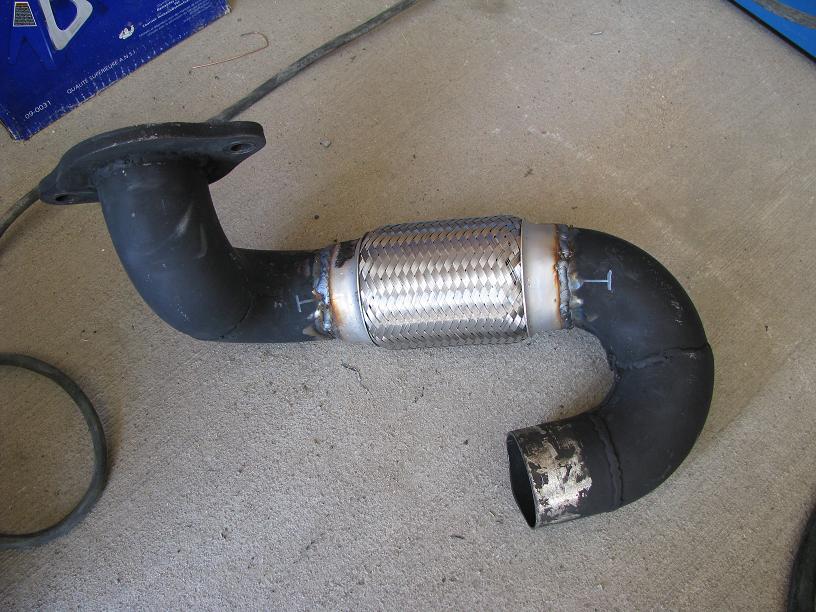
For my first exhaust I was using the 3400 manifolds and tried to make the system as simple as possible. I have since installed headers and re-routed the exhaust a couple times since. For my original setup, I cut off the connector from a 3400 equiped van and welded it onto the new pipe to connect to the stock manifold outlet. Here are some pics of my first system.


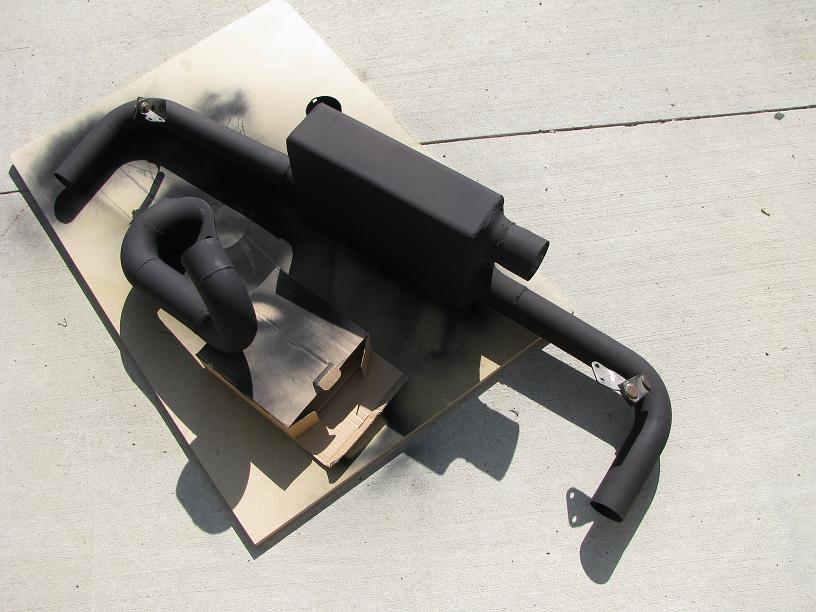
Here is another setup that would use the stock Fiero muffler and tailpipes.


You can use some Fiero 2.8L headers currently available on these engines with minor modifications.
First, the exhaust ports on the head are a "D" shape, unlike the 2.8L which are round.


You can purchase new exhaust flanges from TCE which can replace the ones on the Fiero headers.
Usually, you will need to clearence the crossover pipe around the thermostat housing. Some need more then others.


EXTRAS

I will try to compile all the small things I can think of here.
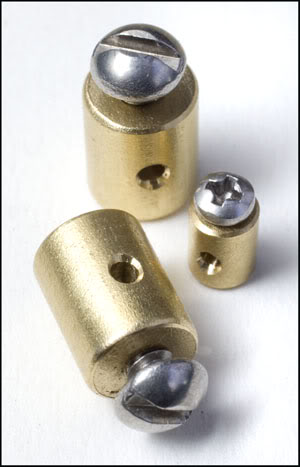
The throttle cable is quite simple if you are not running cruise. The stock 3400 cable bracket that is mounted to the throttle body will work. Some minor grinding is needed to allow the Fiero cable to lock into the bracket. Then a universal type cable stop can be installed that will fit into the throttle bodies plastic cable guide.
Here is a pic of the cable stop.


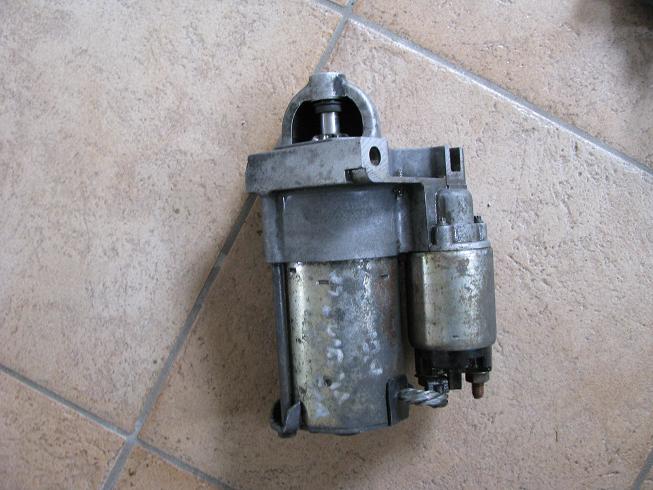
The stock Fiero starter will bolt up to the 34/3500 but I wouldn't bother. I would use the newer, much lighter gear reduced starters pictured here:


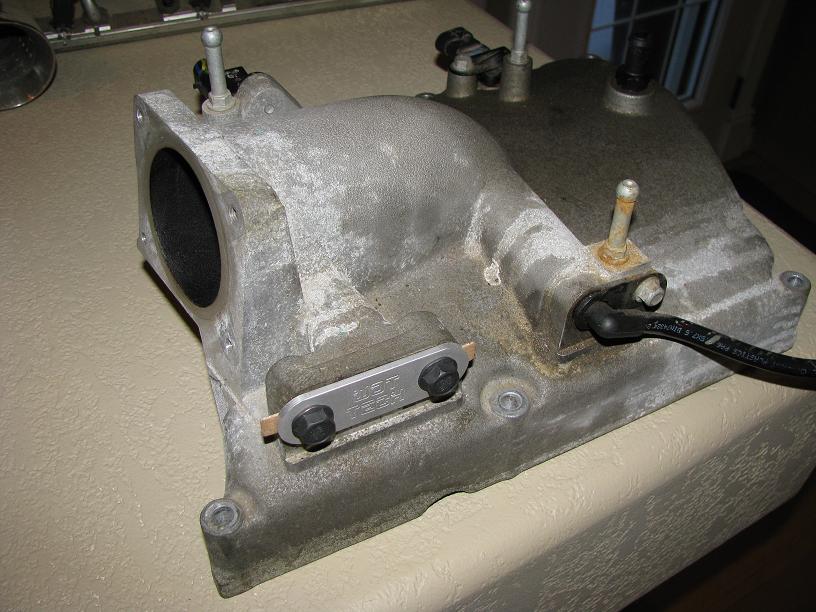
There are many options for the upper intake on these engines. Some are better for performance then others, some have other advantages. It is important to note that the upper and lower intakes should be from the same engine. For example you should only use a 3500 upper intake with a 3500 lower intake; when it is going on a 3400.

Early 3400 upper. Usually found in vans. The poorest performer due to restrictions in the neck of the intake. However, it is free of any markings on the top.


Newer 3400. Improved flow, but has the "3400" cast into it.


3500 upper. Larger volume and an increased 65mm throttle body opening. Void of any markings on top as well. Probably the best choice for the Fiero in regards to performance.


The Equinox LNJ upper. Largest volume and most even air distribution, but will not clear the Fiero decklid.


If you are swapping the 3500 LX9 you will need to convert the throttlebody to a manually operated unit. The 3500 uses a drive-by-wire TB. An aftermarket billet alum. TB is available from TCE. An alternative is to purchase an adapter plate from WOT-Tech and use the TB from the Olds LX5 V6. It is 65mm.

Note* you must match the throttle body to the intake between 3400s (or do some cutting.) The "3400 SFI" plenum has a notch for Idle Air Control, while the smooth plenum does not.
Newer 3400

Older 3400

I will try to keep this updated with more information and part numbers as I can. Enjoy.

[This message has been edited by Bridgetown (edited 02-19-2013).]

IP: Logged
PFF
System Bot
KaijuSenso
Member
Posts: 911
From: Westland, MI
Registered: Jan 2007


Feedback score: (1)
Leave feedback

Rate this member

Report this Post02-11-2013 08:34 PM Click Here to See the Profile for KaijuSensoSend a Private Message to KaijuSensoEdit/Delete MessageReply w/QuoteDirect Link to This Post
Good stuff! This swap really is very darn simple compared to what else is out there.

I'd like to throw in some help if I can but don't want to ruin the organization of the article. PM sent.
IP: Logged
Bridgetown
Member
Posts: 1210
From: Alberta
Registered: Feb 2007


Feedback score: (2)
Leave feedback

Rate this member

Report this Post02-11-2013 09:28 PM Click Here to See the Profile for BridgetownSend a Private Message to BridgetownEdit/Delete MessageReply w/QuoteDirect Link to This Post
Replied
IP: Logged
Bridgetown
Member
Posts: 1210
From: Alberta
Registered: Feb 2007


Feedback score: (2)
Leave feedback

Rate this member

Report this Post02-11-2013 11:44 PM Click Here to See the Profile for BridgetownSend a Private Message to BridgetownEdit/Delete MessageReply w/QuoteDirect Link to This Post

Bridgetown

1210 posts
Member since Feb 2007
More info regarding the LX9/LNJ added
IP: Logged
masospaghetti
Member
Posts: 2477
From: Charlotte, NC USA
Registered: Dec 2009


Feedback score:    (10)
Leave feedback

Rate this member

Report this Post02-15-2013 05:55 PM Click Here to See the Profile for masospaghettiSend a Private Message to masospaghettiEdit/Delete MessageReply w/QuoteDirect Link to This Post
Will the 3400 plenum fit on the 3500?

Also, is it easier to modify the existing 3500 harness or to use a different one?

Great info, thanks for posting.
IP: Logged
Bridgetown
Member
Posts: 1210
From: Alberta
Registered: Feb 2007


Feedback score: (2)
Leave feedback

Rate this member

Report this Post02-15-2013 10:40 PM Click Here to See the Profile for BridgetownSend a Private Message to BridgetownEdit/Delete MessageReply w/QuoteDirect Link to This Post
 
quote
Originally posted by masospaghetti:

Will the 3400 plenum fit on the 3500?

Also, is it easier to modify the existing 3500 harness or to use a different one?

Great info, thanks for posting.


A 3400 upper intake will fit on a 3500, but the 3400 lower intake will not fit the 3500. You will need to modify the 3400 to accept at least a 65mm throttle body if you want to run it on a 3500. Anything smaller will choke the 3500.
If you really wanted you could modify your Fiero 2.8L harness to run a 3500 on OBD1 (7730 ecu) That would be the "simplest" engine management, but I don't think it would be any less work then modifying the 3500 harness. By far the easiest option is to purchase a harness from Reddevil aka Phonedawgz. For the money, I think it is well worth it. Others can probably offer more input on wiring, as my experience with wiring is limited.

[This message has been edited by Bridgetown (edited 02-15-2013).]

IP: Logged
KaijuSenso
Member
Posts: 911
From: Westland, MI
Registered: Jan 2007


Feedback score: (1)
Leave feedback

Rate this member

Report this Post02-15-2013 10:52 PM Click Here to See the Profile for KaijuSensoSend a Private Message to KaijuSensoEdit/Delete MessageReply w/QuoteDirect Link to This Post
The wiring all depends on what PCM you're going to run. Sinister Performance has wiring pin out information on their website (which I used) to make it very straight forward for OBD2. It lists what PCM numbers you can use with it and for either Auto or Manual transmission. It seems to make sense to match the wiring harness you're using to the PCM, that way you have the correct pins and sensor connectors.

The pin out downloads are available here, at the bottom of the page.

http://www.gmtuners.com/files/index.htm
IP: Logged
x-thumpr-x
Member
Posts: 1992
From: Toronto, Ontario
Registered: Aug 2001


Feedback score: N/A
Leave feedback

Rate this member

Report this Post02-17-2013 01:11 AM Click Here to See the Profile for x-thumpr-xSend a Private Message to x-thumpr-xEdit/Delete MessageReply w/QuoteDirect Link to This Post
Hey there, nice write up and like the pics Good to see the 3x00 swap getting some more attention. As some of you know, I'm also playing with the 3400 motors and done my share of upgrades. Few of us have helped each other out & exchanged idea's back and forth. Not many of us doing the swap 8 years ago so we had to do our own R&D, but today it seems more common and like to help out when I can. I have the same ideas as Bridgetown for future mods to my 3400, 65mm T/B installed on 3400 plenum for now. I have a 3500 waiting to go on the motor when I'm ready to upgrade to OBDII.

OBDI computer (7730) are getting harder to locate here in Ontario. The vehicle with those ECM's usually go straight to the crushers now. Either way, we have members on the forum who can program either ECM/PCM

I've recently come across a possibly new choice for dog bone brace with the 3400 swaps. All my swaps have used Grand Am as donor vehicles which have no upper dog bone brace. My last trip to the local wreckers, I've come across an 03 Impala & 02 venture mini van that had upper dog bone brackets. Next time my motor is out ( will be a next time) I plan on trying out this new bracket.


Anyone planning on installing the alternator in the A/C location, this is the bracket in which will be needed. I know I have a better pic somewhere on the part number stamped on it. They are found on late 3.1L & EARLY 3100 motors who's A/C is not mounted straight to the block like the 3400 is. Picture also show where I cut to modify for use.


Alternator used look exactly like an 88 but slightly different. There are three outer brackets for the C130 alternator which have the mounting holes 180* apart. I know it's the middle size unit used, but best to have the bracket with you for test fitting. The pulley I use has a spacer behind it and is 8 grooves for a mustang S/C. The length was needed to line up with the crank shaft. Your belt will only be 6 grooves.

for those who can fabricate, my current dog bone method is made up of 3 different brackets. The stock 3400 engine lift that sits behind the stock alternator bracket. The V6 rear brace & a 4 cylinder bracket with it's head cut off (so to speak) We prefer to have the brace from both heads for extra support. Plenty of bad expeience from my old design


Another item for the low alternator mount would be a good coolant hose. Since the alternator is sitting right under the return line now, I've found the stock V6 hose just sits right on the alternator now. I've had to strap it up out of the way. I've recently purchased an 87 4 cylinder hose with A/C. The hose was designed to fit around the stock A/C pump, so I'm hoping it will do the same for the low mount alternator.

The 3400 motor can be opened up. I took alot off the heads an intake when I gasket matched them. I've installed the WOT-TECH adapter for the 65mm short star T/B and you have to take your time porting out the 3400 plenum so you don't go to far. If you leave any kind of edge between the plenum & adapter, you will get a good whistle ( words of experience OOPS) The stock air canister intake will also starve this motor for air, it does not flow enough for this motor. Spend some time and design a pipe into the fender with a K&N on it.

When installing the 65mm T/B, you have to choose how the throttle cable will adapt. I already had the cable set up for the stock 3400 plenum & found the stock 65mm bracket big, bulcky & interfered with my transmission cables after trying to modify it. I simply modified the 3400 bracket to fit the 65mm T/B. You will have to pull out one of the vacuum lines, tap it & plug it up. If you don't plan on using the other two vacumm ports as well, might be good to plug them permenantly also.


With my original swap which the motor was completely stock, I was running the stock Fiero fuel pump and it seemed to run just fine. After the last round of modification, I've upgraded to a Delphi fuel pump for an 88 corvette. My stock fuel pressure is now 55PSI and haven't had any issues with it plus it was a lot cheaper then buying a Walboro high flow pump for the Fiero. I purchased mine from rock auto.


For now it's all I can add. Hope this helps out others with there 3x00 swap. Links to photos from my swaps acheived.
http://s913.photobucket.com...ums/ac339/3400Swaps/

Fieronut Version 4.0


Thumbs up for Bridgetown for starting this thread.
IP: Logged
ericjon262
Member
Posts: 3082
From: everywhere.
Registered: Jan 2010


Feedback score:    (10)
Leave feedback


Total ratings: 66
Rate this member

Report this Post02-18-2013 12:56 AM Click Here to See the Profile for ericjon262Send a Private Message to ericjon262Edit/Delete MessageReply w/QuoteDirect Link to This Post
Mars on 60* ran his pretty hard, hard enough to go low 11's on boost in a full weight third gen camaro. I think the pistons should be fine as long as the tune is right.

Edit:

here's a link, 14-16 pounds...

http://60degreev6.com/forum...aro-still-work-to-do

stock 3500 with a cam and boost.

Edit again:

I have 2 3500's, both are from 2006 Pontiac G6's, both have steel cranks. if I were going to get another, I would try to find another 06G6.

------------------
we're in desperate need of a little more religion to nurse your god-like point of view...

Built not bought...

https://www.fiero.nl/forum/Forum2/HTML/119122.html

[This message has been edited by ericjon262 (edited 02-18-2013).]

IP: Logged
Bridgetown
Member
Posts: 1210
From: Alberta
Registered: Feb 2007


Feedback score: (2)
Leave feedback

Rate this member

Report this Post02-18-2013 01:11 AM Click Here to See the Profile for BridgetownSend a Private Message to BridgetownEdit/Delete MessageReply w/QuoteDirect Link to This Post
Wow! On stock pistons? That's impressive.
IP: Logged
ericjon262
Member
Posts: 3082
From: everywhere.
Registered: Jan 2010


Feedback score:    (10)
Leave feedback


Total ratings: 66
Rate this member

Report this Post02-18-2013 01:18 AM Click Here to See the Profile for ericjon262Send a Private Message to ericjon262Edit/Delete MessageReply w/QuoteDirect Link to This Post
he's swapping a 3900 in now. the 3500 is going back into his 4 speed Fiero.

------------------
we're in desperate need of a little more religion to nurse your god-like point of view...

Built not bought...

https://www.fiero.nl/forum/Forum2/HTML/119122.html

IP: Logged
PFF
System Bot
Bridgetown
Member
Posts: 1210
From: Alberta
Registered: Feb 2007


Feedback score: (2)
Leave feedback

Rate this member

Report this Post02-19-2013 12:38 AM Click Here to See the Profile for BridgetownSend a Private Message to BridgetownEdit/Delete MessageReply w/QuoteDirect Link to This Post
More pics and info added
IP: Logged
ericjon262
Member
Posts: 3082
From: everywhere.
Registered: Jan 2010


Feedback score:    (10)
Leave feedback


Total ratings: 66
Rate this member

Report this Post02-19-2013 12:59 AM Click Here to See the Profile for ericjon262Send a Private Message to ericjon262Edit/Delete MessageReply w/QuoteDirect Link to This Post
if you use the low mount alternator setup seen above, install an idler pulley on the standoff between the crank and the waterpump, that will give you way more wrap on both the alternator and the crank.
IP: Logged
ericjon262
Member
Posts: 3082
From: everywhere.
Registered: Jan 2010


Feedback score:    (10)
Leave feedback


Total ratings: 66
Rate this member

Report this Post04-17-2013 02:27 AM Click Here to See the Profile for ericjon262Send a Private Message to ericjon262Edit/Delete MessageReply w/QuoteDirect Link to This Post
anyone have coolant hose P/N's for the swap?

Edit:

and by coolant hose, I''m referring to the main hose into the waterpump, and out of the thermostat.

[This message has been edited by ericjon262 (edited 04-17-2013).]

IP: Logged
pontiackid86
Member
Posts: 19632
From: Kingwood Texas..... Yall
Registered: Sep 2008


Feedback score:    (12)
Leave feedback


Total ratings: 344
Rate this member

Report this Post04-18-2013 12:45 AM Click Here to See the Profile for pontiackid86Send a Private Message to pontiackid86Edit/Delete MessageReply w/QuoteDirect Link to This Post
I had the pleasure to own a boosted 3400SFI engine in a fiero and its the most fun I've had in a car that dident involve a back seat and a female Stupid fast very responsive and a ton of fun to drive. In my opinion (and my car was not given its due credit by the 3800Sc guys) but it rivaled the 3800Sc swap in everything but reliability.

[This message has been edited by pontiackid86 (edited 04-18-2013).]

IP: Logged
ericjon262
Member
Posts: 3082
From: everywhere.
Registered: Jan 2010


Feedback score:    (10)
Leave feedback


Total ratings: 66
Rate this member

Report this Post04-19-2013 12:15 PM Click Here to See the Profile for ericjon262Send a Private Message to ericjon262Edit/Delete MessageReply w/QuoteDirect Link to This Post
3.4 F bodies and some early 90's 3.8 FWD have a coil pack adapter that can make swapping an early coilpack onto a 3500 coilpack mount easier. that adapter uses 3 larger bolts to hold it on much easier to drill out then 6 smaller holes.


------------------
we're in desperate need of a little more religion to nurse your god-like point of view...

Built not bought... Because bolt-ons don't.

https://www.fiero.nl/forum/Forum2/HTML/119122.html

IP: Logged
BV MotorSports
Member
Posts: 4821
From: Oak Hill, WV
Registered: May 2001


Feedback score:    (7)
Leave feedback


Total ratings: 189
Rate this member

Report this Post04-19-2013 01:25 PM Click Here to See the Profile for BV MotorSportsSend a Private Message to BV MotorSportsEdit/Delete MessageReply w/QuoteDirect Link to This Post
 
quote
Originally posted by ericjon262:

3.4 F bodies and some early 90's 3.8 FWD have a coil pack adapter that can make swapping an early coilpack onto a 3500 coilpack mount easier. that adapter uses 3 larger bolts to hold it on much easier to drill out then 6 smaller holes.


I use the same coil pack adapter on my L67.
IP: Logged
x-thumpr-x
Member
Posts: 1992
From: Toronto, Ontario
Registered: Aug 2001


Feedback score: N/A
Leave feedback

Rate this member

Report this Post04-20-2013 10:51 PM Click Here to See the Profile for x-thumpr-xSend a Private Message to x-thumpr-xEdit/Delete MessageReply w/QuoteDirect Link to This Post
 
quote
Originally posted by ericjon262:

anyone have coolant hose P/N's for the swap?

Edit:

and by coolant hose, I''m referring to the main hose into the waterpump, and out of the thermostat.


I don't have the part numbers but know what I'm have. On the water pump side, I'm using a stock 87 4cylinder with A/C (to clear my alternator) on the thermostat side I'm also using a stock 4 cylinder hose that goes to a T-fitting (for coolant fill) then I used a small piece from there to the thermostat housing.
IP: Logged
ericjon262
Member
Posts: 3082
From: everywhere.
Registered: Jan 2010


Feedback score:    (10)
Leave feedback


Total ratings: 66
Rate this member

Report this Post04-21-2013 12:12 PM Click Here to See the Profile for ericjon262Send a Private Message to ericjon262Edit/Delete MessageReply w/QuoteDirect Link to This Post
10-4, thanks.

for the interested parties,

TCE sells adapters to adapt the stock fuel rail to AN fittings.

http://britishcarconversion...id=62&category_id=26

Nook and Tranny sells AN fitting adapter that work for the body side lines.

http://www.nookandtranny.co...Category_Code=HOS-AN

The TCE adapters will require you to use an aftermarket FPR. I plan to go with an Aeromotive piece.
IP: Logged
lou_dias
Member
Posts: 5258
From: Warwick, RI
Registered: Jun 2000


Feedback score: (3)
Leave feedback


Total ratings: 67
Rate this member

Report this Post02-20-2015 12:10 PM Click Here to See the Profile for lou_diasSend a Private Message to lou_diasEdit/Delete MessageReply w/QuoteDirect Link to This Post
I bought a swapped car (3100 bad head gasket mated to a 4T60-E). I swapped out the 3100 block and heads with a 3400.
It constantly overheats. I believe it is because it is using 2 expansion tanks: the stock 86 Fiero expansion and a setup similar to what has been described here.
There was no mention of blocking off the Fiero expansion tank as a solution in this thread, but is that what is done? My mechanic is suggesting this.
IP: Logged
Bridgetown
Member
Posts: 1210
From: Alberta
Registered: Feb 2007


Feedback score: (2)
Leave feedback

Rate this member

Report this Post02-20-2015 02:49 PM Click Here to See the Profile for BridgetownSend a Private Message to BridgetownEdit/Delete MessageReply w/QuoteDirect Link to This Post
I have not blocked off my front tank, however I'm considering it. My stock front tank only has a small amount of fluid in it when the car is cold. As soon as it warms up, it is drawn out. If i fill the front tank up to the proper level, it overflows my rear tank. I have ran my setup for many years like this and I have not had overheating problems. I suspect the front tank can be eliminated, but I'm not much of an expert on how these systems work exactly.
IP: Logged
PFF
System Bot
ericjon262
Member
Posts: 3082
From: everywhere.
Registered: Jan 2010


Feedback score:    (10)
Leave feedback


Total ratings: 66
Rate this member

Report this Post02-20-2015 06:33 PM Click Here to See the Profile for ericjon262Send a Private Message to ericjon262Edit/Delete MessageReply w/QuoteDirect Link to This Post
I would ditch one tank, it doesn't really make sense to have two unless you need that much volume. then you need to make sure you get all of the air out of it.

------------------
"I am not what you so glibly call to be a civilized man. I have broken with society for reasons which I alone am able to appreciate. I am therefore not subject to it's stupid laws, and I ask you to never allude to them in my presence again."

"The day I tried to live, I stole a thousand beggars' change and gave it to the rich."
https://www.fiero.nl/forum/Forum2/HTML/119122.html

IP: Logged
lou_dias
Member
Posts: 5258
From: Warwick, RI
Registered: Jun 2000


Feedback score: (3)
Leave feedback


Total ratings: 67
Rate this member

Report this Post02-20-2015 06:37 PM Click Here to See the Profile for lou_diasSend a Private Message to lou_diasEdit/Delete MessageReply w/QuoteDirect Link to This Post
Perhaps that's been the problem - getting the air out... I'm hoping that the heads haven't warped because I've had to bring it back 3 times for various coolant leaks and the temp light has come on each time...
IP: Logged
KaijuSenso
Member
Posts: 911
From: Westland, MI
Registered: Jan 2007


Feedback score: (1)
Leave feedback

Rate this member

Report this Post02-20-2015 07:07 PM Click Here to See the Profile for KaijuSensoSend a Private Message to KaijuSensoEdit/Delete MessageReply w/QuoteDirect Link to This Post
I'm not sure why you would install an extra coolant expansion tank? If it is only for a rear fill, I installed an inline coolant fill (summit racing) at the highest point of the system on the thermostat side of the engine (drivers side.)
IP: Logged
Raydar
Member
Posts: 40728
From: Carrollton GA. Out in the... country.
Registered: Oct 1999


Feedback score:    (13)
Leave feedback


Total ratings: 460
Rate this member

Report this Post02-20-2015 11:25 PM Click Here to See the Profile for RaydarSend a Private Message to RaydarEdit/Delete MessageReply w/QuoteDirect Link to This Post
Thanks!
I am happy to see this thread, as I am contemplating a swap to an LZ4 (3.5) or LZ9 (3.9) at some point.
I have another car with an LZE (a flex fuel LZ4) and it's quite quick, even lugging 3400 lbs around, in the form of a G6.
It ought to stroll in a Fiero, with a manual tranny.

 
quote
Originally posted by lou_dias:

I bought a swapped car (3100 bad head gasket mated to a 4T60-E). I swapped out the 3100 block and heads with a 3400.
It constantly overheats. I believe it is because it is using 2 expansion tanks: the stock 86 Fiero expansion and a setup similar to what has been described here.
There was no mention of blocking off the Fiero expansion tank as a solution in this thread, but is that what is done? My mechanic is suggesting this.


I scrapped the front expansion tank and installed a 20 lb cap on the radiator.
I have a rear fill adapter on my installation (a 4.9 - but that really doesn't matter) and an overflow tank in the rear. It has eliminated all of the cooling issues that I had with my engine. With a 15 lb cap on the rear, all of the overflow happens there. Which is perfect, since it's the high point of the system. No air is introduced.
(Actually, the issue was that the coolant was leaking out of the front overflow due to residue left over from the 4.9 "stop leak" pellets. A "cleaner" system may not have had the issues, but there's no question that what I did works perfectly. I would highly recommend it, if you have room for the reservoir.)

------------------
Raydar
88 Formula IMSA Fastback. 4.9, NVG T550

Praise the Lowered!

IP: Logged
Bridgetown
Member
Posts: 1210
From: Alberta
Registered: Feb 2007


Feedback score: (2)
Leave feedback

Rate this member

Report this Post02-20-2015 11:33 PM Click Here to See the Profile for BridgetownSend a Private Message to BridgetownEdit/Delete MessageReply w/QuoteDirect Link to This Post
 
quote
Originally posted by KaijuSenso:

I'm not sure why you would install an extra coolant expansion tank? If it is only for a rear fill, I installed an inline coolant fill (summit racing) at the highest point of the system on the thermostat side of the engine (drivers side.)


I found these engine difficult to bleed the air from the cooling system. A rear expansion tank seemed to make the process much easier. I suppose a fill port may have done the same. I am planning to try the system with the front overflow removed from the system.
Question, should the rear overflow be plumbed down stream to the thermostat (drivers side) as Raydar suggests, or upstream (passenger side) like mine is?

[This message has been edited by Bridgetown (edited 02-20-2015).]

IP: Logged
KaijuSenso
Member
Posts: 911
From: Westland, MI
Registered: Jan 2007


Feedback score: (1)
Leave feedback

Rate this member

Report this Post02-23-2015 01:29 PM Click Here to See the Profile for KaijuSensoSend a Private Message to KaijuSensoEdit/Delete MessageReply w/QuoteDirect Link to This Post
To avoid worrying anyone thinking about this engine swap, I have never had any issues bleeding my coolant. The in-line coolant fill takes up less space then a relocated expansion tank and isn't necessary if you already have one up front. Note the Fiero stock engines had a coolant fill in the back on the engine because it was higher then the radiator, this is why I added a simple in line fill. I used a regular radiator cap and plugged the overflow nipple because this feature is taken care of on the stock radiator.

The coolant funnel kit is inexpensive and very useful because you can run the engine with the funnel half full and the air will come out and pull more coolant in. Be careful not to run the engine too long because the system won't be pressurized and can boil over, spilling coolant all over (yup I've done this a few times.) Once you're done just plug the funnel to remove without spilling the extra coolant you have and reinstall the "radiator" cap.

Random pictures taken from the web to illustrate, sorry if they go down...


Bridgetown, this is just a thought process but the rear overflow should probably be plumbed to the hot side of the coolant system (driver's side) because this is where the most coolant expansion will take place? The Fiero overflow is attached to the hot side of the radiator correct, the top tank?
IP: Logged
ericjon262
Member
Posts: 3082
From: everywhere.
Registered: Jan 2010


Feedback score:    (10)
Leave feedback


Total ratings: 66
Rate this member

Report this Post02-23-2015 10:15 PM Click Here to See the Profile for ericjon262Send a Private Message to ericjon262Edit/Delete MessageReply w/QuoteDirect Link to This Post
do you have a P/N for the inline fill? I'm probably going to pick one up later this week for my swap.
IP: Logged
KaijuSenso
Member
Posts: 911
From: Westland, MI
Registered: Jan 2007


Feedback score: (1)
Leave feedback

Rate this member

Report this Post02-24-2015 12:53 PM Click Here to See the Profile for KaijuSensoSend a Private Message to KaijuSensoEdit/Delete MessageReply w/QuoteDirect Link to This Post
 
quote
Originally posted by ericjon262:

do you have a P/N for the inline fill? I'm probably going to pick one up later this week for my swap.


Sorry no I don't have the P/N on hand and it looks like I didn't put the number in my build thread either (but did say it was a 2.25 inch.)

I'm actually struggling trying to find that size on Summit Racing's website so I'll see if I can find my invoice.
IP: Logged
flimbob
Member
Posts: 642
From: Plano, Texas, USA
Registered: May 2008


Feedback score:    (20)
Leave feedback

Rate this member

Report this Post12-18-2019 09:41 AM Click Here to See the Profile for flimbobSend a Private Message to flimbobEdit/Delete MessageReply w/QuoteDirect Link to This Post
On the 86, there is a heater hose running around the shock tower( shown above ). 87/88's have the heater hose connected to the long coolant tube on the passenger side. Where would one hook up the heater hose located at the trunk side of the motor on an 88?
IP: Logged
flimbob
Member
Posts: 642
From: Plano, Texas, USA
Registered: May 2008


Feedback score:    (20)
Leave feedback

Rate this member

Report this Post12-22-2019 09:03 PM Click Here to See the Profile for flimbobSend a Private Message to flimbobEdit/Delete MessageReply w/QuoteDirect Link to This Post
.
IP: Logged
PFF
System Bot
ericjon262
Member
Posts: 3082
From: everywhere.
Registered: Jan 2010


Feedback score:    (10)
Leave feedback


Total ratings: 66
Rate this member

Report this Post12-23-2019 08:49 PM Click Here to See the Profile for ericjon262Send a Private Message to ericjon262Edit/Delete MessageReply w/QuoteDirect Link to This Post
 
quote
Originally posted by flimbob:

On the 86, there is a heater hose running around the shock tower( shown above ). 87/88's have the heater hose connected to the long coolant tube on the passenger side. Where would one hook up the heater hose located at the trunk side of the motor on an 88?


the pipe going out of the back of the engine is the heater supply line, the one that tees into the coolant tube is the return.

on my car (a 1985 SE) I'm setting it up to dump the heater return into the coolant tube like the later cars. here's what I did so far:

Cut the pipe off of the coolant tree


Welded up the hole


and on my car, I am making a new custom pipe to relocate the supply to near the timing cover. I'd bet that you could pick up a early car's rear heater tube cheap enough and install it on the rear bulkhead, and then use the stock 3400 tube the goes into the lower intake.


the tube is actually pretty well placed, I just didn't like it on my car.

------------------
"I am not what you so glibly call to be a civilized man. I have broken with society for reasons which I alone am able to appreciate. I am therefore not subject to it's stupid laws, and I ask you to never allude to them in my presence again."

"The day I tried to live, I stole a thousand beggars' change and gave it to the rich."
https://www.fiero.nl/forum/Forum2/HTML/119122.html

IP: Logged

next newest topic | next oldest topic

All times are ET (US)

Post New Topic  Post A Reply
Hop to:

Contact Us | Back To Main Page

Advertizing on PFF | Fiero Parts Vendors
PFF Merchandise | Fiero Gallery | Ogre's Cave
Real-Time Chat | Fiero Related Auctions on eBay


Copyright (c) 1999, C. Pennock