Hello everyone, not really sure how this forum works but I'm used to posting on a 49cc scooter forum where people have "build" threads and post updates on their vehicles ask questions etc. Hopefully this is the right place for that.
So I got this fiero for $500 from a guy who bought it from someone else a few months prior who had it sitting since 2007. I'm used to working on 49cc scooters and after doing just about everything imaginable on mine and knowing it inside and out became bored with it and decided I would try my hand at cars.
So the fiero I got is an 86 with 160k miles, GT, 5 speed gertrag, sunroof and spoiler.
interior was in pretty rough shape and I was at first thinking about repairing it and fixing some stuff that wouldn't work etc. (power mirrors didn't do anything for instance) but I came to the conclusion that I already have a car with a nice interior, nice radio, nice commuter car, so why need two?
My goal is to strip the interior and create a custom dash and have a bucket seat with 4 point harness and battery mounted in the passenger space. This gets rid of the problem of redoing the interior and allows me to sell the parts I've taken off. I've already stripped the interior and will use the stock dash/switches until I get it running but I plan on eventually having custom gauges and switches controlling everything.
Here's a pic
So the first thing I want to begin working on is the shifter. Doesn't shift left/right only up/down. I disconnected the shift/select at both ends and was able to use the shift mechanism on the trans by hand and go through all gears, leaving the cables culprit.
I plan to take the cables out and clean/lube them as they seem rusty. How do you get the cables off the shifter mechanism upfront, and how do you get the select cable free on the trans side?(the one closer to the ground)
A build thread is a great idea... but you might wish to re-size your images so we can actually see them. A maximum width of 1024 pixels is good. And a file size of less than 300 kb will allow the image to appear without the need to click on an icon.
[This message has been edited by Patrick (edited 09-05-2016).]
Alright, so is this the right section for a build thread?
Here's the pic scaled down. Used to the forums having a scaler built in.
Got the clips off the shifter cables, but how are you supposed to feed it through the firewall hole? It's too small, do the metal connectors at the end come off the cables?
The rubber cable grommets must be popped out of the firewall and removed with the cable. The ends are solidly fastened to the cable and don't come off. Ecm and its tray must be removed, the console skeleton (very fragile) must be lifted and the cables pulled from underneath.
The rubber cable grommets must be popped out of the firewall and removed with the cable. The ends are solidly fastened to the cable and don't come off. Ecm and its tray must be removed, the console skeleton (very fragile) must be lifted and the cables pulled from underneath.
Thank you, exact info I needed.
Already got the ecm and tray removed and the console skeleton was already cracked at two of the threaded holes in the middle from PO. not going to use it anyways.
The car has a "superchip" sticker on the back window and I was told it had some sort of tunable ecm crap attached to it and I wanted to remove it but see no signs of it, where would something like that be?
Remove the little plate on the ecm. It's inside. Best have a stock chip for your engine/trans, ac and cruise options before removing it. The small plastic carrier can also be easily broken and chip pins bent or broken when reinstalling.
What quadrant of the US are you in? May come in useful for parts source referrals or hands-on help if it was in your profile at the left.
[This message has been edited by fierofool (edited 09-05-2016).]
Remove the little plate on the ecm. It's inside. Best have a stock chip for your engine/trans, ac and cruise options before removing it. The small plastic carrier can also be easily broken and chip pins bent or broken when reinstalling.
What quadrant of the US are you in? May come in useful for parts source referrals or hands-on help if it was in your profile at the left.
In central florida, I'll add to my profile.
Thanks I'll look inside tommorow.
Shift cable is fine, getting it to work smoother, but select cable won't budge. One end doesn't move at all and the other end moves a very small amount (1/16") before stopping and I can hear the cable inside making a noise. Possibly broken inside?
Probably won't be replacing the cable until I get the engine running which is my next step. At least I know the trans is good as I am able to shift through all gears using the mechanism thats on the transaxle.
Be sure to pick up replacement cables from Rodney Dickman. The quality is better than OE and they fit beautifully. I would advise replacing both cables, though the 5 speed seems a tad more forgiving than the 4 speed (they use different cables and setups, 5 speeds are very prone to select cable failure due to routing near the transmission end). You won't be sorry with Rodney's products.
[This message has been edited by viperine (edited 09-05-2016).]
Be sure to pick up replacement cables from Rodney Dickman. The quality is better than OE and they fit beautifully. I would advise replacing both cables, though the 5 speed seems a tad more forgiving than the 4 speed (they use different cables and setups, 5 speeds are very prone to select cable failure due to routing near the transmission end). You won't be sorry with Rodney's products.
Probably will do this if I can't get the cable moving. It appears it still has the hook routing so it probably got messed up from that.
I took the two screws holding the little plate on the ecm off but the panel won't come out. Does it need to be pried off?
Unless someone can post a pic of how to remove it, I can't help until late Tuesday. I'll check back to see if you have an answer by then. If not I'll post a pic. You know, pic worth 1000 words, and so forth.
Using a 1/4 inch nut driver or socket, remove the cover plate on the ECM.
This is the chip inside it's carrier.
Using the two ends, you may have to walk the chip and carrier out of the ECM. It's a tight fit. When reinstalling, be very careful to align the pins with their sockets. Walk the chip back into position using the two end tabs. Do not be tempted to press on the center area. Damage to the chip may occur. There is a little trick to getting the chip out of it's carrier, but it's been so long that I don't remember. Maybe someone else can help.
thank you fierofool for the write up, but I can not even get the metal cover off (the one in the first picture held on by the two bolts). It won't budge.
Also I don't have the stock ecm so I may as well leave it as it is, just curious as to whether it has the superchips ecm in it or not.
That plate has a rubber liner on the back side. It acts as a dust shield and seal. It could be that over time, it's bonded itself to the housing. There's nothing inside holding it. What ECM do you have? Any numbers? Can you post a picture? I can't tell from the picture you posted above.
That plate has a rubber liner on the back side. It acts as a dust shield and seal. It could be that over time, it's bonded itself to the housing. There's nothing inside holding it. What ECM do you have? Any numbers? Can you post a picture? I can't tell from the picture you posted above.
yeah I think over time it got a little stuck, but when I went out to look at it today it had freed itself and was open. Chip inside is a superchips indeed.
Got a few questions concerning removing the interior.
How do I get the power lock buttons unconnected? How do I get the power mirror controls unconnected? How do I remove the AC boxes/vents, does it unbolt from the otherside of the front wall?
[This message has been edited by Elektrey (edited 09-07-2016).]
yeah I think over time it got a little stuck, but when I went out to look at it today it had freed itself and was open. Chip inside is a superchips indeed.
Got a few questions concerning removing the interior.
How do I get the power lock buttons unconnected? How do I get the power mirror controls unconnected? How do I remove the AC boxes/vents, does it unbolt from the otherside of the front wall?
It's been a while since I replaced lock buttons, so I'm not sure but I believe you can remove the inner door handle and surrounding plastics and unplug it from the rear.
Power mirror controls are plugged into the main harness way way up underneath the dash. The easiest way to disconnect that is to do it when you remove the dash to remove the AC boxes/vents.
Not sure which AC box you're referring to. The portion with the motor must be removed from the front compartment. The portion with the heater core is removed from inside and requires removing the right speaker for access to one of the top screws that holds the box in place. The chime box and horn relay mount has to be removed. The AC/heater core cover is held in place with 7 mm screws. The top one is the most difficult. I know of at least one person who has only once replaced that screw once it was removed. None of my cars have it.
The end vents on the dash are easiest removed with the complete dash out of the car. I removed one before I knew much about Fieros, and it was a real task with the dash in the car. The dash can be removed by removing the instrument pod, the center gauge cluster and the soft vinyl radio/ac surround, the lower steering column cover, and the speakers.
There is a screw on each end of the dash, underneath, vertically that must be removed. I think they're 10 mm heads. Speakers must be removed and unplugged. There are also screws in the back ledge of the speaker recesses. 7 mm heads--they must be removed. The dash will slide right out. If you want to remove the ductwork from the backside of the dash, you will see all the screws that hold it in place and you can trace the power mirror switch harness to it's connector.
Thanks. Just for reference everything is out of the interior except the heater core/ the part with the motor, the window lock buttons/handle, the mirror controls (removed the entire portion around it with the 7mm bolts) and the steering wheel/steering wheel mount bar thingy.
The interior door handle is removed by popping out the Fiero logo from it's top edge, using a very small screwdriver and the small round button behind the pull handle. There are screws behind each. Pull the lock slider all the way forward and try to pry the rearward end off it's rod. Then the complete handle will come off along with the door lock actuator button.
Don't try to depin the mirror control switch. Very likely that springs and such will go flying. Same goes for the power window switches. I think the front part of the skeleton has to be removed for final removal of the mirror harness. Mirrors can be removed by removing the door panel. Their harness connector is just behind the top front of the panel and the 10mm nuts are also right there.
So I went under the car today and it looks like it has a cat delete and also the straight pipe where the cat is supposed to go is rusted and has a pretty big leak. At least I think thats what the pipe is. Its the one that connects by bolts and is held on by springs and runs from the left to the right of the car under it.
Will it run with a big hole in it and how would I fix it.
Use my brother's fix. He bought 2 hose clamps, cut a soda can top and bottom off, split the can, wrapped and clamped it over the hole. Did that repeatedly for a couple of years. Not recommended, but it worked.
Use my brother's fix. He bought 2 hose clamps, cut a soda can top and bottom off, split the can, wrapped and clamped it over the hole. Did that repeatedly for a couple of years. Not recommended, but it worked.
Wow - THAT brought back memories of my first car (Homemade, dirt cheap repairs done by an 18 year old clueless kid just trying to keep his car alive. , I learned SO much from that 82 Pontiac J2000. I loved that car)
Use my brother's fix. He bought 2 hose clamps, cut a soda can top and bottom off, split the can, wrapped and clamped it over the hole. Did that repeatedly for a couple of years. Not recommended, but it worked.
never thought of that. Sounds like it would work as a temp fix, I really don't mind paying $40 to do it right, I just want to make sure it runs fine before I start putting money into it.
Trying to figure out where the ignition coil terminal plug is... It's the plug on the coil thats closest to the trunk. Can't find it anywhere, maybe need to take off the upper part to find it.
Also I'm trying to empty the gas thats in there, whats the best way to do that? I was going to drop the tank and just clean it out and replace all fuel lines but it is a lot of work don't know if there is an easier way.


 A maximum width of 1024 pixels is good. And a file size of less than 300 kb will allow the image to appear without the need to click on an icon.
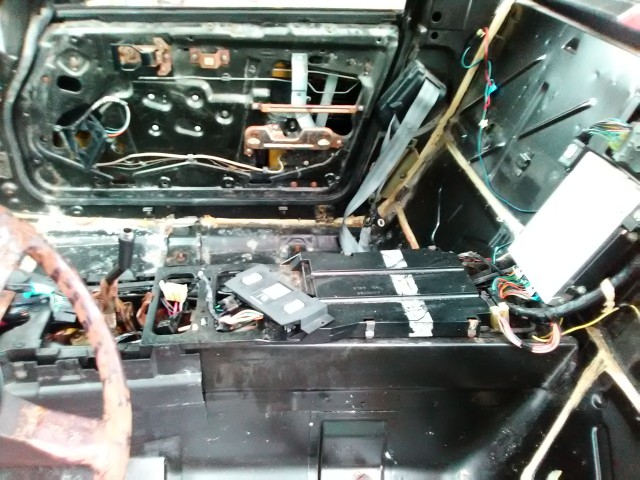


.JPG)
_1.JPG)
.JPG)

 (Homemade, dirt cheap repairs done by an 18 year old clueless kid just trying to keep his car alive.
  , I learned SO much from that 82 Pontiac J2000. I loved that car)


