we are planning on a remodel of the bath, our 1 pc. fiberglass tub is an odd shade of creme-ish, and i would like it white to match the stool and sink so we were looking at jet tubs, and such (the wife thinks she would use it) and there like 22" deep VS the standard 12" or so that the standard issue tub is so i was thinking of pulling it out and doing a tub install and then doing tile arround the 3 walls to the celing for the shower, and doing some built in's on the shower wall for bottles and stuff. and then continuing with the same tile for the floor my house was built in 94 and mim sure that when i rip out the tub there will not be and drywall behind it, which is fine, ill stuff it with insulation where i can and hang 1/4" cement board for the tile?
any tips or help on what to use or not to use? id like to concider myself a pretty handy guy but i have never worked with tile before is there somthing special to use or NOT to use biengs its going to be in a wet enviroment? any help is appreaciated if you have pics that would be sweet many thanks Rich
IP: Logged
08:19 AM
PFF
System Bot
jimbolaya Member
Posts: 10652 From: Virginia Beach, Virginia Registered: Feb 2007
I just did the reverse of what you are doing about 2 years ago. We had tile and hated it. The grout was always full of mildew and we couldn't keep it sealed where the tile met the tub. I was caulking every 3-4 months. I didn't install the tile so I am guessing it was done wrong. We went with a deeper tub and a surround. We love it. Installation was a bear because the drain didn't match the old drain and I had to cut up slab.
That said, make sure your mixture is right when putting up the tile. It will have to be thicker in order to hold the tiles in place while drying. I'm not sure if there is a different glue when doing walls, but ask your local hardware guy, they will know that. Make sure you seal the grout. It will be exposed to excessive moisture and the sealer will help it last and prevent mildew. I am guessing that's why my tile failed so miserably. I recommend mixing the sealer with the grout before applying, not after you grout. Follow instructions on ratio of grout to sealer or the grout will fail. Lastly give the tile plenty of time to dry before you use the tub/shower. Everything will be dry in 24 hours, but ideally it does not fully cure for 30 days. I know that may not be possible, but try to give it a couple of days if you can.
Jim
Edit: To be clear, wall grout is different from floor grout. It is less gritty and porous. Do not use floor grout.
[This message has been edited by jimbolaya (edited 06-09-2009).]
IP: Logged
09:05 AM
DanFiero Member
Posts: 2815 From: Cedar Rapids, Iowa Registered: Jul 2002
I just got done doing a bathroom remodel that was forced upon me by the fact that our existing shower floor cracked because it wasn't installed correctly by the contractor who built the house. We decided to do a tile shower as we thought it just would look better and give a better return on our investment. A few recommendations I Would give is I would use 1/2" backer board on the walls, it should match up with any existing drywall better, plus it's a thicker board and water would have that much more to get through before it got into your walls. We also painted on a rubber type of coating ( http://www.merkrete.com/merkrete/hg-one-01.htmover ) the backer board that was recommended to us by our local tile store, it essentially makes the wall water proof and provides just one more barrier to protect your walls, however it was not cheap, I think it's like $100 a gallon, but peace of mind is worth it in my opinion. Tile saws will run $60 a day rental, but if you have a Harbor Freight store nearby then look for coupons for 15 to 20% off and you can pick up a decent tile saw from $100 to $200 (about 3 days rental). I got this one http://www.harborfreight.co...taf?Itemnumber=97360 on sale and with a coupon for $169 (+extended warranty so about $200 total), and it is a wonderful saw, it made it so much easier. Here's a video I found when I was doing mine that might be helpful for you, it's about installing a shower pan but the techniques should be able to be used around a tub: http://www.thisoldhouse.com...o/0,,1639349,00.html
Also after you get the insulation in the walls don't forget a vapor barrier between the wall and the backer board, also helps with moisture. I'm sure there is more that I'm forgetting, but feel free to shoot me a note and I'll see if I can answer it since I've spent about 3 months this winter tiling on my days off.
And one more thing is to clear silicone caulk the corners and tub edges and allow to dry for 3 days before you use the tub. And as Jim said seal the grout with a good sealer This was recommended by our local tile store http://www.stonetechdirect....out%2C-Sealer/Detail . I did use the wall grout on the floor, but I used what our local tile store told me to use (I relied heavily on their advice..can you tell )
Here's a little slide show of my recent remodel and tile job to give you an idea of what I did (mine was a shower only, so no tub which should actually be easier):
Good luck!!!! It'll be worth it
Dan
[This message has been edited by DanFiero (edited 06-09-2009).]
IP: Logged
09:25 AM
jimbolaya Member
Posts: 10652 From: Virginia Beach, Virginia Registered: Feb 2007
Also after you get the insulation in the walls don't forget a vapor barrier between the wall and the backer board, also helps with moisture. I'm sure there is more that I'm forgetting, but feel free to shoot me a note and I'll see if I can answer it since I've spent about 3 months this winter tiling on my days off.
Very good point. I had forgot to mention creating a moisture barrier. This is actually to prevent damage from moisture that comes from outside. Such as condensation and humidity.
Got a dead battery in my camera right now, but we went with Jaccuzi jet tub and made the splash surround from the same solid surface as the counter top. Will add something higher up later--above the solid surface. We did not put the shower head pipe in, but the riser is inside the wall if we ever decide to. The walls really aren't angled--like this pic shows--I had the camera on the wrong setting. 5' Jacuzzi brand tub. This is a big bathroom tho--15' X 18'.
Most jet tubs come with an optional place to install an inline heater. It just has a blank that is easy to remove. Unscrew the blank, and you just screw in the heater--buy the heater!! Saves on hot water. Be aware, that all jet tubs require GFI receptacles. The the 2 GFI receptacles for the heater and pump motor are actually located away from the tub, in the alcove where the toilet is. They are tied in to the receptacles that are hidden inside the tub enclosure--there is an access panel on the rear end of the tub to service the pump.. Another velcro fastened access panel on the front side to allow you to get to the heater.This pic shows the heater--the black thingie. Takes 5 min to install and cost about $50 to purchase separately.
I personally did not want the jet tub, but wife wanted a jet tub, so we compromised and got a jet tub. We do have a separate simple shower enclosure tho--which is what I use.
If you have to build to code, you may find yourself having to use scald proof plumbing fixtures on bath and shower. I hate em--water cannot be turned to full "hot" position. Some can be adjusted--some cannot.
[This message has been edited by maryjane (edited 06-09-2009).]
IP: Logged
11:48 AM
82-T/A [At Work] Member
Posts: 25081 From: Florida USA Registered: Aug 2002
I haven't done it yet, but I'm planning TWO bathroom renovations.
That said, I've done my research and come up with the following:
1 - Bigger tiles = LESS grout = LESS cleaning / maintenance 2 - Gold Trim died in 1989. 3 - Glass Blocks are back in style (if you live in South Florida)
thanks for all the pics and replies guys, MJ that is the exact tub we have in mind, its like $8xx at Lowes
dan, can i get into your photobucket account to see the pics better? (need a password) it is on the mode where they flash thu quickly it looks like you did a very nice job, and the tile looks to be the same as the samples i picked up from the store for ours
Yeah, that's about what we paid for it, a little less, since they had a sale on at the time. The only thing I really don't like about it, is the support under the tub. The box says it's fully supported and ready to drop in, but it reall needs some extra support right near the back, where your butt will be if you are sitting right in the back of the tub. I've had 2 different people tell me that model has had some problems with cracking right in the back end. If you want to read the owners manual and install instructions, they are available on Jacuzzi's website.
The only other thing, is the 2 jets on the side cannot be turned off, and because of the narrowness at that area, those jets just beat me to death in the same place on my sides all the time the jets are on. I'm 6'4", so there isn't a lot of room for me to shift about. For that reason alone, I have not been in the dang thing but twice.
Do not be surprised, if the 1st time you turn it on, that the water comes out a bit dirty--with fine particles floating about. Crap left over from manufactoring and instal. Again--don't even consider NOT getting the heater--it's fully automatic and only comes on if the pump is running.
IP: Logged
08:41 PM
blackrams Member
Posts: 32826 From: Covington, TN, USA Registered: Feb 2003
Been the tile route, been the jet tub route, been the shower/tub route. At this point in my life, the next bathroom remodel I do will be to rip out the tub and install a two head shower the same deminishions as the current tub/shower.
Solid surfaces for the walls is preferred but I'll probably lose that battle to the "better" judgement of my wife.
Ron
[This message has been edited by blackrams (edited 06-09-2009).]
IP: Logged
09:35 PM
DanFiero Member
Posts: 2815 From: Cedar Rapids, Iowa Registered: Jul 2002
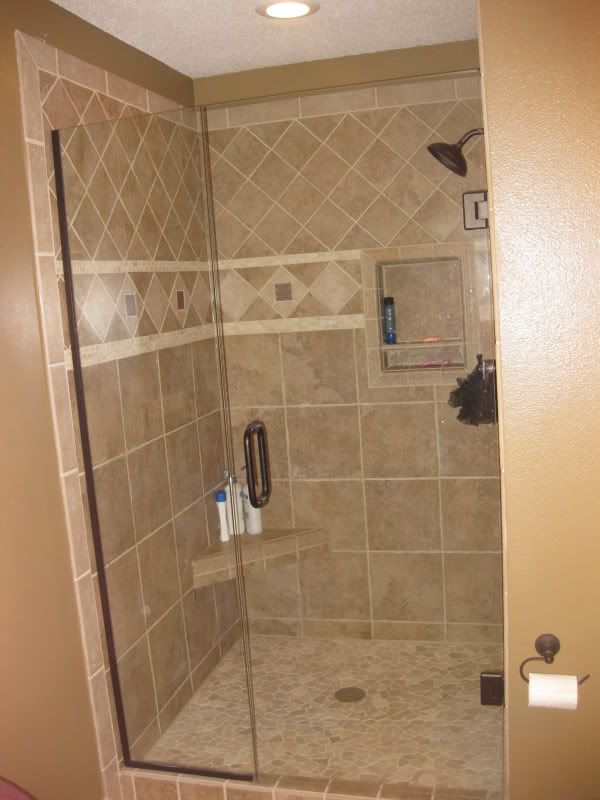
Email sent with link to the album with the password, let me know if it doesn't work. The tile I used is from Lowe's, I believe the name is Roman Noce, we used the darker and the lighter off white version in the border.
Dan
[This message has been edited by DanFiero (edited 06-09-2009).]
IP: Logged
10:21 PM
jimbolaya Member
Posts: 10652 From: Virginia Beach, Virginia Registered: Feb 2007
Email sent with link to the album with the password, let me know if it doesn't work. The tile I used is from Lowe's, I believe the name is Roman Noce, we used the darker and the lighter off white version in the border.
Dan
That is sweet. Good job Dan.
Jim
IP: Logged
11:39 PM
PFF
System Bot
Jan 26th, 2011
madcurl Member
Posts: 21401 From: In a Van down by the Kern River Registered: Jul 2003
For me, I am installing a shower enclosure. I have some mudding to finish and then paint/flooring. I didn't use tile as this would have required more work and there is a chance for something to shift because of the added weight. The previous owners already put a brick wall on the opposite side of the tub wall. I had a fiberglass enclosure at my old house and I loved it... easy to clean and always looked new. The tub/shower replacement in the main bathroom will be an enclosure also, because of weight and ease of installation. Keep us updated on the progress. It is good to see these projects!
I used DensShield backer board which is pricey, but totally impervious to water and easy to cut and install.
This is the jacuzzi in my main bathroom.
It was installed by the previous owner. There is no access to the motor and piping. If it ever goes, I have a problem.
The tub filled is very heavy. It caused the grouting around the bottom edge of the tile to crack. So I've sealed it with color matched Flextile Ltd. tile caulk.
If I was doing it myself, and using tile, I'd use ceramic and I'd fill the tub with water before grouting the bottom row.
Good luck
Arn
IP: Logged
10:50 AM
jaskispyder Member
Posts: 21510 From: Northern MI Registered: Jun 2002
I cant wait till my new house is complete There are a couple of things we want to do ourselves once done and we knew we were going to do it. I am happy about my Jacuzzi though
IP: Logged
11:07 AM
87antuzzi Member
Posts: 11151 From: Surrounded by corn. Registered: Feb 2009
I wanna play. I did this at my moms back in california Standard issue really. The floor was rotting out over the basement and the walls were off plumb from the rotting floors. So I ripped it out and re did it in a weekend. Replaced the floor joyste and notched the 2x12 and laid a 5x5 frame for the tub (sits over a basement) with 4x4. The tub sits over the water heater in the basement so I figured I would put radient heat with the pump and a eletronic silionode with a thermo stat. So if it got under 65 in the house it would pump hot water under the floor. I laid the pipe and put quic set over it and then put the tile down. I was going to drop the tub down about 6 inches but decited aginst it. The tub is a wirlpool that is also heated. The tub always stays heated. The house was a older house and had this ugly wood slat panaling everywere and it looked like crap. So I ripped that out and set the walls plumb and then sheered them. I laid all the tile around the tub with white tile and did not like it one bit. So I ripped half of it back down and put a decoritave tile in the middle and that set it off. I then installed the shower door and did the recessed lights. And I was done.
This would still cause cracks. The tub is not properly supported, it sounds like.
Nope, the tub is well supported by the joists and tongue and groove subfloor. The issue was the insulation on the bottom of the tub compressing a little. It did not move much, just enough to crack the grout. If you add the weight of the tub full of water when you do the grout, you should not have a problem with cracking. I like to add a sealing layer of Flextile over the grout and it has some built in elasticity so the cracking has not re-occurred.
Arn
IP: Logged
12:25 PM
jaskispyder Member
Posts: 21510 From: Northern MI Registered: Jun 2002
Nope, the tub is well supported by the joists and tongue and groove subfloor. The issue was the insulation on the bottom of the tub compressing a little. It did not move much, just enough to crack the grout. If you add the weight of the tub full of water when you do the grout, you should not have a problem with cracking. I like to add a sealing layer of Flextile over the grout and it has some built in elasticity so the cracking has not re-occurred.
Arn
My concern would be that once the weight of the water is out, the insulation will spring back a little. I think the flextile is a good idea!
IP: Logged
12:33 PM
Larryh86GT Member
Posts: 1757 From: Near sunny Buffalo NY Registered: Jan 2008
Email sent with link to the album with the password, let me know if it doesn't work. The tile I used is from Lowe's, I believe the name is Roman Noce, we used the darker and the lighter off white version in the border.
Dan
Impressive.
IP: Logged
02:01 PM
PFF
System Bot
Firefox Member
Posts: 4307 From: New Berlin, Wisconsin Registered: Feb 2003
My one reminder......make sure that you mark your installation guide lines properly and check your measurements. I measured, made my start lines, then checked it again....I found that I had made a mistake and had my centerline just off enough that my tile would have been screwed up pretty good.....measure twice-cut once!
Mark
IP: Logged
02:05 PM
madcurl Member
Posts: 21401 From: In a Van down by the Kern River Registered: Jul 2003
A Cinderella NAKAMICHIi stereo with duel sub system. I haven't got around to hiding the wires and cables. This has been a long, long project that keep getting pushed back.
[This message has been edited by madcurl (edited 01-26-2011).]
IP: Logged
09:39 PM
madcurl Member
Posts: 21401 From: In a Van down by the Kern River Registered: Jul 2003
Watch a bunch of episodes of 'Holmes on Homes' they do dozens of tile and shower installs, showing exactly how to do it the right way, and the designs turn out amazing.
Don't use a light colored grout, it's impossible to keep clean.


 )
)
.JPG)
.JPG)
.JPG)