This will be a short build thread of a computer. I won't go into installing CPU, Memory, applying Thermal Paste, installing Videocards, scerwing down the Motherboard, etc. Since this was already a running computer, this is more of a "Swap & Mod" assembly. I will be taking the guts out of one computer and installing them in another case while lightly modifying, wiring & lighting the case. I find the WIRING to be the most difficult part of ANY build. Ideally, you want to hide as much of the wiring as possible, but in MOST cases, it's a matter of "Wire Management". I guess we'll see how it all turns out.
The System
Motherboard - EVGA 750i SLi FTW Processor - Intel Core 2 Duo E8400 Wolfdale 3.0GHz CPU Cooler - Asus Silent Square Memory - 4Gigs OCZ Platinum 1066MHz PC2 8500 Videocards - Dual-EVGA 8800GT 512MB Superclocked Powersupply - Coolmax 600W Power Supply Soundcard - Creative Sound Blaster Audigy 2 Platinum Chassis - CoolerMaster Stacker 830 Operating System - Windows XP Pro
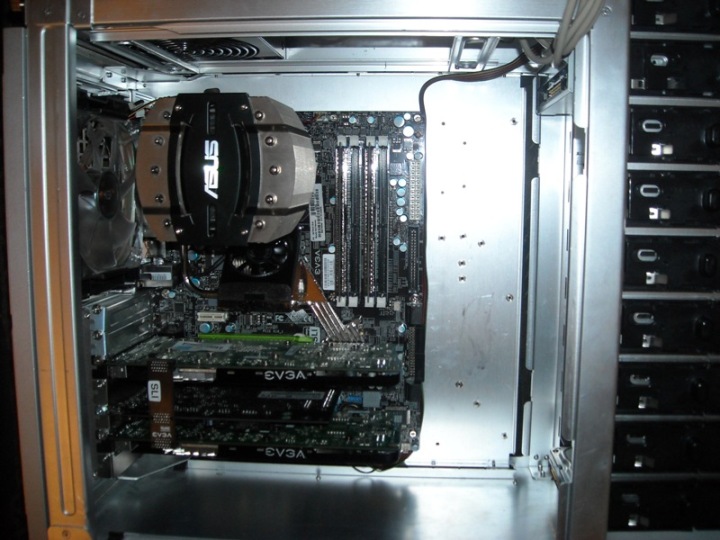
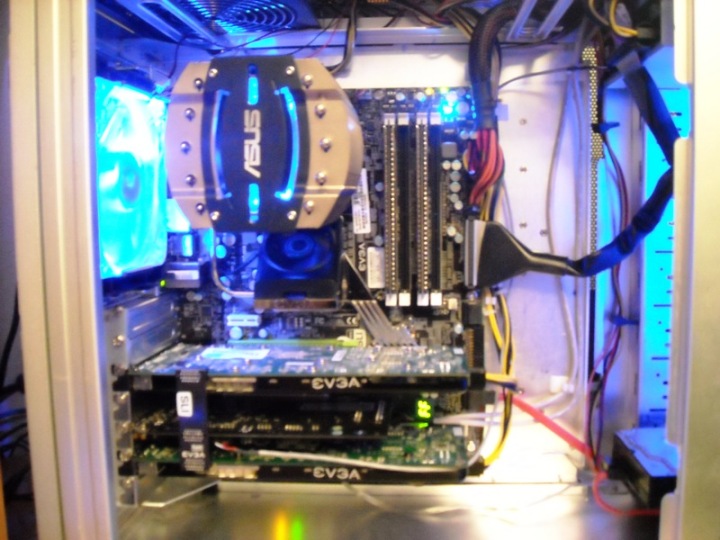
Motherboard Mounted To Tray, With Video, Sound, & Memory:
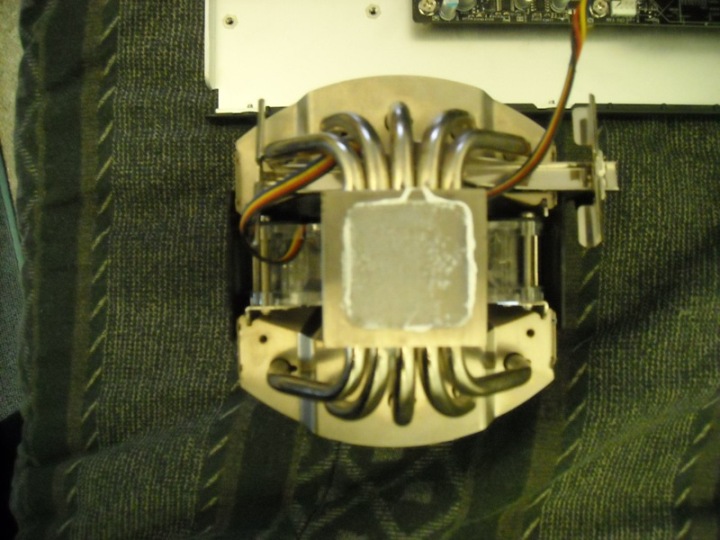
Asus Silent Square CPU Cooler:
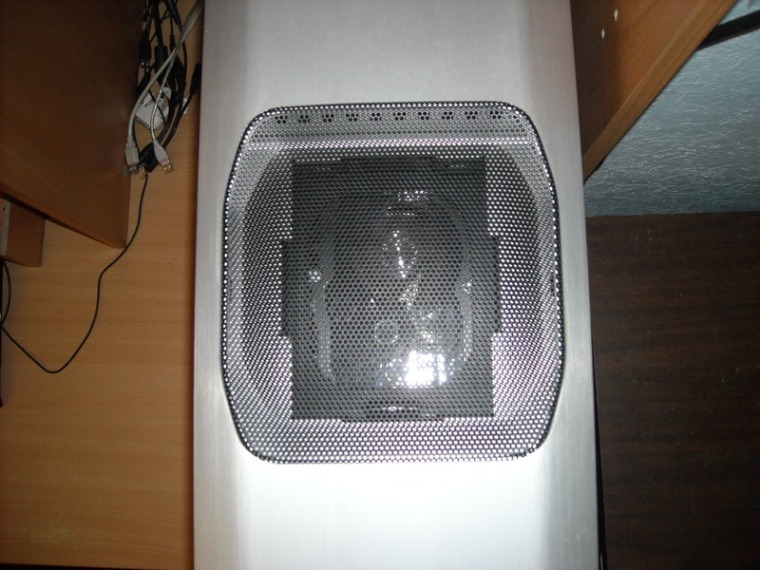
Top View:
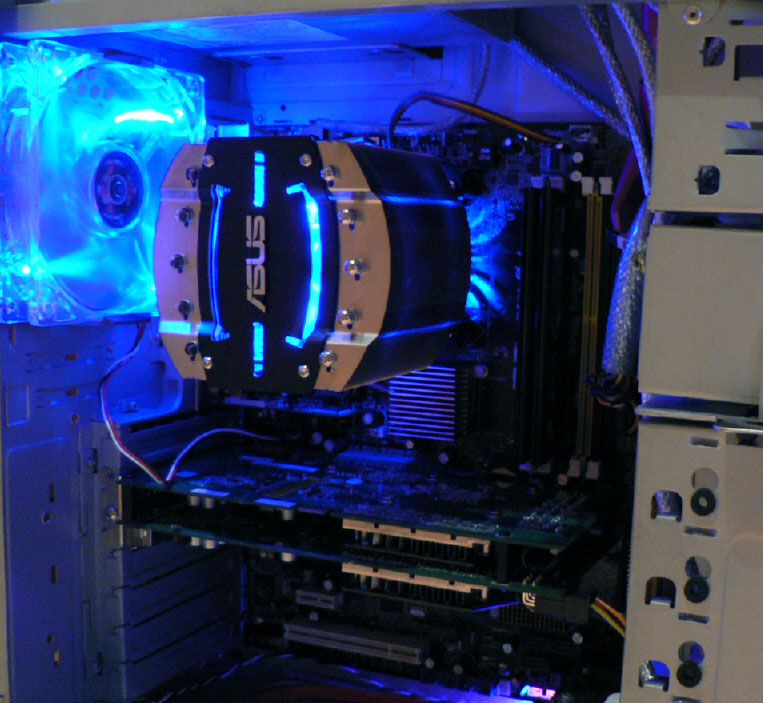
Videocards & Rear High-Speed Fan:
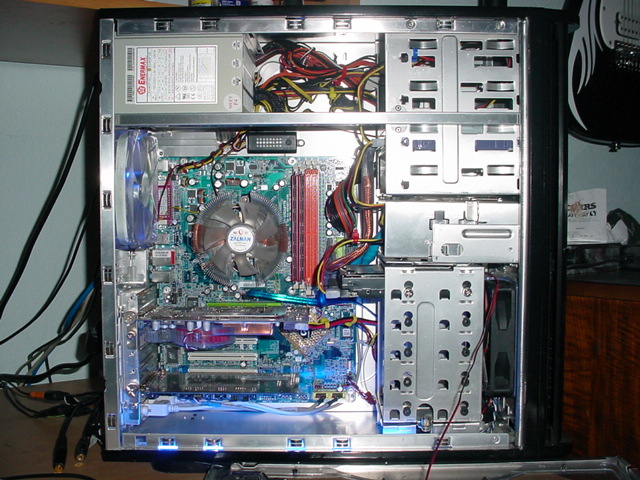
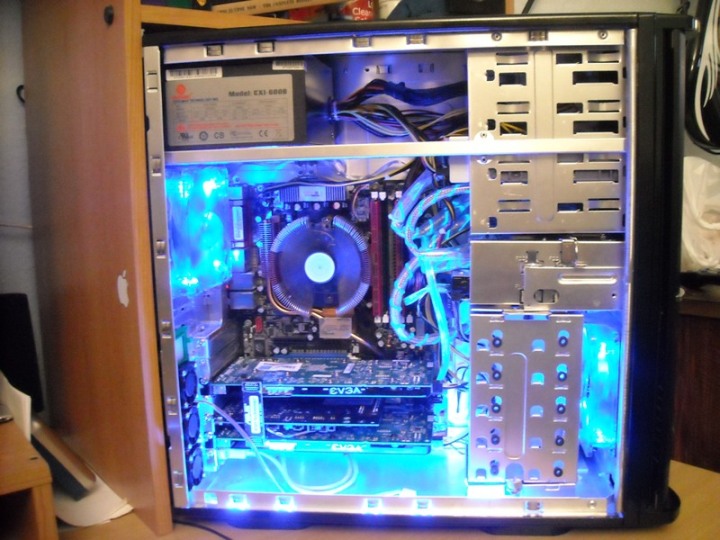
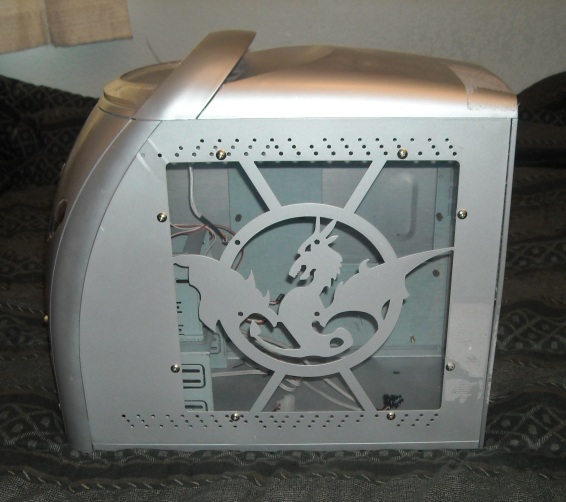
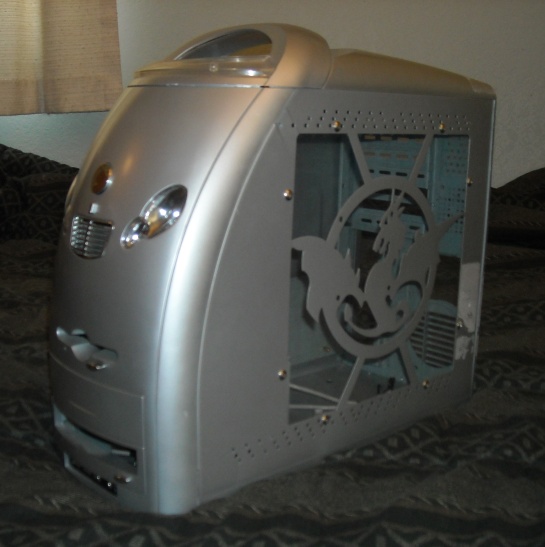
Motherboard In CoolerMaster Stacker 830 Chassis:
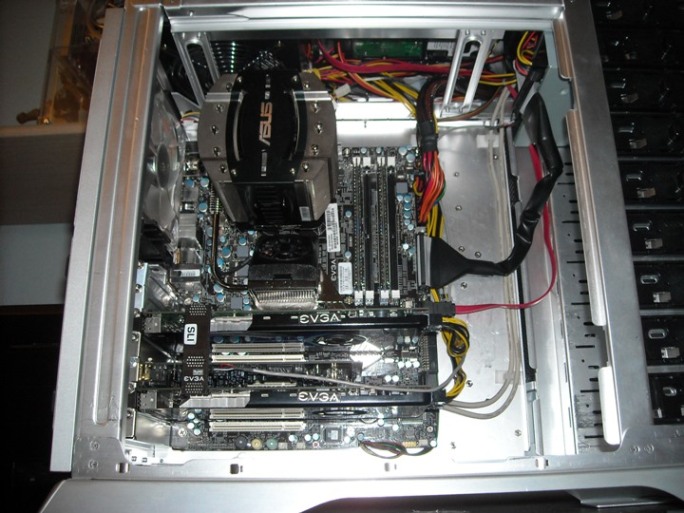
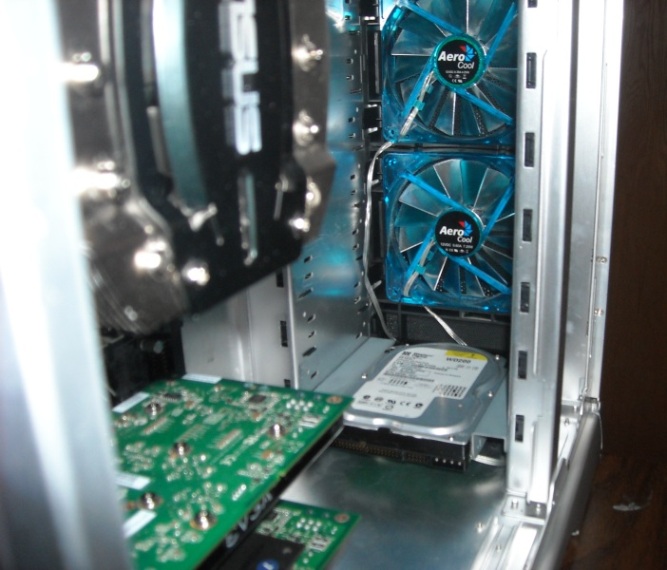
Videocards, CPU Heatsink, & Rear Fan In Case:
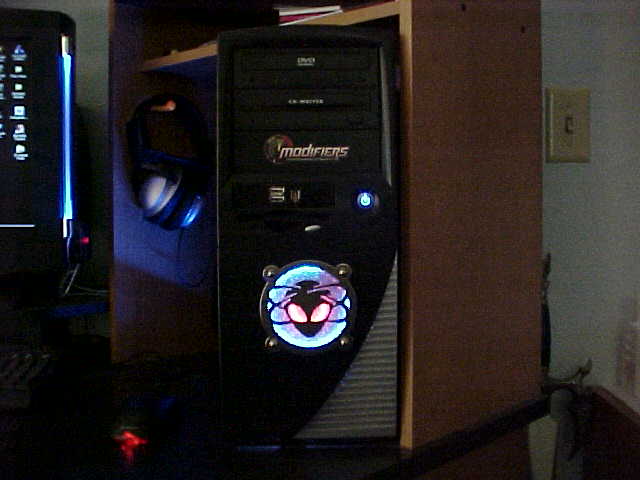
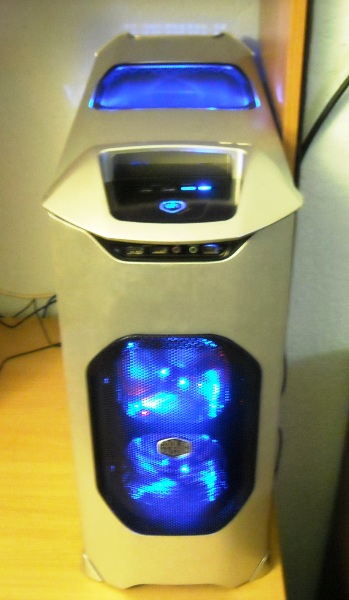
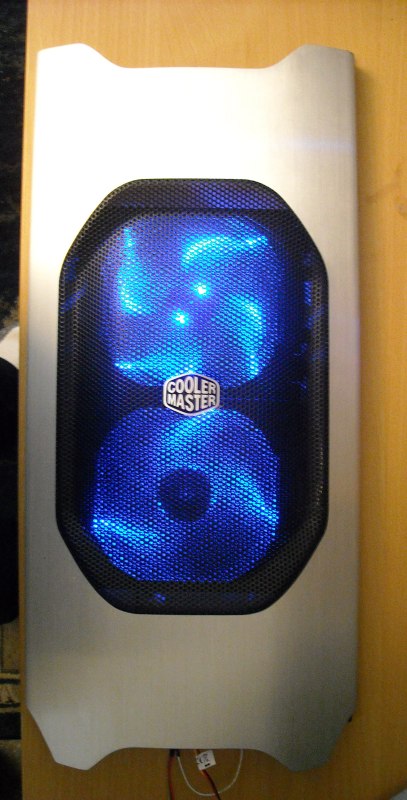
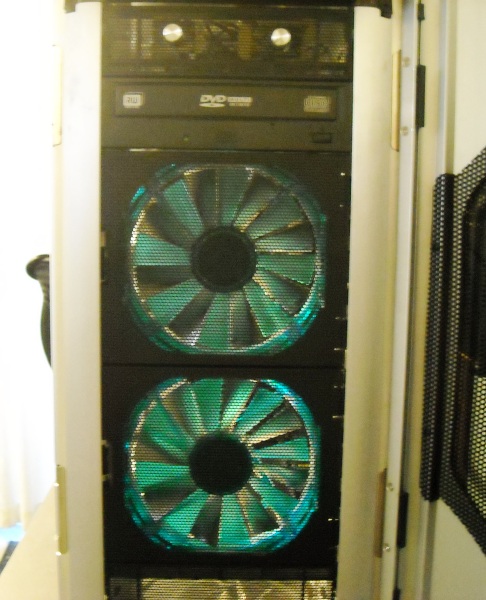
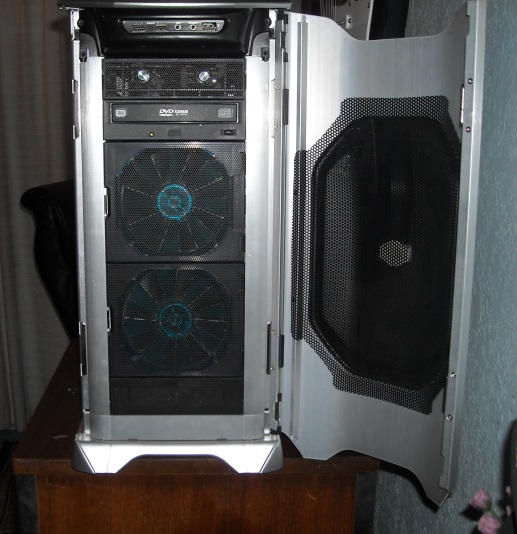
Front Blue-Lighted Fans, 2 Fanspeed Knobs, & Missing DVD Drive:
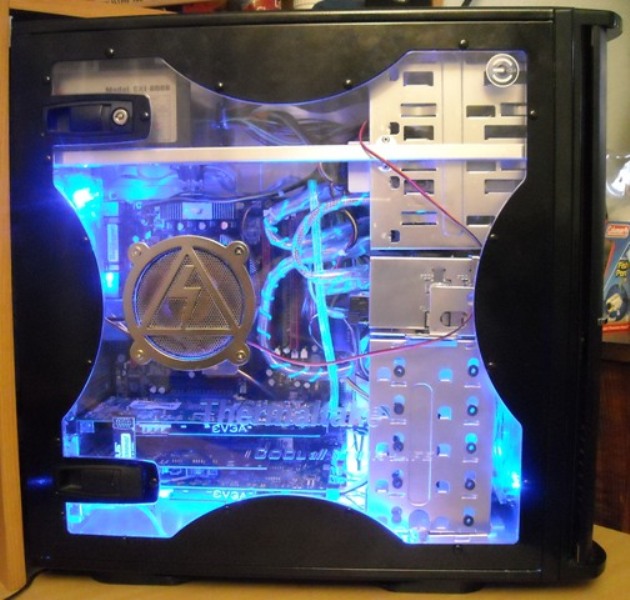
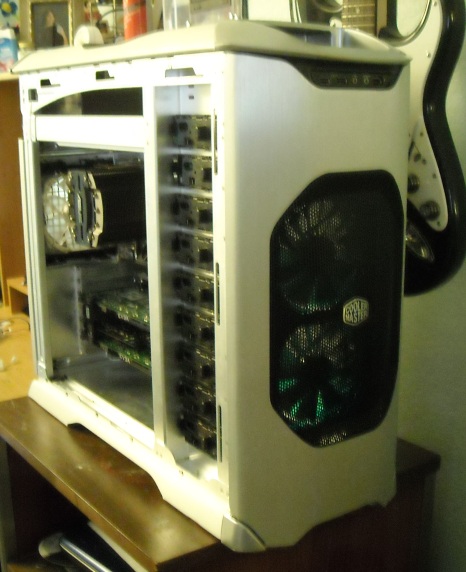
I'm Going To Remove The 4-Fan Inner Door:
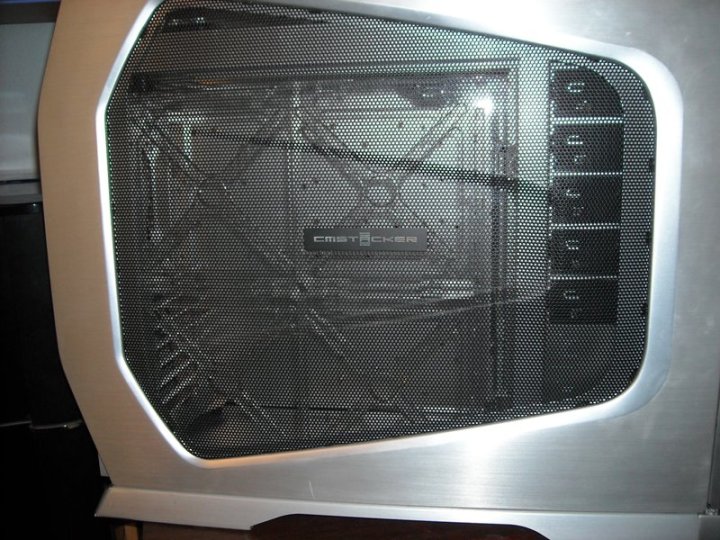
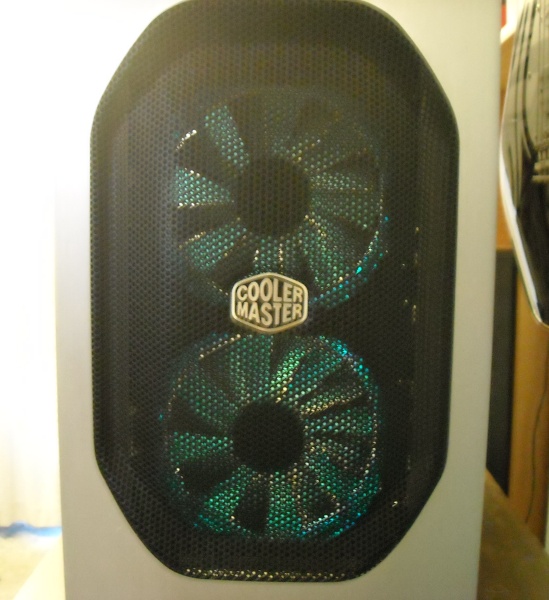
I'm Going With Just The Mesh, With Blue Lighting Inside:
The Windowed Raptor X Hardrive Mounted In The Blue-Lighted Top Fan Slot:
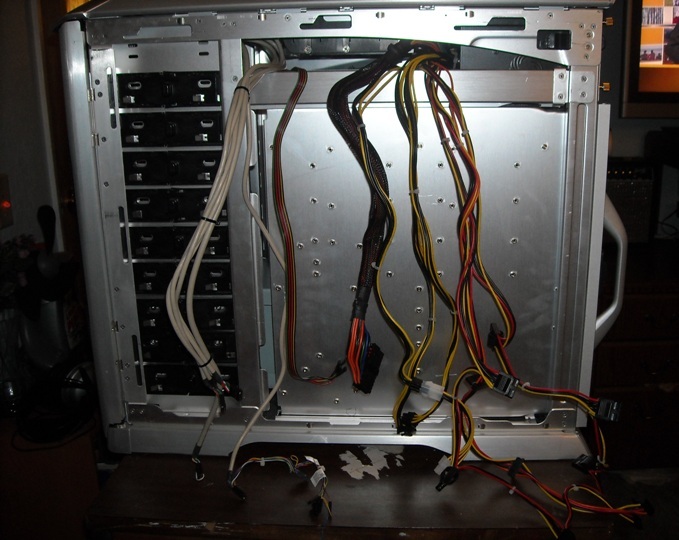
The Rear With Powersupply & Dual-Videocards:
The Motherboard & Front-Panel Wiring:
------------------ "I have never seen a greater monster or miracle then myself." ~Montaigne~ 1533-1592 "Technological progress is like an axe in the hands of a pathological criminal." ~Albert Einstein~ 1879-1955 "They speak of my drinking, but never my thirst." ~Scottish Proverb~
IP: Logged
10:56 AM
PFF
System Bot
htexans1 Member
Posts: 9116 From: Clear Lake City/Houston TX Registered: Sep 2001
you should take that heatsync to a machine shop and have them drill like 4more holes in it, drop small cold cathode lights in it, will look like its glowing from the inside
IP: Logged
11:16 AM
Boondawg Member
Posts: 38235 From: Displaced Alaskan Registered: Jun 2003
you should take that heatsync to a machine shop and have them drill like 4more holes in it, drop small cold cathode lights in it, will look like its glowing from the inside
It has a 90mm bluelighted fan sandwitched in the middle:
------------------ "I have never seen a greater monster or miracle then myself." ~Montaigne~ 1533-1592 "Technological progress is like an axe in the hands of a pathological criminal." ~Albert Einstein~ 1879-1955 "They speak of my drinking, but never my thirst." ~Scottish Proverb~
IP: Logged
11:24 AM
Boondawg Member
Posts: 38235 From: Displaced Alaskan Registered: Jun 2003
Just barely. I HAVE been running 2-videocards full throttle, 7-fans (3 of them lighted) a 9 LCD Colorwheel, & 2-Cold cathoid 12" tubes. I think I'm pushing it's limits!
This system will be about the same. A 1,000w Powersupply IS on the horizon, though...............................
IP: Logged
11:31 AM
hookdonspeed Member
Posts: 7980 From: baltimore, md Registered: May 2008
ah, i though it was a fanless heatsync :P my last 3 systems have all been fanless, altho my lastone i did mods on was water cooled, no fans just a gental hum of a waterpump, and one night at 3am the loud beep of the water-low alarm, somehow from 9pm that night to 3am a good bit of the water just...went away, no leaks, no signs of evaperation...just low guess im glad i had that alarm, was missing about 8oz of coolant.. 16 total in the system.
IP: Logged
11:57 AM
SCCAFiero Member
Posts: 1144 From: Boca Raton, Fl USA Registered: Apr 2006
I HAVE been running 2-videocards full throttle, 7-fans (3 of them lighted) a 9 LCD Colorwheel, & 2-Cold cathoid 12" tubes.
Is that thang turbocharged??
This post reminds me of 1979+/- (I was 10). My dad (worked for IBM 27 years) brought home the prototype IBM PC, set it up, turned it on and me and my siblings looked at it and said,... . . . . . . " So, what does it do?"
This post reminds me of 1979+/- (I was 10). My dad (worked for IBM 27 years) brought home the prototype IBM PC, set it up, turned it on and me and my siblings looked at it and said,... . . . . . . " So, what does it do?"
back then.... not much lol
IP: Logged
01:37 PM
PFF
System Bot
Eagle Kammback Member
Posts: 533 From: South Jersey Registered: Nov 2007
No wiring today. I ran into fan planning problems. The 2 front fans were very highspeed Thermaltake TT1225T's hooked to 2 speed controllers. It is a cool set up, lowspeed is nice and mellow, midrange is totally acceptable, and highspeed is a monster. But for MY setup, I got to thinking I might need something alittle different. Remember the whole side of the case is going to be fanless, with just a "neutral" mesh.
So, the setup as it was would be: 2 - 120mm Multi-Speed Front Fans (highspeed) blowing into the case 1 - 120mm Single-Speed (midrange) exiting the case 1 - 120mm Powersupply fan (lowrange) exiting the case No Top-Exit Fan due to Lighted/Windowed Raptor X mounted there.
So, it was pretty much 2 In, 2 Out. Pretty even flow, while leaving the Side-Mesh neutral. But the 2 Fans up front were adjustable in speed/airflow. So once adjusted for "Neutrality", that would be the maximum airflow. Any higher, and it would start bleeding out of the side mesh, and recurculating back into the front and through the system again.
So, in essence, the Fan Controllers up front, once adjusted to "Neutrality", would never get touched again, and could not be turned up for extra cooling during stress.
So, I went with Silent Midrange Fans up front, with no controllers. Then, I put one of the High-Speed fans in back hooked to one controller. Now, If I want to increase airflow during stress, I will crank up the REAR fan, which will pull more air through the front mesh, the venting around the Top-Fan grating where the Raptor X is mounted, and it may even pull some air into the case through the Side-Mesh.
I think that setup will give me more control over pulling air over the motherboard, while leaveing the Side-Mesh "Neutral".
Now, I Have To Decide If I Want 3-Light - Clear Blade (bottom), Or 4-Light - Reflective Blade (top) Front Fans:
Day-Lit Non-Running From The Open Sidecase:
Day-Lit Non-Running From The Open Sidecase:
Day-Lit Non-Running From The Open Sidecase:
Dark Non-Running:
Where The Second Drive ( 320 SATA - the one below is not it) Is Being Mounted:
This airflow stuff really messed with my mind for more then just a few hours after work today, figuring out the kind of positive~v~passive airflow control I wanted. Testing, retesting, combining, rewiring the controllers, etc., and all by using the power and connectors from another running computer! Back at it tomorrow though, after work again.
[This message has been edited by Boondawg (edited 03-18-2009).]
IP: Logged
12:58 AM
Cliff Pennock Administrator
Posts: 11898 From: Zandvoort, The Netherlands Registered: Jan 99
cliff: most "newer" systems boards that are made for the mod'er/OC'er in mind are re-inforced on around the cpu sockets for this very reason... im hopping his does if not, aslong as he doesnt bounce the system around i think he will be ok.
IP: Logged
09:00 AM
Boondawg Member
Posts: 38235 From: Displaced Alaskan Registered: Jun 2003
Well, I gave her the good ol' back & forth waller' and it seems to be pretty solid. The mounting area around & behind the CPU and the "spread-out' nature of the front & back of the mount itself seems to be built to handle just such stresses. But in my opiniom it IS pushing it.
A part of me, though, DOES think it would be kind of cool if it DID break off....................but then again, I have been known to have a few issues..................
IP: Logged
10:14 AM
Doug85GT Member
Posts: 10065 From: Sacramento CA USA Registered: May 2003
Looks like a very cool build you have going. Two 8800GT SLI will be as good or better than most of the performance boards on the market.
I would not recommend removing the side 4 fan inner door. You want a smooth path of air through your case. Most cases are set up to have air from from the front over the hard drive to the back and out through the power supply and rear exhaust fan. By removing that side door, you will hurt your air flow and cooling. That is why you don't see very many all mesh open cases. They are actually worse at cooling than a closed case with two fans in it.
IP: Logged
10:49 AM
Boondawg Member
Posts: 38235 From: Displaced Alaskan Registered: Jun 2003
That is why you don't see very many all mesh open cases. They are actually worse at cooling than a closed case with two fans in it.
I am inclined to agree with you. But I think I am going to start there. Then add fans as needed. I mean, I have seen pictures of the Stacker being used with the inner-fan door attached but no fans mounted (but on second thought, they DID have the fan-screens installed...............) I removed all of my fan-screens from the system, although I love the "Shadow Effect" they give lighted fans, I HATE their restrictive nature when it comes to air flow, and the amount of fine dust the collect. I would rather have streght-blowthrough.
I just never understood the design of most cases with reguard to airpreasure:
1 Exit Fan in rear of case 1 Powersupply Exit Fan in rear of case ~But Then~ 2-3 Entrance Fans up in front of case 1-4 Entrance Fans in the side of the case
But it is ALWAYS 2 exit, and invariably MORE THEN 2 Entrance fans. WTF? Doesn't that create some kind of air-preasure inequality?
[This message has been edited by Boondawg (edited 03-18-2009).]
IP: Logged
11:30 AM
Doug85GT Member
Posts: 10065 From: Sacramento CA USA Registered: May 2003
Fans can't really create pressure. It takes a compressor to create pressure. Fans just move air. With two exit fans and 3+ entrance fans, it just moves the air faster. The fans on the exits can spin faster since the air coming at them is already moving so they add even more velocity to it.
Here is something that could add a little more cool factor to your cooling:
This is already the coolest looking PC I've ever seen. I can't wait to see what you do with it next. I'm jealous of you people who can go to a MicroCenter or order stuff online piece by piece then put it together and it not only looks awesome, but works too. If you lived closer I'd try to convince you build my next computer.
- Flamberge
IP: Logged
05:34 PM
PFF
System Bot
Boondawg Member
Posts: 38235 From: Displaced Alaskan Registered: Jun 2003
This is already the coolest looking PC I've ever seen. I can't wait to see what you do with it next. I'm jealous of you people who can go to a MicroCenter or order stuff online piece by piece then put it together and it not only looks awesome, but works too. If you lived closer I'd try to convince you build my next computer.
- Flamberge
Actually, nowadays, anyone can do it. Really, It's no big deal.
My number one secret?: Have a running computer hooked up to the internet while you are doing your build. Run into problems? So has some one else, and the answer (or leads) are right there waiting for you to wade through the false/positives. The Manufacturer Forums have become QUITE good at helping you get your system up & running, simply becouse you bought their parts! Overclocker Forums are great, too!
In building your own system from scratch, the first step is to research, see what everyone else is building. They know what parts are working together. I used to buy a computer magizine, look at the advertisments for already built computers. They always had Highend, Medium, & Budget systems. I would look at what parts they were using to make each system. Since I knew on each system all the parts HAD to be working together right out of the box, I could just copy those specs and be right on the money that it would fire up first time.
But................ Believe it or not, it has gotten Waaaaaaaaaaaaay easier! Just go to NewEgg.com. Pick a motherboard based on what you want to spend. Read the reviews of the people that bought it. Most times, they will also tell you what CPU, memory, etc. they are using. If you see people using a wide range of CPU's & memory, etc, on one spesific board, (like Asus) you know the board is very loose & forgiving. A PERFECT board for the beginner on a budget, becouse you can buy a wider range and/or lower grade CPU, memory, etc., just to get you started.
Then just add upgrades to that motherboard a year later by just buying a bigger/faster CPU and bigger/faster/more memory. Takes about 30 minutes to install the upgrades, and you have a Brand New Computer practically, and you KNOW it will work!! STILL with all your favorite programs installed, unbothered by the change!
After I physiclly build a system, here's how I fire it up:
DO NOT PLUG INTO THE INTERNET.
Turn on. Hit "Delete" on the keyboard. Go to "Boot Priority". Set CD/DVD drive as no.1, Hardrive as no.2, and USB HDD (thunbdrive) as no.3. Open CD/DVD drive. Insert Full Version Windows disk. Close CD/DVD drive. Press "F10" on the keyboard. Press "Y" & then "Enter" on the keyboard. When asked, "To Boot From Disk Press Any Key", press "Enter".
Follow The Onscreen Windows Install Instructions.
When finished, reply "No" when asked to search or install drivers. Install your Antivirus from the disk you have, or your thumb drive.
Now install the Drivers Disk that came with the motherboard.
NOW YOU CAN PLUG IN & HOOK UP TO THE INTERNET.
IMMEDIATLY go to "Windows Update". Do them.
Then do Videocard, Sound, Lan, updated drivers on your own, if you didn't want to accept the ones windows found for you.
If you want to see if you are finished, go to "Start>Settings>Control Panel>System>Hardware>Device Manger. See any yellow "Question Marks"(?)?
Nope, your done! You should have a working system.
Then, later on, if you want to, go into BIOS & finetune stuff for maximum speed or casual reliability. Mess it up? No worries, becouse the motherboards nowadays even have a "Oh Shizz, go back to the last settings that worked good!" button. No more resetting the BIOS! Easy as ABC 123!
[This message has been edited by Boondawg (edited 03-18-2009).]
IP: Logged
06:49 PM
Boondawg Member
Posts: 38235 From: Displaced Alaskan Registered: Jun 2003
Well, the build is at a standstill............................. This case is soooooooooo long, I need to order some extension cords for my front fans. And some cable sheathing.
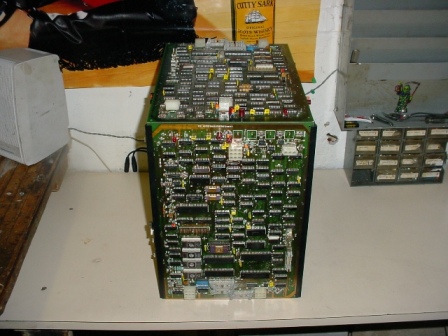
So, here's a look back at some of my early mods, some just the same case with different motherboards, and/or videocards, & lighting.
My First Mod. I Designed, Cut, Wired, & Lighted The Front Alien:
My First Motherboard & Videocard Mod:
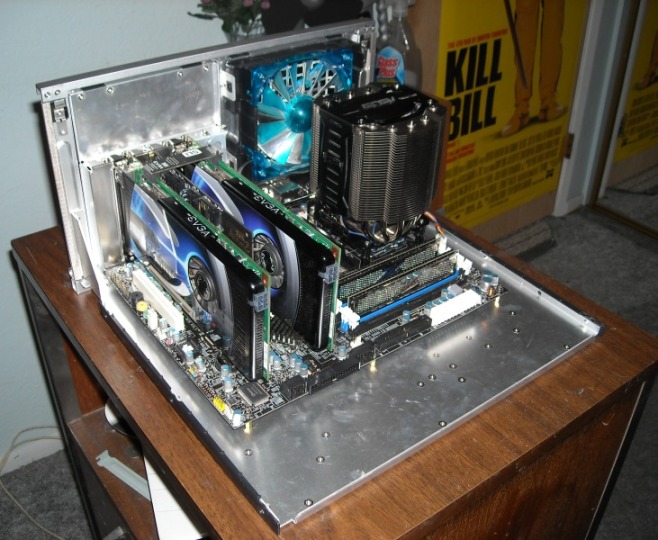
My First From-Scratch, All Mine, Build (Motherboard, Videocard, Memory, CPU & Cooler, & Lighting)
The Borg Mod That Never Was (thanx, Picard.........beeatch!:
My Asus With Dual-Videocards, Lighted Cables, & Mini-Fan Video Heat Mod:
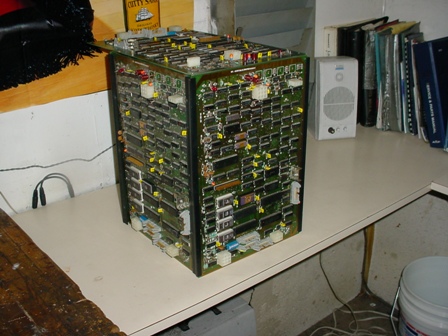
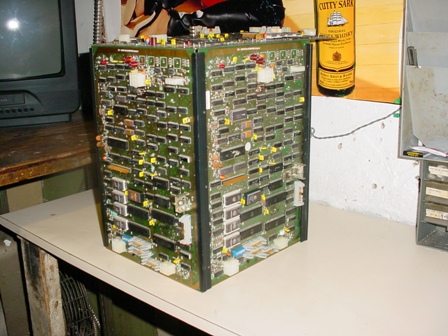
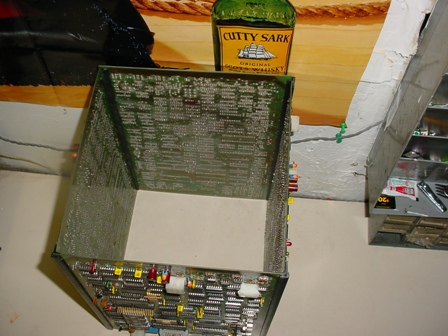
Ofcourse, The Glow Cube:
This Was Just An Art Deco Build, But I Tore It Down For Fan & Lighting Mods, As It Is A Strange Design (upside-down motherboard, powersupply at the bottom, etc.):
There have been MANY more computer builds, but these are the MODS that stand out.
The NEXT of course is the STACKER!...........................
------------------ "I have never seen a greater monster or miracle then myself." ~Montaigne~ 1533-1592 "Technological progress is like an axe in the hands of a pathological criminal." ~Albert Einstein~ 1879-1955 "They speak of my drinking, but never my thirst." ~Scottish Proverb~
IP: Logged
08:24 PM
Flamberge Member
Posts: 4268 From: Terra Sancta, TX Registered: Oct 2001
Still your new one rocks though. Looks like something that fires missiles at UFOs.
I have two computers I use regularly. One is a 7 year old Dell Desktop (not great), and one is a 2 year old Alienware Laptop. It's pretty cool, but the Achilles heel for Alienware is that on battery power, you get about an hour and a half, unless you are rendering 3D frames, running gigantic Photoshop files, or anything else that I specifically need to do.
I'll be watching this thread with great interest, young Skywalker.
IP: Logged
10:14 PM
Boondawg Member
Posts: 38235 From: Displaced Alaskan Registered: Jun 2003
I'll be watching this thread with great interest, young Skywalker.
"Rewarded your curiosity shall be, if patient you are."
------------------ "I have never seen a greater monster or miracle then myself." ~Montaigne~ 1533-1592 "Technological progress is like an axe in the hands of a pathological criminal." ~Albert Einstein~ 1879-1955 "They speak of my drinking, but never my thirst." ~Scottish Proverb~
IP: Logged
10:32 PM
Blacktree Member
Posts: 20770 From: Central Florida Registered: Dec 2001
Regarding the Stacker, I'd be tempted to relocate one of the front fans to the side panel. It would help with video card cooling, and maybe even help CPU cooling a bit.
BTW, it's looking pretty sweet. Keep up the good work.
IP: Logged
10:34 PM
Boondawg Member
Posts: 38235 From: Displaced Alaskan Registered: Jun 2003
Regarding the Stacker, I'd be tempted to relocate one of the front fans to the side panel. It would help with video card cooling, and maybe even help CPU cooling a bit.
:
I really do not want to do that. I want a streght flow from front to back. The Asus CPU cooler has a 90mm fan in it that pulls the air from the front of the case to the back fan, which the Asus Heatsink fan is just 2 inches from the rear fan. The videocards pull air from the front fans, and exhast onto the side-mesh, which should be drawing fresh air from the front to rear airflow. We will see, but I will vent out the top before I abanden the clear-view mesh. Or better yet: http://www.uniquepcgear.com/comastcacrfl.html
I Would Want To Mount It Here:
Or Mount It In The Door, If I Have To:
------------------ "I have never seen a greater monster or miracle then myself." ~Montaigne~ 1533-1592 "Technological progress is like an axe in the hands of a pathological criminal." ~Albert Einstein~ 1879-1955 "They speak of my drinking, but never my thirst." ~Scottish Proverb~
IP: Logged
11:17 PM
Blacktree Member
Posts: 20770 From: Central Florida Registered: Dec 2001
With the open side panel, you're not going to get a clean front-to-back airflow pattern. There will be some bleed-through, in both directions. With all that open vent area, air will have no problem getting in or out of the case, which means that setting up an airflow pattern may not be very critical in your case (pun intended). Hence the side fan suggestion.
Actually, you could probably get away with no front intake fans at all. With all that open vent area, there will be no shortage of fresh air to draw from.
Anyway, I'm going to shut up now and watch you build your computer.
IP: Logged
11:41 PM
Boondawg Member
Posts: 38235 From: Displaced Alaskan Registered: Jun 2003
With the open side panel, you're not going to get a clean front-to-back airflow pattern.
I really have no idea how well my idea will work.
But we should make a bet.
I say I will be able to put a single Zig~Zag rolling paper (my age-old method of checking airflow) almost anywhere on the mesh side and suction will make it stick.
I'm just guessing on it, but what you say? Wanna bet?
quote
Originally posted by Blacktree:Anyway, I'm going to shut up now and watch you build your computer.
Naw, I like talking about this with you. It makes me think about my thinking.
[This message has been edited by Boondawg (edited 03-19-2009).]
IP: Logged
11:53 PM
Mar 19th, 2009
Boondawg Member
Posts: 38235 From: Displaced Alaskan Registered: Jun 2003
With the open side panel, you're not going to get a clean front-to-back airflow pattern. There will be some bleed-through, in both directions.
The more I think about it, the more I'm tending to follow your thinking. Some areas of the mesh will be pulling air, some will be bleeding air.
So tell me this: If I removed the Raptor X Drive from the top fan mesh, and put a "sucking from within" fan there (as intended by manufacturer), that should make the mesh "suck air in", correct? Or ATLEAST not "bleed air"?
------------------ "I have never seen a greater monster or miracle then myself." ~Montaigne~ 1533-1592 "Technological progress is like an axe in the hands of a pathological criminal." ~Albert Einstein~ 1879-1955 "They speak of my drinking, but never my thirst." ~Scottish Proverb~
IP: Logged
07:50 AM
Deabionni Member
Posts: 4088 From: Kalkaska, MI Registered: Mar 2004
I gotta quit looking at your build threads, Boonie. You're getting me in the mood to upgrade my main PC, and use my leftover parts to build the HTPC I've been meaning to build.
Looking good, and keep on modding.
IP: Logged
10:16 AM
PFF
System Bot
Boondawg Member
Posts: 38235 From: Displaced Alaskan Registered: Jun 2003
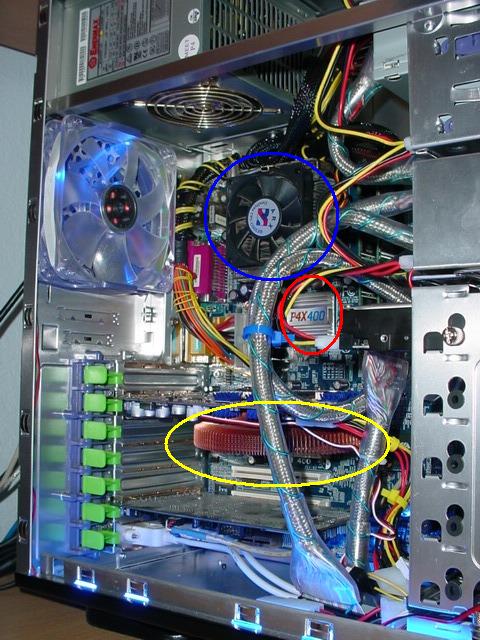
I jumped out of bed at 4am, screaming inside my head, "I know that Asus Silent Square CPU Heatsink has a fan in it, but how do I know I mounted it facing in the RIGHT direction?! What about that picture you saw (below) online?! Wasn't the "ASUS" name facing UP tword the top of the case?!" (yeah, sometimes I wake up solving WORK problems, too)
So having no manual, I go on line, and sure enough, there are little arrows on the sides of the Asus Silent Square CPU Heatsink pointing to the back fan of your computercase. So, off it came, no easy task, in the case. But I never really mind, becouse I get to see how well my Arctic Silver has covered.
I may have to lap both CPU & Heatsink, as I see an aera I don't like, but that could have been made by the way I pulled it off by rocking it to one side. But I'll do some temputure runs first, just to see if they look right: (yes, I know, I see I put too much on!)
Got it all put back together, 4-something-a.m. in the morning, I thought, "What the hell, lets wire 'er up!".
Just The Front Panel Wired:
Fully Wired:
Just Waiting On My Front Fan Extension Cords, And I'm Go!:
I think it came out pretty clean, with the exception of the DVD cable..............I'll have to work something out for that. Tomorrow, lighting installation. Maybe fire her up on Friday!
[This message has been edited by Boondawg (edited 03-19-2009).]
IP: Logged
10:38 AM
Mar 20th, 2009
Boondawg Member
Posts: 38235 From: Displaced Alaskan Registered: Jun 2003
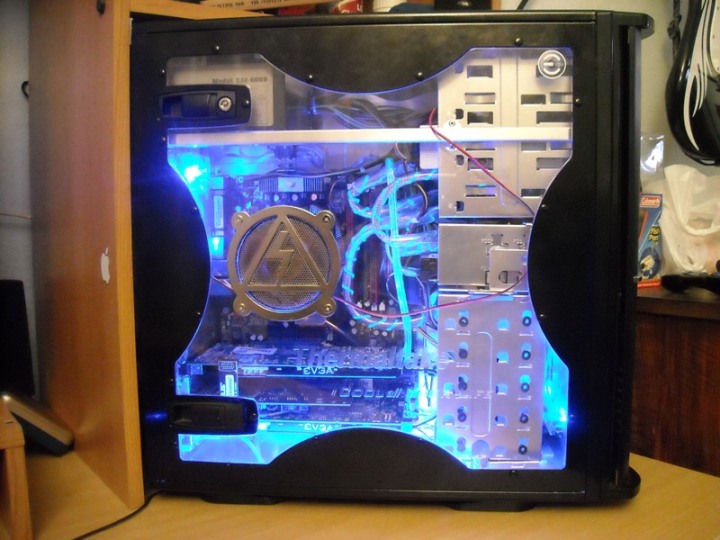
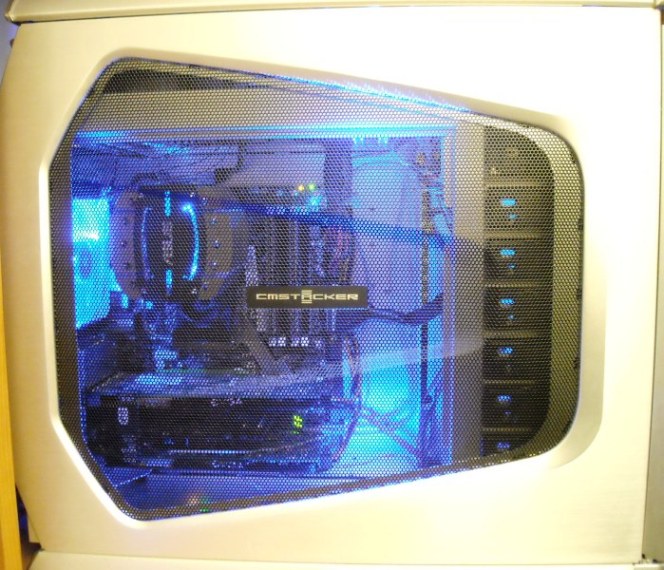
Batteries are almost out on my camera, but here she is running:
The air flow is somewhat strange. The back half of the mesh is sucking enough to stick a ZigZag rolling paper to the mesh, lightly. The front half of the mesh won't nstick one, but it's not blowing any air out, either. I need to do a cigarette smoke test, but I don't smoke anymore....................SEE, I TOLD YOU I STILL NEED TO SMOKE!!!!!!
But everything is REALLY running cool inside after 2 hours. Still need to REALLY stress-test the videocards & get that heat cranking up , for a proper tempeture & airflow cooling test.
More to follow..........................
[This message has been edited by Boondawg (edited 03-20-2009).]
IP: Logged
10:11 AM
Deabionni Member
Posts: 4088 From: Kalkaska, MI Registered: Mar 2004
All Done! Really had a hard time installing windows on any drive I tried in it. While installing, it would say it could not copy a certain file, and asked if I wanted to skip it. I would, it would go for 2 or 3 more files, then do the same thing. When Windows finished installing, everything seemed fine. Untill you tried to use Windows Update. It would fail about 1/3 of the updates. I just could not figure it out. I changed drives, different plug-in ports, & just plain struggled with it.
Then I figured it out. When I configured the system when I first got it some time back, I had done some tweaking to the bios. No overclocking, to speak of, just some minor improvements in boot priorities, disable/inablements, etc.
So I set the Bios to "Failsafe", and bam, everything worked fine. Installed everything, updated it, and reset the bios to a Kickass Overclock! I'm running the Intel E8400 Duo Wolfdale 3.0 CPU at 3.8, and I took the EVGA 750i SLI-FTW motherboard from a 1,333 Frontside Bus to a 1,700, Frontside Bus running VERY stable!
I'm running the WD Raptor X 150gb as my main Operating System, Gaming, & Music Drive, and using my WD 320 SATA drive as storage. A success story!
Unfortunately, for some reason, PIP won't work for me anymore, even when I revert my system back to "FailSafe". It give s me a "Microsoft Error Report". Have to use Photobucket................
IP: Logged
01:00 AM
Mar 23rd, 2009
Flamberge Member
Posts: 4268 From: Terra Sancta, TX Registered: Oct 2001
BTW I reread this thread and noticed the dual video cards. Is this so you can run 2 or 4 monitors, or is it to increase your VRAM for whatever you are doing graphically?
Everything looks very cool, so here's my next question: How much did this all cost you? You don't have to answer, I'm just curious. Looks expensive.
- Flamberge
IP: Logged
04:02 PM
jetman Member
Posts: 7811 From: Sterling Heights Mich Registered: Dec 2002
BTW I reread this thread and noticed the dual video cards. Is this so you can run 2 or 4 monitors, or is it to increase your VRAM for whatever you are doing graphically?- Flamberge
One monitor. I already had one pretty good card, and wanted to indrease my video performance without scrapping my card & buying another newer model (which is the way you SHOULD do it), so I opted for an identical card to mine, and just ran them in SLI for more graphics power.
quote
Originally posted by Flamberge: Everything looks very cool, so here's my next question: How much did this all cost you? You don't have to answer, I'm just curious. Looks expensive.
- Flamberge
CPU - $150.00 Motherboard - $150.00 Memory - $50.00 Extra Videocard (I already had 1) - $100.00 CoolerMaster Case - $100.00 CPU Heatsink (I didn't NEED it, I WANTED it) - $30.00
So, around $600.00 bucks. But you can just put all the new guts in your own case, use the CPU heat sink that comes with the new CPU, & just buy ONE really good videocard for about $500.00 bucks for the whole system.
------------------ "I have never seen a greater monster or miracle then myself." ~Montaigne~ 1533-1592 "Technological progress is like an axe in the hands of a pathological criminal." ~Albert Einstein~ 1879-1955 "They speak of my drinking, but never my thirst." ~Scottish Proverb~


 This is exactly what I had in mind for a build thread!!


 if not, aslong as he doesnt bounce the system around i think he will be ok.