Also found a crappy video of my first drive (I lost the first startup video (and others) due to a hard drive crash way back) no exhaust after the manifolds and wheel alignment way off: http://members.shaw.ca/efog.../4.9/first_drive.avi
Great video!
I never got a first drive vid. My first drive was around the parking lot at the shop. No VSS connected, EGR silonoid missing power wire, high idle from ISC out of adjustment, no ground on F7 & C10, no speedo, and tack reading high. It was a mess. It still felt faster then any other fiero I had driven at that time. A real seat of the pants drive. I wasn't sure if it was going to hold together or not. It was great!
IP: Logged
12:27 PM
Dan_Seattle Member
Posts: 235 From: Seattle, WA,USA Registered: Jan 2007
First drive I ever did with mine there was still some unfinished pieces to the conversion. I was almost shaking with excitment/nervousness. Mainly watched the temp, oil pressure etc. Each time out was a little longer over the course of the next few weeks as I finished up other little parts of the conversion.
IP: Logged
01:47 PM
Fieroseverywhere Member
Posts: 4242 From: Gresham, Oregon USA Registered: Mar 2006
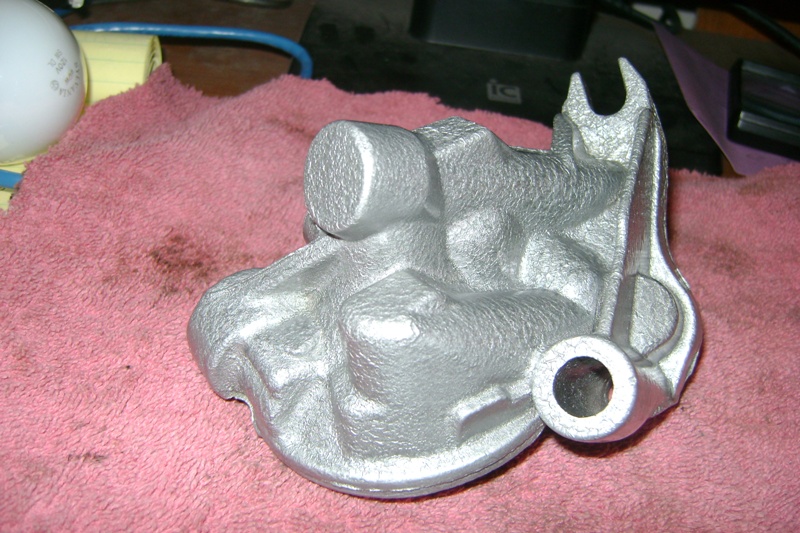
I cleaned and painted the oil filter adapter this afternoon. I used silver 'Hammered' looking paint on it. I will put two coats of clear engine enamel over the 'hammered' silver in the am after the dew burns off. It was 47* this morning at 700am, lots of dew. Had a breakdown on the tracator this morning and didn't get to do all I wanted to the 4.9.
IP: Logged
07:57 PM
Dennis LaGrua Member
Posts: 16191 From: Hillsborough, NJ U.S.A. Registered: May 2000
I had that happen on a 302 Ford once. I use a short piece of heater hose, and fit a metal plug in the end. Put a clamp on it, then just slide it on the nipple, and tighten a second clamp. On these 4.9 swaps it will never be seen anyway. Those rubber caps are worthless. Joe Crawford
My technique is to fill the unused water outlet with black silicone sealant, then cap it off after it sets up.
------------------ " THE BLACK PARALYZER" -87GT 3800SC Series III engine, 3.4" Pulley, N* TB, LS1 MAF, Flotech Exhaust Autolite 104's Custom CAI 4T65eHD w. custom axles, HP Tuners VCM Suite. "THE COLUSSUS" 87GT - ALL OUT 3.4L Turbocharged engine, Garrett Hybrid Turbo, MSD ign., modified TH125H " ON THE LOOSE WITHOUT THE JUICE "
IP: Logged
09:34 PM
Nov 13th, 2009
josef644 Member
Posts: 6939 From: Dickinson, Texas USA Registered: Nov 2006
Checking things out some more today. I found my ECM ground wires I had put out of the way to wire up last are not grounded to anything. I need to fix that. It is about 4-5 wires that come togeather. I want to ground these to the block, as the block will also be also have the NEG battery lead attaached to it. I need to add a chasis to engine ground. I need to add the POS batterey lead to the starter, and install a battery. I am thinking to add a long heaev gauge wire to the starter solinoid for easy spinning the engine over at this stage. I can always remove it later. I am gonna spin it over a bit to get the oil pressure back up before I try to fire it off sometime tomorrow.
I have been looking forward to this for 4 years now, since I got the Fiero bug real hard in 2006
Really Real Burning Hot Close
IP: Logged
10:43 PM
Nov 14th, 2009
josef644 Member
Posts: 6939 From: Dickinson, Texas USA Registered: Nov 2006
Added the POS & NEG battery cables, starter jumper wire, shorty exhaust pipe, exhaust crossover pipe, tied up some wires to close to the exhaust. I capped off the brake booster vacume tube. I went and got 2.5 gals fresh fuel and added it in the tank. I will add another 2 gals after I see where the fuel gauge reads. I will install a new rotor underneath the dist cap, add the 8 spark plug wires and then give her a spin tomorrow. I could have finished up today, but.........
I was removed from my garage by brute force. A gray headed, rolling pin swinging grandmother threatened me with iminent bodily injury and making me sleep in the garage for the rest of the year if I didn't stop , clean up and go shopping with her.
She didn't think it was funny when I told her "OK, thats wonderful news, are you sure you wouldn't mind?" Dad-gum it my head hurts like sin!!!!!
Joe
Wish me luck guys Snuck back outside and installed the new rotor. She never knew!!!!!!!
[This message has been edited by josef644 (edited 11-14-2009).]
IP: Logged
05:02 PM
Nov 15th, 2009
josef644 Member
Posts: 6939 From: Dickinson, Texas USA Registered: Nov 2006
After installing the spark plug wires and adding a battery, I unplugged the fuel pump fuse. Cranked it over until I had oil pressure. Pressure came up after just a few rev's. I poured a tablespoon of gas down each throttle bore. I reach in and turned the key. She hit and ran about 6 seconds. I hit the key again and it ran about 3-4 seconds without adding fuel again. I added some more gas and watched the oil pressure gage this time. It was about half way between 60 and 80 lbs of oil pressure while running. I plugged in the fuel pump fuse and added a test light to the ALDL Turned the key and the light come on for a bit . It comes back on when the starter is cranked over. I ran it about 50- 60 seconds today a litle bit at a time as I don't have a cooling system connected up yet. It would run as long as I kept adding fuel to the T body. I depressed the schrader valve and got a nice shot of gas leaving the fuel rail.
I am 100% sure I have the fuel supply line connected to the port on the right, and not the one that goes to the regulator. It is the return line. Right?
The engine idled fine untill all the fuel is exhausted from the throttle bores. I will check for injector +12 at C203 'J & K'. If these are good, I'll move outside to the engine bay and see if I have +12 at the injector harness connector.
Speedo zeros when the key is turned or the engine was running.
Absolutly no viberation at all with the engine running.
No fuel or oil leaks anywhere
If I can get it to idle I will hook up my lapttop and test out the Dodgerunner's ALDL cable to see if it will run the TunnerPro software. I have added a jumper to ALDL pin 'E' from lead 'M' to see if this will work.
I have positioned my muffler's inlet up arount the exhaust stubbbie. The exhaust sounds real good.
I will make a video clip when I correct the fuel problem. A 6 second clip isn't worth the time to mess with it.
Did I say it sounds GREAT when it is running
+12 at he C203 J and K, and all the way out to the injector connector. They were lettered J and K there also. Go figure Checking things over and discovered the green ECM connector was not seated all the way. VAts bypass is F10 in there. Pushed it and and started it up. Ran it about 15 seconds. Has a hard miss. It ran smooth and great on poured in gas. That by it self would eliminate the ingition. Has to be a either bad or miss wired injectors. I will check for miss wired injectors tomorrow. I will unplug the harness and route it inside the car by the ECM plugs. Ohm em all out
Is there a way to check the injectors with out taking them apart?
[This message has been edited by josef644 (edited 11-15-2009).]
IP: Logged
08:09 PM
PFF
System Bot
Nov 16th, 2009
olejoedad Member
Posts: 20094 From: Back home again in Indiana Registered: May 2004
On your injector wires. Double check the black/red wires. I may be wrong on the exact color but there should be two of them the same color. Just make sure they are in the correct spots. If you look at the 92-93 wiring diagrams you will see what I'm talking about.
Just double checked. According to the wiring diagram both wires are Blk/Lt blu. I'm pretty sure mine were blk/red. Check PCM pins C15 = injector #4, D14 = injector #7. Double check with a continuety tester to be sure they are in the right place. Wont idle well with them reversed. You can switch pins at the PCM if needed to easily correct the problem.
[This message has been edited by Fieroseverywhere (edited 11-16-2009).]
IP: Logged
10:25 AM
josef644 Member
Posts: 6939 From: Dickinson, Texas USA Registered: Nov 2006
fuel problem could be VATS (passkey) - did you have it programmed out?
I have a Baker Electronix VATS by pass. And the green Led is on. I also verified the connection to ECM F10. It has to be working or I wouldn't be able to get it to run from the injectors for around 12-15 seconds before I killed the ingnition.
Would it help or hinder for me to remove the 8 injectors and put them in a quart of thinner to help get them unstopped?
Gonna go remove the injector part of the harness now to verify the connections with the pin positions.
[This message has been edited by josef644 (edited 11-16-2009).]
IP: Logged
01:47 PM
josef644 Member
Posts: 6939 From: Dickinson, Texas USA Registered: Nov 2006
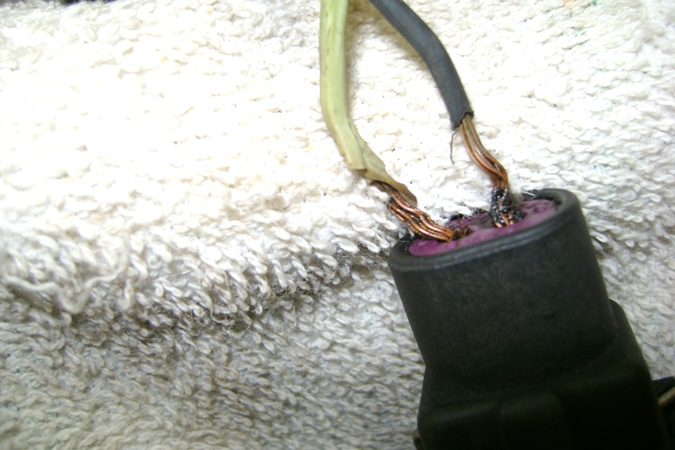
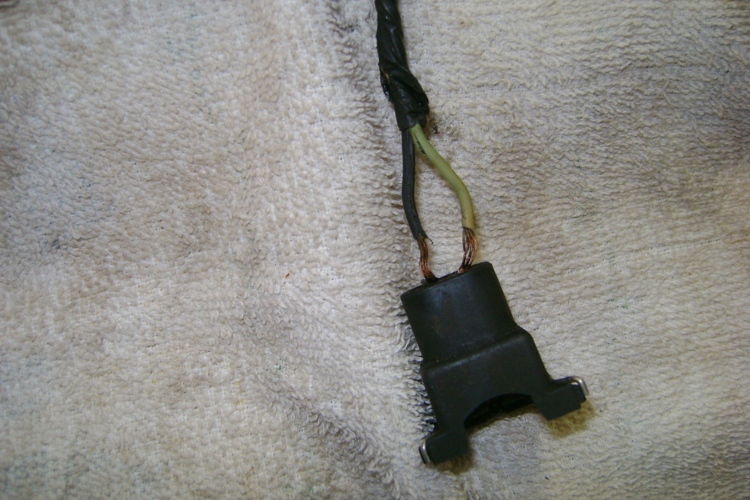
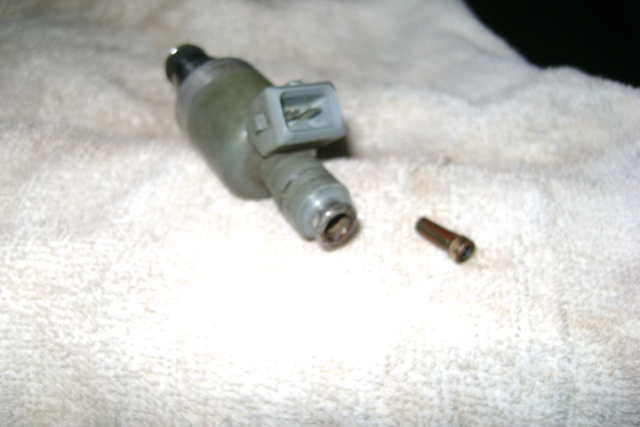
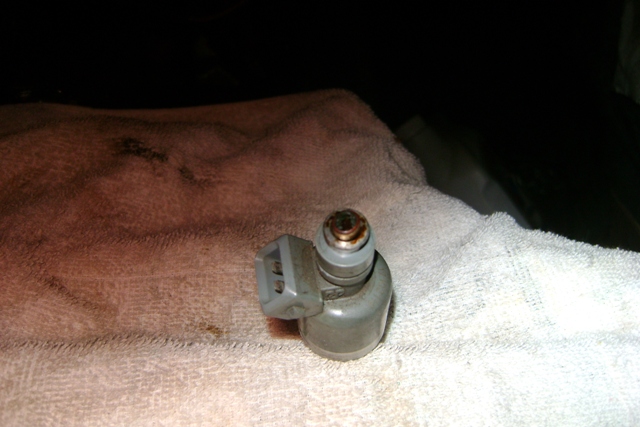
All ten injector wires check out perfect all the way from the ECM to the injector connector. I did find two wires like shown in these pictures The wires were twisted 360* and were shorting out:
# 6 & 8 injectors were wet, all the rest were dry.
Im gonna remove the injectors from the fuel rails and clean them up good with some fresh gas. I will order new 'O' rings for the bottom and tops tomorrow. I'm gonna set up and do a quick spray test with the rails and injectors off of the engine as fieroguru suggested.
quote
Originally posted by fieroguru:
You probably have at least 1 if not more plugged injectors (these 4.9's are notorious for them).
Last 4.9 swap I did, the 64K mile engine had 3-4 clogged injectors. Took the fuel rail/injectors off another engine and every one of them was clogged.
I made a little injector test stand along side the car, ran the fuel return/supply to it and jumpered the fuel pump to stay on. Then made a jumper harness that plugged into the injector harness and added 12V and ground to let them spray... just make sure there are no sparks/fires/ignitions sources around and only spray them long enough to check the pattern of each.
Thats a great idea, I never would have thought of doing this.
I just went to Rockauto to check prices, they were $57.00 and up, to $112.00 each.
Nothing left to do tonight
[This message has been edited by josef644 (edited 11-16-2009).]
IP: Logged
05:46 PM
30+mpg Member
Posts: 4062 From: Russellville, AR Registered: Feb 2002
I guess I could just use a piece of fuel hose on the top of the injector, and add a dab of air pressure. Say 10lbs? I also have a 12 V lawn mower battery. And I would think one could use just about any type of petroluem based liquid, gas , diesel or what ever is in the shop.
I hate the taste of gas.
Great ideas here.
[This message has been edited by josef644 (edited 11-16-2009).]
IP: Logged
07:44 PM
Nov 17th, 2009
fieroguru Member
Posts: 12644 From: Champaign, IL Registered: Aug 2003
You really need to check them at operating pressure with fuel.... since there are several failure modes for injectors: Stuck closed, Stuck open, and partially clogged producing a poor spray pattern and less fuel delivery.
I will have to go back and check some PM's, but a set of 8 rebuilt injectors was around $150.
[This message has been edited by fieroguru (edited 11-17-2009).]
IP: Logged
08:50 AM
Dan_Seattle Member
Posts: 235 From: Seattle, WA,USA Registered: Jan 2007
When my Formula still had the 2.8 in it, it sort of had a similar issue. Hadn't run in over a year, It would fire off the cold start injector or if you sprayed a little fuel down the intake etc. I didn't pull the injectors off, I kept my gas pedal 100% depressed to the floor while trying to start it. It isn't often full fuel pressure is ever delivered to injectors. Believe it or not, it worked. Engine started to stumble, them finally light on it's own and eventually run. The more I flogged the throttle (while driving at this point), the better it continued to run.
Warning though, it puts a little stress on the starter in the begining and in the end, I should have just pulled the injectors and had them all hydrostatically cleaned and tested. But in the end, the engine did run good with the "smash foot to floor" method.
IP: Logged
09:36 AM
PFF
System Bot
Fieroseverywhere Member
Posts: 4242 From: Gresham, Oregon USA Registered: Mar 2006
I didn't pull the injectors off, I kept my gas pedal 100% depressed to the floor while trying to start it.
This wont work with a 4.9. With the car off and gas pedal fully pressed (High TPS reading) the PCM puts the car into "clear flood mode" and cuts all fuel delivery.
IP: Logged
09:51 AM
Dan_Seattle Member
Posts: 235 From: Seattle, WA,USA Registered: Jan 2007
After installing the spark plug wires and adding a battery, I unplugged the fuel pump fuse. Cranked it over until I had oil pressure. Pressure came up after just a few rev's. I poured a tablespoon of gas down each throttle bore. I reach in and turned the key. She hit and ran about 6 seconds. I hit the key again and it ran about 3-4 seconds without adding fuel again. I added some more gas and watched the oil pressure gage this time. It was about half way between 60 and 80 lbs of oil pressure while running. I plugged in the fuel pump fuse and added a test light to the ALDL Turned the key and the light come on for a bit . It comes back on when the starter is cranked over. I ran it about 50- 60 seconds today a litle bit at a time as I don't have a cooling system connected up yet. It would run as long as I kept adding fuel to the T body. I depressed the schrader valve and got a nice shot of gas leaving the fuel rail.
I am 100% sure I have the fuel supply line connected to the port on the right, and not the one that goes to the regulator. It is the return line. Right?
The engine idled fine untill all the fuel is exhausted from the throttle bores. I will check for injector +12 at C203 'J & K'. If these are good, I'll move outside to the engine bay and see if I have +12 at the injector harness connector.
quote
Originally posted by josef644: I have a Baker Electronix VATS by pass. And the green Led is on. I also verified the connection to ECM F10. It has to be working or I wouldn't be able to get it to run from the injectors for around 12-15 seconds
Would it help or hinder for me to remove the 8 injectors and put them in a quart of thinner to help get them unstopped?
I like the little test on the injectors you did
In your first post, you mention that it runs only when you add fuel to the throttle body (injectors not firing). Part of the function of the VATS is to disable the fuel system after 2-3 secs after startup - the car will run if force fed, but the injector will not fire (VATS also disables the starter, but this does not apply to the Fiero unless you wired it up as it is in the Caddy with the VATS relay and such). If your car will start (without adding fuel to the throttle body) and stall shortly after, it is most likely a VATS issue. Are you running the correct frequency on the bypass module? I don't recall off hand right now if the 4.9 is running the 50Hz or the 60Hz signal (this may also depend on the year of the program that is in the ECM) - try switching the frequency if your module lets you and try that. I just checked and it seems Rockcrawl has removed that info from his website.
Injectors: Don't use thinner on them, you may damage the insulation on the coils - use injector or carb/throttle body cleaner. Check out Dodgerunner's post here: https://www.fiero.nl/forum/Forum2/HTML/096900.html
[This message has been edited by Mickey_Moose (edited 11-17-2009).]
IP: Logged
10:04 AM
josef644 Member
Posts: 6939 From: Dickinson, Texas USA Registered: Nov 2006
In your first post, you mention that it runs only when you add fuel to the throttle body (injectors not firing). Part of the function of the VATS is to disable the fuel system after 2-3 secs after startup - the car will run if force fed, but the injector will not fire (VATS also disables the starter, but this does not apply to the Fiero unless you wired it up as it is in the Caddy with the VATS relay and such). If your car will start (without adding fuel to the throttle body) and stall shortly after, it is most likely a VATS issue. Are you running the correct frequency on the bypass module? I don't recall off hand right now if the 4.9 is running the 50Hz or the 60Hz signal (this may also depend on the year of the program that is in the ECM) - try switching the frequency if your module lets you and try that. I just checked and it seems Rockcrawl has removed that info from his website.
Injectors: Don't use thinner on them, you may damage the insulation on the coils - use injector or carb/throttle body cleaner. Check out Dodgerunner's post here: https://www.fiero.nl/forum/Forum2/HTML/096900.html
Here is my Baker order: VATS PASSkeyII Bypass Item# VATS , LED Color: Green , VATS Signal: 30 Hz $25.00 USD 1 $25.00 USD"
And a part of their list of 30 Hz autos Known PCMs or vehicles that used the 30 Hz VATS: 1993 Camaro (The 88,90 & 92 may or may not be 30Hz) 1990-93 Cadillac Deville (The 89 may or may not be 30Hz) 1993 Oldsmobile 88
So guess you are thinking I need to send the prom to Stickpony to correct the VATS part of the programing? I have started it off of the injectors and ran it for about 12-14 seconds. I had a real bad miss or maybe more than one miss, and I was having a hard time keeping the engine running.
I thought that if the VATS was the problem, I wouldn't have been able to run it ofer 2-3 seconds before the ECM turned off the fueling
[This message has been edited by josef644 (edited 11-17-2009).]
IP: Logged
11:20 AM
josef644 Member
Posts: 6939 From: Dickinson, Texas USA Registered: Nov 2006
You really need to check them at operating pressure with fuel.... since there are several failure modes for injectors: Stuck closed, Stuck open, and partially clogged producing a poor spray pattern and less fuel delivery.
I will have to go back and check some PM's, but a set of 8 rebuilt injectors was around $150.
Mr Injector will do a full rebuild service on my injectors for 128.00
IP: Logged
11:52 AM
Fieroseverywhere Member
Posts: 4242 From: Gresham, Oregon USA Registered: Mar 2006
90-93 4.9 is 30hz. 94-95 is 60hz. Looks like that is right. Based on how long it ran I'd bete the vats bypass is working correctly. Can't you verify this with a scanner?
You can use two jumper wires (one +12V, one ground) to test each individual injector if you remove the connectors. This will at least tell you if they are firing.
Have you tried the injectors again since fixing the shorting wires?
[This message has been edited by Fieroseverywhere (edited 11-17-2009).]
IP: Logged
12:04 PM
josef644 Member
Posts: 6939 From: Dickinson, Texas USA Registered: Nov 2006
I can work the injectors wirh two wires to listen for the clicks. I have been reading on the net about flow rate, cleaning etc. Not sure on the best way to clean these up yet. It seams that washing them off with some gas, and blowing them off is about as effective as one can do at home. Changing the prindle cap, O rings and the filter would be a good idea, and cheap to do.
I am gonna remove the injectors from the rails today and do some type of test to them to check for stopped up or stuck open conditions. I will post my findings afterwards.
I just got off of the phone with Mr Injector. Bill offerd me good suggestions and advise. He is the top link above. He recommends using a Max 8700 Choke and Carb with the little plastic squirt nozzel, and a rubber plug to force the spray inside the injector with the filter screen removed. Apply 9 volts to the connector. This should get it working better than just soaking overniight in a carb cleaner. His EBay store: http://stores.ebay.com/Mr-Injector.
[This message has been edited by josef644 (edited 11-19-2009).]
IP: Logged
12:19 PM
josef644 Member
Posts: 6939 From: Dickinson, Texas USA Registered: Nov 2006
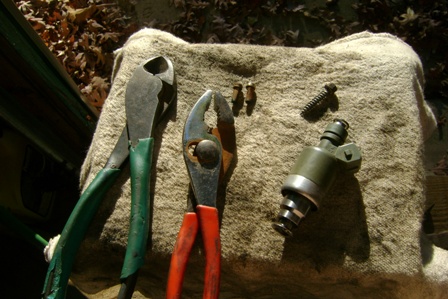
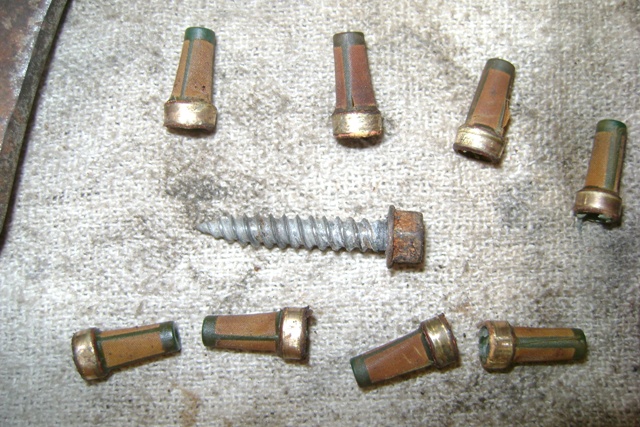
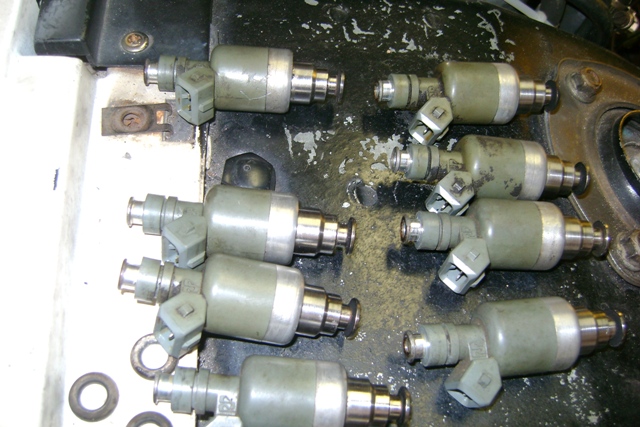
I removed all 8 injectors from the fuel rails. The rail ends of the injectors had this awful smell and a chocolate brown color on inlet end where the filters insert: Here is what I used to remove the filters from the inlet on the top:
Just screw in the patented filter remover, and pull it out. I used the side cutters because it was a bit larger and gave me better leverage A shot of all 8 removed and the patented fuel injection filter remover:
8 injectors ready to be cleaned up and tested sometime tomorrow.
A bit of sour gas was in the top of all 8 injectors
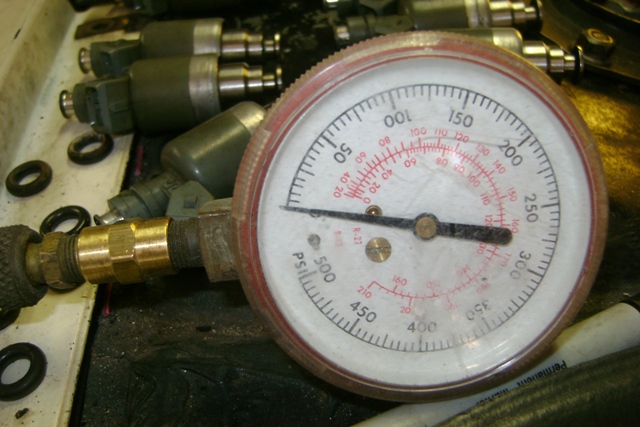
I went to the hardware store an scored me a brass adapter so I can connect the pressure gauge to the fuel rail after I reinstall this mess:
IP: Logged
05:58 PM
Fieroseverywhere Member
Posts: 4242 From: Gresham, Oregon USA Registered: Mar 2006
...but mind if I ask a stupid question? Where exactly are the filter in relation to the injector body (I know this is probably obvious if I would just look at the injectors). You go the replacement filter from (Mr. Injector)?
Cheers,
IP: Logged
09:25 AM
josef644 Member
Posts: 6939 From: Dickinson, Texas USA Registered: Nov 2006
Sorry M_M, I assumed you had removed one in the past for some reason.
I ordered the injector service kit yesterday, $24.00 delivered.
Here are some pictures of the placement of the filter: and in the injector but not seated:
I want to give credit to whoever wrote this web page on how to clean their injectors in the link below. I recommend taking the 5 mins or so to read his instructions. The names Mike and Debbie are at the bottom of the page: http://www.rowand.net/shop/...InjectorCleaning.htm
[This message has been edited by josef644 (edited 11-18-2009).]
IP: Logged
10:14 AM
Fieroseverywhere Member
Posts: 4242 From: Gresham, Oregon USA Registered: Mar 2006
Has a stainless steel tank and looks like it would work well. Worth the money for $20 + shipping. I think I'm going to order one up and get a rebuild kit for my injectors also. I'm pretty sure at least one leaks. I just need to find a good, non-flamable liquid to use in the cleaner. Thanks for posting the info Joe.
[This message has been edited by Fieroseverywhere (edited 11-18-2009).]
IP: Logged
11:42 AM
Mickey_Moose Member
Posts: 7597 From: Edmonton, AB, Canada Registered: May 2001
Very good article. I took a quick peek for a ultrasonic cleaner and found this...
Yes I would recommend picking up a cheaper ultrasonic cleaner as they work quite well. I have cleaned my 2.8 and 4.9 injectors with one and it made a big difference. On a side note I also used the cleaner to do the door latches on the one car and boy that sure made a difference in the power locks.
josef644 >> thanks for the pictures, that is how I assumed they came apart.
IP: Logged
11:54 AM
josef644 Member
Posts: 6939 From: Dickinson, Texas USA Registered: Nov 2006
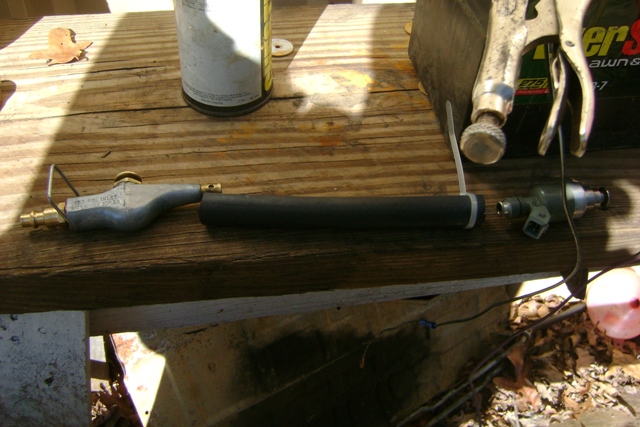
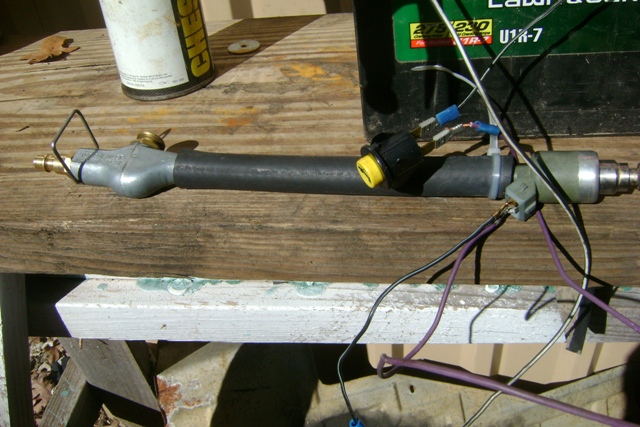
Well I collected all my 'Patented" fuel injector checker parts one can of Max's 8700 Carb and Choke cleaner 8 " of 5/8" heater hose w/ one ty strap Air nose putton pushed compressed air on and off unit one used trunk lock popper button off of a 91 Deville, not seen in the first photo one lawn mower battery wire and connectors
Assemble 'Patented" injector checker
The 5/8th hose fits good on the top of the injector. I turned on the air compressor untill I had 40 lbs of air pressure. I put the hose on the injector. Add a bit of the Max's 8700 Carb and Choke cleaner from NAPA, insert the air nozzel into the hose and hold the button down on the air nozzel. I pushed the button up and down and watched for a spray. I was rewarded three times. I had one that would omly drip at first, but was able to clear it up. I had two that I had to play with a bit to get them to un plug an spray. I have six working injectors now. Two have refused to cooperate. I am gonna soak them over night in gas or a carb cleaner of some type. I usually use laquier thinner for carb parts, but I'm not so sure if I want to put these plastic injectors in that kind of thinner.
6 good, and they have a nice TIC<TIC<TIC when the power is applied to the injectors 2 Deceased
Edited to add : The two deceased ones are now in Berryman's Chem Dip for overnight.
[This message has been edited by josef644 (edited 11-18-2009).]
IP: Logged
01:59 PM
josef644 Member
Posts: 6939 From: Dickinson, Texas USA Registered: Nov 2006
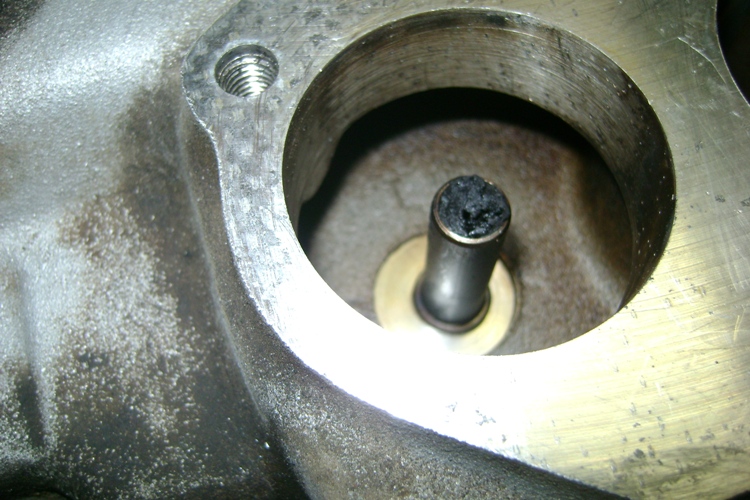
Went outside and removed the TB so I could do a good job cleaning the intake around where the injectors plug back in . Got it all cleaned pretty good and saw this. What tha hell is this? :
I put my shop vac in the throttle bore and turned it on. This is the rear one, and I could hear and feel air coming threw the injector holes on the forward bank.
At first I thought maybe EGR path, as it is right behind this intake bore. But the air flow is on the other side of the intake.
The other bore has a shorter one, but it isn't stopped up near this bad.
Took my finger and feeled of it. Its simi soft. Not crunchy like burnt ERG waste is that I have had to dig out of SBC engines before.
Edit to ask:
When you guys have replace thte fuel rails to the intake, what method did you use? As a one piece unit, or take the two sides apart? When I removed it from the in take, I started on the forward bank alt end, rear alt end, Rear transm end, then the forward bank transm end. Just wondered what worked best for everyone. I want to have the harness on the underside as Fieroseverywhere suggested before I stab it on.
[This message has been edited by josef644 (edited 11-18-2009).]
IP: Logged
04:38 PM
Fieroseverywhere Member
Posts: 4242 From: Gresham, Oregon USA Registered: Mar 2006
I replace as a full unit. Never had a problem that way.
On a side note a wrecking yard close to me wants 76 dollars for a caddy fuel rail with all injectors, harness, and regulator attached. They have a few if your interested. I'm going to pick one up for a fuel rail project.
IP: Logged
07:11 PM
josef644 Member
Posts: 6939 From: Dickinson, Texas USA Registered: Nov 2006
I'll see what happends after I get them out of the Chem Dip tomorrow. I will be mowing till 2 or so it'll be later in the day before I know if they cleaned up or not.
IP: Logged
07:32 PM
josef644 Member
Posts: 6939 From: Dickinson, Texas USA Registered: Nov 2006
I replace as a full unit. Never had a problem that way.
On a side note a wrecking yard close to me wants 76 dollars for a caddy fuel rail with all injectors, harness, and regulator attached. They have a few if your interested. I'm going to pick one up for a fuel rail project.
Ok so one piece, and then what. Please don't tell me " Installation is the reverse of the removal procedure" like my Haynes does. ANY tips for easy replacement?
When I removed the rails from the intake the top O rings were still soft and puffed up,round-ish sort of. The ones from the intake were real flat on the sides. I know this is gonna be fun.