Here's a rod cap with bearing still installed. It looks ok, but has pitting and some wear from dirty oil.
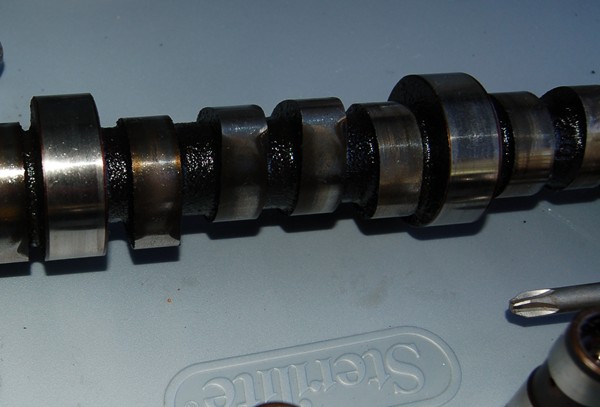
Once the timing chain and lifters are removed you can carefully pull the camshaft out. Here I found some scoring and wear on the cam bearing journals...again a result of dirty oil. Seems like the previous owner didn't like changing the oil. The cam bearings were worn pretty badly so they need to be replaced. That's a job for the machine shop since I don't have the proper installation tools, plus I need to get all the crud out of the block so it's a good time to have the block hot tank cleaned as well.
[This message has been edited by randye (edited 04-07-2007).]
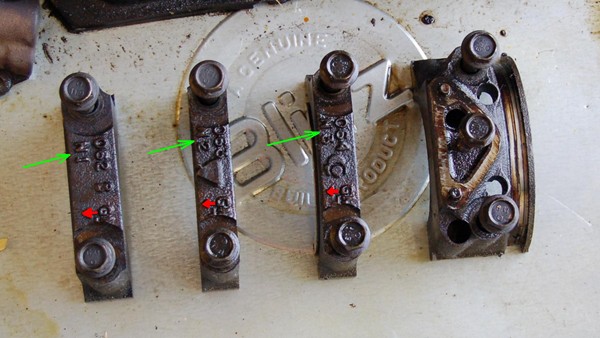
Once the pistons and rods are out it's time to remove the main bearing caps. The caps are pretty distinct from one another so it's hard to mix them up, but they are convieniently numbered starting from the front of the motor; N1, N2, N3 (green arrows) The caps are also marked with a small cast arrow indicating their orientation which I've highlighted in red. The rear main cap that mounts the oil pump is very different as you can see, (the oil pump is obviously removed here, and the pump mounting bolt placed back in the cap.
Randye, if I understand you correctly you are going to use the original cam with new lifters. You might get away with that but usually thats not a good solution as the cam and lifters have worn together. I don't want to sound like an alarmist and maybe someone else will weigh in here but when you consider the time, effort and money involved you might want to look at a cam kit. I don't know about you but my least favorite part of working on cars is doing stuff over and over. Just a thought. Good luck. I'll be following this thread with interest as I have made up my mind that I will never build another 2.8.
Randye, if I understand you correctly you are going to use the original cam with new lifters. You might get away with that but usually thats not a good solution as the cam and lifters have worn together. I don't want to sound like an alarmist and maybe someone else will weigh in here but when you consider the time, effort and money involved you might want to look at a cam kit. I don't know about you but my least favorite part of working on cars is doing stuff over and over. Just a thought. Good luck. I'll be following this thread with interest as I have made up my mind that I will never build another 2.8.
No David, I'm replacing the cam, lifters and pushrods I don't like the look of the lobe wear on the cam I pulled out, plus if you look a couple of posts back, the cam journals had some scoring. If the previous owner had believed in oil changes, or if I had x-ray vision to see inside this motor before I bought it ......*sigh*
Thanks for keeping an eye on me. Never know when I'll go off and do something really stupid and it's good to have someone watching
Last night I removed all the rod bearings and put the caps back on the rods loosely. I had (3) 1 gallon cans of GUNK brand carb and parts cleaner on the shelf so I decided to give my rods and pistons a good bath, This stuff works wonders... After the parts soaked overnight, I cleaned the now loose carbon and sludge out of the ring grooves in the pistons with broken pieces of old rings and then inverted the rods and soaked the bearing ends.
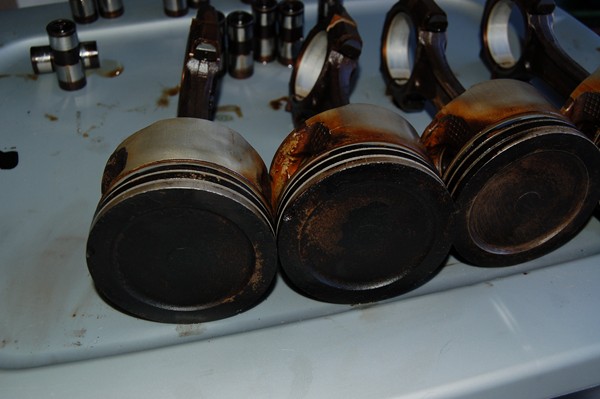
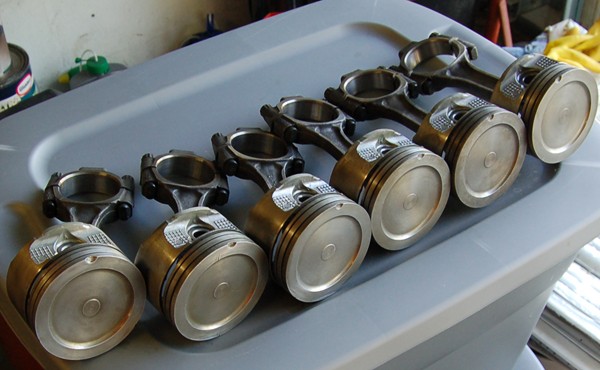
Here's the pistons and rods after their cleaning. All ready for new bearings and rings:
The light in the garage reflected off the pistons a bit, but all the pistons came out carbon and varnish free. The reflection looks a little like varnish, but they are nice clean aluminum and steel now The #2 piston had apparently ingested something hard during it's past and there are a couple of gouges on the piston top that were obscured by the carbon buildup. I figure since the gouges are not too awful bad and piston obviously held up fine for 100k+miles, I'll probably re-use it.
IP: Logged
04:59 PM
Apr 10th, 2007
sardonyx247 Member
Posts: 5032 From: Nevada, USA Registered: Jun 2003
Well Between the 2 of us, this WILL be THE 3.4 Thread. Install and rebuild Myself, I'm in Vegas doing 2 swaps right now, have both engines ready to pull in the morning. But didn't bring my camera, so no pics on this swap(s) as of yet, providing I find a camera to use.
Well Between the 2 of us, this WILL be THE 3.4 Thread. Install and rebuild
Before we call it "THE" thread on 3.4s I think a little clarification might be in order:
There are a lot of threads regarding the 3.4 and a lot of ongoing work that others are doing, and have done, with modifications to the 3.4 looking for more performance. Things like head, intake and exhaust manifold porting, different performance cams, 1.6 roller rockers, roller timing chains, different valve springs, reprogramming EPROM chips...the list goes on and on....
Some of the best advice on 3.4 performance builds I've seen regards the "Law of Diminishing Returns"
In other words, there's a point at which you just will not get increases in performance, (HP or Torque), in proportion to the money spent on modifications. I think you can almost swap in a decent stock 3800 NA without overhaul and get more performance from it right off the bat than with all the mods you could do on a 3.4, so on a $/ hp basis the 3.4 is not a really great candidate motor for lots of performance mods from what I've seen. (just my opinion)
So why the interest in a 3.4 swap anyway?
Well, to my mind it's THE easiest engine swap for a little more performance over the 2.8 and, other than the simple modification to the starter location, it's a complete BOLT IN, including no transmission, axles, motor mounts, harness, exhaust or ECU changes really necessary. It also LOOKS like the original Fiero 2.8 which is appealing to some folks, including me. It can also be one of the cheapest engine upgrades for your Fiero.
So...as far as this being "THE" 3.4 thread, lets just say that for my part, as far as the engine rebuild goes, I'll be limiting it to simply a very basic "refreshing" of a worn 3.4 for some reliability and longivity without going to the "extremes" of blueprinting, balancing, porting etc. etc. looking for that last fraction of HP that can be squeezed out of a 3.4 V6
Call it "low tech" if you want, but it's also "low budget", which doesn't violate my interpretation of the "Law of Diminishing Returns" Additionally, this sort of stock motor work may be very familiar to a lot of people, but I've received PMs from a few that have never attempted this sort of thing before, and while I'm FAR from being an expert at this, I think that almost anyone can do this sort of thing with a little explanation and help. I'll also be keeping track of costs of this basic rebuild while I'm at it so that you can decide if you want to just drop a salvage yard motor in your car as-is, rebuild or replace just some parts of it, perform "open heart surgery" on it like I'm doing, or just say to heck with all the work and and buy a new crate motor.
Randy
Apologies for being long-winded
[This message has been edited by randye (edited 04-10-2007).]
IP: Logged
12:00 PM
alex de jorge Member
Posts: 501 From: Kissimmee, FL Registered: Nov 2005
Has anyone figured out what size plug extractor tool is needed to remove the plug for that one sensor? I would hate to order one from Snap On tools to find out it doesn't work and have to return it. Unfortunately there are no local store form them.
Has anyone figured out what size plug extractor tool is needed to remove the plug for that one sensor? I would hate to order one from Snap On tools to find out it doesn't work and have to return it. Unfortunately there are no local store form them.
One easy way to make your own tool for this is to simply use an old bolt and cut it off just above the threads at the shank. Then grind a square shape on the cut off end of it to fit the plug. Insert it into the plug and apply a suitably sized socket wrench....total cost: $0
If you're taking the heads off and doing a valve job and replacing pushrods, lifters and cam like I am, just swap them right for left when reassembling. The heads are the same as far as I can tell. You can just remove the sensor that is, (was), in the opposite head and leave the old plug in place. (This is not recomended if you're not replacing the valve train parts I mentioned.)
IP: Logged
06:50 PM
PFF
System Bot
sardonyx247 Member
Posts: 5032 From: Nevada, USA Registered: Jun 2003
Has anyone figured out what size plug extractor tool is needed to remove the plug for that one sensor? I would hate to order one from Snap On tools to find out it doesn't work and have to return it. Unfortunately there are no local store form them.
quote
Originally posted by sardonyx247:
I would measure it if I were you.
But since you didn't it measures 8mm
quote
Originally posted by randye:
One easy way to make your own tool for this is to simply use an old bolt and cut it off just above the threads at the shank. Then grind a square shape on the cut off end of it to fit the plug. Insert it into the plug and apply a suitably sized socket wrench....total cost: $0
The reason I say get the right tool is I tried the grinding method and it just kept breaking off in the plug, untill it broke off and couldn't get the peice of the tool out. Had to drill it out.
quote
Originally posted by randye:
Before we call it "THE" thread on 3.4s I think a little clarification might be in order:
OK then, I will call it THE 3.4 Swap thread, Why because when I did mine there was hardly any pics of anything for the 3.4 swap. All the swap threads had very little info, so I tried to have as much info and pics as I could for swaping this. There was 0 starter relocation pics, and everyone just said to give my money away to rodney for a 1 time use only jig. I tried to keep this a cheap swap since if I could blank check a car I would not be here. And most people here can not blank check a car either or have what it takes for a bigger swap. I have not seen a better thread on swapping the 3.4L. Rebuilding modding or what ever. This thread was designed for my swap and to try to give as much info as I could so it could be reproduced.
OK then, I will call it THE 3.4 Swap thread, Why because when I did mine there was hardly any pics of anything for the 3.4 swap. All the swap threads had very little info, so I tried to have as much info and pics as I could for swaping this. There was 0 starter relocation pics, and everyone just said to give my money away to rodney for a 1 time use only jig. I tried to keep this a cheap swap since if I could blank check a car I would not be here. And most people here can not blank check a car either or have what it takes for a bigger swap. I have not seen a better thread on swapping the 3.4L. Rebuilding modding or what ever. This thread was designed for my swap and to try to give as much info as I could so it could be reproduced.
Hey, we are in complete agreement! All I was saying is that my engine rebuild addition to YOUR thread was going to be simply a stock "refresh" of a 3.4 , nothing more really. Just wanted to forestall any of the "why didn't you add a performance _________" type of posts. I see too many people ask about doing a simple swap and suddenly get blasted with a bunch of mega-dollar suggestions.
I'm more than happy to call it "THE" 3.4 thread, afterall it's still your thread. I'm honored you let me horn in on it a little My intention is simply to help out those who might want to, (or need to), do some internal engine work on their stock 3.4 swap. I agree, this should be a cheap and simple as possible.
Randy
[This message has been edited by randye (edited 04-10-2007).]
IP: Logged
08:46 PM
alex de jorge Member
Posts: 501 From: Kissimmee, FL Registered: Nov 2005
I had a hell of a time getting the harmonic balancer off. That has been the hardest thing to remove out of the whole engine. The timing chain looked a bit worn. I am now getting ready to replace the timing chain and sproket. We'll see how that goes. BTW my engine was pretty much clean. It actually looks tobe in pretty good shape.
IP: Logged
08:56 PM
shawnkfl Member
Posts: 2457 From: Largo, Florida Registered: Oct 2004
the fun part about mine was going to auto zone and telling them i needed a oil pan gasket for the camaro 3.4 and a water pump for a 2.8 fiero....the look on the guys face was priceless!! i used the 3.4 oil pan on mine with the 3.4 oil pump. instead of doing the "impact persuasion" on the pan though, i ground a touch off the front motor mount and left the pan alone. you don't have to grind much off the motor mount to jeopardize the integrity of the mount at all either, so i couldn't see denting the pan to get it fit. randye, it was good talking with you again, hope the book helps. i have the starter jig bagged up for our next visit. Chinese lunch sounds good!
I had a hell of a time getting the harmonic balancer off. That has been the hardest thing to remove out of the whole engine. The timing chain looked a bit worn. I am now getting ready to replace the timing chain and sproket. We'll see how that goes. BTW my engine was pretty much clean. It actually looks tobe in pretty good shape.
Alex, If the engine looks pretty clean inside and your bearings and journals look good, then I'd say just put in the new timing set and new standard bearings and Plastigage them. If they look good on the clearances then button it up.
Don't forget to put on a new chain dampner with the timing set if it didn't come with one. They're cheap and it should be replaced with the timing chain set.
Be VERY careful with the cam! Don't pull it out when you remove the cam sprocket or you'll be pulling the lifters out to get the cam back in. If you still have the 3.4 DIS distributor plug in place leave it in until you change out the timing set. It holds the cam in place If you already took it out, then temporarily put the distributor and clamp from your 2.8 in or re-insert the DIS plug...doesn't matter what alignment, just use it to keep the cam in place.
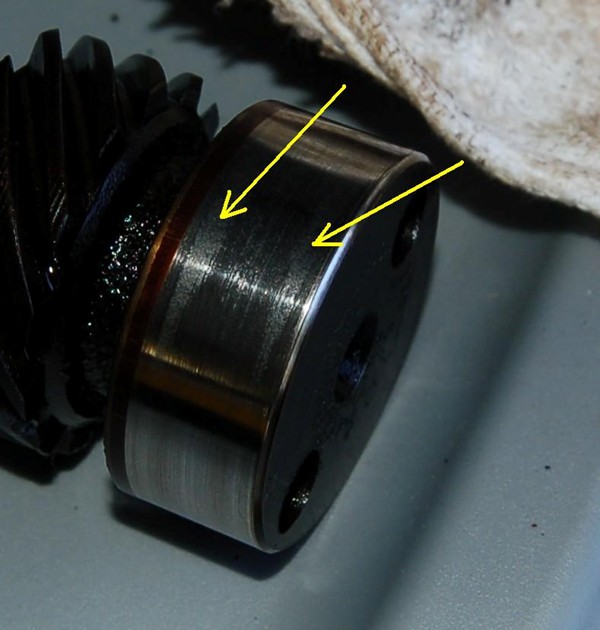
Some balancers and gears pull off nice and smooth and some fight you all the way. Be sure to have the puller arms as equally spaced as possible to prevent "racking" the hub when you're pulling on it. If it's fightiing you, stop and realign the puller, that sometimes helps. Squirting on some Deep Creep or PB Blaster ahead of time also helps sometimes. When you pulled off the balancer you should have seen a little gob of RTV or sealer on the front end of the woodruff key in the groove. Be sure to remove that old sealer and clean the area with solvent and reapply a small dab of RTV there when you reassemble the balancer. It's there to prevent oil leaking
(edited to add Inspect the hub on your harmonic balancer. If there's a groove worn in it from the front seal, you'll need the repair sleeve kit to keep it from leaking oil.
Also, look very carefully at all the bolts you have removed so far. If you see any of them broken off on the ends start looking in all the holes...you're going to need to get the broken bolts out now. I had one broken head bolt and 2 broken exhaust manifold bolts to extract. I had the machine shop do that since I sent the heads and block in. They charge $12 per broken bolt to extract...well worth it in my opinion!
[This message has been edited by randye (edited 04-10-2007).]
the fun part about mine was going to auto zone and telling them i needed a oil pan gasket for the camaro 3.4 and a water pump for a 2.8 fiero....the look on the guys face was priceless!! i used the 3.4 oil pan on mine with the 3.4 oil pump. instead of doing the "impact persuasion" on the pan though, i ground a touch off the front motor mount and left the pan alone. you don't have to grind much off the motor mount to jeopardize the integrity of the mount at all either, so i couldn't see denting the pan to get it fit. randye, it was good talking with you again, hope the book helps. i have the starter jig bagged up for our next visit. Chinese lunch sounds good!
Great talking with you too Shawn. Thanks for the starter drill jig! I'll be sure to pass it along to someone else when I'm done, psssst, Alex are you listening? I had the parts counter guy all befuddled when I ordered my gaskets !! Head gaskets for a 3.4, oil pan gasket for a 3.4, timing cover gasket set and manifold gasket set for a Fiero 2.8.....he kept trying to tell me the gaskets I was ordering wouldn't fit on a Camaro 3.4 and I kept saying, "Yes, I know" We'll see how much damage we can do to the Chinese buffet in a hour
IP: Logged
10:28 PM
Apr 11th, 2007
alex de jorge Member
Posts: 501 From: Kissimmee, FL Registered: Nov 2005
All of my bolts came out extremely easy with non of them broken. Like I said, the only problem I have had so far was removing the Harmonic Balancer. Everything else has been pretty straight forward.
IP: Logged
10:25 AM
alex de jorge Member
Posts: 501 From: Kissimmee, FL Registered: Nov 2005
Well, after going to Auto Zone to borrow a puller for the bottom sprocket it seems that they do not have one. I have no idea as to how to get the sprocket off. Does anyone have a suggestion for me? BTW I received my bag of goodies from Rodney today. Drill jig, motor and tranny mounts, stud kit, idler pulley. Next comes the big order from the Fiero Store. I believe they are going to love me.
IP: Logged
03:00 PM
Apr 12th, 2007
alex de jorge Member
Posts: 501 From: Kissimmee, FL Registered: Nov 2005
OK. I have officially given up on trying to get the sprocket off. I have been to every auto parts store in my area and no one has the correct tool for getting the sprocket off. I take that back. The local NAPA store has a kit that they sell which has the correct tool but the want $103 for it. I don't think I am going to spend that much money for a tool that I'll be using just once. This is unbelievable! I have been at this for 3 days back and forth between auto parts store. I am about to just put the new timing chain with the old sprocket or else my swap will take years to complete at the rate I am going.
IP: Logged
11:38 AM
sardonyx247 Member
Posts: 5032 From: Nevada, USA Registered: Jun 2003
OK. I have officially given up on trying to get the sprocket off. I have been to every auto parts store in my area and no one has the correct tool for getting the sprocket off. I take that back. The local NAPA store has a kit that they sell which has the correct tool but the want $103 for it. I don't think I am going to spend that much money for a tool that I'll be using just once. This is unbelievable! I have been at this for 3 days back and forth between auto parts store. I am about to just put the new timing chain with the old sprocket or else my swap will take years to complete at the rate I am going.
Alex,
As a last ditch effort you might try calling up any service center that has a hydraulic press and see if they can help you out. If they have the right spacer blocks to put under the sides of the sprocket they could easily press that booger off there *and* press the new one on as long as you bring along a suitably sized piece of pipe to do it with.....just a thought.
I got my block, heads and crank back from the machine shop today. All the new engine parts are stacked on the bench and ready to go, EXCEPT the piston rings.
What I have discovered is that nobody seems to stock the standard, (non-oversize), rings anywhere around here. All the usual suspects like Auto Zone, Advance, NAPA etc. list the rings but don't have them or can't get them. What everyone DOES have are oversize rings, (.010 & up), Sort of makes some sense I guess, since most engine rebuilds requiring rings usually bore the cyls.... I also found out that piston rings, (regardless of size), for a 3.4 are EXPENSIVE. Best price I found was $143 per set The GM dealer wanted $45 PER PISTON for 3.4 standard rings, and had to get them shipped in from Michigan.... Had to call the machine shop that did my work and ask them where to get standard rings. They eventually located some in Miami and I should have them first of next week. Cost: $125 shipped
By comparison, I priced a full set of standard rings for a 2.8, (which are readily available), at $53 for the set!
Even the parts counter guys at the stores were astonished at the high cost of rings for a Chevy 3.4
Reassembly starts tomorrow morning, so I'll have photos and an update to share soon.
Randy
IP: Logged
01:23 AM
yellowstone Member
Posts: 9299 From: Düsseldorf/Germany Registered: Jun 2003
I got my block, heads and crank back from the machine shop today. All the new engine parts are stacked on the bench and ready to go, EXCEPT the piston rings.
What I have discovered is that nobody seems to stock the standard, (non-oversize), rings anywhere around here. All the usual suspects like Auto Zone, Advance, NAPA etc. list the rings but don't have them or can't get them. What everyone DOES have are oversize rings, (.010 & up), Sort of makes some sense I guess, since most engine rebuilds requiring rings usually bore the cyls.... I also found out that piston rings, (regardless of size), for a 3.4 are EXPENSIVE. Best price I found was $143 per set The GM dealer wanted $45 PER PISTON for 3.4 standard rings, and had to get them shipped in from Michigan.... Had to call the machine shop that did my work and ask them where to get standard rings. They eventually located some in Miami and I should have them first of next week. Cost: $125 shipped
By comparison, I priced a full set of standard rings for a 2.8, (which are readily available), at $53 for the set!
Even the parts counter guys at the stores were astonished at the high cost of rings for a Chevy 3.4
Reassembly starts tomorrow morning, so I'll have photos and an update to share soon.
You were exactly right my friend I would probably have never done this swap if it had not been for my bad luck last month at Daytona.
You know a 3.4 swap would work very well for you also. It would look exactly like the 2.8 which the German inspection would never notice, and you could use that Trueleo intake, Morse TB and all those other engine parts you just bought. I would bet that you could make some very serious performance with all that on a 3.4.......or is that what you are really doing ?? Guess we will have to wait to see your next upgrades.
[This message has been edited by randye (edited 04-14-2007).]
IP: Logged
10:39 AM
David DeVoe Member
Posts: 1358 From: Grand Blanc, MI US Registered: Jul 2001
Alex de Jorge, try to resist using the old crank gear with a new chain. It will probably wear right out as the timing set has all worn together. After rebuilding several 2.8's I'm thinking I just used 2 screwdrivers to pry the crank gear off, or a steering wheel puller which you can get at Harbor Freight for next to nothing. As I recall I had to grind the ends of the puller arms to make them thinner so they would fit between the block and the gear. The trick is to not ruin the threads in the crank so you have to provide some other surface (a bolt head) for the puller to work against. Try the screwdrivers (big ones) first though and pry evenly outward. Isn't engine building fun?
IP: Logged
11:27 AM
alex de jorge Member
Posts: 501 From: Kissimmee, FL Registered: Nov 2005
I got my block, heads and crank back from the machine shop today. All the new engine parts are stacked on the bench and ready to go, EXCEPT the piston rings.
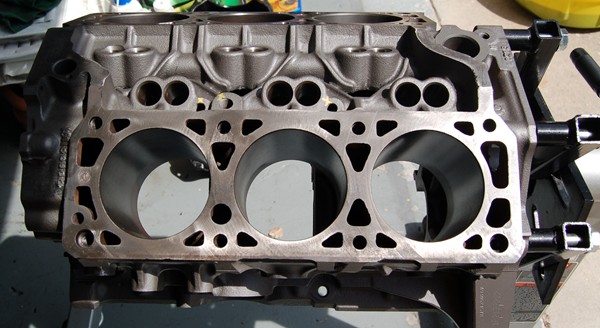
Not much accomplished today. Spent most of theday doing some gritty, dirty, but FREE upgrades to the block prior to cleaning and starting assembly.
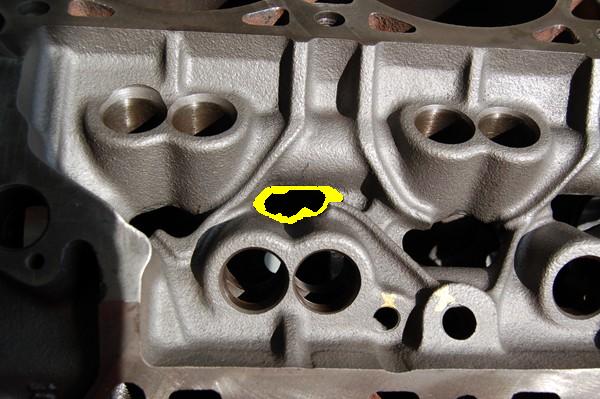
Here's the nice clean engine block with new cam bearings installed. I asked the machine shop to leave all the freeze plugs and oil galley plugs out so that I could flush and clean the block again after the next step: I used a carbide cutter rasp and small grinding points on a Dremel tool to remove the casting flash in the lifter valley oil return holes. The area I've highlighted in yellow shows about how much flash was removed from each return hole. Doing this dramatically helps oil return from the top end back down to the oil pan.
This passage in the front of the block, just above the front cam bearing was alomost 30% blocked with casting flash! (shown before going to machine shop...dirty!)
Here's the port cleaned up after just a little work:
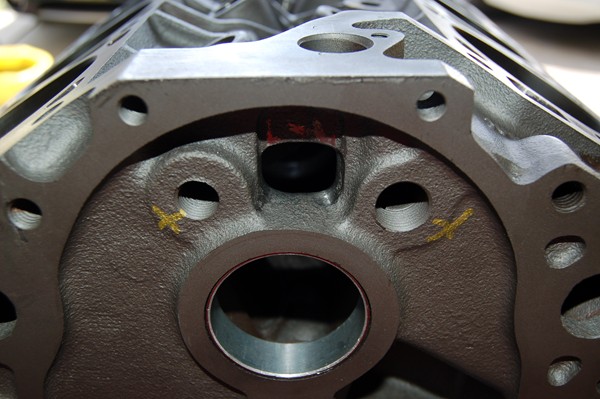
The machine shop helpfully marked a yellow "X" wherever they removed a plug to remind me to put one back in Nice..
[This message has been edited by randye (edited 04-14-2007).]
Here's why it's a great idea to replace freeze plugs, even if you're not doing any internal engine work: This plug was literally paper thin, but just looked rusty before the machine shop pulled it out prior to tanking the block! If you are just going to swap in a salvage engine without doing any work on the motor, do yourself a big favor and carefully inspect the freeze plugs.
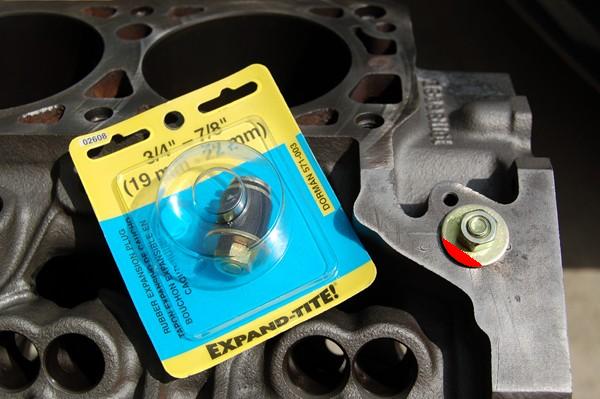
I found some nice plugs to fill the holes left by the cam sensor on top of the block and the crank sensor on side of the block.: The area I've marked in red will need to be ground off to clear the lower intake manifold for the top plug for the cam sensor hole. The plug for the side of the block is the exact same plug, but can be used unaltered. You could leave the old sensors in place to act as plugs, but I like to clean things up a bit. The holes in the top and side of the block measure almost exactly 3/4 inch. This plug is an excellent snug fit.
[This message has been edited by randye (edited 04-14-2007).]
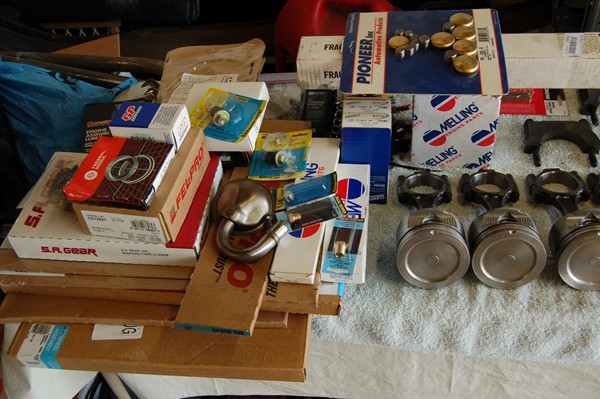
Some of the parts pile waiting for their new home in the engine: Melling Cam, (stock grind), Melling Lifters, Melling pushrods, Melling Oil pump Melling Oil Pump drive shaft. SA Gear Timing Set SA Gear Timing Damper Clevite 77 Rod Bearings, (.25MM over) Hi Tech Main Bearings, (.25MM over) FelPro Gaskets Pioneer Freeze and oil plug set Pioneer Flex Plate, (88Fiero automatic, neutrally balanced) Pioneer motor and trans mounts GP Sorensen Injector O-Rings Front and Rear Crank Seals (forgot the brand) Assorted NPT plugs Moly Assembly Lube Permatex "Super Slick" Assembly Lube Perfect Circle Standard Piston Rings
The oil pump pick-up tube is salvaged from the old 3.4 and has been cleaned up.
[This message has been edited by randye (edited 04-20-2007).]
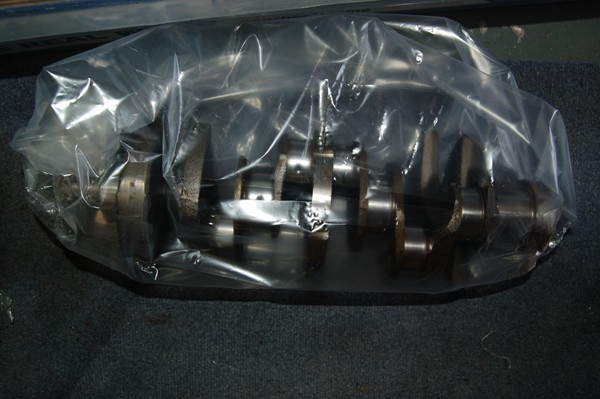
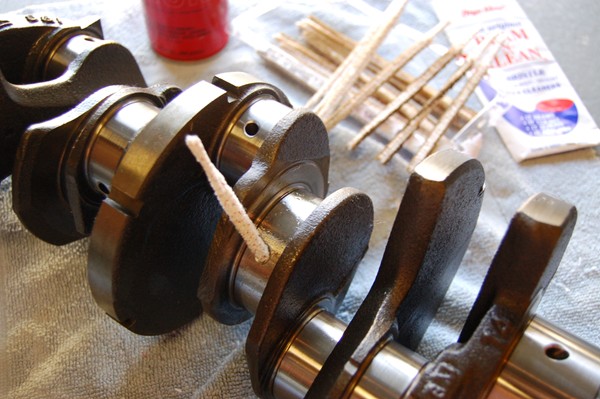
The crankshaft arrived all nicely ground and polished ,(.25MM under size), and covered in a nice poly bag The shop doesn't clean cranks real well after grinding, so it will need to be completely washed, and all oil passages cleaned out with pipe cleaners or gun brushes and solvent flushed and blown out with the air gun. The crank will get it's bath after I'm done prepping the block and be put back in a clean plastic bag until it's ready to be placed in the engine.
IP: Logged
12:13 AM
shawnkfl Member
Posts: 2457 From: Largo, Florida Registered: Oct 2004
In regards your new crank, how do you plan on breaking them in? I just finished the same job (crank, that is), and I'm wondering what I should and shouldn't do...
IP: Logged
04:54 PM
sardonyx247 Member
Posts: 5032 From: Nevada, USA Registered: Jun 2003
It nice to have the pics of the casting flash removal. Alot of people don't seem to get what I am talking about when I tell them about the flash. I'm just about done with the 3.4L swap I am working on now. Then I get finish the other swap I am working on too. (2 going on right now)
At least I titled this "lots of pics", I never knew how many pics this thread would end up getting
In regards your new crank, how do you plan on breaking them in? I just finished the same job (crank, that is), and I'm wondering what I should and shouldn't do...
I'd just follow the same engine rebuild break in procedure. Run it at low to medium rpms for no more than 20-30 minutes, then change the oil and filter. After that, normal engine break-in. Lots of different theories on proper engine break-in, but other than the initial oil change to get any debris from initial start up out, I'd just drive it normally, but not excessively hard, for approx. 500 miles and change the oil again. if it's going to chew something up, you'll know it soon enough.
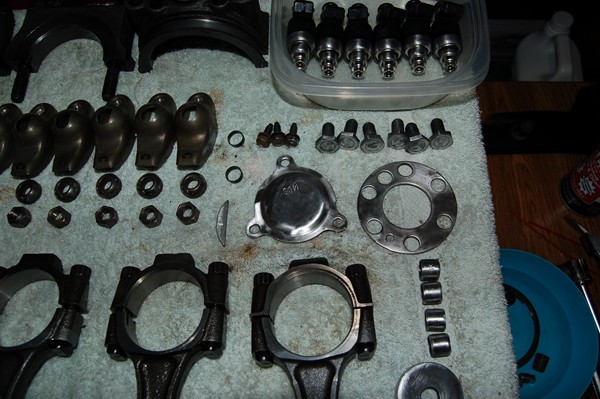
Hard to get much done during the work week, but did get a few things done yesterday and this evening: Lots of engine parts cleaned up and waiting to reassemble:
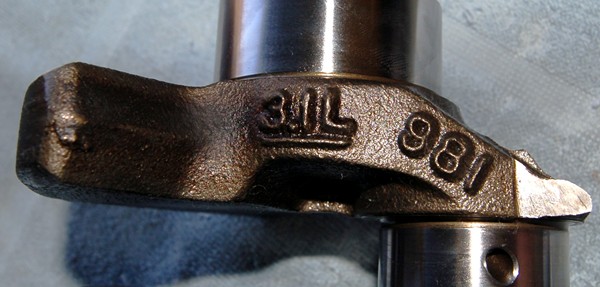
Also started cleaning the re-ground crankshaft, but stopped dead in my tracks when I spotted this: A quick check of the specifications and a measure of the bore in my block eased my mind that I hadn't received a 3.1 engine in disguise. Seems that the 3.1L and the 3.4L engines share a 3.31 stroke. The 3.1 L engine has a 3.503 bore whereas the 3.4 L engine has a 3.620 bore. Interesting that they share the same crankshaft marked "3.1L"
The first order of business is to clean all the oil passages in the crank. Most good machine shops usually do a decent job, but you should NEVER rely on them to give you absolutely clean parts back. That applies especially to crankshafts that have been ground. The grinding debris ends up in the oil passages and if not cleaned out spotlessly, will EAT your new bearings and crank journals.
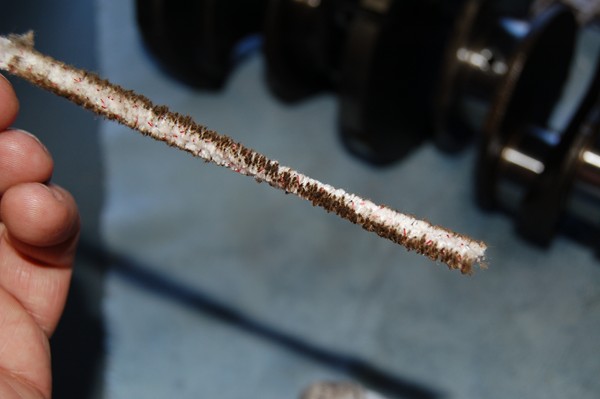
I started with some carb cleaner solvent and nice heavy duty pipe cleaners, (doubled up to fill the holes better) :
Keep cleaning the oil passages with pipe cleaners until they come out perfectly clean. Here's a pipe cleaner after the 3rd time cleaning this particular hole, (needs a lot more cleaning): Lots of little metal particles and dirt that would end up directly in the bearings at start-up I had to clean this particular passage 11 times. Think "surgical clean" when prepping a rebuild.
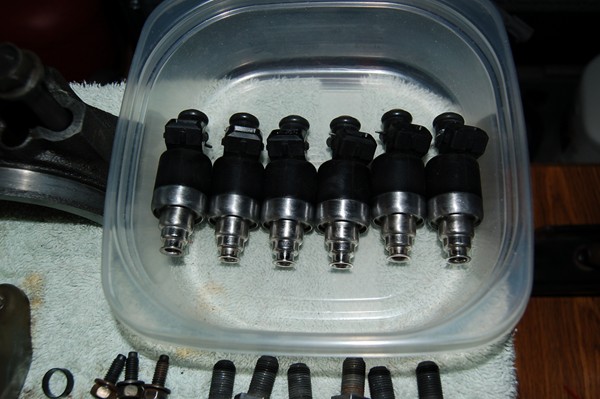
The 3.4 injectors looked really good! They might have been replaced before the Camaro they were in met it's demise. Only a little cleaning required and new O-rings will be installed before reassembly to the 2.8 fuel rail: I hate to put the old 15# 2.8 cold start injector back in, so I'm considering just plugging it's hole in the manifold and capping the tube outlet on the fuel rail. Don't see much cold weather here in Florida anyway...
[This message has been edited by randye (edited 04-16-2007).]