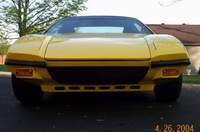
im going to start out by saying im sorry i didnt think to place a thread on this untill i got the first bucket done ....to catch you up..i first removed the drivers side headlight system....then removed the head light lid....i used some card board and molded and cut and molded some more .....i then took my card board mold and fiber glassed it not too bad for my first time (keep in mind im 16) after it dryed i figured out i should have put something on the card board before the fiber glass the card board got stuck to it when it dryed. so it took me 30 min to get the card board off half way here is some pic's of where i am so far any coments wil be appreciated -daniel
on this pic it was just a test fit i know the headlight is still in there its like 38 outside so i hurried up and didnt take the headlight out
Neato. I just got some freshly rebuilt headlight motors after not having any at all and I cant decide if I want flushmounts or not. What type of bulbs are you going to use? The staggered ones from the Storm, Grand AM, or Camaro?
IP: Logged
11:45 AM
1984_fiero Member
Posts: 200 From: ansted,west virginia,united states Registered: Nov 2006
my brother has a geo storm and he has some extra lights for it and im low on money so im thinking the storm lights... any suggestions? i seen a pic somewhere that i liked it had a blue halogen** on the inside and a white on the outside im thinking something like that.
IP: Logged
11:48 AM
1984_fiero Member
Posts: 200 From: ansted,west virginia,united states Registered: Nov 2006
Next time you use your cardboard as the mold, just cover it with the aluminum furnace tape like you get from Lowe's or Home Depot. Use the kind that has the white peel off backing. Put it on as neatly as you can, and press out any wrinkles or bubbles with the back of your fingernail.
You can glass directly over the metal tape. If you spring for the smallest bottle of PVA ( $3.50 from USComposites ) then you can brush or wipe a coat or two of PVA onto the metal tape. Let it dry well, and layup directly over it.
Nice writeup. For the guys who simply want to buy them, I made my own also, but I ended up buying KMunson's kit which was clearly superior to my own work. This is a good project and not hard for anybody to take on.
I like that you're working with fiberglass. I used aluminum and it was not as good as yours. Can't wait to see your light chassis design. I'll be following with interest.
BTW I can sell my light set if anyone is interested in using them for their project. They are 50w low beams and 100w high beams using driving lights.
Arn
IP: Logged
01:03 PM
1984_fiero Member
Posts: 200 From: ansted,west virginia,united states Registered: Nov 2006
bottum of the box looks rough from the fiberglass and i want a amooth finish so im am going to bondo the insides to make it smooth also bondo is alot easier to sand then fiberglass this is where i am as of right now......(im going back to school monday so im going to try to update everyday but i might not as i go to school in the day and work at night)-daniel
IP: Logged
11:34 AM
1984_fiero Member
Posts: 200 From: ansted,west virginia,united states Registered: Nov 2006
Assuming that you are using Windows, you can down load a utility from this link: http://www.microsoft.com/wi...oys/xppowertoys.mspx Scroll down till you find the Image Resizer and download the EXE file. It make resizing the pictures a breeze.
the time and date is wrong lol i have a cheap ebay camera and the batterys go dead really fast and it is to much a pain to set the time/date everytime ........im out of funds/sandpaper/bondo/fiberglass so ill post again Sat. 21st when i get some supplys any questions, comments or suggestons -daniel