Pennock's Fiero Forum
  General Fiero Chat - Archive
  My hood scoop project....PROGRESSION PICS (AND FINISHED) (Page 2)

T H I S   I S   A N   A R C H I V E D   T O P I C
  

Email This Page to Someone! | Printable Version

This topic is 4 pages long:  1   2   3   4 
Previous Page | Next Page
My hood scoop project....PROGRESSION PICS (AND FINISHED) by My7Fieros
Started on: 03-12-2002 09:20 PM
Replies: 122
Last post by: Fie Ro on 04-12-2004 11:47 AM
skitime
Member
Posts: 5765
From: Akron, PA, USA
Registered: Aug 2000


Feedback score:    (10)
Leave feedback


Total ratings: 332
Rate this member

Report this Post06-03-2002 10:28 PM Click Here to See the Profile for skitimeSend a Private Message to skitimeDirect Link to This Post
Very good point Fieroshop.. I will remember that. Thanks

------------------
~~~~~~~~~~~~~~~~~~~~~~~~~~~~~~

IP: Logged
FieroJoe
Member
Posts: 2314
From: Southfield, MI
Registered: Nov 2000


Feedback score: N/A
Leave feedback

Rate this member

Report this Post06-03-2002 10:33 PM Click Here to See the Profile for FieroJoeSend a Private Message to FieroJoeDirect Link to This Post
Maybe I missed it in the threads above, but what's a good source for some honeycomb-esq screening material? Maybe just yoinking the front cowl off the parts Fiero you steal the hood from too??

Dash defroster vents?

Great pics, I'm going to save them all!

IP: Logged
Oreif
Member
Posts: 16460
From: Schaumburg, IL
Registered: Jan 2000


Feedback score:    (19)
Leave feedback


Total ratings: 442
Rate this member

Report this Post06-04-2002 02:01 AM Click Here to See the Profile for OreifClick Here to visit Oreif's HomePageSend a Private Message to OreifDirect Link to This Post
 
quote
Originally posted by fieroshop:
Looks good for what you have done and accomplished. My hat is off to you.
Couple of question. Using wood as I did on my first hood vent I found that the wood even though it is sandwiched in fiberglass has a tendency to swell and contract with the weather. How did or are you going to compensate for that. Mine cracked the fiberglass.
What will you do with the water that puddles up in the vent since you have a ridge and water cannot flow out and is trapped.


My hood was done the exact same way. First, they water doesn't "puddle" there for long. The ridge is very small. It 'puddles" about as much as water in the embossed "Pontiac" on the headlight cover.
Second, I've had mine done for about 2 years now and have had no problems with the wood swelling or expanding. We have temp extreme's from high 90's and humidity to below 0 temps. If the wood swells it is most likely it wasn't sealed all the way, was not fully dry when you used it, or it was a very humid day when you sealed it.

IP: Logged
RBeaubien
Member
Posts: 775
From: Glendale (Phoenix), AZ, USA
Registered: Mar 2002


Feedback score: N/A
Leave feedback


Total ratings: 50
Rate this member

Report this Post06-27-2002 01:28 PM Click Here to See the Profile for RBeaubienClick Here to visit RBeaubien's HomePageSend a Private Message to RBeaubienDirect Link to This Post
I would like to do this, but I don't want to use my original hood. Are there any differences between hoods of any Fieros? If there are, which ones can I use on my 87 GT?

Thanx,

------------------


Robert Beaubien
87 GT 5-speed

IP: Logged
Monza76
Member
Posts: 1298
From: Gander, NF. Canada
Registered: Jul 2002


Feedback score: N/A
Leave feedback


Total ratings: 67
Rate this member

Report this Post07-12-2002 12:40 PM Click Here to See the Profile for Monza76Click Here to visit Monza76's HomePageSend a Private Message to Monza76Direct Link to This Post
I just marked the cut lines on my "experimental" hood. Has anyone used a jigsaw with a smooth cut blade to do this cut? I thought I could start it with a dremel tool with a fibre cut disk, that way I wouldn't have large drill holes to deal with later. Will this work?

BTW has anyone used perforated steel (like that used in large commercial electronics cases) instead of wooden blocks? If it was formed properly it could be pop riveted to the dropped section (out 0f sight) and glassed onto the bottom of the front area of the hood, anyone get the idea?

Ira

------------------
Ira Crummey
1984 econo coupe
1985 coupe

IP: Logged
Monza76
Member
Posts: 1298
From: Gander, NF. Canada
Registered: Jul 2002


Feedback score: N/A
Leave feedback


Total ratings: 67
Rate this member

Report this Post07-12-2002 12:48 PM Click Here to See the Profile for Monza76Click Here to visit Monza76's HomePageSend a Private Message to Monza76Direct Link to This Post

Monza76

1298 posts
Member since Jul 2002
Great work by the way!

------------------
Ira Crummey
1984 econo coupe
1985 coupe
http://www.k12.nf.ca/gc/Staff/Teachers/Crummey/fiero/index.htm

IP: Logged
tstroud
Member
Posts: 527
From: Chariton, Iowa
Registered: Feb 2002


Feedback score: (2)
Leave feedback

Rate this member

Report this Post07-12-2002 01:42 PM Click Here to See the Profile for tstroudSend a Private Message to tstroudDirect Link to This Post
You should drill some approx 1/4 inch holes in the front corners to keep from causing cracks.
The holes will help spread the stress and provide you with a place to start and stop with your cuts.
I used a skil saw with a fine tooth blade mounted backwards when I cut my hood.

tstroud

IP: Logged
My7Fieros
Member
Posts: 3357
From: Germantown, TN
Registered: Jun 2000


Feedback score: N/A
Leave feedback

Rate this member

Report this Post07-12-2002 03:15 PM Click Here to See the Profile for My7FierosSend a Private Message to My7FierosDirect Link to This Post
Good grief I had no idea when I posted this it would keep returning from the dead lol. Thanx for the compliments, and good luck to those of you who are going to do it yourselves also..its really not too difficult.

------------------
The force will be with you, always.

IP: Logged
KissMySSFiero
Member
Posts: 5541
From: Tarpon Springs, FL USA
Registered: Nov 2000


Feedback score:    (18)
Leave feedback


Total ratings: 111
Rate this member

Report this Post07-12-2002 03:47 PM Click Here to See the Profile for KissMySSFieroSend a Private Message to KissMySSFieroDirect Link to This Post
just goes to show you that people DO use the search engine on here.

------------------
Two 88FORMULAS Red & Yellow
SSFiero@Aol.com

IP: Logged
Monza76
Member
Posts: 1298
From: Gander, NF. Canada
Registered: Jul 2002


Feedback score: N/A
Leave feedback


Total ratings: 67
Rate this member

Report this Post07-15-2002 10:31 AM Click Here to See the Profile for Monza76Click Here to visit Monza76's HomePageSend a Private Message to Monza76Direct Link to This Post
I have made the cuts with a with a DREMEL!!, used a fibre reinforced cutting disk and was finished in about 10 minutes. I also cut out the undrhood reinforcement but only back to where the trunk seals. I can post pictures if necessary. Thanks again guys for the details.

I still need to know more about the fiberglass work. Do I sand everything first or just clean it? How many layers of fiberglass cloth do you need? Is the wooden block fastened to the dropped section in any way (screws?)? Has anyone used anything other than wood?

IP: Logged
maryjane
Member
Posts: 69654
From: Copperas Cove Texas
Registered: Apr 2001


Feedback score: (4)
Leave feedback


Total ratings: 441
Rate this member

Report this Post08-11-2002 07:20 PM Click Here to See the Profile for maryjaneSend a Private Message to maryjaneDirect Link to This Post
Bumped up for others to see My7's & Archies great contributions, and of course, thanks to Rich Warber.
IP: Logged
PFF
System Bot
$Rich$
Member
Posts: 14575
From: Sioux Falls SD
Registered: Dec 2002


Feedback score:    (20)
Leave feedback


Total ratings: 397
Rate this member

Report this Post01-29-2003 12:27 AM Click Here to See the Profile for $Rich$Send a Private Message to $Rich$Direct Link to This Post
back from the dead again, im gonna atempt it tommorrow if i get a chance, the hood is off the car, and in the basement just waiting to be cut up

i just wanted to be another to say thanks for the effort in posting results and giving us ideas

------------------
Rich
99 X-treme
97 Eclipse GS-t
92 325i
White 86 SE V6

IP: Logged
ig88vsbobafett
Member
Posts: 3446
From: Cheyenne Wyoming
Registered: Oct 2001


Feedback score:    (8)
Leave feedback


Total ratings: 71
Rate this member

Report this Post01-29-2003 04:56 AM Click Here to See the Profile for ig88vsbobafettSend a Private Message to ig88vsbobafettDirect Link to This Post
You should sell the Wood parts to make it i would buy a set LMK in a PM THanks
IP: Logged
$Rich$
Member
Posts: 14575
From: Sioux Falls SD
Registered: Dec 2002


Feedback score:    (20)
Leave feedback


Total ratings: 397
Rate this member

Report this Post01-29-2003 11:51 AM Click Here to See the Profile for $Rich$Send a Private Message to $Rich$Direct Link to This Post
 
quote
Originally posted by ig88vsbobafett:

You should sell the Wood parts to make it i would buy a set LMK in a PM THanks

no offence, but if you cant handle cutting a oval hole in 2 2x4's i dont think you should operate a saw near your hood

but on the other hand, if your willing to PAY for someone else to do it for you!!??!!??

IP: Logged
ig88vsbobafett
Member
Posts: 3446
From: Cheyenne Wyoming
Registered: Oct 2001


Feedback score:    (8)
Leave feedback


Total ratings: 71
Rate this member

Report this Post01-29-2003 06:01 PM Click Here to See the Profile for ig88vsbobafettSend a Private Message to ig88vsbobafettDirect Link to This Post
Hehe i dont have any wood tools but a skill saw

 
quote
Originally posted by $Rich$:

no offence, but if you cant handle cutting a oval hole in 2 2x4's i dont think you should operate a saw near your hood

but on the other hand, if your willing to PAY for someone else to do it for you!!??!!??

[This message has been edited by ig88vsbobafett (edited 01-29-2003).]

IP: Logged
Monza76
Member
Posts: 1298
From: Gander, NF. Canada
Registered: Jul 2002


Feedback score: N/A
Leave feedback


Total ratings: 67
Rate this member

Report this Post04-29-2003 12:05 PM Click Here to See the Profile for Monza76Click Here to visit Monza76's HomePageSend a Private Message to Monza76Direct Link to This Post
Because this is a topic which still comes up, and because I learned a lot from this thread I am bumping it back into play.

BTW, I used the measurements given in your diagram Archie, will this clear the radiator easily or will I need to make any adjustments, 9 1/4 inches seems pretty tight.

Ira

------------------
The Iron Duke Resource Site

Ira Crummey
1985 coupe

IP: Logged
ZeroC
Member
Posts: 1664
From: Chilliwack,BC,Canada
Registered: Jan 2003


Feedback score: N/A
Leave feedback


Total ratings: 170
Rate this member

Report this Post04-29-2003 12:18 PM Click Here to See the Profile for ZeroCClick Here to visit ZeroC's HomePageSend a Private Message to ZeroCDirect Link to This Post
My7Fieros
What Kind Of Product Is "Kitty Hair" U Used Looks Nice ..I Need To Fill A Rip In My Fastback Clip ....As A Matter Of Fact Id Like To Get All The Supplies You used ...A List Would Be Relly Cool

------------------
Zero C's 86 Gt Fastback

IP: Logged
ZeroC
Member
Posts: 1664
From: Chilliwack,BC,Canada
Registered: Jan 2003


Feedback score: N/A
Leave feedback


Total ratings: 170
Rate this member

Report this Post04-29-2003 12:18 PM Click Here to See the Profile for ZeroCClick Here to visit ZeroC's HomePageSend a Private Message to ZeroCDirect Link to This Post

ZeroC

1664 posts
Member since Jan 2003
My7Fieros
What Kind Of Product Is "Kitty Hair" U Used Looks Nice ..I Need To Fill A Rip In My Fastback Clip ....As A Matter Of Fact Id Like To Get All The Supplies You used ...A List Would Be Relly Cool

------------------
Zero C's 86 Gt Fastback

IP: Logged
MinnGreenGT
Member
Posts: 11545
From: Lakeville, MN 55044
Registered: Jul 2001


Feedback score: (1)
Leave feedback


Total ratings: 274
Rate this member

Report this Post04-29-2003 01:18 PM Click Here to See the Profile for MinnGreenGTClick Here to visit MinnGreenGT's HomePageSend a Private Message to MinnGreenGTDirect Link to This Post
 
quote
Originally posted by ZeroC:

What Kind Of Product Is "Kitty Hair" U Used Looks Nice ..I Need To Fill A Rip In My Fastback Clip ....

I don't know exactly what products they used, but "Bondo" makes 2 types of fiberglass enhanced fillers. One is "Bondo-Hair" which has many long strands of fiberglass already mixed into a resin... you just add hardener and shape! The other product they have is "Bondo-Glass" which is more like regular body filler, but has small/short strands of fiberglass in it. The added strands help create a stronger filler once cured.

Now on the other hand, you mentioned wanting to repair a "rip" in your fastback. I'd actually suggest a different product. Different parts of the car (hood, roof, upper/rear clip, & decklid) are made from SMC (Sheet Molded Compound). It's a lot like Fiberglass, but not exactly the same. Anyway, I've been using Duramix (#4056?), which is made specifically for SMC and Fiberglass repairs. Just a suggestion!

------------------

Looking for Fiero posters?

IP: Logged
Monza76
Member
Posts: 1298
From: Gander, NF. Canada
Registered: Jul 2002


Feedback score: N/A
Leave feedback


Total ratings: 67
Rate this member

Report this Post04-29-2003 02:34 PM Click Here to See the Profile for Monza76Click Here to visit Monza76's HomePageSend a Private Message to Monza76Direct Link to This Post
Very useful information MinnGreenGT, I was wondering what to use.

Ira

IP: Logged
Monza76
Member
Posts: 1298
From: Gander, NF. Canada
Registered: Jul 2002


Feedback score: N/A
Leave feedback


Total ratings: 67
Rate this member

Report this Post04-29-2003 09:38 PM Click Here to See the Profile for Monza76Click Here to visit Monza76's HomePageSend a Private Message to Monza76Direct Link to This Post

Monza76

1298 posts
Member since Jul 2002
I am planning on painting the hood flat black until I can afford a paint job, hey MinnGreenGT is that what you have been doing?

Ira

IP: Logged
PFF
System Bot
My7Fieros
Member
Posts: 3357
From: Germantown, TN
Registered: Jun 2000


Feedback score: N/A
Leave feedback

Rate this member

Report this Post04-30-2003 12:33 AM Click Here to See the Profile for My7FierosSend a Private Message to My7FierosDirect Link to This Post
My God when how did this thread come back around? Like MinnGreen said...Kitty Hair is just bondo w/ the strands in it. Great stuff.
IP: Logged
Monza76
Member
Posts: 1298
From: Gander, NF. Canada
Registered: Jul 2002


Feedback score: N/A
Leave feedback


Total ratings: 67
Rate this member

Report this Post04-30-2003 09:04 AM Click Here to See the Profile for Monza76Click Here to visit Monza76's HomePageSend a Private Message to Monza76Direct Link to This Post
On a related note, see https://www.fiero.nl/forum/Forum1/HTML/028500.html is this anything like the kit you sell Archie, or do you do the completed hood. I like this idea since it eliminates any problems with the wood blocks. I wonder if these are still available and for how much.

Ira

IP: Logged
MinnGreenGT
Member
Posts: 11545
From: Lakeville, MN 55044
Registered: Jul 2001


Feedback score: (1)
Leave feedback


Total ratings: 274
Rate this member

Report this Post04-30-2003 10:15 AM Click Here to See the Profile for MinnGreenGTClick Here to visit MinnGreenGT's HomePageSend a Private Message to MinnGreenGTDirect Link to This Post
 
quote
Originally posted by Monza76:

I am planning on painting the hood flat black until I can afford a paint job, hey MinnGreenGT is that what you have been doing?

Actually, most of my stuff has just been sprayed with a flat black primer... although I'm working on getting the correct tools (paint equipment) to at least put a basic finish on the parts to protect them from weathering (since I drive the car every day and in all weather except snow) until I can paint the whole thing.

I've actually been discussing some of these details with rogergarrison - who pointed out to me that spray cans can't effectively layer material on... so they won't get you too far in the finishing process. The parts need to sprayed with a good surfacer/primer (a few coats) to really get a good base to finish on.

IP: Logged
Monza76
Member
Posts: 1298
From: Gander, NF. Canada
Registered: Jul 2002


Feedback score: N/A
Leave feedback


Total ratings: 67
Rate this member

Report this Post04-30-2003 10:42 AM Click Here to See the Profile for Monza76Click Here to visit Monza76's HomePageSend a Private Message to Monza76Direct Link to This Post
MinnGreenGT, If the vent looks good enough I may take it to a paint shop and have it properly primed in the black primer. Since it is not steel the primer shouldn't pose any problem with protecting the surface and it should hold out until I can afford a paint job.

Thanks
Ira

IP: Logged
webbee
Member
Posts: 1149
From: Los Angeles, Ca. USA
Registered: Jun 2000


Feedback score: N/A
Leave feedback

Rate this member

Report this Post04-30-2003 11:26 AM Click Here to See the Profile for webbeeSend a Private Message to webbeeDirect Link to This Post
I think the original product was called Tiger-Hair. I have used this stuff a lot. It should be used for the base coat with a thin skin of regular bondo of fiberglass resin on the top. The fibers that are projecting at you make a dimple if you don't put something between them and the primer.

I always loved this hood mod. This thread is what this forum is all about. Tip of the hat to all involved.

IP: Logged
Monza76
Member
Posts: 1298
From: Gander, NF. Canada
Registered: Jul 2002


Feedback score: N/A
Leave feedback


Total ratings: 67
Rate this member

Report this Post04-30-2003 06:01 PM Click Here to See the Profile for Monza76Click Here to visit Monza76's HomePageSend a Private Message to Monza76Direct Link to This Post
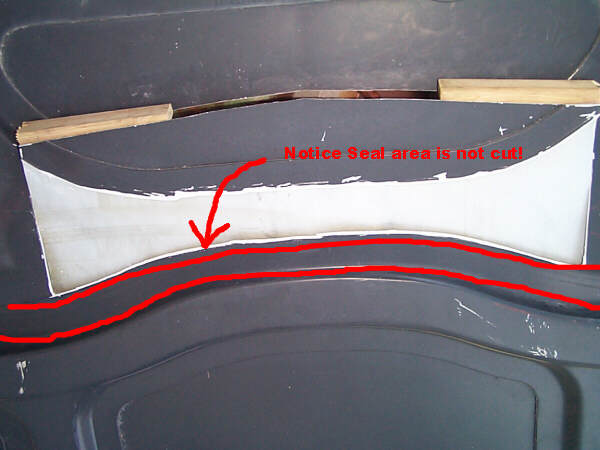
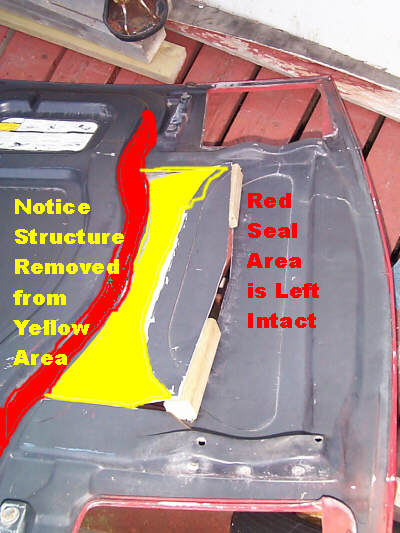
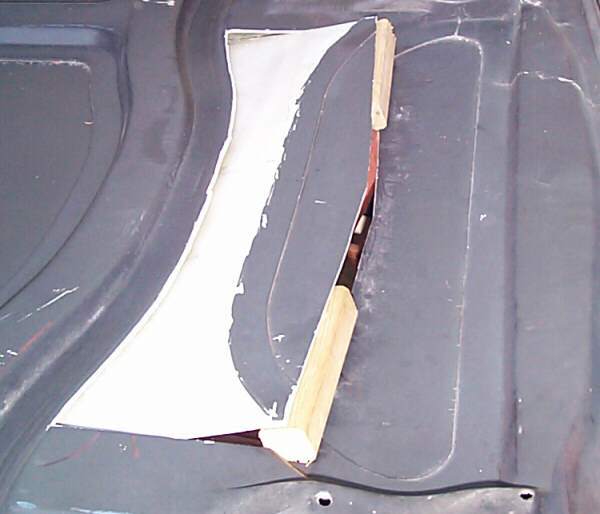
Some one asked about the trunk seal area, if you use Archie's measurements you can remove structure from under the hood but leave the seal intact, see these pictures:

inside

more detail:

so it looks like this:

Sorry about all of the pictures but I am a visual learner and I am sure I am not alone. BTW all cuts were made with a fiber disk on a Dremel tool, you have to be careful but it is fast and accurate.

Ira

IP: Logged
Monza76
Member
Posts: 1298
From: Gander, NF. Canada
Registered: Jul 2002


Feedback score: N/A
Leave feedback


Total ratings: 67
Rate this member

Report this Post04-30-2003 10:56 PM Click Here to See the Profile for Monza76Click Here to visit Monza76's HomePageSend a Private Message to Monza76Direct Link to This Post

Monza76

1298 posts
Member since Jul 2002
Has anyone tried this without the wood blocks? If so how did you do it?

Ira

IP: Logged
Gokart Mozart
Member
Posts: 12143
From: Metro Detroit
Registered: Mar 2003


Feedback score: (1)
Leave feedback


Total ratings: 159
Rate this member

Report this Post05-01-2003 09:16 AM Click Here to See the Profile for Gokart MozartClick Here to visit Gokart Mozart's HomePageSend a Private Message to Gokart MozartDirect Link to This Post
 
quote
Originally posted by fierosa:

THIS is EXACTLY why this forum is so addictive! One Fiero Owner showing his pride in his Fiero with all others while holding nothing back, showing step by step how to improve and modify their respective pride and joy. Should I ever decide to modify my hood, I will know exactly where to go to get the best help and advice with the project wheather it be the archives or folks ready to help real time!


Very well said. Great group of folks with the ability and desire to help others enjoy the fun little cars we all have an obsession for.

IP: Logged
Monza76
Member
Posts: 1298
From: Gander, NF. Canada
Registered: Jul 2002


Feedback score: N/A
Leave feedback


Total ratings: 67
Rate this member

Report this Post05-02-2003 07:53 PM Click Here to See the Profile for Monza76Click Here to visit Monza76's HomePageSend a Private Message to Monza76Direct Link to This Post
I may be guilty of keeping this thread going but I believe it is one of the best pictorials on doing a modification I have seen in a while (other than the much more involved engine swap stories). I also really like this particular mod, how about some pictures of more radical versions of this same modification.

Ira

IP: Logged
David Bartlett
Member
Posts: 1090
From: Ancaster, Ontario, Canada
Registered: Aug 2001


Feedback score: N/A
Leave feedback

Rate this member

Report this Post05-02-2003 09:57 PM Click Here to See the Profile for David BartlettSend a Private Message to David BartlettDirect Link to This Post
This is the hood project I've been working on.

I'm currently finishing up the back side. The supports were made out of fiberglass cloth and resin.

Enjoy

Dave

IP: Logged
PFF
System Bot
$Rich$
Member
Posts: 14575
From: Sioux Falls SD
Registered: Dec 2002


Feedback score:    (20)
Leave feedback


Total ratings: 397
Rate this member

Report this Post05-02-2003 10:14 PM Click Here to See the Profile for $Rich$Send a Private Message to $Rich$Direct Link to This Post
that looks really good

------------------
Rich
white 86 se, 2" drop, coil overs, KYB's. CRX intake, ported manifolds

IP: Logged
Monza76
Member
Posts: 1298
From: Gander, NF. Canada
Registered: Jul 2002


Feedback score: N/A
Leave feedback


Total ratings: 67
Rate this member

Report this Post05-23-2003 06:50 PM Click Here to See the Profile for Monza76Click Here to visit Monza76's HomePageSend a Private Message to Monza76Direct Link to This Post
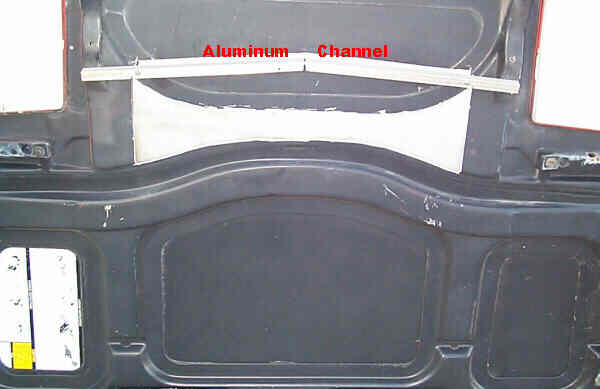
How about this idea to eliminate the wood blocks. I noticed a piece of aluminum channel belonging to an old shower door. I notched it in the middle so it would bend to the shape of my hood opening and then I fit the channel over the edge so that it supported the open hole. See the first picture:

Here is a detail from above (sorry the digital camera has no macro mode)

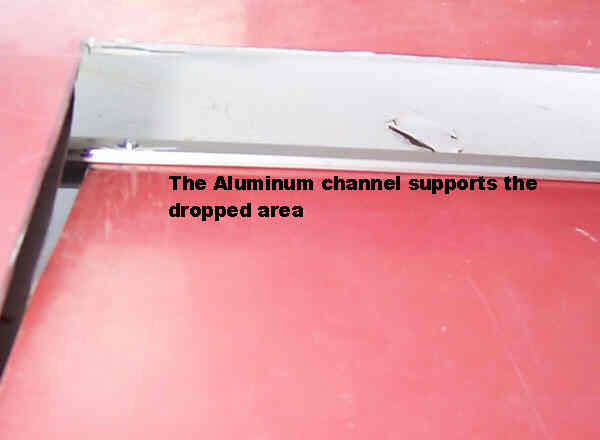
And here is one from below:

What do you think? I can use long pop rivets and washers to attach it across the front and glass it onto the underside of the hood. The sides I will then fill with long strand fiberglass body filler and then sand and paint, the preliminary colour scheme will be similar to MinnGreenGT, flat black untill it is all painted. (see https://www.fiero.nl/forum/Forum1/HTML/026705.html for a sketch of the final product.)

Any comments?

Ira

IP: Logged
Monza76
Member
Posts: 1298
From: Gander, NF. Canada
Registered: Jul 2002


Feedback score: N/A
Leave feedback


Total ratings: 67
Rate this member

Report this Post06-16-2003 08:13 PM Click Here to See the Profile for Monza76Click Here to visit Monza76's HomePageSend a Private Message to Monza76Direct Link to This Post
Here is a diagram of the hood using Archie's sketch and measurements but editing on the PC:

With these measurements the fit was perfect however my aluminum channel idea now allowed the aluminum to contact the radiator hose, solution, cut a strip about 1/2" wide out of the centre section to allow the channel to clear the hose:

More pictures and information to follow.

Ira

IP: Logged
Yellow87FieroGT
Member
Posts: 330
From: MN
Registered: May 2003


Feedback score: N/A
Leave feedback

Rate this member

Report this Post06-16-2003 08:19 PM Click Here to See the Profile for Yellow87FieroGTSend a Private Message to Yellow87FieroGTDirect Link to This Post
Looks Great! Similar to Earls, but his was slightly bigger. I'll say the same though - makes me think GT40
IP: Logged
Monza76
Member
Posts: 1298
From: Gander, NF. Canada
Registered: Jul 2002


Feedback score: N/A
Leave feedback


Total ratings: 67
Rate this member

Report this Post06-17-2003 10:45 AM Click Here to See the Profile for Monza76Click Here to visit Monza76's HomePageSend a Private Message to Monza76Direct Link to This Post
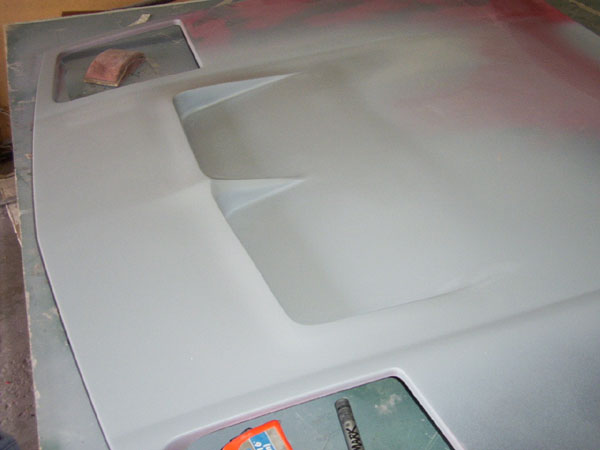
The GT-40, late 60's prototype look is what I am going for. This is a great modification since it looks cool and is functional. I wanted to avoid the wood blocks since I didn't think I could do a good job with them, so the aluminum channel idea came about by accident. I have donated one of my rear vent screens to act as the grill, I will post pictures as I make more progress.

This thread has been one of the best "how to" discussions I have seen, it gave me the motivation to try this myself.

Ira

IP: Logged
KRuzn MAchines
Member
Posts: 1102
From:
Registered: Jul 2003


Feedback score: N/A
Leave feedback


Total ratings: 84
Rate this member

Report this Post07-14-2003 05:03 PM Click Here to See the Profile for KRuzn MAchinesSend a Private Message to KRuzn MAchinesDirect Link to This Post
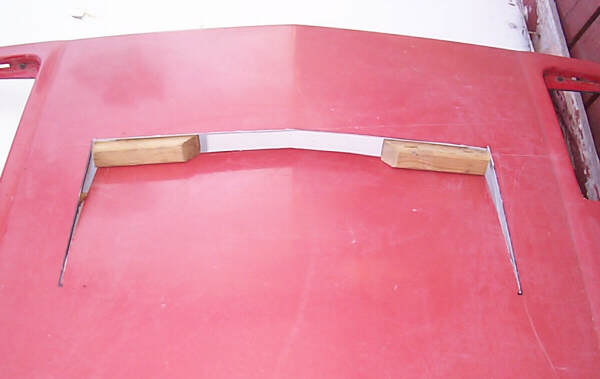
Okay guys here is the deal. I just cut the lines on my project car for the scoop. I followed the exact measurements and on the hood area i hit the part where the seal lies. Now I read later on that you could just cut a quarter inch underneath the seal and all would be well. So I guess I have to head this way now. Anyways my MAIN question is now that I have cut it there is still stiffness. I know it might take time to get the scoop down enough where I can put rulers to hold the shape. Right now I got in it roman candles. That's as far as I want to venture based on the stiffness. Am I being a wimp and should I just jamp two rulers in there like show in the picture or keep going and take a couple of days by stretching the stiffness more and pushing it down? I'm new to this area so any advice would be much appreciated and a plus would be a definate award. Thanks in advance!

-Kruz

------------------
These are the Kruz'n Machines:
'84 SE 2m4 (PROJECT CAR)
'87 GT V6
'83 Mint Dodge Ram 150 Royal

IP: Logged
thegreep
Member
Posts: 209
From: South Jordan, Ut
Registered: Nov 2002


Feedback score: N/A
Leave feedback

Rate this member

Report this Post07-14-2003 05:29 PM Click Here to See the Profile for thegreepSend a Private Message to thegreepDirect Link to This Post
I love it! Martin, you still have an extra hood?

------------------
The fiero is now shown! Check out some of my rides:
http://shawn.ccicom.com

IP: Logged
Monza76
Member
Posts: 1298
From: Gander, NF. Canada
Registered: Jul 2002


Feedback score: N/A
Leave feedback


Total ratings: 67
Rate this member

Report this Post07-14-2003 06:04 PM Click Here to See the Profile for Monza76Click Here to visit Monza76's HomePageSend a Private Message to Monza76Direct Link to This Post
KRuzn MAchines Check out the pictures with my posts and you will see the details of what to leave and what to trim. If you have cut into the seal area but did not remove it, then repair the cut lines by fiberglassing on the top (so it doesn't interfere with the seal).

Good luck with your project.

Ira

IP: Logged
KRuzn MAchines
Member
Posts: 1102
From:
Registered: Jul 2003


Feedback score: N/A
Leave feedback


Total ratings: 84
Rate this member

Report this Post07-14-2003 06:24 PM Click Here to See the Profile for KRuzn MAchinesSend a Private Message to KRuzn MAchinesDirect Link to This Post
but my7fieros did the exact same thing i did and all he did to correct it to make it sit good was cut into the seal a quarter inch. I believe this would be the easier route for me. Your opinion is much appreciated. I just think that it would be easier to do what he did by cutting into the seal.
IP: Logged
Previous Page | Next Page

This topic is 4 pages long:  1   2   3   4 


All times are ET (US)

T H I S   I S   A N   A R C H I V E D   T O P I C
  

Contact Us | Back To Main Page

Advertizing on PFF | Fiero Parts Vendors
PFF Merchandise | Fiero Gallery | Ogre's Cave
Real-Time Chat | Fiero Related Auctions on eBay


Copyright (c) 1999, C. Pennock