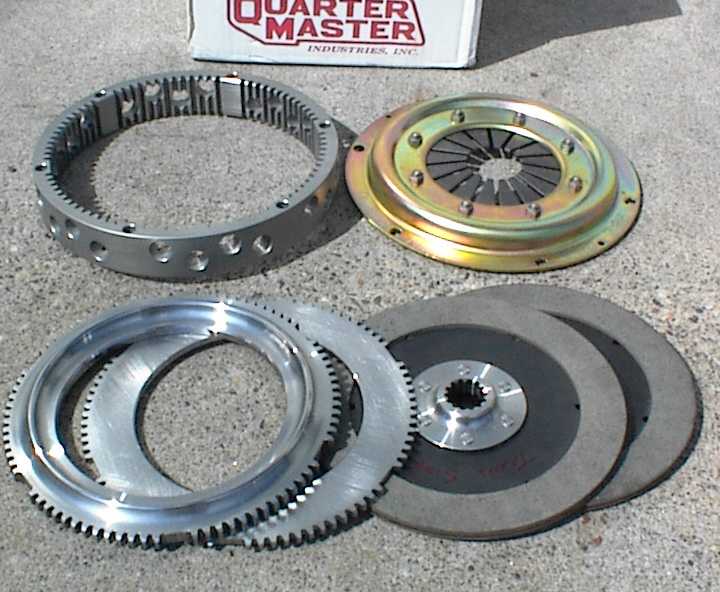
Well, Quartermaster finally came through and had this delivered this morning.
About time too, the last clutch didn't fare too well....
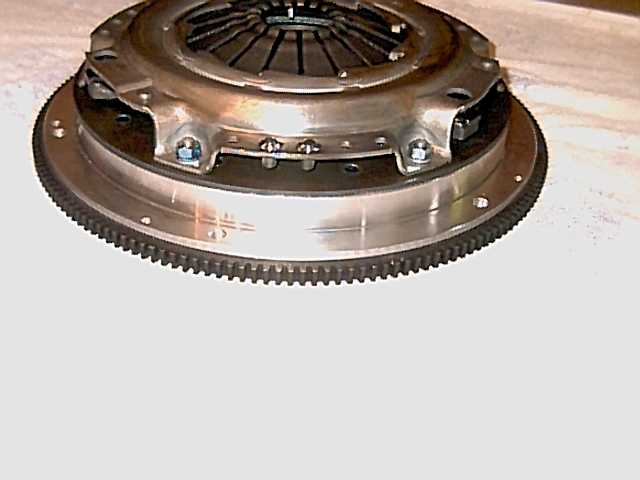
Anyways, after running around trying to find a place to machine the flywheel, cutting a small grove to sink the housing in, drilling the holes into the flywheel (After three broken bits Eric gave up, trying to thread them,...plain nuts and bolts will do for now then...) This is how far we got....
Looks good, ...BUT... even after some light machining on the inside of the trans, we still seem to have a clearance issue...grrr (I was really hoping to have this thing buttoned up this weekend)
Guess I get to wait now until the machine shops open on Monday, to get the flywheel machined once more ( Shave off a bit more, and then balancing again)
Tina
BTW I am starting to think this darn thing is cursed... did I mention that the transmission on the car carrying the flywheel to the machine shop went south
IP: Logged
02:39 AM
PFF
System Bot
Archie Member
Posts: 9436 From: Las Vegas, NV Registered: Dec 1999
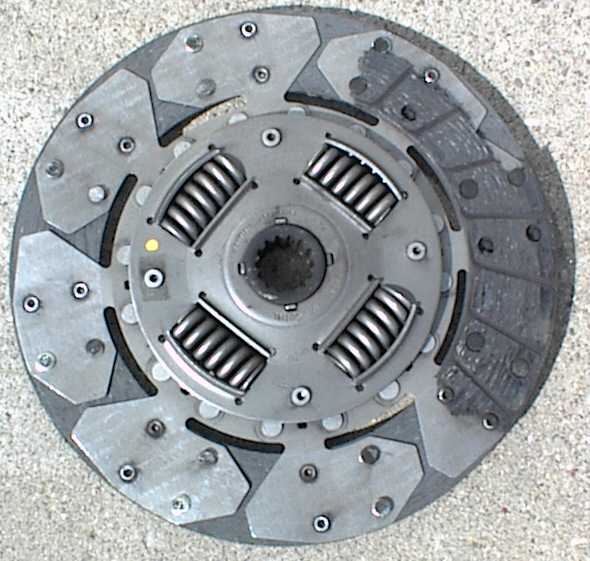
Did they cutback the friction material on the F/W side of disc one like they said they were going to do?
Are you keeping track of how much material you are taking off of the F/W?
I don't understand why you wouldn't be able to tap the F/W.
After I went over there to represent your interests a few days ago, I'd like to know how well they followed instructions. Can you send (via EMail) pics of the other sides of the discs & pictures of the F/W face after you've had it machined?
Archie
IP: Logged
09:04 AM
Tina Member
Posts: 2858 From: At an elevation of 8564 feet. Registered: Nov 2000
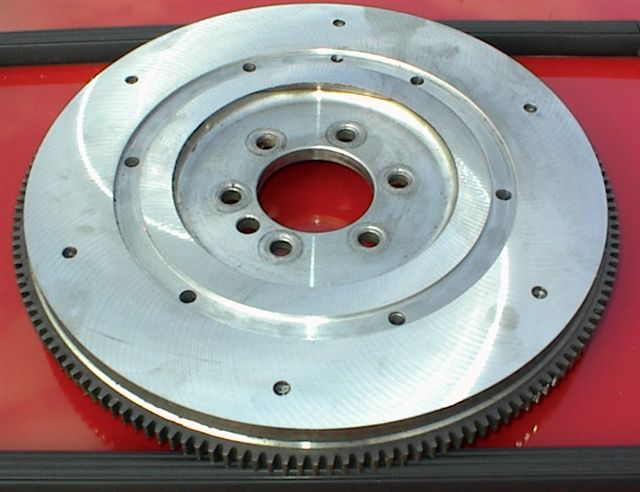
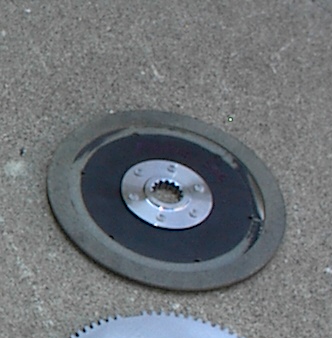
I knew you were not going to be satified with that pic, Archie
Here you go....
How's this?
To the Flywheel,... the issue with breaking taps...probably from the hot spots in the metal when we grenaded the clutch, it had some really bad hot spots on it after that. (was that really already 2 years ago..wow) We had to machine quite a bit off after that, and still ended up with a small chip on the surface. Since then it was machined a couple times more (sometimes the machine shop put a stamp on it,sometimes not, on how much was taken off) Guess the best way would be,...if you could measure a new flywheel of yours,and we measure ours, when we got it were we need it, thickness wise
I do have to say, when it comes to Customer Service...you rock... I really appriciate you going out of your way and bringing a flywheel down to QM, explaining your set up, and making sure I get what I need. But noooo, you don't stop there Dear Archie also schlepps a transmission down there... with a viewing window... too. What a guy
Tina
BTW Can't forget about the Cal Kid either,...Thanks... for pointing me the QM way.
IP: Logged
09:45 AM
California Kid Member
Posts: 9541 From: Metro Detroit Area, Michigan Registered: Jul 2001
Tina, sorry to hear your still having some headaches with the setup.
You may want to have the machine shop install threaded dowels on the flywheel, as it will help when changing disks (see picture below): Also, if you're talking to QM, I'd be interested if they changed (why they changed) the clutch lining material, as it doesn't look like the last disk's I received from them?. Maybe your disks are the same, but doesn't appear so in the photo you posted. Mine appear to be a composite mix (like a hard cast epoxy). edit: clutch disk photo removed to save space ------------------ Click to Listen!
[This message has been edited by California Kid (edited 08-25-2002).]
IP: Logged
10:04 AM
Tina Member
Posts: 2858 From: At an elevation of 8564 feet. Registered: Nov 2000
Originally posted by California Kid: You may want to have the machine shop install threaded dowels on the flywheel
Not a bad idea, gonna have to run that idea by my favorite machine shop guy tommorow. ( he has actually not seen this set up yet... refuses to work on the weekend...smart guy)
To the parts,...QM did mention they changed/upgraded their set up recently. Would explain the problems we first had with the discontinued # numbers. Anyways,this is just the first attempt of QM and Archie trying to get me back on the road. From what I understand Archie and QM are going to stick their heads together in the next months and come up with a new fly wheel to elimate some of the problems I am running into currently
Tina
IP: Logged
10:19 AM
California Kid Member
Posts: 9541 From: Metro Detroit Area, Michigan Registered: Jul 2001
Make sure you're getting full surface contact on the flywheel side disk. In my case they machined the flywheel to accept a hardened steel insert (press in) that is trapped by the QM ring housing to get full contact (see photo above).
Happy to read the Archie in working with QM, you're in good hands! Had a feeling that some material would have to be removed from his flywheel. With my modified Zumalt setup it appears that they added an additional 3mm thick trans to engine adapter plate, to package the QM setup. This is my best guess, as my flywheel is very thin already.
Hope you have a good 'low miles' trans to put in when your ready to assemble. My Getrag decided at 130,000 miles that 2nd gear was due for a major heart attack, and it ripped all it's teeth off (felt like the whole ass end of the car was coming apart!!!).
Thanks for the QM feedback! Please let me know what the new QM part numbers are/price.
[This message has been edited by California Kid (edited 08-25-2002).]
IP: Logged
10:55 AM
Tina Member
Posts: 2858 From: At an elevation of 8564 feet. Registered: Nov 2000
Originally posted by California Kid: Hope you have a good 'low miles' trans to put in when your ready to assemble.
Haha, ...too funny. No seriously...I have no idea what exactly I got right now...(Isuzu that much I do know)and what it came out off. We found the current trans laying in some corner of a little junkyard covered with dirt and other debris...cleaned up nice though and seems to be holding...small leak at one of the seals... but I can deal with that, only have a few more weeks left of driving the car, before storing it for the winter. (Will give us something to do over the winter)
Tina Edited to get all the part #'s on here Part #'s
#309508 Bolt Kit 7.25 3D Rear MT QM BE #296061OR Clutch Unit 7.25 2D 1x14 #309500 Cover #209503 Housing #509506 Floater
[This message has been edited by Tina (edited 08-25-2002).]
IP: Logged
11:21 AM
Archie Member
Posts: 9436 From: Las Vegas, NV Registered: Dec 1999
Originally posted by Tina: .... even after some light machining on the inside of the trans, we still seem to have a clearance issue...
Thanks Tina
What kind of light mochining did you do on the inside of the trans?
Also, what area inside the trans bellhousing are you interferring with?
Once you have the F/W where you need it please set the F/W on a flat surface with the face down and measure from the surface that bolts to the crankshaft down to the flat surface.
Also, please show us the business side of the F/W after it's machined.
Those guys over at QM were really surprized when I showed up with a cut-away transmission.
I got the full factory tour and am quite impressed.
Because my Mothers' health, we are moving her to LasVegas to live with my brother. So for the next 10 days (starting tomorrow) I'll be on the road everyday except this Wednesday. QM is already working on the F/W you mention & I already have an appointment with them for when I return. Man, I love working on stuff like this, Thanks for letting me jumo into the middle of your relationship with QM.
Archie
IP: Logged
04:13 PM
Tina Member
Posts: 2858 From: At an elevation of 8564 feet. Registered: Nov 2000
Originally posted by Archie: Because my Mothers' health, we are moving her to LasVegas to live with my brother. So for the next 10 days ...
First of all, hope your Mother is going to be o.k. and everything will go well
quote
What kind of light machining did you do on the inside of the trans? Also, what area inside the trans bellhousing are you interferring with?
No pic,..sorry. Ran out of memory , but if you happen to have a pic of the inside of a trans I could show you where it still hits. I'll have some tomorow evening, perhaps even tonight. (Kinda taking a day off the Fiero stuff, and do some serious power lounging) The only reason we attempted to grind of some of the inside casing in the first place, ...no machine shop was open anymore to take a little more off the flywheel... Eric and me weren't going to give up this easy. He doesn't think machining will be necessary in the future,...we just gotta figure out how thin this fly wheel has to get in order to work.
quote
Once you have the F/W where you need it please set the F/W on a flat surface with the face down and measure from the surface that bolts to the crankshaft down to the flat surface.
Also, please show us the business side of the F/W after it's machined.
Will do.
quote
Man, I love working on stuff like this,... Thanks for letting me jumo into the middle of your relationship with QM.
No problem,...as a matter of fact...nobody had thought about the inside diameter of the flywheel..well exept you Saved me a whole lot of time, at least this way I have a fighting chance to drive this "cursed beast" to FieroRama
Tina
[This message has been edited by Tina (edited 08-25-2002).]
IP: Logged
07:38 PM
California Kid Member
Posts: 9541 From: Metro Detroit Area, Michigan Registered: Jul 2001
Here's a pic of the inside of a Getrag, don't know if it's similar (as no modifications had to be made to mine. Just thought I'd post for your reference in case you pick up a Getrag.
IP: Logged
07:49 PM
LS1swap Member
Posts: 1181 From: McHenry,IL.USA Registered: Jan 2001
Hi Tina thanks for keeping us posted , and the part numbers. I will have to see how my ram clutch holds up, but if it doesn't I will have to check into this set up. And they are right here in Lake Zurich, IL, 60047. Can't get much closer than that. Please keep us posted, and hope you can make it to firorama good luck
Have you contacted with artred and orville. Orville is going to be using an hydraulic throwout. Similar to the new f-bodies
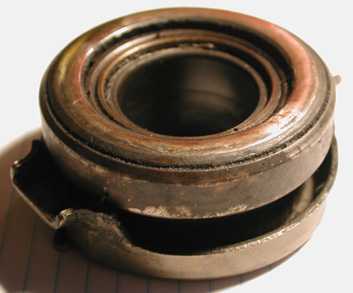
Another thing that might help you out is that there are two clutch release bearings for the Fiero. One is flat surface like the one show in the photo I posted, the other bearing is conical radius faced and a little thicker than the flat faced one. It would seem to me that in your packaging the conical bearing would be better suited to make up some of the distance removed on your flywheel (probably not a critical item, but a little better package).
By the way, you are really going to like the feel and grab of the QM setup, it's very precise and solid!!!
IP: Logged
08:21 PM
Tina Member
Posts: 2858 From: At an elevation of 8564 feet. Registered: Nov 2000
Originally posted by LS1swap: Hi Tina thanks for keeping us posted , and the part numbers.
Hehe,..just doing my part to get the info to my favorite Fiero Community
Alright, alright...and a couple purely selfish reasons too I am really getting tired of these guys on the local Highways picking on my poor little 130thou miles and going 85 V6.
You guys just wait...(insert evil grin here)
Tina
IP: Logged
08:22 PM
Tina Member
Posts: 2858 From: At an elevation of 8564 feet. Registered: Nov 2000
Originally posted by California Kid: there are two clutch release bearings for the Fiero. One is flat surface, the other bearing is conical radius faced and a little thicker than the flat faced one. It would seem to me that in your packaging the conical bearing would be better suited to make up some of the distance removed on your flywheel.
Noted,..good info to have
IP: Logged
08:26 PM
California Kid Member
Posts: 9541 From: Metro Detroit Area, Michigan Registered: Jul 2001
Archie, I first send good wishes to you and your mother. Hope the best for her in her new home.
Second: Orville and I will be trying the hydraulic clutch t/o bearing system. (didn't know fbodys used this type of system. Makes sense. It's beautifully simple.)
Anyway, it's too early for me to say anything yet, but it shows a lot of promise, and as you replace the master cyl too, *YOU ELIMINATE ALL THE HISTORICALLY PROBLOMATIC OE FIERO CLUTCH HYDRAULICS ALLTOGETHER!* (phew, sorry, hope that didn't make your hair stand on end.) Anyway, yeah, I'm excited about some truely percise clutch feel and actuation.
RE: the QM clutch!
Looks like it's coming together, don't worry, these things take time
Hrm, my QM setup should be here any minuite then, ours should have shipped about the same day!
AWESOME news below guys on the collaboration!!!
Best! Ben
quote
Originally posted by Tina: From what I understand Archie and QM are going to stick their heads together in the next months and come up with a new fly wheel to elimate some of the problems I am running into currently
Tina
------------------ Ben Cannon 88 Formula, T-top, Metalic Red. (2:13.138 at Sears Point) "Every Man Dies, not every man really Lives" 88 Formula, Northstar, Silver, In-Progreess. -Mel Gibson, "Braveheart"
[This message has been edited by artherd (edited 08-26-2002).]
IP: Logged
02:50 AM
Orville Member
Posts: 263 From: Bakersfield, Ca USA Registered: Dec 2000
Very iteresting about the clutch's interference with the trans. I have a 4sp and that's the close spot on it too. My clutch is the 7.25 v-drive model and I have about 2mm clearance with the disk splines still entirely engaged with the input shaft splines.
California Kid, what is the ID of the fiero radius faced T. O. you referred to? If it's 1 3/4" it'll fit on the internal slave cylinder.
Orville
IP: Logged
06:24 PM
California Kid Member
Posts: 9541 From: Metro Detroit Area, Michigan Registered: Jul 2001
Originally posted by Orville: California Kid, what is the ID of the fiero radius faced T. O. you referred to? If it's 1 3/4" it'll fit on the internal slave cylinder.
Orville
Clutch Release Bearing pictured is for a GETRAG, ID is 1 3/16". Working surface against pressure plate is ID 1 3/4", OD 2 3/16" (this is the contact zone, bright metal, that contacts fingers of pressure plate). It's an NSK part no. 61TKB3001:
Personally I like the way Ben is thinking with the hydralic unit, waiting results!
[This message has been edited by California Kid (edited 08-26-2002).]
IP: Logged
07:51 PM
Tina Member
Posts: 2858 From: At an elevation of 8564 feet. Registered: Nov 2000
Originally posted by artherd: [B]Looks like it's coming together, don't worry, these things take time [b]
I am starting to find this out, the machine shop wasn't too happy when they heard that I wanted an addional 100thousands grinded off. But should be done by tommorow though, then off to have the stuff balanced, and we should be in biz.
quote
[b] My QM setup should be here any minute then, ours should have shipped about the same day![b]
Actually Mark assured us to have it done this past Monday, well Thursday comes and goes, and no clutch. Ended up calling them the next day,and within 2 hours the machined the clutch plate,and shipped it out "Next Day Saturday" (Come to think of it, I don't think they charged me for shipping either)
Nice save by Mark D.
Tina
IP: Logged
09:16 PM
PFF
System Bot
Aug 27th, 2002
Tina Member
Posts: 2858 From: At an elevation of 8564 feet. Registered: Nov 2000
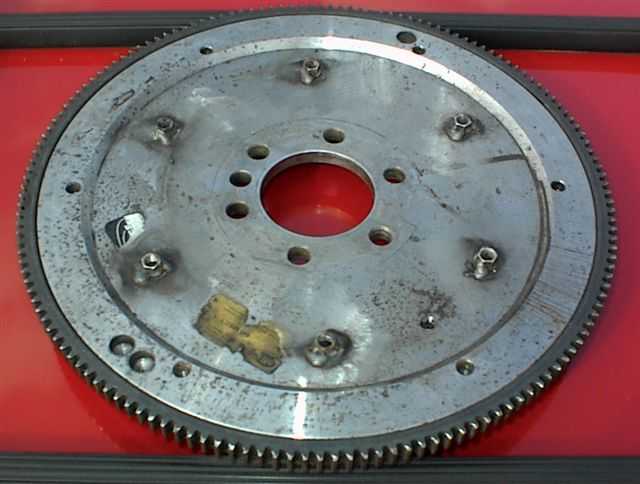
Am I missing something about your setup??? The QM hsg ring should be flush with the flywheel clutch bearing surface. The picture you posted shows an inside raised ring going inside of the QM housing clutch disk area when positioned on the flywheel (which will eat up clutchpak space)???
IP: Logged
11:19 PM
Tina Member
Posts: 2858 From: At an elevation of 8564 feet. Registered: Nov 2000
Originally posted by California Kid: The picture you posted shows an inside raised ring going inside of the QM housing clutch disk area when positioned on the flywheel
per QM... Housing needs to be 100thousands of an inch recessed in order for the stack height to be correct.
Tina
IP: Logged
11:37 PM
Aug 28th, 2002
California Kid Member
Posts: 9541 From: Metro Detroit Area, Michigan Registered: Jul 2001
Originally posted by Tina: per QM... Housing needs to be 100thousands of an inch recessed in order for the stack height to be correct.
Tina
That's interesting, I may not be aware of all the changes that were made when Keith Huff installed the QM unit in my car. I do know that 3 years ago we removed .020" from the flywheel face of the QM housing ring to improve clutch stack for longer life of disks. New disks start to grab with clutch pedal barely off floor until they are broke-in seated, then it start engaging about 1" off floor.
Have your machine shop radius those sharp corners slightly. Sharp corners act as stress risers and promote cracking.
Looks liked you've approached my flywheel thickness (lower weight mass), you're going to be really impressed at how fast the engine revs up to redline unloaded (be careful, rev limiter highly recommended).
[This message has been edited by California Kid (edited 08-28-2002).]
IP: Logged
06:34 AM
LS1swap Member
Posts: 1181 From: McHenry,IL.USA Registered: Jan 2001
"Have your machine shop radius those sharp corners slightly. Sharp corners act as stress risers and promote cracking."
I would normally agree but in this case no... I had a similar setup with my flywheel. The purpose of the recess is to hold the ring in place. If you chamfered or fillet the edges you would counter act this and put the shear force back on the bolts. I recessed the spacer on my flywheel too. The only thing I have to ask is how wide is the friction surface to clutch disk contact... It looks narrow? I realize that you sill have full contact on the three other surfaces, but it seems like it should be wider.
IP: Logged
06:44 PM
Tina Member
Posts: 2858 From: At an elevation of 8564 feet. Registered: Nov 2000
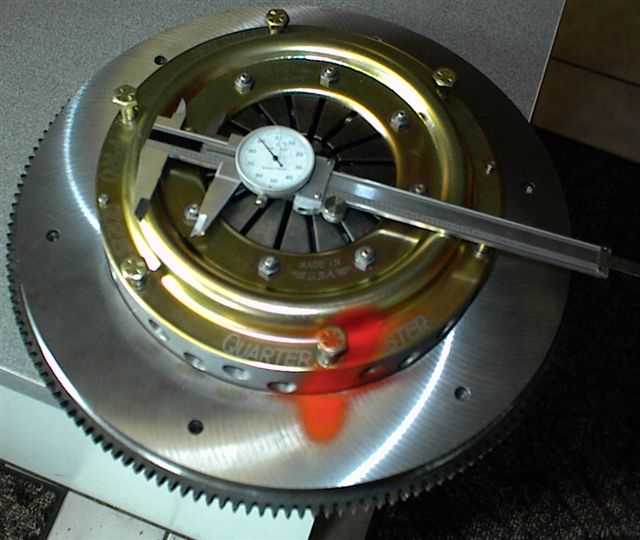
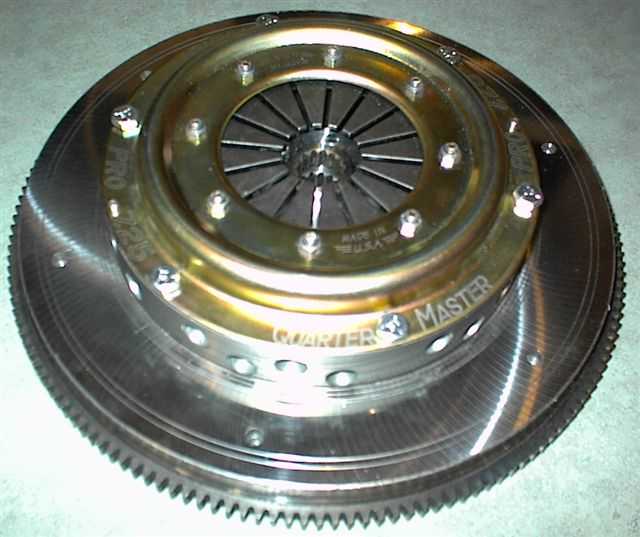
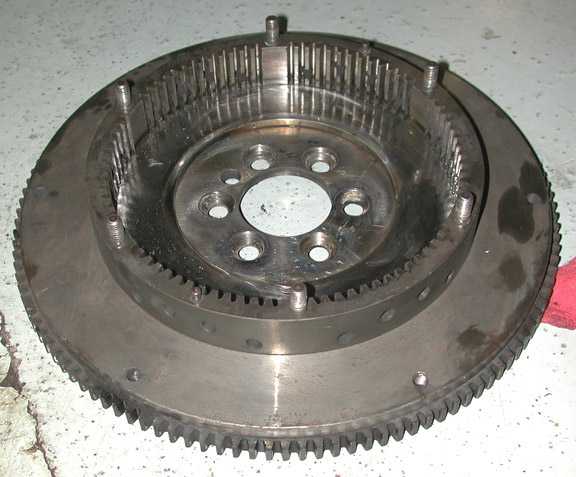
Well, ...the whole thing is now balanced. Bruce (My machine shop guy) did have a small issue with the cover...big wobble there... Not a manufacturing mistake though,he contributes the wobble to the fact the the housing is a stamped part.
Balancing end result = we are 1/2 a gram off.
Final thickness 990 thou (Not including the lip on the back of the fly wheel, far ouside edge by the teeth...dark colored area)
And as promised earlier, a pic of the inside of the housing, were some grinding took place in an attempt to make the then thicker fly wheel work.
Tina
[This message has been edited by Tina (edited 08-28-2002).]
IP: Logged
10:13 PM
California Kid Member
Posts: 9541 From: Metro Detroit Area, Michigan Registered: Jul 2001
Originally posted by LS1swap: "Have your machine shop radius those sharp corners slightly. Sharp corners act as stress risers and promote cracking."
I would normally agree but in this case no... I had a similar setup with my flywheel. The purpose of the recess is to hold the ring in place. If you chamfered or fillet the edges you would counter act this and put the shear force back on the bolts. I recessed the spacer on my flywheel too.
Let's see: Known fact, sharp machined edges are stress risers. I've had no housing stud failures, or flywheel failures, and car has been running the QM setup since 1993. I'm not saying Tina will have any problems, but it's better to be safe than sorry, especially with that much rotating mass right at your backside and not scatter shield. The welded on nuts bother me a little bit also, as those heat zones did alter the metallurgy locally. Just my opinion, but I would have the flywheel spun to 15,000 rpm and magna-fluxed for cracks before putting it in (just to have piece of mind).
IP: Logged
11:32 PM
Tina Member
Posts: 2858 From: At an elevation of 8564 feet. Registered: Nov 2000
I am usually not in the habit of posting a "Mall subject" in GT, BUT I could really use on of those
Tina BTW everything went smooth tonight with the bolting the trans to the engine part...just waiting on a few more parts (should be in tomorow morning) to hopefully finish it tomorow night ...keeping my fingers crossed of course...afterall we are dealing with the "Cursed Beast" (Iknow,..I know... not the most flattering name for a Fiero... but it just seems to fit)
IP: Logged
11:33 PM
Tina Member
Posts: 2858 From: At an elevation of 8564 feet. Registered: Nov 2000
Originally posted by California Kid: [QUOTE] I would have the flywheel spun to 15,000 rpm and magna-fluxed for cracks before putting it in (just to have piece of mind).
I 'll ask Bruce (Machine shop guy) tomorow, my guess though, ( he probably already did) he's rather..well picky is an understatement
Tina BTW Finally caught up to my PM's too
IP: Logged
11:47 PM
Aug 29th, 2002
artherd Member
Posts: 4159 From: Petaluma, CA. USA Registered: Apr 2001
Hey Tina, well, called Mark, and he's really shipping it tommorow, he promises I'll call again to be sure.
PS: glad now I sprung for the few extra $ for the 'super pro' billet aluminum pressure plate.
I'm using QM's billet button assy, so my setup height will be exactly what they think is right, I'll be sure to post copious pics! (Tom, this may indeed be why you found grinnding the titanium ring to be beneficial! Knew I was onto something here
I bet that's exactly what QM is intending, almost a 'press fit' into what would become a groove cut into the flywheel 0.100" that the ring will recess into. I wouldn't camfer the INNER edges,(well, not a whole heluva lot, maybe a thousandth or so) but the outters sure could use it. (which is I think what you meant.) the groove's cross section would look like:
\ / <- Alotta chamfer |._____.| <-just a wweeee tiny bit, or none.
Tina: you'll maybe just get about 1/8 less life out of your setup with part of the friction disc not engauged (might change to whatever QM/Archie work out in 30k or so.)
Best! Ben.
------------------ Ben Cannon 88 Formula, T-top, Metalic Red. (2:13.138 at Sears Point) "Every Man Dies, not every man really Lives" 88 Formula, Northstar, Silver, In-Progreess. -Mel Gibson, "Braveheart"
IP: Logged
12:46 AM
PFF
System Bot
California Kid Member
Posts: 9541 From: Metro Detroit Area, Michigan Registered: Jul 2001
Originally posted by artherd: I bet that's exactly what QM is intending, almost a 'press fit' into what would become a groove cut into the flywheel 0.100" that the ring will recess into. I wouldn't camfer the INNER edges,(well, not a whole heluva lot, maybe a thousandth or so) but the outters sure could use it. (which is I think what you meant.) the groove's cross section would look like:
\ / <- Alotta chamfer |._____.| <-just a wweeee tiny bit, or none.
Tina: you'll maybe just get about 1/8 less life out of your setup with part of the friction disc not engauged (might change to whatever QM/Archie work out in 30k or so.)
Best! Ben.
As far as the edges go, they just have to be rolled a very small amount, it could be accomplished with a small concave roller with very little pressure on a lath. Or just a very minor radius fly cut, very minor radii will not get into the contact zone of the clutch disk. The recess in the flywheel does satisfy clutch pack centering and is desired by QM to setup proper disk stack (keep in mind that we're using it for the street where clutch temperatures get a little hotter than race, so it might be just a little too tight. You'll know if it starts to chatter a little bit in stop and go traffic (disks will temporarily warp a little taking up all the air space, ie not full disengagement).
Hey Ben, drop me a pm and let me know how your projects are going???
IP: Logged
01:10 AM
LS1swap Member
Posts: 1181 From: McHenry,IL.USA Registered: Jan 2001
Good luck on the clutch..... My clutch disk has no dampening springs either. The only time I seem to notice it chattering is in reverse????. It is also not that uncommon for the pressure plate to be a little out of balance. Mine was too straight from the manufacture. I had them balance the flywheel first. Then add the pressure plate, and balance it again, butt by altering the weight of the pressure plate and not the flywheel. That way if I ever go and replace the pressure plate the flywheels balance will still be ok, and just be off whatever the new pressure plate is. You can see in this pic two little studs welded on the pressure plate to correct its balance. It is also hard to tell from the pic but the spacer is recessed into the flywheel about an 1/8"
Once again good luck that is going to be one heck of a set up I am sure you will but please keep us poasted.
IP: Logged
06:29 AM
Aug 30th, 2002
Tina Member
Posts: 2858 From: At an elevation of 8564 feet. Registered: Nov 2000
Got to drive it this afternoon for the first time...I just got back from my test drive
I love it, just one thing though, I am going to have to do some extra leg curls with the right leg, to kinda balance out the workout my left leg gets in traffic.
Tina
[This message has been edited by Tina (edited 08-30-2002).]
IP: Logged
10:03 PM
artherd Member
Posts: 4159 From: Petaluma, CA. USA Registered: Apr 2001
Originally posted by California Kid: [QUOTE]Originally posted by artherd: [b]I bet that's exactly what QM is intending, almost a 'press fit' into what would become a groove cut into the flywheel 0.100" that the ring will recess into. I wouldn't camfer the INNER edges,(well, not a whole heluva lot, maybe a thousandth or so) but the outters sure could use it. (which is I think what you meant.) the groove's cross section would look like:
\ / <- Alotta chamfer |._____.| <-just a wweeee tiny bit, or none.
Tina: you'll maybe just get about 1/8 less life out of your setup with part of the friction disc not engauged (might change to whatever QM/Archie work out in 30k or so.)
Best! Ben.
As far as the edges go, they just have to be rolled a very small amount, it could be accomplished with a small concave roller with very little pressure on a lath. Or just a very minor radius fly cut, very minor radii will not get into the contact zone of the clutch disk. The recess in the flywheel does satisfy clutch pack centering and is desired by QM to setup proper disk stack (keep in mind that we're using it for the street where clutch temperatures get a little hotter than race, so it might be just a little too tight. You'll know if it starts to chatter a little bit in stop and go traffic (disks will temporarily warp a little taking up all the air space, ie not full disengagement).
Hey Ben, drop me a pm and let me know how your projects are going???
[/B][/QUOTE]
------------------ Ben Cannon 88 Formula, T-top, Metalic Red. (2:13.138 at Sears Point) "Every Man Dies, not every man really Lives" 88 Formula, Northstar, Silver, In-Progreess. -Mel Gibson, "Braveheart"
IP: Logged
11:03 PM
Oreif Member
Posts: 16460 From: Schaumburg, IL Registered: Jan 2000
Got to drive it this afternoon for the first time...I just got back from my test drive
I love it, just one thing though, I am going to have to do some extra leg curls with the right leg, to kinda balance out the workout my left leg gets in traffic.
Tina
[This message has been edited by Tina (edited 08-30-2002).]
So does this mean we'll see it at Fierorama next week???
------------------ Happiness isn't around the corner... Happiness IS the corner.
IP: Logged
11:41 PM
California Kid Member
Posts: 9541 From: Metro Detroit Area, Michigan Registered: Jul 2001
Originally posted by Oreif: So does this mean we'll see it at Fierorama next week???
That's the plan, just one more little snag to take care off....seems Eric's cousin is getting married the same weekend. Anybody have any good exuses,ideas on how to get out of that wedding thing?


 >:
>: