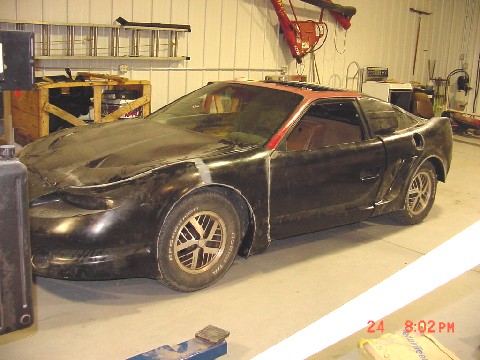
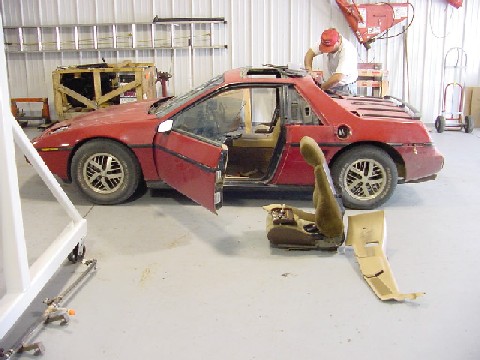
We started construction of the Finale kit from Archie today. Rolled the car in about noon and here is the victim just after we got started.
At 4:10 it looked like this and we were playing with fitting the doors.
We've been working on the donor since May and it's nearly mechanically perfect now. The mechanicals have really been done for a while, but we've driven the car 4,000 miles to get the bugs out before we started the bodywork. It averages about 22 mpg and dyno'd at 136 hp at 4400 rpm.
3.4L Crate engine Underdrive Pulley WCF Headers No Cat K&N with intake tube Lindertech injectors MSD 6A and MSD Coil Eibach's front and rear KYB's Front and rear Poly everywhere All new brake and suspension components RCC Bumpsteer correction kit Added Rear Sway bar Rebuilt Auto with shift kit and HD internals Sony in dash CD with Kenwood Front speakers, sony in seat speakers will go in with the seat recovering.
Still coming are new wheels and tires, we'd like 17's but will probably go with 16's
Mr. Mike's leather interior
We hope to have the body hung and ready to work on finishing by this weekend or early next week.
John Stricker
IP: Logged
11:21 PM
PFF
System Bot
GTFiero1 Member
Posts: 6508 From: Camden County NJ Registered: Sep 2001
It's a secret. Only one other forum member knows and he's sworn to secrecy. It won't be the color of my Scout though. Even though I see you like Blue. 8-)
John Stricker
quote
Originally posted by GTFiero1: what color are you painting it?
IP: Logged
12:00 AM
West Coast Fiero Member
Posts: 2044 From: Los Angeles, CA, USA Registered: Jun 2001
hmmm, from a psychological standpoint, Im going to guess that it will be painted yellow, thereby representing nearly the other end of the spectrum - that and it would look really cool
------------------ ( the above was the thoughts, views, and opinions of a disgruntled Fiero mechanic, and do not express or imply those of West Coast Fiero, Fieros West, or any other organization - just that of this poor bastard ) :) Eric Nelson Technician, West Coast Fiero 310-305-4111
IP: Logged
01:06 AM
GTFiero1 Member
Posts: 6508 From: Camden County NJ Registered: Sep 2001
i whsh archie made a finale style nose that would fit on the front of a regular GT... (hint, hint) kinda like the 355 noses that are out now, just finale style!
I'm guessing he's going to paint it either YEllow or bright green. but he doesn't seem like a green guy guwess we'll have to see! Good luck!!! :-) It's gonna look great!
We didn't get a whole lot done today but like any project like this the thing is that you have to do SOMETHING every day or it gets too easy to just blow it off. We still hope to have the body final mounted by the weekend though. We probably put in a couple of hours on it today.
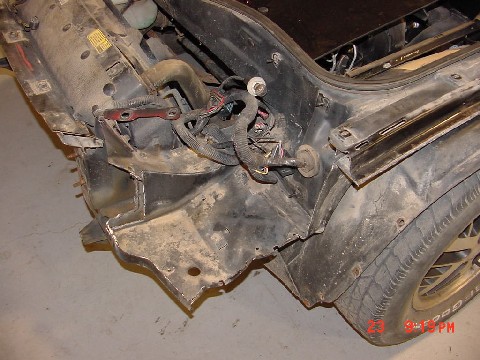
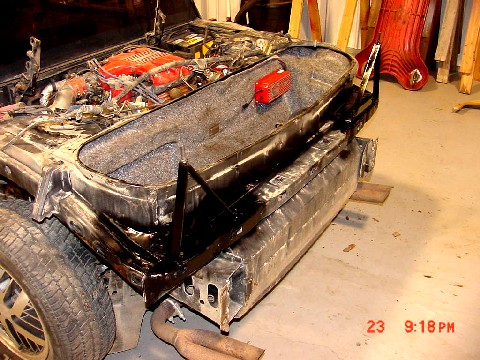
We did get the front area cut out to get it ready for the front clip. Hacksaw and Sawzall through the boxed areas, plasma cutter on the flat parts (lots quicker).
We also got the rear clip mounting brackets drilled and on, as well as the inner fender wells removed and some other clean up items done. The dust is courtesy of Kansas gravel roads.
If you look closely you can see just a little rust on the upper frame rails. We'll cut that out and wire weld in replacements tomorrow. It's not bad, but needs to be fixed before the body is mounted. The paint on the rear brackets was just put on because they come unpainted. The entire exposed areas will be painted before the body is mounted. There is also a pretty good shot of where we mounted the MSD, that comes up occasionally in the tech section.
John Stricker
IP: Logged
11:45 PM
PFF
System Bot
Cheever3000 Member
Posts: 12400 From: The Man from Tallahassee Registered: Aug 2001
Originally posted by The Aura: i whsh archie made a finale style nose that would fit on the front of a regular GT...
My guess is SmoooothGT has already thought of that! Not meaning to hijack this thread, but everything I have suggested to Smooooth turns out to have already been considered!
IP: Logged
11:49 PM
Jul 24th, 2002
jstricker Member
Posts: 12956 From: Russell, KS USA Registered: Apr 2002
We made better progress on the Finale today, put in about 12 man hours on it. The doors are mounted, but not finish mounted. They still need tweaking. We had to cut the roof back about 1/4" and do quite a bit of trimming on the glass pieces, and we're still not done witht that yet.
I talked to Archie about it and he's still working with his new fiberglass guy on how and where to trim without trimming too much, as that would make things lots harder than just trimming by the new owner. He'll get it right when the new glass man has more experience.
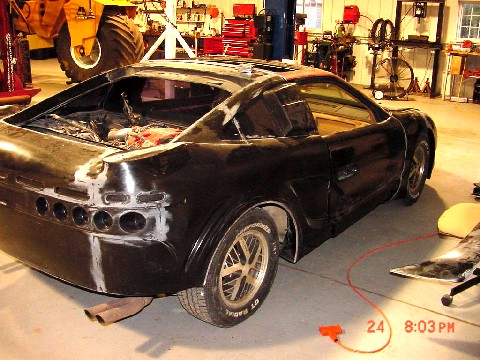
This front quarter view shows we still have some adjustment to do to make the panels line up, but I'd guess no more than a couple of hours for the door rear clip, if that. It's pretty close. The front clip and hood are just sitting there so we could check the gaps between the panels, and they look pretty good.
This is a rear quarter view. There will be lots and lots of finishing involved and I'm going to do it a little differently than Archie usually does it. I'm planning to use microballoons and resin instead of duraflex since it's made of the same resins the body is. I've used this method on airplanes a lot and it's very durable and strong, much more so than automotive products.
I still think we're well on track to having the body mounting finalized by this weekend.
John Stricker
IP: Logged
11:11 PM
jelly2m8 Member
Posts: 6275 From: Nova Scotia, Canada Registered: Jul 2001
Thanks Jelly, but it's still a long ways off from being "Finale". 8-) I honestly figure we will have as much or more time prepping for paint than we have in getting the body mounted. BTDT on airplanes. Fill/sand/fill/sand/fill/sand/sand/fill/sand/sand/sand........ Fiberglass is great to make complex shapes but a real pain to get a glass finish on. And we haven't even done the body mods yet, that will come just before the final mountings. The plan is to get everything shimmed, lined up, and ready to start finishing by Friday, then pull the panels off that will be changed and do that, then final mounting.Hope to have them done by Monday or Tuesday at the latest. Then comes the finishing.
The car will be in the paint shop on August 5 though.
John Stricker
quote
Originally posted by jelly2m8: Wow, you guys are moving along nicely! From Fiero to Finale in 2 days.
Keep up the good work!
IP: Logged
12:20 AM
Jul 29th, 2002
jstricker Member
Posts: 12956 From: Russell, KS USA Registered: Apr 2002
We had to take a couple of days off work on the car to do some work that pays something, but we've been making steady progress, even though it doesn't look like much has been accomplished.
We had all the body panels on and aligned and now the rear clip is back off to undergo some surgery. Almost all of the cut outs have been done and we're starting some finishing.
The hood took an incredible amount of time, and there's still some finishing to do on the scoops, but they're close.
We've just begun blocking and filling the imperfections in the front clip. As with any fiberglass product, there are a ton of them. Sand, sand, sand, and more sand.
Archies kit is better than most though. Some are really bad with pinholes and surface imperfections. Hopefully, if all the parts get here, we will have the panels all finish and final mounted by this weekend and be doing the block sanding.
It WILL go to the paint shop August 7th.
John Stricker
IP: Logged
11:41 PM
Jul 30th, 2002
GTFiero1 Member
Posts: 6508 From: Camden County NJ Registered: Sep 2001
The Grand Prix lights require some front end modification that I'm not too wild about. I talked to Archie about it on the phone and he's sending me the Caravan lights (the GP ones came with the kit) for me to look at and compare.
The Caravan lights are not without their challenges either. If you look CLOSELY at Archie's website on the Finale, you'll see they don't quite come all the way to the inside of the headlight openings. The car was originally designed for some European lights that are not DOT approved and the Caravan lights are the closest Archie could find when he brought the kit over.
I'm still not sure which way I'm going yet, but the lights should be here tomorrow and I'll decide then.
John Stricker
quote
Originally posted by GTFiero1: Does this one use the Gran Prix lights of the Caravan lights? I want to see one with the Gran Prix lights
IP: Logged
01:45 AM
jstricker Member
Posts: 12956 From: Russell, KS USA Registered: Apr 2002
Yes, the trunk is quite usable. The body wraps around the outer corners of the trunk a bit, but really doesn't affect it's usable space at all. It was one of the questions I asked before I bought the kit as well.
I am working on a different method of closing. The kit comes with a new decklid as well as the hatch. In effect, you have latches for the hatch and then the power lock for the deck. I *think* I've come up with a method for the power lock to release both, if it works properly. But I won't know that until I have the body final mounted and the mods done. As a clue on how it would work, the latch would be reversed. That is, the stock electric release in the trunk and a new hook fabbed to attach to the deck, the hook would pass through a slot in the deck. Some poppers or a rubber spacer would hold the deck firmly closed by the hatch and the hatch and deck would be tied together with a cable or rope similar to a Mitsu Eclipse. It looks like a workable solution, but the devil is in the details.
You can build this car exactly like it comes to you from Archie, but IMHO where's the fun in that? If you're going to build a unique car like this, you might as well put in some special touches.
John Stricker
quote
Originally posted by Little Duce Coupe: Rookie question.....
Don't forget, this is a school car, and has to be stone reliable, which it has been. I'm having quite a bit of fun building it with my son though, maybe I need one for myself. If that should happen, it won't have just 136 hp though. 8-)
The car will be done before Aug 23. It was 98% ready for the paint shop on the 7th, as planned, then my painter took two days off so we kept the car to do some mechnaical/body type things to it that I really preferred done before it was painted anyway. It goes in for paint Monday morning, bright and early.
The things we needed/wanted to do, and have finished now, are fabbing a stock Fiero front hood support to hold the hatch open. This was not as simple as it sounds to figure out, but the result looks very good. We also moved the electric hatch release to the stationary position in the trunk, then fitted a latching system that latches both the deck and the hatch. We remounted the stock mechanical lock cylinder so that it would be possible to open the trunk in case of a battery failure or transmitter failure on the remotes since we shaved the door handles. The mechanical electric switch for the doors is also in the trunk.
A few posts in the past have talked about different tail lights for the Fino/Finale and we did that. I'm saving pictures until it's completed though, you'll just have to suffer until then. Archie has seen the work in progress pictures and he likes the way our lights look A LOT.
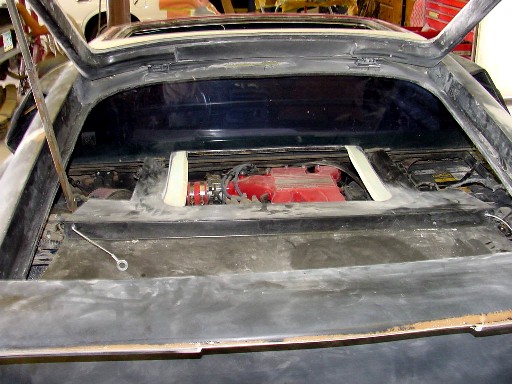
What else?? Lets see, we couldn't decide on the cell phone antenna, it was on the back glass. We left it there. It takes a tiny hole in the roof and only a couple of inches of it protrudes from the roof. Not 100% vandal proof, but damn near. Power antenna mounted in the rear left quarter panel with the power unit in the trunk area. I am finishing up a method to totally seal the rear trunk area with a custom glass piece and still have full access to the trunk. I think it will work especially well but I'm holding pictures back until I know it will work. As usual, Archie will see them before anyone else does. We modified an 84 engine cover grill to go in the deck lid and it shows the engine off pretty nicely.
Just tons and tons of little details. The body mount itself isn't terribly difficult and it can take as little as 40 to 50 hours to mount. The time comes in the things you want to do "different" and all the blending, smoothing, etc. How picky and particular you are determines just how long it's going to take.
I'm trying to take tons of pictures and keep notes as to the problems we had to overcome and the changes we made. I CAN tell you that unless you want to add at LEAST 100 hours to your project, don't do the tail lights like we did. Seriously. Three of us worked 4 almost full days on them. The rear body support that Archie provides had to be completely re-built. More of the rear of the car had to be trimmed, but we managed to keep the trunk intact.
Right now, including the mechanicals, which were almost 100% renovated with the 3.4, I'd estimate we have about 750 man-hours in the project, and that's since last May. But we should have a really special car when we're done.
When all is finished, pictures will be forthcoming. If anyone is building a Fino/Finale and is interested in our mods like the support, latch, etc., let me know and I'll help however I can.
John Stricker
quote
Originally posted by JohnnyK: What do you figure your ETA is for the completed project?
IP: Logged
11:00 PM
Aug 13th, 2002
jstricker Member
Posts: 12956 From: Russell, KS USA Registered: Apr 2002
Well, the Finale went to the paint shop yesterday morning. We didn't make it by the 7th due to us running a day or so behind schedule. This was mostly from the mods we did to the car and not any fault of the kit itself. Had we stuck strictly to the way the kit came we'd have had it there easily. It would have gone the 8th, but my painter/bodyman decided to take two days off so we kept the car to do some mechanical type work to the conversion.
One of the mods was we used a stock Fiero front strut for the rear hatch support. Archie hadn't heard of anyone trying it, but it appeared it would work so we did it.
The first picture is the modification to the grille bracket and showing where we mounted the strut brace. In this next one, you can see the top mount. We potted in a piece of 3/4" aluminum angle to mount the base on and then secured it with the bolts through the potting. There isn't any spring tension or anything on this, it just supports the hatch like a glorified broomstick so it's plenty strong. This last picture is of the deck. We cut it out to accept a modified '84 grille over the engine. You can see the plenum through the grille. You can also see the cables that we fitted to attach to the hatch that will enable the deck and hatch to open together. No, it's not very heavy at all. Other things we did during the extra time was install the Dakota Digital door actuators, power locks, and power hatch release. The hatch uses the Fiero release mechanism and a new hook mounted to the hatch itself. It also uses the stock mechanical keylock in case of a dead battery or failed remote, the hatch can be opened by key and the safety switch used and/or jumpers attached.
The details on this kind of project are killers. Making brackets, figuring out angles of pull and rod lengths, etc., etc. There are more modifications, which Archie knows about, but I'm saving them for the forum until the car is finished from the paint shop.
Mr Mike's leather is on the way, the headliner's been recovered and waiting to be installed. Still need to decide on wheels and tires. We're open to suggestions???
John Stricker
IP: Logged
10:45 PM
Archie Member
Posts: 9436 From: Las Vegas, NV Registered: Dec 1999
Originally posted by jstricker: A few posts in the past have talked about different tail lights for the Fino/Finale and we did that. I'm saving pictures until it's completed though, you'll just have to suffer until then. Archie has seen the work in progress pictures and he likes the way our lights look A LOT.
John Stricker
Every since I bought the Fino/Finale company (Candy Apple Cars)I've been watching tail lights as I drive around town. First I'd look at the curve of the tail light on the outboard end to determine if it would match the curve of the body kits. Then I would look at the placement of the lights and how the whole area's looks would be effected.
After looking at your in process pictures & the method you used, I realized that I had passed up on a lot of tail lights that I could have had made work.
Thnks for your input and I can't wait 'til you show them to everyone.
Good question. The rear hatch is not very substantial. The main structural feature in it is the glass. Now that's not so bad, but the struts attach on each side just where you see the machine screws in the one picture coming through the frame (but on the OUTSIDE) of the frame. The hatch is hinged at the top and latched at the bottom. The struts are not set up in any real easy way to go "over center" when the hatch is closed.
What this all means is that when you close the hatch, you have strut pressure on the pushing out on the center of the frame on each side CONSTANTLY with a solid attachment top and bottom. The only thing holding the glass in is adhesive. Fiberglass has a property called Tg, which is the glass transition temperature. What this means is that when the temp gets above or near Tg, the plastic becomes more flexible. Hot enough it becomes fluid. You can raise Tg by curing at high temperatures because Tg will always be higher than the cure temp (up to a point). But the glass was not cured at high temperature and I didn't want to post cure it.
Now fast forward to next summer. The car is sitting outside, pressure in the middle bowing the hatch upward, top and bottom fixed solidly. There is a real chance that the hatch could warp just enough to cause the adhesive to come loose. If it's loose at the top, air pressuer could cause the glass to come loose and exit the vehicle.
Now all this may or may not happen, but it IS a definite mode of failure. Archie mentioned that he doesn't like the gas springs either and uses a prop to hold his deck up. I wanted something a little more finished, and the strut was free on the parts car. For gas springs to be used properly, they should go over center and then help push the door or whatever closed at the end of the stroke. That's not a simple thing to engineer and the hatch/deck isn't really that heavy so a strut like the front hood seemed much less prone to other problems.
John Stricker
quote
Originally posted by JohnnyK: What is with that front hood support? Do you lose the springs in the back or something?
IP: Logged
12:22 AM
GTFiero1 Member
Posts: 6508 From: Camden County NJ Registered: Sep 2001
I thought the Finale had the glass hatch, why are you covering the engine? Cant wait to see the tail lights, I think the normal ones look really good but we'll see if these ones change my mind....
------------------ --Adam-- 1987 Blue GT 5-speed IM AOL: GTFiero
IP: Logged
01:07 AM
PFF
System Bot
jstricker Member
Posts: 12956 From: Russell, KS USA Registered: Apr 2002
The Finale does have a glass hatch. LOL. I'm laughing because Archie asked pretty much the same thing. 8-)
It's simply personal preference. First off, I look at things further down the road. This is not a show car, it's a daily driver. As much as I'd like to think the engine compartment will stay spotless, I know better than that. If you look at it, the engine compartment in the Fiero is crowded and kind of cluttered. There isn't a whole lot you can do about that because of space limitations. The one thing that does stand out is the plenum and valve covers. If you look at the pic, you'll be able to see those pretty well with the covers on. The rest of the area (strut towers, battery, etc.) will be where they should be, IMHO, under cover.
That's the nice thing about building something like this, you can do it the way YOU want. 8-)
John Stricker
quote
Originally posted by GTFiero1: I thought the Finale had the glass hatch, why are you covering the engine? Cant wait to see the tail lights, I think the normal ones look really good but we'll see if these ones change my mind....
I had always thought the Finale was originally designed around the 1993-1997 era Camaro style front headlights?
On a side note, I always thought the post 1993 Camaro rear tail lights would have been interesting on the Finale, just flip over, and use the right side on the left, and vise versa. (i.e. the backup lights would be on bottom, instead of top)
IP: Logged
05:10 PM
Aug 16th, 2002
jstricker Member
Posts: 12956 From: Russell, KS USA Registered: Apr 2002
Archie told me it was originally designed around some European headlights that weren't DOT certified so he had to find something different when he brought the kit over here. The Caravan lights ARE very close. I think, in many ways, closer than the Grand Prix lights.
We actually did consider the Camaro tail lights since their curve is very close to right for the back of the Finale/Fino. In fact, that's the way my son wanted to go. I exerted my authority as Lord and Master of All I Survey and vetoed it. I was afraid that from the back people would just assume it was some kind of a Camaro or Firebird. 8-)
Our tail lights are much different than that. The Camaro lights would have been easier than ours but even with them, there would have probably been clearance issues between the body and the rear frame and body support.
John Stricker
quote
Originally posted by 88-DOHC: I had always thought the Finale was originally designed around the 1993-1997 era Camaro style front headlights?
On a side note, I always thought the post 1993 Camaro rear tail lights would have been interesting on the Finale, just flip over, and use the right side on the left, and vise versa. (i.e. the backup lights would be on bottom, instead of top)
Anyone ever removed the rear window in the finale, I would look pretty kool from the inside IMO if the engine is nice, but it would be very very noisey and you would have a free heater. Speaking of that, when it get's hot in the hatched area from the engine will the rear fog up alot in the winter from the heat. Also how is the rear visabilty through the rear view mirror?
Your car looks execlent!!! thanks for showing us your progress!! keep up the good work!


 kinda like the 355 noses that are out now, just finale style!


 AIM: Fierobaby87
 Not meaning to hijack this thread, but everything I have suggested to Smooooth turns out to have already been considered!