I cut a 2 inch by 2inch block out of it and re welded it. I doubt I could have hammered it and made it look normal, or have room for flexing.
I cant measure much of anything, I can tell you that lower spacer was about 2inches tall off the block.
Thank you, that info will work... Mine is 1.5" when measured from the same location. I could pivot the alt. in another 1/2"; but there is a boss on the outside of the alt., that when pivoted more may negate that extra 1/2"...
IP: Logged
11:23 AM
Dennis LaGrua Member
Posts: 16187 From: Hillsborough, NJ U.S.A. Registered: May 2000
Many swaps use a 79" belt for the alternator /water pump side. This may vary according to where the alterantor and tensioner sit.
------------------ " THE BLACK PARALYZER" -87GT 3800SC Series III engine, 3.4" Pulley, N* TB, LS1 MAF, Flotech Exhaust Autolite 104's Custom CAI 4T65eHD w. custom axles, HP Tuners VCM Suite. "THE COLUSSUS" 87GT - ALL OUT 3.4L Turbocharged engine, Garrett Hybrid Turbo, MSD ign., modified TH125H " ON THE LOOSE WITHOUT THE JUICE "
IP: Logged
04:41 PM
Oct 20th, 2010
07Hoffmannd Member
Posts: 404 From: St. Louis, Mo. U.S.A Registered: Apr 2008
I am not too formilliar with the pre-88 engine cradles, but that motor looks like it is back tords the trunk allot; judging by the tripot position in relation to the control arm mounts... Did you have to machin the DB mount to fit the tensioner there?
[This message has been edited by ALJR (edited 10-20-2010).]
Pretty similar to everyone else, but here's what we came up with:
Interesting! Did you weld that aluminum tensioner bracket to the DB mount? Any problems w/ belt slipping? The alt. and WP pully look like they have minimal contact with the belt... Maybe flip the tensioner the other way to get more belt-wrap around the WP pully? Also, is that a smooth pully on your tensioner? Hard to tell from the pic, but if it is, your belt will wear faster...
[This message has been edited by ALJR (edited 10-21-2010).]
IP: Logged
12:00 PM
Dennis LaGrua Member
Posts: 16187 From: Hillsborough, NJ U.S.A. Registered: May 2000
Pretty similar to everyone else, but here's what we came up with:
Good approach, simple and its neat. Readers should just be aware that this will fit the earlier 3800 alternators only.
------------------ " THE BLACK PARALYZER" -87GT 3800SC Series III engine, 3.4" Pulley, N* TB, LS1 MAF, Flotech Exhaust Autolite 104's Custom CAI 4T65eHD w. custom axles, HP Tuners VCM Suite. "THE COLUSSUS" 87GT - ALL OUT 3.4L Turbocharged engine, Garrett Hybrid Turbo, MSD ign., modified TH125H " ON THE LOOSE WITHOUT THE JUICE "
IP: Logged
02:02 PM
darkhorizon Member
Posts: 12279 From: Flint Michigan Registered: Jan 2006
In response to the last setup posted.... I consider the "no AC" setups better off when you put the alternator in the AC spot. You can then use the tensioner in stock form with a ribbed pulley. You also never run into the chance of hitting the trunk.
IP: Logged
07:14 PM
Oct 22nd, 2010
deezil Member
Posts: 781 From: St Louis Mo USA Registered: Mar 2010
I just did one of my own as well. I love the way it turned out. I had to take a trip to the parts store and the manager let me dig threw the back until I found the Alt, tensioner and pully I wanted. I will try to post some pictures of it later. it took me 2 hrs. a tig welder, band saw, grinder, some alu. and a laser to get it done. the laser was to make sure the pullys were all in line D.
I just did one of my own as well. I love the way it turned out. I had to take a trip to the parts store and the manager let me dig threw the back until I found the Alt, tensioner and pully I wanted. I will try to post some pictures of it later. it took me 2 hrs. a tig welder, band saw, grinder, some alu. and a laser to get it done. the laser was to make sure the pullys were all in line D.
Post up some pics if you can. The more options we have, the better
IP: Logged
10:17 AM
Oct 23rd, 2010
whodeanie Member
Posts: 3819 From: woodstock,Ga.,USA Registered: Jan 2008
Post up some pics if you can. The more options we have, the better
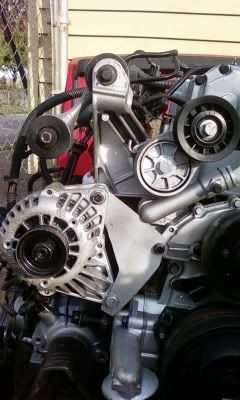
here you go. I used an alt from a GM 1500 truck with the same plug it puts out 115 amps. the tensioner I went to the parts store and just dug threw the boxes till I found the one I wanted, I had the switch the pully with a groved one from the 3800 SC the top mount needed a little clearancing as well as a part welded in place to make the tensioner work. the lower mount I made. D.
Interesting! Did you weld that aluminum tensioner bracket to the DB mount? Any problems w/ belt slipping? The alt. and WP pully look like they have minimal contact with the belt... Maybe flip the tensioner the other way to get more belt-wrap around the WP pully? Also, is that a smooth pully on your tensioner? Hard to tell from the pic, but if it is, your belt will wear faster...
No the tensioner is not welded to the DB mount, just some creative cuts so it fits over the DB mount. The pully IS ribbed, just looks weird in the picture. And to answer the slipping question, i don't believe there have been any slipping issues with it.
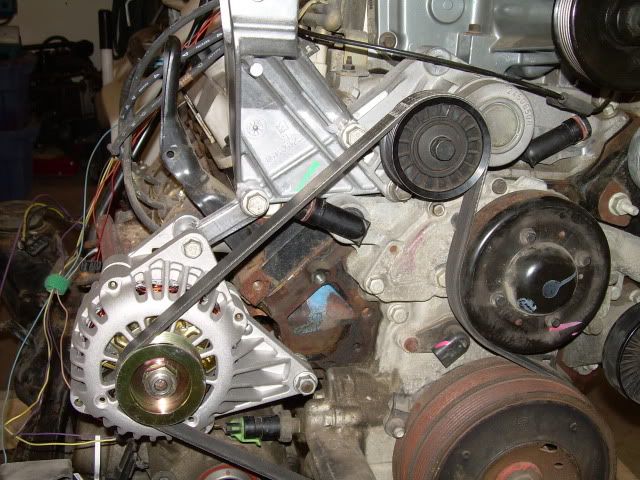
Here's a picture that shows how they look together from the top. gives you a better idea of whats goin on.
IP: Logged
01:21 PM
Dennis LaGrua Member
Posts: 16187 From: Hillsborough, NJ U.S.A. Registered: May 2000
No the tensioner is not welded to the DB mount, just some creative cuts so it fits over the DB mount. The pully IS ribbed, just looks weird in the picture. And to answer the slipping question, i don't believe there have been any slipping issues with it.
Here's a picture that shows how they look together from the top. gives you a better idea of whats goin on.
Looks almost like stock. When we do is disassemble the old tensioner and drill a new hole to hold the end of the spring in a new position that enables arm tension in the new "up" posiiton. Then the center pin on the tensioner is drilled and tapped 1/4 - 20 and a bolt used (with Loctite) to hold the arm in place. It may not be the preferred approach but it works well and lasts.
------------------ " THE BLACK PARALYZER" -87GT 3800SC Series III engine, 3.4" Pulley, N* TB, LS1 MAF, Flotech Exhaust Autolite 104's Custom CAI 4T65eHD w. custom axles, HP Tuners VCM Suite. "THE COLUSSUS" 87GT - ALL OUT 3.4L Turbocharged engine, Garrett Hybrid Turbo, MSD ign., modified TH125H " ON THE LOOSE WITHOUT THE JUICE "
[This message has been edited by Dennis LaGrua (edited 10-24-2010).]
IP: Logged
10:36 PM
07Hoffmannd Member
Posts: 404 From: St. Louis, Mo. U.S.A Registered: Apr 2008
I am not too formilliar with the pre-88 engine cradles, but that motor looks like it is back tords the trunk allot; judging by the tripot position in relation to the control arm mounts... Did you have to machin the DB mount to fit the tensioner there?
it could be. the engine is not installed in the car yet. but its ok becuase it is only on temperary mounts right now. they'll be changed later.
the dogbone mount wasn't machined. i don't have any special tools at my disposal. everything i do is by hand. tryin to do the whole swap without welding either. the mount your talking about was just cut back (with a hand saw) about an inch or so. didnt really measure. just enough so the pulley would be in line for the belt route.
[This message has been edited by 07Hoffmannd (edited 10-24-2010).]
No the tensioner is not welded to the DB mount, just some creative cuts so it fits over the DB mount. The pully IS ribbed, just looks weird in the picture. And to answer the slipping question, i don't believe there have been any slipping issues with it.
Here's a picture that shows how they look together from the top. gives you a better idea of whats goin on.
VERY COOL IDEA! I am gonna go out to my parts box and take a look at that tensioner bracket you machined to fit... You should post up some more detail pics of what/where you cut-to-fit that bracket. It looks like a stock part!
IP: Logged
02:36 PM
americasfuture2k Member
Posts: 7131 From: Edmond, Oklahoma Registered: Jan 2006
In response to the last setup posted.... I consider the "no AC" setups better off when you put the alternator in the AC spot. You can then use the tensioner in stock form with a ribbed pulley. You also never run into the chance of hitting the trunk.
Anymore information on mounting the alternator where the A/C compressor goes? I don't plan on running A/C in my car and this might be a better option.
Any problems w/ belt slipping? The alt. and WP pully look like they have minimal contact with the belt...
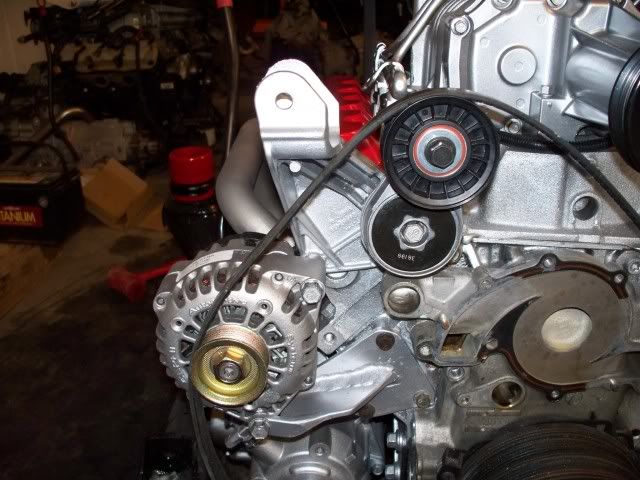
Just wanted to post an update for anyone who goes off from this...My previously posted pictures are not of the final belt routing. The end result looks like this:
IP: Logged
08:04 PM
Dennis LaGrua Member
Posts: 16187 From: Hillsborough, NJ U.S.A. Registered: May 2000
Here is how the routing is on my personal 3800SC series III was done. This picture was taken just before installation a few years ago before the steel dogbone mount and intercooler were added. The tensioner was disassembled and a new hole drilled in position on the housing so the tensioner moves in an upward motion. The alternator is from a 99 Astro w 4.3L engine. Notice that both belts wrap all drive pulleys more than the recommended 50% of their circumference. This is very important to prevent slippage.
------------------ " THE BLACK PARALYZER" -87GT 3800SC Series III engine, custom ZZP Intercooler setup, 3.4" Pulley, Northstar TB, LS1 MAF, 3" Flotech Afterburner Exhaust, Autolite 104's, MSD wires, Custom CAI, 4T65eHD w. custom axles, HP Tuners VCM Suite. "THE COLUSSUS" 87GT - ALL OUT 3.4L Turbocharged engine, Garrett Hybrid Turbo, MSD ign., modified TH125H " ON THE LOOSE WITHOUT THE JUICE "
[This message has been edited by Dennis LaGrua (edited 02-05-2012).]
IP: Logged
10:48 PM
Dennis LaGrua Member
Posts: 16187 From: Hillsborough, NJ U.S.A. Registered: May 2000
Just wanted to post an update for anyone who goes off from this...My previously posted pictures are not of the final belt routing. The end result looks like this:
Sorry to break the bad news to you but you have your water pump running backwards. The engine will overheat and you will blow a head gasket. Look at my routing above. The water pump MUST turn the opposite of what you have it. ------------------ " THE BLACK PARALYZER" -87GT 3800SC Series III engine, custom ZZP Intercooler setup, 3.4" Pulley, Northstar TB, LS1 MAF, 3" Flotech Afterburner Exhaust, Autolite 104's, MSD wires, Custom CAI, 4T65eHD w. custom axles, HP Tuners VCM Suite. "THE COLUSSUS" 87GT - ALL OUT 3.4L Turbocharged engine, Garrett Hybrid Turbo, MSD ign., modified TH125H " ON THE LOOSE WITHOUT THE JUICE "
[This message has been edited by Dennis LaGrua (edited 02-05-2012).]
IP: Logged
10:55 PM
Feb 6th, 2012
GraterFang Member
Posts: 1387 From: Grants Pass, OR Registered: Feb 2008
Originally posted by Dennis LaGrua: Sorry to break the bad news to you but you have your water pump running backwards. The engine will overheat and you will blow a head gasket. Look at my routing above. The water pump MUST turn the opposite of what you have it.
I don't believe the water pump is spinning the wrong way. The ribbed portion of the belt would have to be riding on the water pump pulley for that to happen. If you think about the direction of belt travel you'll see its spinning the correct way even though the belt rides on the opposite side of the water pump from the setup you and I are using. However, the wrap on the water pump is pretty poor and I would worry about slippage.
[This message has been edited by GraterFang (edited 02-06-2012).]
Sorry to break the bad news to you but you have your water pump running backwards. The engine will overheat and you will blow a head gasket. Look at my routing above. The water pump MUST turn the opposite of what you have it.
Based on the picture you posted were both in the bad news boat because we both have them running the same way. Even if what you said were true, I like the worst case scenario approach "I WILL blow a head gasket"...or maybe ill just notice that it keeps wanting to overheat? Regardless I must be one lucky sob because the first car with this setup has thousands of miles on it and has never gotten too hot.
quote
Originally posted by GraterFang:
However, the wrap on the water pump is pretty poor and I would worry about slippage.
Agreed. The wrap on the waterpump is not ideal, and i AM worried about it slipping. It seems to work just fine though.
IP: Logged
09:01 AM
GraterFang Member
Posts: 1387 From: Grants Pass, OR Registered: Feb 2008
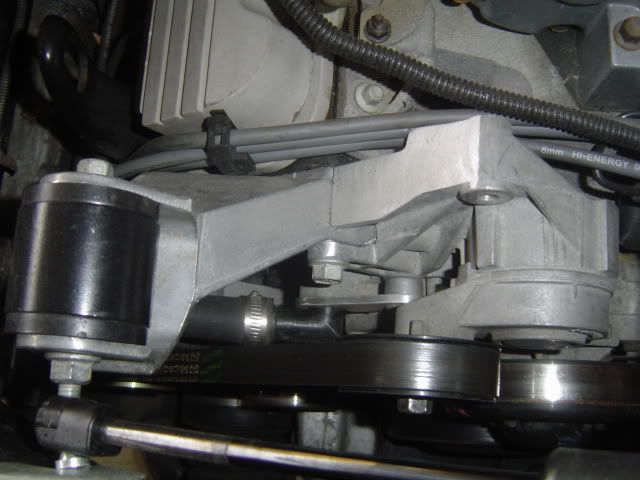
I guess I might as well add mine here as well. I used a 99 Astro alt like Dennis but ended up welding a bracket together with spare metal around the shop.
[/QUOTE]
IP: Logged
06:08 PM
PFF
System Bot
Dennis LaGrua Member
Posts: 16187 From: Hillsborough, NJ U.S.A. Registered: May 2000
Agreed. The wrap on the waterpump is not ideal, and I AM worried about it slipping. It seems to work just fine though.
I see what you mean about the water pump direction so you should be Ok there but the unorthodox routing that you used raises some concerns. Might work at road load but WOT is the question. I believe that the water pump needs 5 HP max to operate at the higher RPM ranges. Will you be able to transfer that much power with as little contact as you have with the WP pulley?
------------------ " THE BLACK PARALYZER" -87GT 3800SC Series III engine, custom ZZP Intercooler setup, 3.4" Pulley, Northstar TB, LS1 MAF, 3" Flotech Afterburner Exhaust, Autolite 104's, MSD wires, Custom CAI, 4T65eHD w. custom axles, HP Tuners VCM Suite. "THE COLUSSUS" 87GT - ALL OUT 3.4L Turbocharged engine, Garrett Hybrid Turbo, MSD ign., modified TH125H " ON THE LOOSE WITHOUT THE JUICE "
[This message has been edited by Dennis LaGrua (edited 02-07-2012).]
That bracket needs a rib somewhere on it to keep it from flexing... I make mine out of a solid 1/4" piece of steel and mine flexed; yours is welded in the center, making it that much more septible to flexing. I had to weld in a small triangle piece to keep mine solid... Squeeze your belts together just in front of the alt. and see if it moves. If it does, you WILL need a rib to stiffen it up...
EDIT to add: will that oil sender clear the inner CV cup? It may be close if your running the 4t65...
[This message has been edited by ALJR (edited 02-06-2012).]
1. different components need different amounts of wrap. alternators, and superchargers need lots. a/c needs almost as much, water pumps need very little. at max rpm the water pump can actually flow too much coolant, creating cavitation around the water pump blades and inside the head casting rough spots. electric water pumps help with this by providing a consistent flow that does not go too fast. race engines often use restrictors in the coolant flow to limit actual gpm. heat can only transfer just so fast to the coolant. beyond this point, more water hurts cooling. better to boost radiator efficiency.
2. direction cannot easily be mixed up, RIBBED PULLEYS SPIN WITH THE ENGINE, SMOOTH PULLEYS SPIN OPPOSITE ENGINE ROTATION.
3. all of these belt routings shown have the tensioner placed between the drive pulley and the loaded pulley/s. under fast engine acceleration (not just vehicle accel) this will naturally put a lot of load on the tensioner pulley. it has been my experience that this load will swing the tensioner and cause the belt to jump, come off, and with aljr (op) set up i would think for certain cause the tensioner to swing into the water pump pulley. it makes life more difficult, but i have had better success placing the tensioner after the loaded pulleys so it does not try to relax tension when the component pulleys are loaded. in my latest 3800 swap i tried to route similar to aljr, under accel the tensioner (a small one) folded up from alternator load, this unloaded the water pump, and you could actually SEE the belt float in mid air over the water pump pulley! the water pump stopped rotation! then as the engine speed leveled out, the water pump started spinning again. back to the drawing board.
IP: Logged
08:51 PM
Dennis LaGrua Member
Posts: 16187 From: Hillsborough, NJ U.S.A. Registered: May 2000
1. different components need different amounts of wrap. alternators, and superchargers need lots. a/c needs almost as much, water pumps need very little. at max rpm the water pump can actually flow too much coolant, creating cavitation around the water pump blades and inside the head casting rough spots. electric water pumps help with this by providing a consistent flow that does not go too fast. race engines often use restrictors in the coolant flow to limit actual gpm. heat can only transfer just so fast to the coolant. beyond this point, more water hurts cooling. better to boost radiator efficiency.
2. direction cannot easily be mixed up, RIBBED PULLEYS SPIN WITH THE ENGINE, SMOOTH PULLEYS SPIN OPPOSITE ENGINE ROTATION.
3. all of these belt routings shown have the tensioner placed between the drive pulley and the loaded pulley/s. under fast engine acceleration (not just vehicle accel) this will naturally put a lot of load on the tensioner pulley. it has been my experience that this load will swing the tensioner and cause the belt to jump, come off, and with aljr (op) set up i would think for certain cause the tensioner to swing into the water pump pulley. it makes life more difficult, but i have had better success placing the tensioner after the loaded pulleys so it does not try to relax tension when the component pulleys are loaded. in my latest 3800 swap i tried to route similar to aljr, under accel the tensioner (a small one) folded up from alternator load, this unloaded the water pump, and you could actually SEE the belt float in mid air over the water pump pulley! the water pump stopped rotation! then as the engine speed leveled out, the water pump started spinning again. back to the drawing board.
The belt routing that you see on my swap has been used numerous times without problems. 1. True but any continual amount of belt slip there will cause the belt to fail in short order. 2. Agreed. Clearly see the point. 3. The belt routing on my 3800SC may put strong pressure on the tensioner during hard acceleration but my tensioner pulley is ribbed. It hasn't slipped off even when I drive the car hard. The belt does appear to wear a bit quicker than normal but I can live with that.
------------------ " THE BLACK PARALYZER" -87GT 3800SC Series III engine, custom ZZP Intercooler setup, 3.4" Pulley, Northstar TB, LS1 MAF, 3" Flotech Afterburner Exhaust, Autolite 104's, MSD wires, Custom CAI, 4T65eHD w. custom axles, HP Tuners VCM Suite. "THE COLUSSUS" 87GT - ALL OUT 3.4L Turbocharged engine, Garrett Hybrid Turbo, MSD ign., modified TH125H " ON THE LOOSE WITHOUT THE JUICE "
3. all of these belt routings shown have the tensioner placed between the drive pulley and the loaded pulley/s. under fast engine acceleration (not just vehicle accel) this will naturally put a lot of load on the tensioner pulley. it has been my experience that this load will swing the tensioner and cause the belt to jump, come off, and with aljr (op) set up i would think for certain cause the tensioner to swing into the water pump pulley. it makes life more difficult, but i have had better success placing the tensioner after the loaded pulleys so it does not try to relax tension when the component pulleys are loaded. in my latest 3800 swap i tried to route similar to aljr, under accel the tensioner (a small one) folded up from alternator load, this unloaded the water pump, and you could actually SEE the belt float in mid air over the water pump pulley! the water pump stopped rotation! then as the engine speed leveled out, the water pump started spinning again. back to the drawing board.
I see your point and I agree... I will keep an eye on it; if need be, I can use a longer belt to increase the gap between the tensioner and WP... Worst case, I fab-up a bracket like Dennis LaGrua and reposition my coil pack elswhere...
Originally posted by Dennis LaGrua: The belt routing that you see on my swap has been used numerous times without problems.
that is good enough for me! . . . this shot shows the first attempt. the belt appeared to magically float over the water pump. about a 1/4" off the pulley. (not much wrap on the alt, but so far so good, would like to have another idler to increase it)
this was a very easy reroute. the belt is an inch or so longer and has no problems at all now. the tensioner (under the compressor) is last in line to the balancer.
IP: Logged
10:19 PM
americasfuture2k Member
Posts: 7131 From: Edmond, Oklahoma Registered: Jan 2006
That bracket needs a rib somewhere on it to keep it from flexing... I make mine out of a solid 1/4" piece of steel and mine flexed; yours is welded in the center, making it that much more septible to flexing. I had to weld in a small triangle piece to keep mine solid... Squeeze your belts together just in front of the alt. and see if it moves. If it does, you WILL need a rib to stiffen it up...
EDIT to add: will that oil sender clear the inner CV cup? It may be close if your running the 4t65...
Thanks for the tip! I was going to wait till it started so i could see how much wobble came from it, but now I'll go ahead and weld it up.
I have changed to the 03 GTP sender since this picture; I need to find a gauge that will run off of it now. I swear I saw a VDO one that did, but I am having no luck finding it now.
Does anyone think I will get too much bounce in that distance between the idler pulley and the AC delete pulley?
[This message has been edited by americasfuture2k (edited 02-06-2012).]
Thanks for the tip! I was going to wait till it started so i could see how much wobble came from it, but now I'll go ahead and weld it up.
I have changed to the 03 GTP sender since this picture; I need to find a gauge that will run off of it now. I swear I saw a VDO one that did, but I am having no luck finding it now.
Does anyone think I will get too much bounce in that distance between the idler pulley and the AC delete pulley?
Im using the stock 88 sender w/ my VDO oil psi gauge; works fine...
I would be more concerned about the wp pully making contact under load than I would be about the SC idler pully. squeze the belt so the tensioner moves and see if it moves the belt into the WP pully.. Your not going to get any bounce on that side of the belt because the crank is always pulling, so if will always be taught...
I see what you mean about the water pump direction so you should be Ok there but the unorthodox routing that you used raises some concerns. Might work at road load but WOT is the question. I believe that the water pump needs 5 HP max to operate at the higher RPM ranges. Will you be able to transfer that much power with as little contact as you have with the WP pulley?
That's a good point, and I don't know. I belive your right it would be better to have more wrap, but the real question is will it work (the way i have it). I belive it works just fine, but I don't know if it slips at WOT. How can I tell? If it never overheats does it matter?
[This message has been edited by 85sliverGT (edited 02-07-2012).]


 [/QUOTE]


