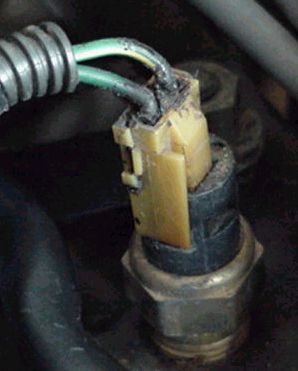
I have a wiring question. I have to replace my temp. gauge sending unit connector, doing the sending unit itself at the same time. My question is, (keeping in mind I am colour blind!) is the original connector's wires in the car are colour coded. I believe one is black (or dark green), the other black (or dark green) with a red stripe. Regardless, one has a red stripe. The replacement connector I purchased from the Fiero Store has wires of the same colour (light green or gray?) and no stripe on either one. The plug itself has A and B indicated on the plastic indicating each pin. So my question is, does the A pin connect to the wire with the stripe or the one without? I can do trial and error, I have a 50/50 chance of getting it right, but I rather just get it correct the first time.
Thanks guys
[This message has been edited by neph (edited 07-23-2011).]
IP: Logged
11:19 AM
PFF
System Bot
neph Member
Posts: 116 From: Kingsville, Ontario, Canada Registered: Jun 2008
The way to do this without any tools, is to start the car and let it warm up. Then touch one wire at a time to either one of the pins on the temperature sender. Only one combination of one wire touching one pin will make the sender move upwards on the dial, so make sure you attach your new pigtail to the old wire harness so that the wire and pin that made the gauge move, go together. The other wire obviously goes to the other pin.
IP: Logged
01:23 PM
neph Member
Posts: 116 From: Kingsville, Ontario, Canada Registered: Jun 2008
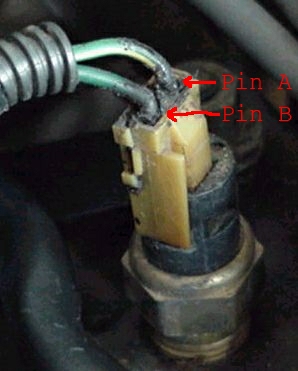
Well those were descriptions even I could understand! To sum up, wire with red stripe to the "A" pin on the AC Delco connector supplied by the Fiero Store.
Thanks guys
IP: Logged
02:03 PM
neph Member
Posts: 116 From: Kingsville, Ontario, Canada Registered: Jun 2008
Now I have a new problem. New connector and sending unit in. Within minutes, even at idle, the temp rises to the max, but yet the engine temp warning light doesn't turn on. I checked everything...sending unit in securely, wires crimped well enough and securely plugged into the sending unit. I lost a little coolant during the switch but not very much. I'm at a loss for ideas.
IP: Logged
04:45 PM
phonedawgz Member
Posts: 17091 From: Green Bay, WI USA Registered: Dec 2009
I'll look for some resistors tomorrow and try that test, but what baffles me though is how would replacing the connector and sending unit cause the temp. needle to steadily rise until it's maxed out over a period of about 5 minutes?
It sounds like your gauge is working properly because it completes a full sweep. That narrows the trouble to the sender itself. The sender's rate of change of it's resistance must correspond to a specific rate of change of temperature. If it changes it's resistance at a different rate than the stock sender, it will change the way the gauge behaves.
Edit: What you want to do at this point is measure the resistance between the gauge pin on the sender and ground using a multimeter. There's a table here on PFF that's been posted something like 600 times which tells you what resistance you should get for a given temperature... just do a quick search and I'm sure you'll find it. At approximately 100*F, the resistance of the sender should be about 1365 ohms, and by the time the coolant reaches 260*F, it should read about 55 ohms. Find the table though for intermediate values and compare them to what you are getting. I'll bet your sender is measuring way too low a resistance when the engine is at operating temperature. This is causing your gauge to peg.
[This message has been edited by Bloozberry (edited 07-23-2011).]
IP: Logged
09:44 PM
spark1 Member
Posts: 11159 From: Benton County, OR Registered: Dec 2002
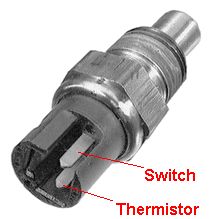
In a stock harness: Pin A on the connector is a Green/yellow wire and goes to pin C2 on the C500, then to the coolant temp guage. Pin B on the connector is a Green wire and goes to pin D3 on the C500, then to the overheat lamp.
Edit to add: Might want to verify the connector is labeled properly as well (mine from Carquest was correct)
Edit to add again: Just read the new issue. Are you sure the new sensor isn't bad? I know there was a rash of bad sensors sold for a while. You can test it with an ohm-meter...should read 1365 ohms at 100 degrees and 55 ohms at 260 degrees. It will be a progressive change between them. Measure between Pin A and a ground. Pin B would show an open loop until 257 degrees, then 0 (or close) ohms until the temp drops back to 230 degrees where it will open again.
[This message has been edited by CowsPatoot (edited 07-24-2011).]
IP: Logged
01:20 PM
neph Member
Posts: 116 From: Kingsville, Ontario, Canada Registered: Jun 2008
Just got back from doing some running around, the needle shot up to just below the red and stayed there. This afternoon I'll put an ohm meter on it and depending on the results, I may swap back in the old sensor (which wasn't bad, just the connector was) and see if it makes a difference. It quite possibly could be a bad sensor as you mentioned.
Just keep in mind that when you replaced the sensor to fill the coolant back up a little air bubble in the system could also cause some problems with high temps like that. Simply pull the thermostat cover off when its cold and add any that's needed. If the temp gauge worked before you replaced the connector than I would say faulty sender but id check after you check your coolant level to rule that problem out.
IP: Logged
02:58 PM
neph Member
Posts: 116 From: Kingsville, Ontario, Canada Registered: Jun 2008