Looking good. Pics take me back to when I was doing mine. I loved coming up with new ideas for any problem I faced. If I ever had to do it again, I'd do another 3.4 DOHC. Hell, after you finish one, you know all the problems before hand. I'd be able to cut my install time by about 80%. I really like the stock style air cleaner look you have going on, and the 4th motor mount. (wish I thought of that). One thing I'd do differant is with the 96-97 intake/elbow/TB setup. I spend so much time looking it over, i think i'd take it to a machine shop, have two small hose adapters welded in for the coolant hosed, remove the TB mount, so the upper and lower intakes can be free of each other. Then make a 90 elbow off the Upper Intake to move the TB up and away from the stock location. Just too much going on in that area. I had fuel lines, coolant lines, shifter cables and air intake all fighting for the same real estate.
Again, really love the look
Rob
IP: Logged
12:03 PM
Aug 28th, 2011
Steven Snyder Member
Posts: 3326 From: Los Angeles, CA Registered: Mar 2004
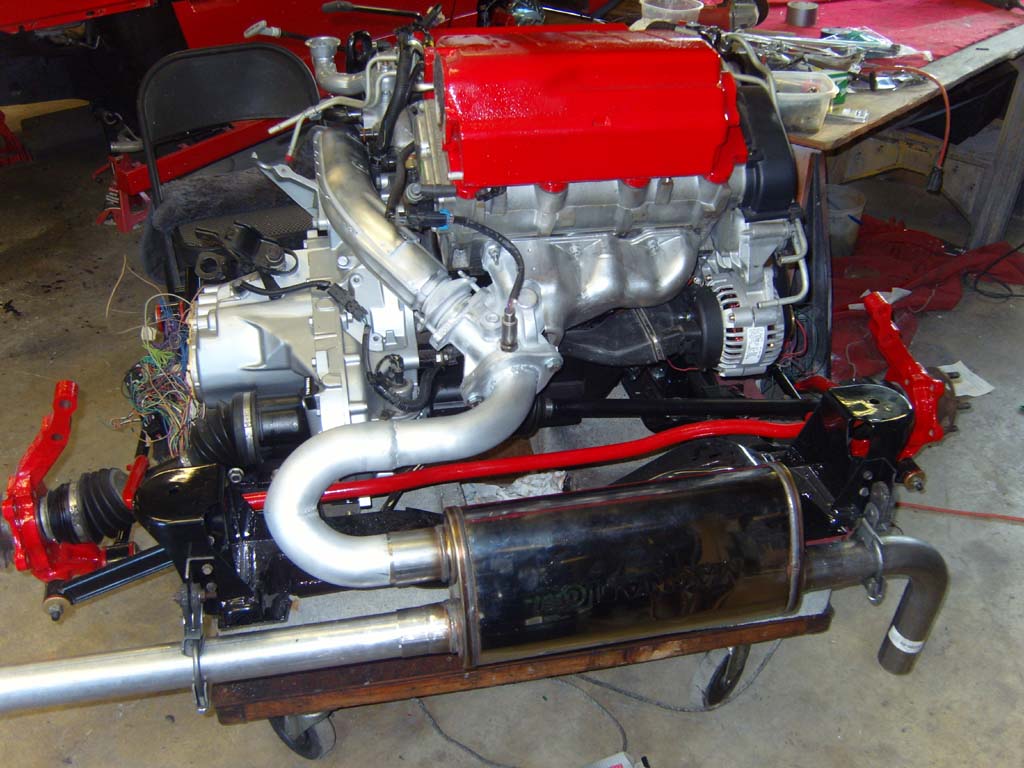
Do you have any concern about the exhaust holding up against motor movement & vibration without a flex coupler? The 91-95 motors had a flexible spring-loaded cup joint on the rear manifold dump, which prevents engine movement from stressing the exhaust, but I see that with your 96-97 era motor it's a flat bolted flange.
Do you have any concern about the exhaust holding up against motor movement & vibration without a flex coupler? The 91-95 motors had a flexible spring-loaded cup joint on the rear manifold dump, which prevents engine movement from stressing the exhaust, but I see that with your 96-97 era motor it's a flat bolted flange.
I didn't actually do the swap, Fieroking did. He has a similar exhaust set up in his DOHC car and it has been running for a few years with no exhaust issues that I'm aware of.
Thanks Nolan
IP: Logged
09:48 PM
Aug 29th, 2011
Steven Snyder Member
Posts: 3326 From: Los Angeles, CA Registered: Mar 2004
Originally posted by Sourmug: I didn't actually do the swap, Fieroking did. He has a similar exhaust set up in his DOHC car and it has been running for a few years with no exhaust issues that I'm aware of.
His exhaust setup has the spring-loaded connection I was referring to. This gives it some flex.
I asked Joe about the exhaust, here's his response:
"I don't think there will be a problem there is not a lot of movement and the mounts for the exhaust are pretty tight. My exhaust wraps around the cradle were yous is more of a straight shot to the muffler."
So we'll see how it holds up.
On a side note, I had to replace the heater core yesterday. Just about the only thing on the car that's not new and it fails, go figure
[This message has been edited by Sourmug (edited 09-03-2011).]
IP: Logged
07:09 PM
Sep 9th, 2011
Reallybig Member
Posts: 974 From: Calgary Alberta Canada Registered: Mar 2011
There are a few things that I'm going to do here soon, nothing major though. I'm still having a few issues with the tach, it looks like the Dakota Digital SGI may be faulty and has to be returned for a replacement, and it also looks like one of the axle seals is leaking.
I did have the car on a dyno when I picked it up. If I can find the slip that I brought home I'll post it.
Thanks Nolan
IP: Logged
01:22 PM
PFF
System Bot
Sep 12th, 2011
Reallybig Member
Posts: 974 From: Calgary Alberta Canada Registered: Mar 2011
Oh I think you've done more that enough for now, it's just that some of us know what you are capable of! Besides, those of us who tinker with projects and upgrades enjoy watching those who accomplish them in short time...kind of like an inspirational shot of visual adrenalin.
This is when the engine had less than 100 miles on it. The engine was tight and the consensus from the speed shop was that the hp and torque would go up once the engine was broken in and should be about 205 HP and 210 torque at the wheels.
Nolan
[This message has been edited by Sourmug (edited 09-13-2011).]
OK, here's an update. Not pertaining to the swap but some additional work that I have done.
The inside of my decklid isn't black it's more of a blue/grey colour. Most other Fieros seem to be black on the underside of their decklids so it's been bugging me. I had also purchased a mirror set from Snapperhead (excellent products by the way ) a few months ago so I figured now was a good time to do something about it.
Here's a couple pics in the middle of the clean-up process. I fixed a few blemishes and removed the now obsolete emissions system sticker and a few others:
See what I mean about the colour of the underside?
Once the prep was done I used Eastwood's Pre paint prep also a great product for getting rid of wax, contaminants etc. before painting. Here's a link: http://www.eastwood.com/eas...e-painting-prep.html
Then the decklid was masked off before primer and paint:
Here's a shot showing the painted underside. I didn't paint the two locations where the mirrors will sit and you can really see the colour difference:
The stainless steel mirrors installed and then on the car:
I had painted the underside of my hood last winter and installed Snapperhead's acrylic mirror set this week too.
Nolan
[This message has been edited by Sourmug (edited 09-15-2011).]
IP: Logged
03:40 PM
JPH87 Member
Posts: 292 From: Post Falls ID Registered: Sep 2008


.JPG)


.JPG)
.JPG)
.JPG)
.JPG)
.JPG)
.JPG)
.JPG)
.JPG)
.JPG)
.JPG)
.JPG)


.JPG)
.JPG)
.jpg)
 ) a few months ago so I figured now was a good time to do something about it.
.JPG)
.JPG)
.JPG)
.JPG)
.JPG)
.JPG)
.JPG)


