The oval mesh looks pretty good. How good will depend on the size of the ovals. What I like best is the expanded aluminum that I found, mentioned in my hood vent thread. I would post links, but the info is on one of my other computers & I haven't had time to retrieve it (the thread itself is linked to on the first page of this thread). The besst thing about expanded metal is it's 3 dimensional. It's harder to see through it at an angle, yet it's almost totaly open. ~ Paul aka "Tha Driver"
What I like best is the expanded aluminum that I found, mentioned in my hood vent thread. I would post links, but the info is on one of my other computers & I haven't had time to retrieve it (the thread itself is linked to on the first page of this thread). The besst thing about expanded metal is it's 3 dimensional. It's harder to see through it at an angle, yet it's almost totaly open. ~ Paul aka "Tha Driver"
I like the 3-D aspect of your choice. I'll be looking for your next post
[This message has been edited by fyrebird68 (edited 01-22-2009).]
IP: Logged
08:51 AM
gem1138 Member
Posts: 631 From: Baton Rouge, LA Registered: Aug 2007
I drove home last night after reading this thread and realized that you wouldn't be able to see the blinkers from the cabin at all. It might entertain those in traffic around you but I don't live for them. I doubt you do either. I suppose it might be construtive to have an eighteen wheeler driver see the things occasionally. Also, I'd finish the job with no grills and live with it for a while.
I tend to agree with you guys, expanded metal is cheep and easy. Seems at looking at McMaster Carr expanded metal gets me into the 70 - 76% open range, paint it black and let it go. Like what I have posted but smaller mesh. The gutter guard is about the same, so maybe a trip to Lowes is in order. I was planning on hot gluing the grill in so now or later would not matter and I could change too.
Getting more interested in getting it finished up an put on the car. I got my pearl samples for TCP yesterday and am itching to spray some this weekend. I'm planning on going back black with a saphire blue or purple pearl mid coat and ghosting in the Pegaus emblem in the hood. Hope to finish up the hood preping this weekend and shoot some color sample panels too. I'll post color panels on the thread and let you guys help me decide. Never any good and chosing a color.
Tom
IP: Logged
04:39 PM
HTXtremes Member
Posts: 345 From: Mansfield, AR Registered: Sep 2007
I tend to agree with you guys, expanded metal is cheep and easy. Seems at looking at McMaster Carr expanded metal gets me into the 70 - 76% open range, paint it black and let it go. Like what I have posted but smaller mesh. The gutter guard is about the same, so maybe a trip to Lowes is in order. I was planning on hot gluing the grill in so now or later would not matter and I could change too.
Getting more interested in getting it finished up an put on the car. I got my pearl samples for TCP yesterday and am itching to spray some this weekend. I'm planning on going back black with a saphire blue or purple pearl mid coat and ghosting in the Pegaus emblem in the hood. Hope to finish up the hood preping this weekend and shoot some color sample panels too. I'll post color panels on the thread and let you guys help me decide. Never any good and chosing a color.
Tom
Man that sounds really sharp. I love to see some creative work done in the paint dept. (it's what I do). Like you, I have a hard time deciding on colors. I prefer to have a different color on each car, so that I have a variety. I've been fip-floping between red, yellow, & black for the custom car, with a few green thoughts thrown in. It's has the beechwood interior. Think I've finaly decided on the new Lamborgini Orange (It's red & yellow combined ). I just gotta find the code... ~ Paul aka "Tha Driver"
IP: Logged
06:56 PM
anwalker Member
Posts: 243 From: High Point, NC Registered: Aug 2007
Paul, I just did mine in a color very similar to lambo pearl yellow. I did 06 vette speed yellow (restoration shop base) with a custom mix of gold pearl in an intercoat. Looks wild with good flop. It was much cheaper than re-finish paint based on the codes. Its loud ask dad, he helped me paint it. Cant wait to see it in the sunlight. Florescent doesnt do pearl justice.
Im pretty sure all the codes with 2CT are tri-stage which is what your referring to with the orange if its the one I am thinking about. LAM.*0058/2 Arancio Atlas Mic 2CT
What I did is pull the mixing ratios for the diamont paint and did something similar with dry pearls on my own and cost 1/3 of the price and looks just as nice.
[This message has been edited by anwalker (edited 01-22-2009).]
Paul, I just did mine in a color very similar to lambo pearl yellow. I did 06 vette speed yellow (restoration shop base) with a custom mix of gold pearl in an intercoat. Looks wild with good flop. It was much cheaper than re-finish paint based on the codes. Its loud ask dad, he helped me paint it. Cant wait to see it in the sunlight. Florescent doesnt do pearl justice.
Im pretty sure all the codes with 2CT are tri-stage which is what your referring to with the orange if its the one I am thinking about. LAM.*0058/2 Arancio Atlas Mic 2CT
What I did is pull the mixing ratios for the diamont paint and did something similar with dry pearls on my own and cost 1/3 of the price and looks just as nice.
That's SHARP! I checked out the Labo colors (thanks) but of course you can't tell on a monitor what they really look like. I think you're right about it being the LAM.*0058/2 Arancio Atlas Mic 2CT. I usually custom mix my colors, too, but that Lambo color is hard to beat. I do plan to add some stripes & panels with black spiderwebbing (if you know what that is) & fogging. ~ Paul aka "Tha Driver"
IP: Logged
01:11 AM
PFF
System Bot
oldfiero Member
Posts: 142 From: Graham, NC, USA Registered: Nov 2007
I just could not wait so I snuck off to the shop last night and preped up a coffee can to shoot. Only thing around that I could find that had round corners. Did the black with the saphire blue ice crystal pearl mixed at 1tsp / qt. shot one wet coat of pearl and the base started to take on the blue hue when viewed directly. So, I thinned it 50% and tried it again.... I think that I got what I am looking for.. It still looks black but when the light hits it just right, the blue pops out. Really won't know until I see it in the sun. I'll try the pearl Purple next. Oh, yes I know what spider is and lace too.... shows my age I guess.
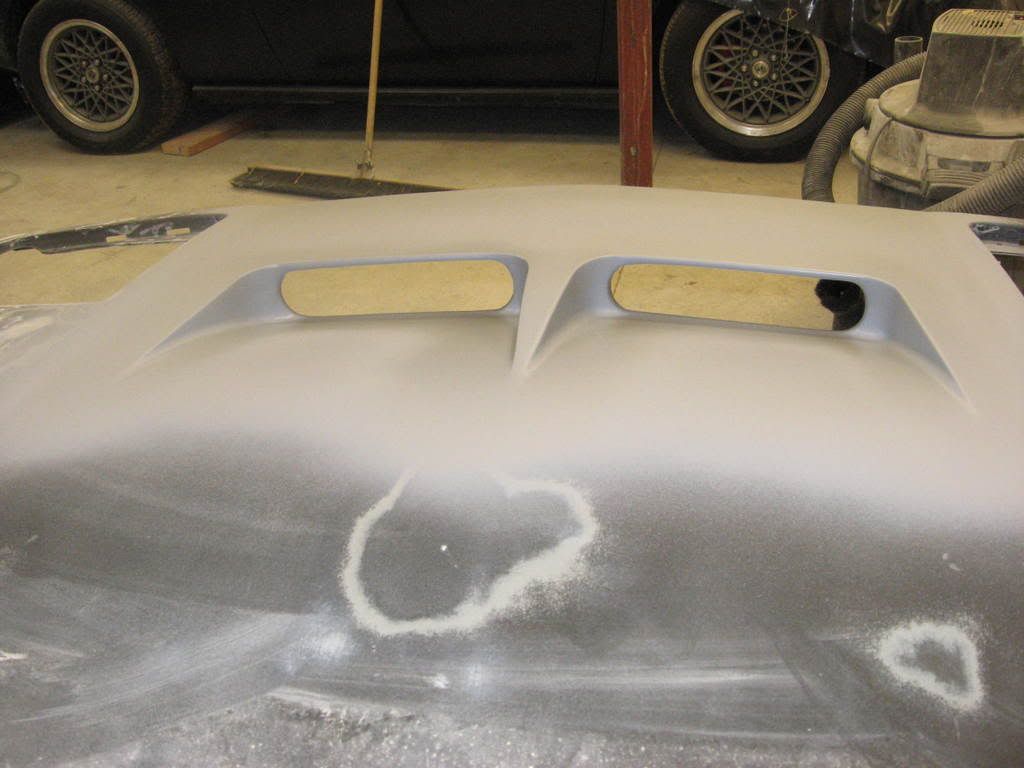
The set back dimension for the start of the hood scoop is 9 1/4" I used the basic dim as Archie posted for the Warber scoop. You can find more info on that by searching the Archives.
Originally posted by rda738: ...what keeps the rain out of the front of car, trunk area?
quote
Originally posted by oldfiero: ...on my scoop there is not lip at the bottom but is a smooth transition to the vent opening so that water does not pool up behind the vent opening. The water just simply drains into the area behind the radiator then on to the ground.
I've a question: Does your design also mean the front trunk compartment of the Fiero does not have to be cut, filed down, or otherwise altered --- or, if it does --- what are the desired modifications to it?
By the way, IMHO, yours are some very good-looking extractor vents!
IP: Logged
10:24 PM
Jan 24th, 2009
anwalker Member
Posts: 243 From: High Point, NC Registered: Aug 2007
Originally posted by project34: I've a question: Does your design also mean the front trunk compartment of the Fiero does not have to be cut, filed down, or otherwise altered...?
quote
Originally posted by anwalker: He did'nt cut or modify any thing in regards to the front trunk. When he did it that was one of the requirements of the design.
Thank you for that clarification, anwalker. I would think that particular design requirement by oldfiero which you'd clarified would be a big plus for those of us on this forum who are considering such a hood modification.
IP: Logged
03:56 PM
Jan 25th, 2009
oldfiero Member
Posts: 142 From: Graham, NC, USA Registered: Nov 2007
I will take a pic of the back side and photoshop in the backside cut dimensions. But basically you find the front most point of the gasket seal surface and move forward 1/4" and cut straight across the hood backing structure leaving the entire seal surface undisturbed.
great job for a first time better than i couldve done on a good day with help lol can we see the finished product on the car? i wanna see how it looks on it
EDIT: spelling
[This message has been edited by black1987gt (edited 01-25-2009).]
IP: Logged
10:53 PM
Oct 4th, 2009
exoticse Member
Posts: 8656 From: Orlando, Fl Registered: Jun 2003


 ). I just gotta find the code...


