Is it possible to modify the stock 88gt steering wheel mount to work w/ a Momo steering wheel? I really do not want to position the Momo wheel closer to when using the Momo kit (as others have stated happens w/ the Momo kit)...
IP: Logged
02:59 PM
PFF
System Bot
whodeanie Member
Posts: 3819 From: woodstock,Ga.,USA Registered: Jan 2008
the stock wheel has the hub built it. the last one I did, I used a Grant adapter and cut it down and re welded it back together. it located the new wheel in the same spot as the stock one. I also think Momo now has a short adapter you can buy. D.
So the splined part of the hub is perminently attached to the steering wheel? The steering wheel does not unbolt from that basket-looking piece?
When I went the The Fiero Store site and looked at there replacement steering wheels, they look like my Momo wheel's bolt pattern... Gonna go grab my shop manual and have a looksie...
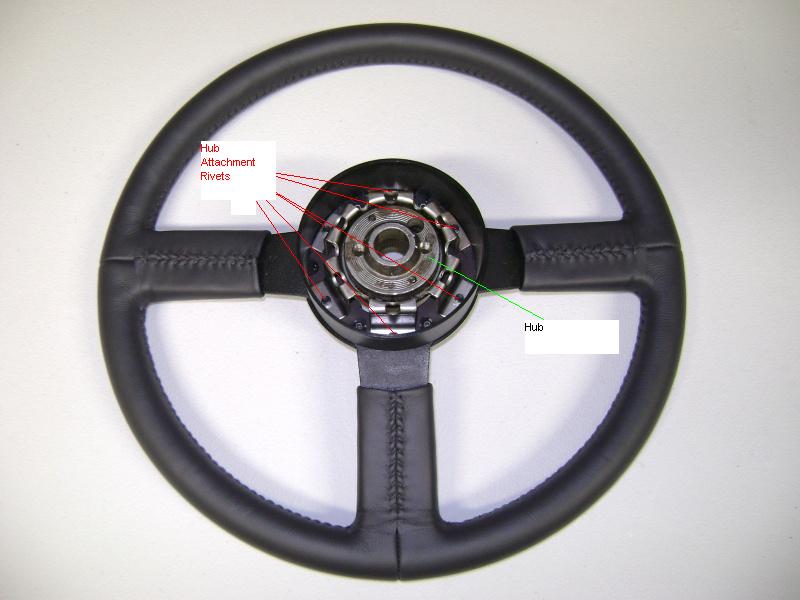
Edit: found the below picture of what my 88gt wheel looks like... Could I just remove the "hub attachment rivits" and install my Momo? Anyone know the measurement across between the rivits?
[This message has been edited by ALJR (edited 11-17-2009).]
IP: Logged
04:10 PM
katatak Member
Posts: 7136 From: Omaha, NE USA Registered: Apr 2008
Yes you can drill out the rivets and use the GT hub. You may need to fab a mounting plate. Grant also make a "Billet" mount kit that is only about 1" high versus the steel one that is close to 3" tall. The Momo has a 6 hole bolt pattern and the Grant has a 5 hole bolt pattern plus the Momo is on a smaller diameter bolt circle.
Factory hub is a smaller diameter than the 6 bolt aftermarket wheels. I don't remember the exact measurement, but it's less than 1/2 inch. I've heard of some people using just the stock hub and spreading it out to match the new wheel. I had someone make me an adapter out of aluminum, but it wasn't thick enough for my wheel. The turn signal stalk would hit the wheel when I clicked the brights on, because my wheel has no dish to it. I had another made thicker and it works great. I don't need the thinner one anymore if you want to buy it. If your wheel has some dish to it (outside of wheel sticks out further than mount of wheel), then it might work fine for you.
Factory hub is a smaller diameter than the 6 bolt aftermarket wheels. I don't remember the exact measurement, but it's less than 1/2 inch. I've heard of some people using just the stock hub and spreading it out to match the new wheel. I had someone make me an adapter out of aluminum, but it wasn't thick enough for my wheel. The turn signal stalk would hit the wheel when I clicked the brights on, because my wheel has no dish to it. I had another made thicker and it works great. I don't need the thinner one anymore if you want to buy it. If your wheel has some dish to it (outside of wheel sticks out further than mount of wheel), then it might work fine for you.
I might be interested in it. Could you post a picture of it please? My Momo has a slight dish to it like the stock gt wheel... I roughly measured my stock bolt pattern and the Momo and it looked VERY close. You stated 1/2", devide that in half and the Momo holes are a 1/4" out. Couldn't I redrill some new holes? I would hate to spead the cage wider and have it not be perfectly round or symetrical...
IP: Logged
08:46 PM
katatak Member
Posts: 7136 From: Omaha, NE USA Registered: Apr 2008
After looking closer at my stock gt wheel and the Momo wheel, it looks as though I would need a spacer of some sort if I used the stock hub and modified it. The reason being is the back of the Momo wheel has some electrical connection for the horn. This area looks like it would interfear with the colum shaft if I installed it w/o a spacer of some sort... I will get some pictures up later of what I am talking about...
EDIT: pics added
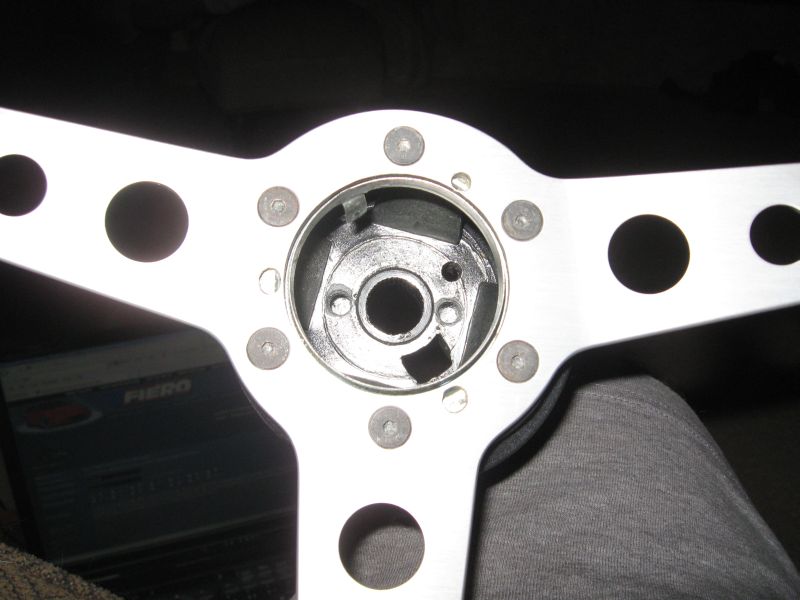
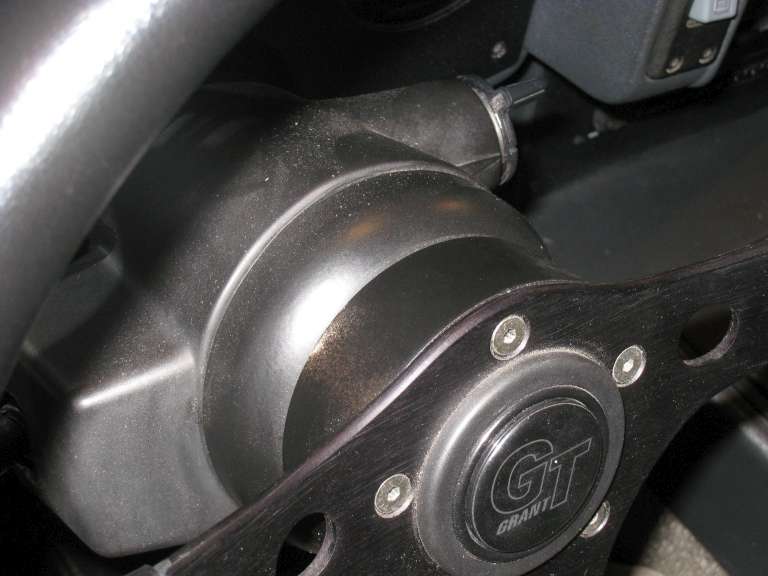
These 2 pic show the nut that may interfear with my Momo wheel
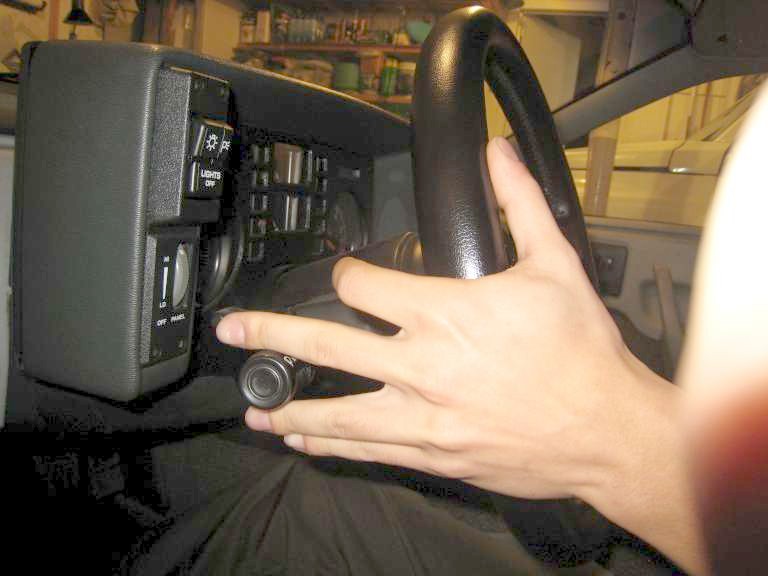
These pics show my Momo wheel. The bolt hole spacing in 70mm. Anyone know the Fiero GT spacing?
Momo offset (or dish) pic
[This message has been edited by ALJR (edited 11-18-2009).]
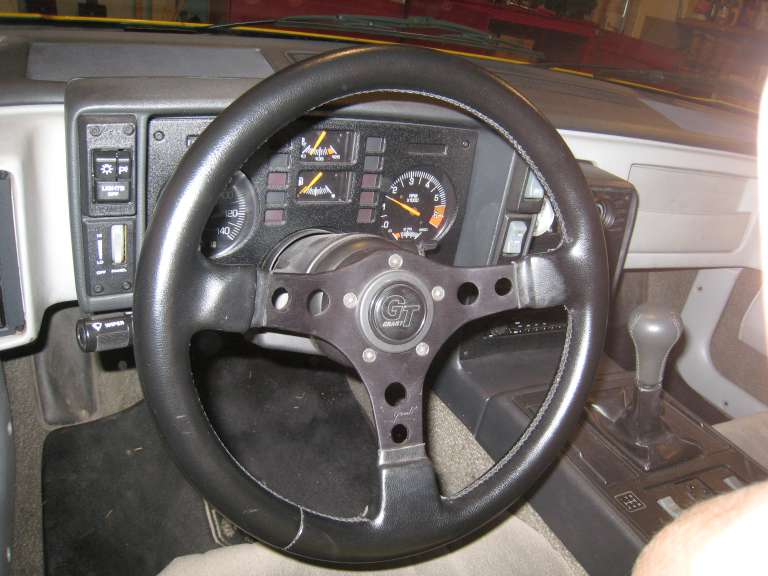
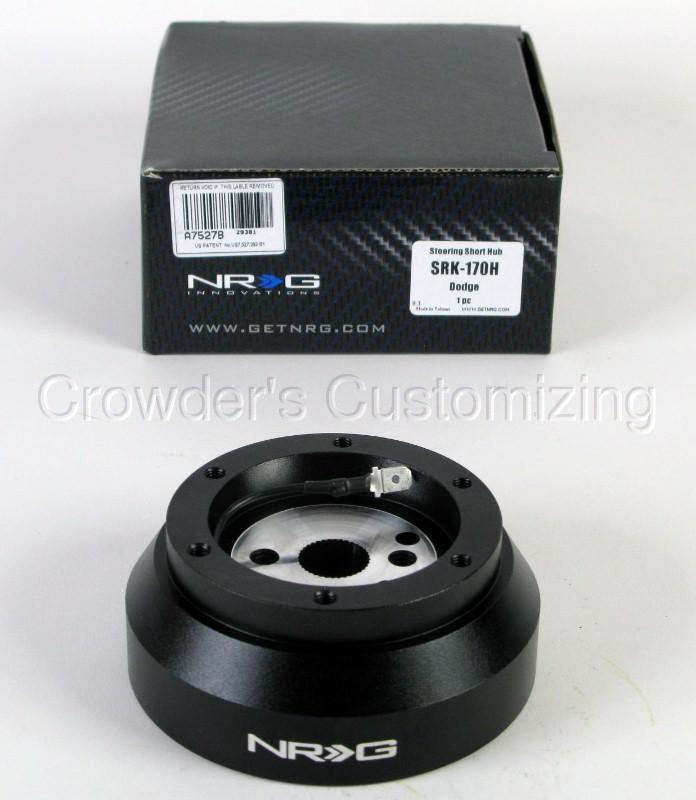
I just installed a new Momo Millennium steering wheel and used one one of the NRG adapters. My new Momo is right at the same position as the stock wheel was. (Don't let the Dodge part number throw you, it's the correct one.) They're more expensive than the Momo adapter ($119.00), but VERY well made and worth it IMO. It's solid heavy billet aluminum machined and fits all Momo wheels perfectly. Installation was a breeze except for a small modification to the Momo horn button to work with the NRG adapter. If anyone goes with the NRG adapter I'll be happy to share details of how to make this easy modification.
I'll try to get some installed pics later. It looks great. I have my dash all torn apart right now installing new gages, stereo and OEM subwoofer and keyless entry....(figured I'd do it all at once.)
[This message has been edited by randye (edited 11-18-2009).]
IP: Logged
11:28 AM
PFF
System Bot
rogergarrison Member
Posts: 49601 From: A Western Caribbean Island/ Columbus, Ohio Registered: Apr 99
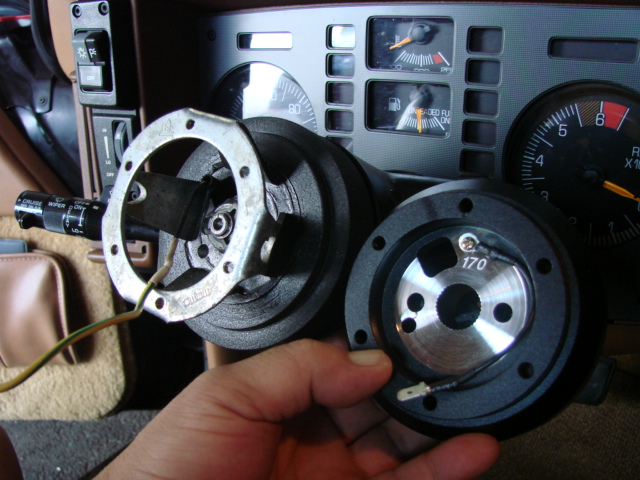
I have the same short NRG adaptor as Randye in my Mera. Here's a comparison with a standard Momo brand adaptor, and the short NRG version. As you can see, there's a huge difference.
Purchased on e-bay from Crowders. They are extremely fast in shipping. Even here to Hawaii, I've received packages from them in 3 days. And normally the shipping is "free."
Word of caution, though!! The 170 NRG short adaptor is SO short, that for some Momo steering wheels, it may in fact be too short for the horn button to fit properly. If that's the case, Crowders also sells a 15mm spacer with longer screws. But even with the spacer, its still much shorter than the standard Momo brand adaptor.
I seen that adapter and would be interested on how you installed it. Will the Momo horn button (see my pic above) interfear with the large nut and splined colum shaft in the center?
Fiero-in-Paradise, Thats what I was worried about... How thick is the splined portion of that adapter? Also, home wuch more of a spacer is needed? The reason why I am asking this is; could the splined area of that hub be machined thinner so the nut sits deeper into it, w/o weaking it...
Factory hub is a smaller diameter than the 6 bolt aftermarket wheels. I don't remember the exact measurement, but it's less than 1/2 inch. I've heard of some people using just the stock hub and spreading it out to match the new wheel. I had someone make me an adapter out of aluminum, but it wasn't thick enough for my wheel. The turn signal stalk would hit the wheel when I clicked the brights on, because my wheel has no dish to it. I had another made thicker and it works great. I don't need the thinner one anymore if you want to buy it. If your wheel has some dish to it (outside of wheel sticks out further than mount of wheel), then it might work fine for you.
Factory bolt pattern is larger then the Momo. Factory is aprox. 87mm (inner edge of hole to inner endge of hole) and the Momo is 70mm (center to center)...
Looks like I need a 10-12mm spacer/adapter plate for the horn to fit. Iess if I want to grind the nub off the end of the splined shaft, or just and adapter plate (minimal thickness) if I wanted to grind off the nub and some of the threaded portion as well... Would rather not grind anything, as I would like to keep that safety clip thing that is attached to the end of the splined shaft...
Anyone wanna machine me a custom adapter/spacer?
[This message has been edited by ALJR (edited 11-18-2009).]
And yeah, I was wrong about the stock hub being smaller. See pic in that thread.
Duno if the "thin" one will work with my Momo wheel. Like your steering wheel, mine also has the center padding that folds around to the back side. So it would not be able to mount up flush with that larger diamater adapter. Not to mention the bolt holes do not line up properlly. My Momo bolt locations would need to be in the same location as stock, only not as far apart as stock... I REALLY like that 2nd new hub adapter you had made. It tapers to a smaller diamater just behind the steering wheel. The bolt pattern is also correct! The only two things I would do different; I wouldn't make it as thick (my Momo wheel HAS a dish to it simmilar to the stock GT wheel) and I would have it anodized black
Could you tell me what the depth is from the hub face (w/o the wheel attached) to the splined colum shaft? Would like to know if my horn button would fit w/o making contact with that splined colum shaft. I need at least 3-4mm from the back of my Momo wheel for the recesed horn button to fit...
Lastly, may I ask what he charged you to make that hub? I may have one made locally and would like an idea of what to expect. OR, do you have the contact info for the guy that made yours? Is he a PFF member?
Thanks, AL
Do you know how thick this part is? and what the face diamater is?
[This message has been edited by ALJR (edited 11-18-2009).]
The thickness at that point is 1/2 inch. The face diameter (where the wheel mounts to) is about 3 3/4 inches. The original one I had made is the same diameter. The new one just flares out to fit over the column. Darrell Morse made that adapter, as stated in the thread. I don't know if he is a member here anymore. He may have gotten out of the Fiero scene.
IP: Logged
11:44 PM
Nov 19th, 2009
Fiero-in-Paradise Member
Posts: 540 From: Honolulu, Hawaii USA Registered: May 2006
I don't think machining down the center so the nut sits lower will work, since the end of the shaft will still be in the same place.
In my case, there was no way of pushing the horn button back onto the steering wheel, with the electric tabs on the back of the button. So, just for the time being, I'm using 3/8" aluminum sleeves/spacers (about 10mm) for each screw; picked them up at the local hardware store. Even with the six spacers, I had to bend the electrical tabs down quite a bit so that the horn button assembly could fit. I know...definitely not the best setup, but I keep a close eye and check the screws for every ride. Plus, the sleeves/spacers have thick walls, so they're pretty strong. I'll soon get around to ordering this to replace the spacers, which should make it a perfect fit.
Does the splined shaft end sit flush with the face of that hub? Is it lower then the face? If its lower, by how much? I am asking because I will definatly need a spacer, just wondering how thick of a spacer I will need... I have seen the below spacer that is only 12mm (vs 15mm for the link you posted) and is made by NRG. So I would have to imagine the color and size would be correct. Although it is not a spacer (its an adapter to change bolt pattern), I could make it work (I think)...
The thickness at that point is 1/2 inch. The face diameter (where the wheel mounts to) is about 3 3/4 inches. The original one I had made is the same diameter. The new one just flares out to fit over the column. Darrell Morse made that adapter, as stated in the thread. I don't know if he is a member here anymore. He may have gotten out of the Fiero scene.
Still possibly interested in it. How did you overcome the different bolt locations? My Momo bolt pattern/position is the same as stock, only not as larg of a diamater...
How I modified the Momo horn button to work with the NRG adapter:
The splined steering shaft is indeed too long and will not allow the Momo horn button housing to snap into the steering wheel, so you modify the horn button housing by first disassembling it and then use a Dremel tool with a cutter bit to remove the brass rivet at the center of the horn button housing. You want to leave the brass connector at the 12:00 position intact. After removing the center rivet then cut a round hole in the plastic horn button housing as large as possible while still leaving the contact shown at 12:00 position in the photo above intact. There is a cone shaped brass spring that goes inside the horn button so you need to leave it a little "rim" to sit on and contact the remaining terminal. Once you have the hole cut enough to clear the splined shaft and nut on the steering shaft then you need to reassemble the horn button and test fit it. On mine it had only a very slight pressure needed to make the brass cone shape disc that sits on top of the spring make contact with the steering shaft, so using a small tack hammer, I gently "blunted" the small end of the cone shaped disc until I had a little more travel on the button, (This avoids inadvertant horn honks..). Next you need to modify the aluminum "nail" and the plastic keeper that holds it in the Fiero steering housing. This pin, or "nail" is held in contact with the turn signal cancel cam and conducts current thru the horn button back to the steering shaft when you push the horn buttton. Remove the plastic keeper, pin , and small spring and then store the aluminum pin in your tool box, (you won't need it). Then shorten the plastic keeper enough to clear the backside of the steering wheel. Be sure to leave the small bayonet pins of the plastic keeper intact so it will lock back into the cancel cam. Next use a small 3-4" section of hook-up wire and strip both ends. On one end of the wire simply twist and flatten the bared wire and insert it down the middle of the small spring that held the aluminum "nail" against the cancel cam. Then fold the flattened end of the wire over in an "L" shape so that the small spring will hold the bared wire against the brass ring portion of the cancel cam. Install the plastic keeper over the wire and , (push the wire thru the center hole of the plastic keepr and lock it in place in the cancel cam. You should now have the wire trapped against the cancel cam an and protruding thru the center of the shortened keeper. Next crimp a spade connector on the remaining end of the wire and connect it to the remaining terminal, ( the one you didn't cut away), on the backside of the Momo horn button. Assemble the horn button and snap it into the steering wheel. Enjoy.
I know this sounds complicated, but it really isn't. My main computer is down right now so I can't upload pics, but I'll try to get some here later. You'll see how simple the modification actually is if my description above seems confusing.
Thinking I am going to go with the NRG adapter and either make or buy a 12-15mm spacer..
Thanks for the info randye! Just how long is that splined steering shaft when using the NRG hub? Is the shaft flush with the Face of the hub adapter, protrudes past or is below? Would like to know so I know how thick of a spacer I will need... I want the thinest spacer possible to keep the wheel as close as possible to the stock location...
What I did was remove the lock plate, and open up the hole where the horn wire goes through it. The wheel has to be turned 30 degrees from normal. It wasn't very difficult at all. The thickness of this one is only about 1/4" though, so it didn't work for me, only because the turn signal stalk would hit when I turned the brights on. The horn button on my wheel does not stick down through the wheel hub. It is contained in the cover, so that wasn't an issue.