A few days a go I placed my 3800 SC on the engine cradle and bolted it to the Getrag.
I believe I got it balanced perfect, since I leveled the cradle and then placed the level on the valve cover.
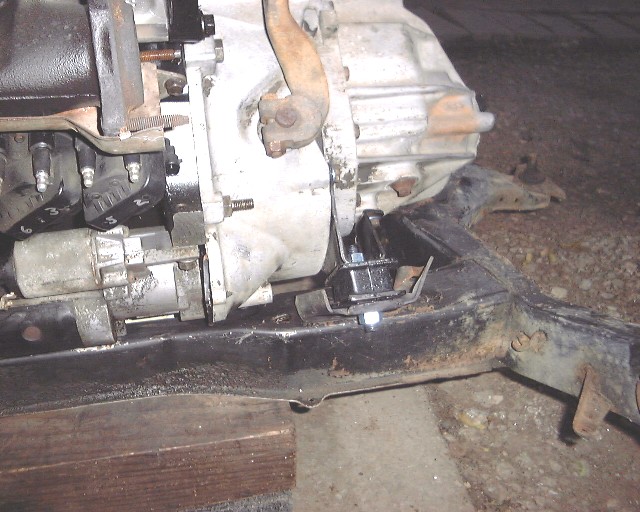
From there I pondered how to mount the engine to the cradle. I've viewed some of the mounts offered and I was told you only need one mount? Kinda seemed odd to only have one engine mount when the stock engine had three attachments. After a few hours last night I managed to fabricate a mount using the old stock mount location that is located in the center of the cradle. I wish I had pictures. This mount seems to hold the weight of the engine, while I believe the other two are used to manage engine torque. I am going to try to replicate the other mounts -- the upper dogbone and also the lower torque absorber.
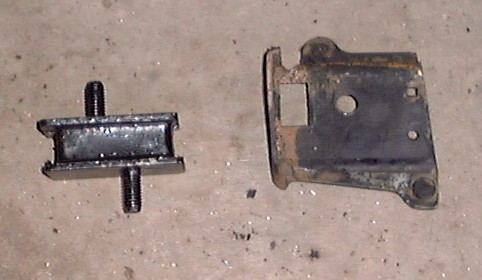
Others will chime in, but if you're using the Getrag, you can use the stock tranny mounts, or upgrade to poly. The factory brackets will work. For under the engine, you can either buy one from purple reign (or other vendors), or use the factory one from a "Trans port" I believe. Finally, you make up something for a dogbone, or purchase one from one of the vendors. You will have a minimum of 3 mounts and a dogbone, or you can do as ome have done and use more mounts below to cradle the engine, then omit the dogbone.
IP: Logged
10:25 AM
RotrexFiero Member
Posts: 3692 From: Pittsburgh, PA Registered: Jul 2002
I never said you only need 1 mount... you just need to "make" one mount.
the stock trans mounts will work as they are stock... but I typically swap the rubber out darthfiero style
The dogbone can be done whatever way you wish, You can typically make that easily enough with just making 2 "engine" mounts, one on each side of the motor going to the front and rear cradle rails, or something similar. I ran one just under the harmonic balancer and one under where the stock a/c compressor is, and it worked great with about 400whp pulsing through it.
So specifically you need to make 2 mounts, but they are not that hard, really.
IP: Logged
03:52 PM
RotrexFiero Member
Posts: 3692 From: Pittsburgh, PA Registered: Jul 2002
I agree about them being easy to make, and I just want to be sure I am doing it right. I really cant justify the reason behind buying these mounts, though I am sure they are fine. But really, for the cost of the mounts you can purchase a welder and make your own!!
Dark you have a picture of the mount under your harmonic balancer?
[This message has been edited by RotrexFiero (edited 10-20-2009).]
I like to use the stock GTP engine mount bracket and mod it to work with the original Fiero cradle mounting point. Take the corner of the GTP bracket and cut it out were the cradle comes up by the A/C compressor and weld it back in flipped over so the mount curves inward instead of out ward and it will clear the cradle with the engine mounted low enough for proper clearance up top. I then use an old chevy truck tranny mount that is connected to the Fiero cradle and a piece of 1/4 inch plate steel welded to the bottom of the mount to reach out for it. There is a bunch of photos of mounts and other things I have made in the link below my sig that might be of help. Dan
And yes those are 14mm through bolts (9/16) That motor isn't going anywhere. It'll also have double dog bones too. I decided to build my own mounts so I could:
A: mount the engine as LOW as possible.
B: feel safe with pounding on them. (I know fierox uses the other style but if just one weld breaks holding the tubes in place it will roll the rest of the way out. I didn't like that. So mine are held in by not only welds but also the strength of the metal that the tube goes through. If one of my butt welds breaks then the strength of the rest of the assembly won't allow the other to bend over giving me time to get it out and repaired or replaced.
C: Learn how to make mounts and gain confidence in my abilities.
All the above was done with Dewalt Drill with drill bits and hole saws, angle grinder with cut off wheels, OLD wood chop saw with abrasive disc (RIP), Bench vice, various hammers, and a modified MIG 80 (walmart special) These things SUCK for duty cycle. Mock up was a couple cardboard boxes and super glue. When the engine comes back out for exhaust assembly then the nuts on the through bolts are getting drilled and pinned for safety.
Feel free to copy. If you locate the URL of the photos they start at 001.jpg - 015.jpg then 016.JPG - 079.JPG
IP: Logged
11:24 PM
DIY_Stu Member
Posts: 2337 From: Republic of TX Registered: Jun 2007
Given when you decide to make your own mounts or other parts in that matter don't deceive yourself into thinking it'll be cheaper on the wallet. Well maybe it will be in the cost of Paycheck dollars, but it'll likely cost you more than just materials. On my mounts I went through a spool of wire at $20 several cut off wheels, sanding wheels, one grinder wheel. $25 drill bit, 20 chop saw, and more. Oh and LOTS and LOTS of TIME, wounds, pain, sweat and cussing. but in the end I came out with what I feel to be better. Had I made the parts as a copy of what was already offered.... Well I would have been better off to just BUY it. But believe me It's a lot of fun though.
That front mount would work in your application. The other mounts would too but they'd have to be different. on the tops since that's a 4T65 trans. But the lower mounts would still work for any trans. New tops would need to be built.
I agree about them being easy to make, and I just want to be sure I am doing it right.
Dark you have a picture of the mount under your harmonic balancer?
It is really impossible to do the mounts wrong, as long as you rubber isolate them and think logically about it. You wouldnt have a table with 3 legs longer than the other, or impossibly stiff poly/rubber holding in a vibrating crazy beast.
I have a few pictures, i will post them later when I get a few more free seconds.
IP: Logged
09:46 AM
RotrexFiero Member
Posts: 3692 From: Pittsburgh, PA Registered: Jul 2002
I completed a front mount for the engine with just some scrap steel I had and with hardly any cutting. Of course I had to do some welding, but in about an hour I had it mounted. The stock rubber mount is snagging a little from the weight of the engine, and I did not account for this. My engine is not noticeably unbalanced but I feel I have to fix that. I am going with another mount and then also a upper dogbone to aid in managing engine torque. Even with measuring its all rather a simple job.
IP: Logged
10:06 AM
86fieroEarl Member
Posts: 2203 From: Orlando, FL Registered: Jun 2002
actually with a automatic you can use the fiero auto mounts for the cradle side and use the 3.8 mounts for the transmission side, worked good for me, Only mod I had to do is notch the holes in the cradle that bolts the mounts to, to go farther out, Come to think of it the only mounts I really had to make was 2 for the engine.
[This message has been edited by 86fieroEarl (edited 10-22-2009).]
IP: Logged
08:59 PM
Oct 23rd, 2009
Dennis LaGrua Member
Posts: 15762 From: Hillsborough, NJ U.S.A. Registered: May 2000
actually with a automatic you can use the fiero auto mounts for the cradle side and use the 3.8 mounts for the transmission side, worked good for me, Only mod I had to do is notch the holes in the cradle that bolts the mounts to, to go farther out, Come to think of it the only mounts I really had to make was 2 for the engine.
I believe that you mean use the Fiero cradle mounts with the 4T65eHD brackets- right? This might work with the 98-03 GTP trans but the 04-08 4T65eHD doesn't have much in the way of attachment points on the right side (rear) . In that case a special transmission mount will need to be fabricated. With sticks just use fresh stock mounts and brackets (or upgrade to poly) and use the U shaped 3800 front engine mount that is used on Van applications or build as appropriate.
------------------ " THE BLACK PARALYZER" -87GT 3800SC Series III engine, 3.4" Pulley, N* TB, LS1 MAF, Flotech Exhaust Autolite 104's Custom CAI 4T65eHD w. custom axles, HP Tuners VCM Suite. "THE COLUSSUS" 87GT - ALL OUT 3.4L Turbocharged engine, Garrett Hybrid Turbo, MSD ign., modified TH125H " ON THE LOOSE WITHOUT THE JUICE "