I got the lines in the car tonight and also changed the accumulator and fixed orifice tube as well, i started to pull a vacuum on the system and ran out of time and energy so i'll finish it tommorow. i also got some pics of what i did so i'll post them as well and let everyone know how it works. Ant
Thank you!
IP: Logged
10:56 AM
Ants87gt Member
Posts: 272 From: Chehalis, Wa, US Registered: Nov 2007
ok got the system working first i'll give some pics of what needs to be changed
For any 134-A conversion you need to change the accumulator
next i always recommend changing the fixed orifice tube its also up front of the car and can easylly be acessed once the accumulator is removed.
once you remove the line you should be able to pull the "o" tube out with neddle nose pliers, though i have seen some that were a real bear to get out but mine came out real easy. also take note of the direction that it was in the line that does matter on how it works.
you need to also put in r134a compatible oil into the system. i like to pour it into the accumulator before i install it into the car. i would put someware between 6-8 ounces of oil. then when you have the whole system back together you need to pull a vacuum on the system, with a a/c vacuum pump i like to let that run for at least an hour, this will remove any moisture from the system so if yours has been open for any length of time (weeks-months) you may run it longer to make sure that it is nice and dry. At this point i like to close the valves on both gauges and note where the needles are the low side should be real close to -30 and the high side should be as low as it can go, then let it sit for about 30min and see if the needles have moved if they have you have a leak if not they you should be pretty much good. i also like to add a/c dye to my systems so if i have a leak its real easy to find with a black light. then add the right amount of R134-a, on conversions i usally start with about 80% of the original system capacity which is 2.5lbs or 40ounces therefore about 2lbs or 32ounces is a nice starting point. by the way that is what the regal that i got my compressor from called for. my only problem is that i now live in washington state and this morning when i charged the system it was about 50 degrees out side, not the best condition for getting good pressure readings on the a/c. i had 30-32 on the low side which is real good but the high side was quite low about 75-80 because of the cold ambient. so i need to fine tune the system on a nice hot day. i had some decent temp in the car about 44degrees but like i said i need a hot day to make sure that all is well. but for right now it does work and i think it won't take much more to get it in the zone where i want it.
I wound up putting 2lbs 4 ounces into my system but may need a little more or less when it gets hot i'll check and let you know what happened.
hope this all helps Ant
IP: Logged
03:21 PM
Ants87gt Member
Posts: 272 From: Chehalis, Wa, US Registered: Nov 2007
I just remebered one other thing that i wanted to let everyone know, somewhere on here i think it was suggested to put the 3 wire sensor up front into the high side service port, that will NOT work that port does NOT have provision for the O-ring that the sensor needs to seal it so the sensor will leak. I know that would have been nice but not a good option.
1. What was the point of removing the piece from the orfice tube? 2. Did you change all the o-rings in the system for 134-a? 3. Did you use a new fiero accumulator? Or one from another car? 4. does your sensor that you put on your made up "T" have an o-ring?
Since I am converting the car to A/C, i have never had it running, but accumulated parts throughout last year.
The orifice tube I have, I just pulled the piece out of the orfice tube, it was oily and some metal flakes were in there..did you remove yours just to clean it and replace the oring?
Matthew
IP: Logged
03:43 PM
Ants87gt Member
Posts: 272 From: Chehalis, Wa, US Registered: Nov 2007
the white piece that i removed is the fixed orifice tube and that was replaced, the new one that you get will be for the r134-a and it does have a different size oriffice then the old r 12 had.
you do not need to change any of the o-rings except on the lines that you may open, I know that people will tell you that you need to change them but I use to live in Florida and did literally hundreds of conversions and have never changed those, there were a bunch of theories on what needed to be done and the final conclusions was you only need to change the accumulator, they have different disicant then r-12, and the oil to one that is compatible with r-134a.
on the accumulator get a new one for the fiero from any parts store it will be the right one for r-134a, they went to a design that would work for both gases years ago and that is all that they make any more so it will work fine.
yes my "T" has the right o ring since the weld shop cut the top if the original fitting off the regal line and welded it to the t fitting that i bought
Ant
IP: Logged
04:47 PM
darkhorizon Member
Posts: 12279 From: Flint Michigan Registered: Jan 2006
perhaps a line would blow? maybe compressor would get too hot and sieze? cause the belt to all of a sudden catch of the engaged clutch and burn the belt?
Not sure.. just things that came to mind.
IP: Logged
08:43 PM
Jun 3rd, 2008
Dennis LaGrua Member
Posts: 16187 From: Hillsborough, NJ U.S.A. Registered: May 2000
Just discovered some additional info concerning 3800 A/C hookup.
Here is how it is done: A/C refrigerent pressure switch installed high side line and three sensor pins get hooked up to PCM to refrig pressure input pin, 5V and ground A/C relay signal from PCM- this is a signal used to activate the A/C clutch relay believe that this is a 5 V signal but it might be 12V. You can measure it with a VOM and know for sure. A/C request signal - this signal is the turn on signal and must be 5V (not 12V). SInce 12V is at the Fiero A/C on switch, you will need to route 5V to it or put a voltage regulator on the Fiero A/C request wire.
So there are 5 wires to route to and from the PCM and another three on the A/C relay that must be connected. .
------------------ 87GT - 3800SC Series III engine, 3.4" Pulley Flotech Exhaust Autolite 104's 4T65eHD 87GT - 3.4L Turbocharged engine, modified TH125H " I'M ON THE LOOSE WITHOUT THE JUICE "
which one is this? A/C relay signal from PCM- this is a signal used to activate the A/C clutch relay believe that this is a 5 V signal but it might be 12V.
IP: Logged
08:10 PM
Dennis LaGrua Member
Posts: 16187 From: Hillsborough, NJ U.S.A. Registered: May 2000
which one is this? A/C relay signal from PCM- this is a signal used to activate the A/C clutch relay believe that this is a 5 V signal but it might be 12V.
If you look at the PCM pinouts for your year PCM you will see and A/C cl;utch relay out put. There is only one pin that is assigned to this function.
------------------ 87GT - 3800SC Series III engine, 3.4" Pulley Flotech Exhaust Autolite 104's 4T65eHD 87GT - 3.4L Turbocharged engine, modified TH125H " I'M ON THE LOOSE WITHOUT THE JUICE "
Sorry I understand that.. I ment A/C request signal - this signal is the turn on signal and must be 5V (not 12V). SInce 12V is at the Fiero A/C on switch, you will need to route 5V to it or put a voltage regulator on the Fiero A/C request wire.
IP: Logged
10:20 PM
Jun 4th, 2008
Dennis LaGrua Member
Posts: 16187 From: Hillsborough, NJ U.S.A. Registered: May 2000
Sorry I understand that.. I ment A/C request signal - this signal is the turn on signal and must be 5V (not 12V). SInce 12V is at the Fiero A/C on switch, you will need to route 5V to it or put a voltage regulator on the Fiero A/C request wire.
Matt: The A/C control signals on the late model GM cars and Grand Prix are all 5V. The Fiero uses a 12V system. To get the voltage from the Fiero A/C switch to turn on the A/C via the PCM the request signal must be 5V. Higher voltages may even burn the PCM out. You can change the Fiero A/C request signal from 12V to 5V with a simple voltage regulator cicuit or DC/DC conveter added inline or you can tap the 5V outs from the PCM and route this to the A/C switch. If you do an online search, voltage regulators & DC/DC converters are available online.
------------------ 87GT - 3800SC Series III engine, 3.4" Pulley Flotech Exhaust Autolite 104's 4T65eHD 87GT - 3.4L Turbocharged engine, modified TH125H " I'M ON THE LOOSE WITHOUT THE JUICE "
I believe you would open up both ends on the lines and pour in some denatured alcohol, and blow it out with an air compressor. Keep doing that till the lines were clear.
quote
Originally posted by darkhorizon:
What would one do if they were driving around for a few years with nothing on the lines in the engine bay?
I just started working on a 98 camaro for my son with a 3800 N/A in it. It has a tee in the high pressure line that could be cut out and used.
The Grand Prix 3800SC A/C high side hose that I have is a #10 size. I have not been able to locate an inline switch port with #10 beadlock nipples on it. Something like this but this is for a #6 line:
Plan B is to take the pressure switch nipple from an old accumulator and heliarc weld it to the Fiero A/C block where it connects to the cooling hoses that go underneath the vehicle
[This message has been edited by Dennis LaGrua (edited 07-11-2008).]
yes my "T" has the right o ring since the weld shop cut the top if the original fitting off the regal line and welded it to the t fitting that i bought
Ant
where did you get the T-fitting? do you have pics of the result?
Matt: The A/C control signals on the late model GM cars and Grand Prix are all 5V. The Fiero uses a 12V system. To get the voltage from the Fiero A/C switch to turn on the A/C via the PCM the request signal must be 5V. Higher voltages may even burn the PCM out. You can change the Fiero A/C request signal from 12V to 5V with a simple voltage regulator cicuit or DC/DC conveter added inline or you can tap the 5V outs from the PCM and route this to the A/C switch. If you do an online search, voltage regulators & DC/DC converters are available online.
Dennis,
As an alternative couldn't you wire in a relay to switch one of the 5V PCM references back to the A/C request signal input and use the Fiero's 12V request signal to energize the relay?
Gary
IP: Logged
09:26 PM
Dennis LaGrua Member
Posts: 16187 From: Hillsborough, NJ U.S.A. Registered: May 2000
Matt: The A/C control signals on the late model GM cars and Grand Prix are all 5V. The Fiero uses a 12V system. To get the voltage from the Fiero A/C switch to turn on the A/C via the PCM the request signal must be 5V. Higher voltages may even burn the PCM out. You can change the Fiero A/C request signal from 12V to 5V with a simple voltage regulator cicuit or DC/DC conveter added inline or you can tap the 5V outs from the PCM and route this to the A/C switch. If you do an online search, voltage regulators & DC/DC converters are available online.
Dennis,
As an alternative couldn't you wire in a relay to switch one of the 5V PCM references back to the A/C request signal input and use the Fiero's 12V request signal to energize the relay?
Gary
I have info tha the A/C request signal is +5V but Darthfiero says that he fed a 12V input to the PCM and it worked. I have a few variable DC/DC converters that are adjustable from 1.5V through 9V so I can just splice one in if necessary. This week I will complete th series III A/C adapter hose and post a picture of it here. It is the Fiero hose end at the fire wall that has a #12 hose barb heliarc welded to the Fiero hose barb which is a #10 hose. The other connection is the high side #8 hose which is the same for the Grand Prix and for the Fiero. We also Heliarc welded a M10 1.25 trinary switch port fitting to the high side line. Pics coming soon.
------------------ 87GT - 3800SC Series III engine, 3.4" Pulley, N* TB, LS1 MAF, Flotech Exhaust Autolite 104's Custom CAI 4T65eHD w. custom axles 87GT - 3.4L Turbocharged engine, modified TH125H " I'M ON THE LOOSE WITHOUT THE JUICE "
[This message has been edited by Dennis LaGrua (edited 08-26-2008).]
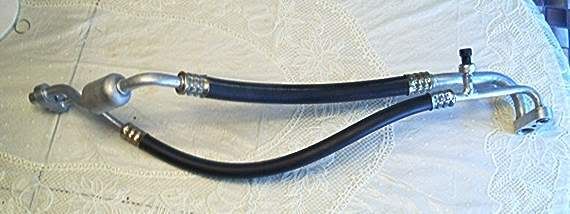
Finished up today. This is how we connected the GTP compressor to the Fieros A/C lines
I am glad that we were able to use the 3800 PCM to control the GTP compressor, although using the Fieros basic A/C control scheme would have been easier. . The 3800 A/C system with its variable displacement compressor.was designed to be operated under PCM control. Update: Finished the charge today. Started with liquid, engine off and went to gas using a 12oz can of R-134A upside down. Started engine, A/C on max, large tank connected to low side port and gauges on both. Finished the fill in about 5 minutes. High side pressures settled in at 150-200psi and low side was around 28-30psi. The A/C is blowing super cold air and the job came out perfect. Now I can cruise the roads in comfort and know that the PCM is keeping an eye on the system. The safeguard that shuts the A/C compressor down at WOT /high RPMs is good to have and the idle speed is maintained and holds steady.
------------------ 87GT - 3800SC Series III engine, 3.4" Pulley, N* TB, LS1 MAF, Flotech Exhaust Autolite 104's Custom CAI 4T65eHD w. custom axles 87GT - 3.4L Turbocharged engine, modified TH125H " I'M ON THE LOOSE WITHOUT THE JUICE "
[This message has been edited by Dennis LaGrua (edited 09-14-2008).]
IP: Logged
06:49 PM
Sep 30th, 2008
americasfuture2k Member
Posts: 7131 From: Edmond, Oklahoma Registered: Jan 2006
------------------ 1987 Fiero GT built by my brother, merlot566jka, 3500 LX9 from 06 Malibu, WOT-TECH.com 1280 grind stage 3 cam, LS6 valve springs, 1227730 ECM conversion, Darrel Morse solid aluminum cradle mounts, Truleo headers modified to fit the 3500, 36# inectors, 70mm 4.3 throttle body adapted to 3500 intake, ported heads, upper and lower intakes, lightly polished, tcemotorsports.com crank trigger wheel, CenterForce dual friction clutch, Flowtech Afterburner muffler, 2.5" piping, cat deleted, EGR deleted, SinisterPerformance tuning, C6 Corvette exhaust tips. projected to be 35 MPG with a guesstimate of 250 hp at the motor
IP: Logged
10:34 PM
Apr 5th, 2009
Dennis LaGrua Member
Posts: 16187 From: Hillsborough, NJ U.S.A. Registered: May 2000
I thought that I'd end off this post with the successful conclusion since I never reported the end result. My A/C system is working perfectly using the GTP PCM for control. It blows real cold. Darthfiero was correct in that the A/C request signal to the GTP PCM works with +12V applied to it. There is also lots of trail and error testing in this post and a lot of R&D so don't let it confuse you. Bottom line is that if you use the GTP A/C comprerssor, w a correctly made A/C adapter hose ( that mates the GTP compressor to the Fieros) and install the GTP refrigerent pressure sensor on the high side line and have everything hooked up to the PCM like the GTP system does, the A/C system will work great, actually better that the OEM Fiero system does.
------------------ " THE BLACK PARALYZER" -87GT 3800SC Series III engine, 3.4" Pulley, N* TB, LS1 MAF, Flotech Exhaust Autolite 104's Custom CAI 4T65eHD w. custom axles, HP Tuners VCM Suite. "THE COLUSSUS" 87GT - ALL OUT 3.4L Turbocharged engine, Garrett Hybrid Turbo, MSD ign., modified TH125H " ON THE LOOSE WITHOUT THE JUICE "
IP: Logged
08:14 PM
Apr 8th, 2009
ca420 Member
Posts: 108 From: Collinsville,OK Registered: Mar 2008
Guys this is a great topic, I want to do this with my harness while I have it out but it would be nice to have a pin out kind of like what Darth has on his site for the PCMs. Only reason I am saying this is because some people have already wired their harnesses and need a reference so they know what wiring to change.
For me I am using pins 22, 27, 34, 35, and 39 from Darth's 98-2001 OBD2 Clear connector pin out. My engine is from a Bonneville and has the A/C hoses but I will have to go look again to see if it has a 3 pin sensor on already. Sadly I no longer have the pig tail that went to it so will have to find one.
update: Yes my hoses have the 3 pin pressure sensor but the hoses route the wrong way which can be changed when making the new lines.
[This message has been edited by ca420 (edited 04-09-2009).]
IP: Logged
12:22 AM
Apr 21st, 2009
tampalinc Member
Posts: 776 From: Waukesha, WI Registered: May 2001
Can someone verify for me that I have these A/C relay connections correct. C: Dk Blue <=> C2-39 B: Dk Green <=> A/C compressor plug A: Lt Blue <=> C203, N D: Blk/Wht <=> C203, N
IP: Logged
02:59 PM
Darth Fiero Member
Posts: 5922 From: Waterloo, Indiana Registered: Oct 2002
Can someone verify for me that I have these A/C relay connections correct. C: Dk Blue <=> C2-39 B: Dk Green <=> A/C compressor plug A: Lt Blue <=> C203, N D: Blk/Wht <=> C203, N
Looks ok to me except my diagrams don't show a blk/wht wire going to pin D, but show it going to pin E of the Fiero's A/C relay. Pin D is not used.
Also, the PCM must be reprogrammed to disable code P1641 (A/C relay electrical) because it may set the way you have it wired. If this code is disabled, the PCM will operate the A/C relay correctly.
-ryan
------------------ 5+ years on this same swap -- NO engine or transmission failures... Custom GM OBD1 & OBD2 Tuning | Engine Conversions & more | www.gmtuners.com
IP: Logged
04:45 PM
May 21st, 2009
Rolling Thunder Member
Posts: 1244 From: College Station, TX Registered: Aug 2008
I'm doing my 3800 swap this summer, but I have a dilemma. I have a series III motor that I'm converting down to Series II electronics and controls. Does anyone know if the Series II PCM will work with the Series III A/C compressor? How about Series III PCM with Series II ECU?
IP: Logged
01:11 AM
Rolling Thunder Member
Posts: 1244 From: College Station, TX Registered: Aug 2008
I'm doing my 3800 swap this summer, but I have a dilemma. I have a series III motor that I'm converting down to Series II electronics and controls. Does anyone know if the Series II PCM will work with the Series III A/C compressor? How about Series III PCM with Series II ECU?
Yes. You are describing the way my setup is hooked up. A 2003 PCM controls my Powertrain and A/C system.
As for Darkhorizons question on leaving the system open for a while; as long as you flush, evacuate, and recharge correctly you should be fine. On the question of whether or not the O rings should be replaced. The OEM O ring material will hold with an R-134 charge but since they are 20+ years old, I believe replacing them is good (and inexpensive) preventative maintenance.
------------------ " THE BLACK PARALYZER" -87GT 3800SC Series III engine, 3.4" Pulley, N* TB, LS1 MAF, Flotech Exhaust Autolite 104's Custom CAI 4T65eHD w. custom axles, HP Tuners VCM Suite. "THE COLUSSUS" 87GT - ALL OUT 3.4L Turbocharged engine, Garrett Hybrid Turbo, MSD ign., modified TH125H " ON THE LOOSE WITHOUT THE JUICE "
[This message has been edited by Dennis LaGrua (edited 05-21-2009).]