I had eveything pegged when I took out the distributor. So I thought. Turns out that the previous owner got it pretty wacked from where #1 cylinder is supposed to be based on the diagrams people posted here.
Had to start fresh. Turned the center harmonic balancer bolt clockwise while feeling for compression on the #1 cylinder. I did this several times so I hope I have it right. After feeling the compression I watched for the large groove on the harmonic balancer to line up with the 0 degree mark. Then I dropped the distributor in in an orientation as close the pics people posted as I could. I then modifed an old distributor cap so I could see the rotor line up with the #1 pin inside the distributor cap. Here:
Here are the 3 questions:
1- Is this close enough to get it running or should I have done something else? 2- As I rotated the crankshaft I heard some clacking or slapping like the timing chain. Is this normal? 3- The harmonic balancer is a rebuilt one from the damper doctor. It did not ahve the white paint mark. I used the large groove. Is that the line up mark?
[This message has been edited by sjmaye (edited 05-25-2008).]
IP: Logged
01:29 PM
PFF
System Bot
Oreif Member
Posts: 16460 From: Schaumburg, IL Registered: Jan 2000
To get close on the timing, Turn the crank to 10* BTDC and set the rotor so it just starts to touch the #1 pole. Having them lined up is too late. The spark passes just as the rotor gets to the pole, not when it's centered.
The large groove should be the correct one.
[This message has been edited by Oreif (edited 05-25-2008).]
IP: Logged
01:40 PM
sjmaye Member
Posts: 2468 From: Hendersonville, TN USA Registered: Jun 2003
I like that modded cap, you should invent a clear cap for the rest of us. Yes, you're right, the previous owner didn't get the orientation correct according to the diagrams when he installed the distributor, makes it a confusing pain for the next person trying to figure it out.
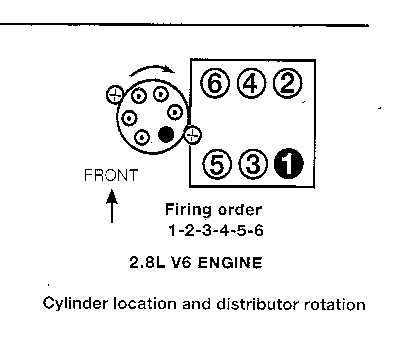
As long as you have #1 plug wire to #1 spark plug correct and follow in proper sequence, you'll be ok.
IP: Logged
02:34 PM
Raydar Member
Posts: 41581 From: Carrollton GA. Out in the... country. Registered: Oct 1999
To get close on the timing, Turn the crank to 10* BTDC and set the rotor so it just starts to touch the #1 pole. Having them lined up is too late. The spark passes just as the rotor gets to the pole, not when it's centered.
The large groove should be the correct one.
I was going to suggest just backing up the distributor a bit (counterclockwise) from where you are now, but Oreif's method is just as easy, and much more precise.
If the rebuilt harmonic damper is specifically designated for a Fiero, it ought to be okay. Most of them (well... anything not for a Fiero) have the timing mark on the wrong side.
------------------ Raydar 88 4.9 Formula IMSA Fasback..........................88 3.4 coupe -soon to be something other than red Read Nealz Nuze!Praise the Lowered!
IP: Logged
02:51 PM
sjmaye Member
Posts: 2468 From: Hendersonville, TN USA Registered: Jun 2003
The damper was rebuilt by the Damper Doctor. They claim it is correct for a Fiero.
I thought more about the sounds. I am pretty sure now it is just the lifters as everything is pretty dry now. Oil was drained long ago. The valve guide seals were replaced. I followed all the instructions here on the forum. I am 99.9% sure everything is fine,
IP: Logged
03:31 PM
gem1138 Member
Posts: 631 From: Baton Rouge, LA Registered: Aug 2007
You might consider removing the valve cover to expose the rocker arms for cylinder #1. This way you can insure that the valves are closed and you are not 360 degrees our of wack. I too, like the cap mod.
I have previously posted about the modification to distributor ,,,old mechanic tool for cars commonly worked on ,, you can drill large holes and open them up or if you need a quick check just drill a hole to eyeball thru !! the balancer will shift and then the timming marks are off,but should be close enough to start
Use straw as tdc tool,locate piston TDC approximate!! first with straw or similar tool then mark straw,so you can see rise and falll and match to timing marks this assures you of correct time on balancer
[This message has been edited by uhlanstan (edited 05-25-2008).]
IP: Logged
05:48 PM
jetman Member
Posts: 7811 From: Sterling Heights Mich Registered: Dec 2002
You might consider removing the valve cover to expose the rocker arms for cylinder #1. This way you can insure that the valves are closed and you are not 360 degrees our of wack. I too, like the cap mod.
Therein lies the difficulties of setting the timing. You need to remove plenhum, upper intake, engine lift eyehook, dog bone and dog bone bracket to pull off the valve cover thanks to the engineers at GM. I did pry a cover off in a junkyard under the intake but it was useless afterwards.
Most of the time you get it right the first time, if not, you're 180* off which is easy to remedy.
IP: Logged
07:46 PM
sjmaye Member
Posts: 2468 From: Hendersonville, TN USA Registered: Jun 2003
I thought I might pull the #1 exhaust manifold off. I think I can see the vale depress indicating the piston will then be coming up for the exhaust stroke. Once I hit TDC for that it should be one more revolution to TDC compression. Right?
IP: Logged
08:49 PM
jetman Member
Posts: 7811 From: Sterling Heights Mich Registered: Dec 2002
You can actually make any terminal the #1 but it's best to make it like it is shown in the technical manuals, to avoid confusion for the next owner. Yours is off by one.
IP: Logged
09:28 PM
May 26th, 2008
sjmaye Member
Posts: 2468 From: Hendersonville, TN USA Registered: Jun 2003
Remove the #1 sparkplug, put your finger over the hole, turn the engine over, it'll blow off at TCD compression, simple as that.
I do not sense much compression when turning over by heand. I checked the compression before diassembly and it checked good, but it was done using the starter to turn it over. So it was rotating at pretty good speed when it showed a good compression. turning over by hand with my finger plugging the #1 spark plug hole I can only feel a little bit of compression.
Does it make any difference in your compression tests to do it either way?
There is little compression turning by hand , a compression check is done using a screw in type comprssion tester.. the engine is turned over for 5 seconds,gas pedal to floor is proper method Of course check is done with plugs out of all cylinders,this is a hazzle on V6 so just remove one.pull juice wire & coil wire so engine does not start compression low? pour in tablespoon of oil recheck,if compression comes up a lot ,,bad rings low compression and oil in cylinder does not bring compression up?? you have bad valves, leaking ,gasket,ect If it ran O K before work,,you are probably alright
When remove distributor,ALWAYs mark distributor to block ,,also make a pencil mark where rotor is in relationship to dist base when you start pull and when you finish pulling dist out.. this will simplify future work,,if engine is to be turned over during work bring to # 1 TDC or #1 fire position ..
[This message has been edited by uhlanstan (edited 05-26-2008).]
I do not sense much compression when turning over by heand. I checked the compression before diassembly and it checked good, but it was done using the starter to turn it over. So it was rotating at pretty good speed when it showed a good compression. turning over by hand with my finger plugging the #1 spark plug hole I can only feel a little bit of compression.
Does it make any difference in your compression tests to do it either way?
Did you do any work on the lifters or lash? Over lashing will give low compression. I know well, I just did it! (was out until 1AM last night fixing it). If you drill a nice round hole in the dist cap you can just stick a cap on it.
------------------ If you ever have a questions about the sincerity of the circle of Fiero owners on this site, take a look at: "In Memoriam: Fiero Members"
Pretty impressive.....
Avatar is of an actual Fiero on fire
IP: Logged
02:27 PM
sjmaye Member
Posts: 2468 From: Hendersonville, TN USA Registered: Jun 2003
I set the lash with 3/4 - 1 turn past not lash based on comments here. I checked the compression when I pulled the engine. I am going to check it one more time to either be sure everything is OK or that I actually have a problem. Just do not want to put this engine back in and find something wrong.
[This message has been edited by sjmaye (edited 05-26-2008).]
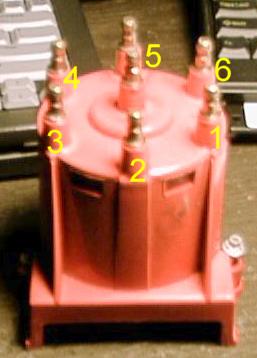
You have to align the trigger points of the pickup coil star wheel to set the timing, not the rotor tip. Here's what it should look like with the harmonic balancer set on 10� compression:
Notice that the rotor is in around the right place but that the tips are exactly aligned. This will get you within a couple degrees of perfect. Turn the base of the distributor to align the tips.
JazzMan
IP: Logged
01:56 PM
sjmaye Member
Posts: 2468 From: Hendersonville, TN USA Registered: Jun 2003
OK. I have it on 10 degrees before TDC #1. I am assuming all the star points line up equally so I took this shot. The star is dead center. Will this work?
You did verify TDC compression, right? There are two TDCs, the other is TDC exhaust.
JazzMan
Did not go all the way to TDC. Verified I was on the compression stroke of #1, stopped short at 10 degrees before, lined up as pictured above and locked it down.
IP: Logged
03:53 PM
jetman Member
Posts: 7811 From: Sterling Heights Mich Registered: Dec 2002
Oh so I wish. I would like to do nothing more. I have the subframe powder coated sitting ready. Now with this complete I feel comfortable and getting the drivedrain ready for install. I will load everything on the subframe this weekend and then it will sit some more while I refurbish the engine bay.
Yep, that gets you within a couple of degrees of perfect. You did verify TDC compression, right? There are two TDCs, the other is TDC exhaust.
JazzMan
How is the 10 degrees determined?
------------------ If you ever have a questions about the sincerity of the circle of Fiero owners on this site, take a look at: "In Memoriam: Fiero Members"
Pretty impressive.....
Avatar is of an actual Fiero on fire
[This message has been edited by NashvilleFiero (edited 05-29-2008).]
IP: Logged
05:37 PM
sjmaye Member
Posts: 2468 From: Hendersonville, TN USA Registered: Jun 2003
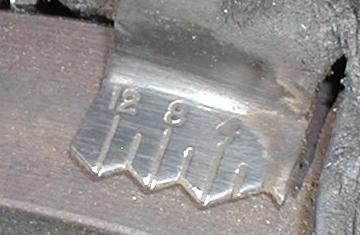
The gauge with graduations from 0 - 12 degrees located just above the harmonic balancer. The 10 is not shown on mine. It is right between the 8 and 12.
This first picture I borrowed from Dodgerunner, he posted such a good picture with the numbers, I just had to post it again. Thank Dodgerunner the next time you see him.
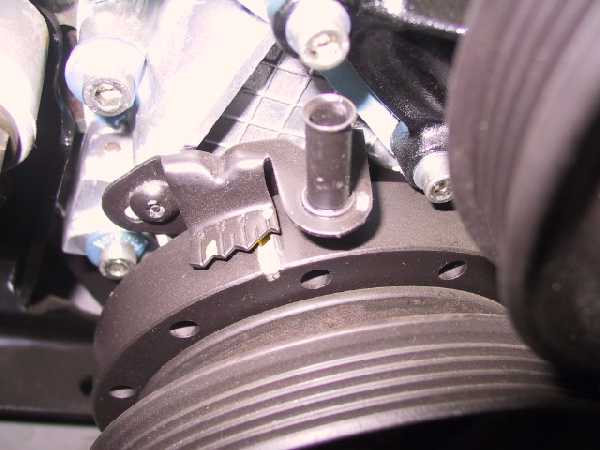
Second picture I found in a post by rubyredfiero in the archives, give rubyredfiero credit for this nice shot.
OK. I have it on 10 degrees before TDC #1. I am assuming all the star points line up equally so I took this shot. The star is dead center. Will this work?
Looking at the shape of the magnet (cracked, etc) you might want to upgrade to the newer style distributor. One of the little magnetic chips will mess up your firing. The chips can hide too. Don't use any PB Blaster on distributors, unless you want a scitzophrenia simulator!
You have to align the trigger points of the pickup coil star wheel to set the timing, not the rotor tip. Here's what it should look like with the harmonic balancer set on 10� compression:
Notice that the rotor is in around the right place but that the tips are exactly aligned. This will get you within a couple degrees of perfect. Turn the base of the distributor to align the tips.
JazzMan
This is a very helpful picture. Thanks Jazz
[This message has been edited by NashvilleFiero (edited 05-29-2008).]
IP: Logged
08:47 PM
Aug 6th, 2008
sjmaye Member
Posts: 2468 From: Hendersonville, TN USA Registered: Jun 2003
C'mon now, fire that baby up, let it warm up, set the timing and tell us all your success story.
Finally! I finally got all the parts back form the powder coater and finished off the engine bay. I fired it up this weekend. I mean it fired right up and idles like a champ. Those pointers for setting preliminary timing are perfect. For all the crap that could have gone wrong nothing did.
All I have left to do is to set the timing with your thread, Jetman. Thanks for your help guys!


_(Small).JPG)


.JPG)