Pennock's Fiero Forum
  Technical Discussion & Questions - Archive
  Faulty fuel gauge or sender? Here’s how with pics.

T H I S   I S   A N   A R C H I V E D   T O P I C
  

Email This Page to Someone! | Printable Version


Faulty fuel gauge or sender? Here’s how with pics. by jetman
Started on: 09-30-2007 10:11 AM
Replies: 7
Last post by: spark1 on 10-04-2007 11:26 PM
jetman
Member
Posts: 7811
From: Sterling Heights Mich
Registered: Dec 2002


Feedback score: (4)
Leave feedback


Total ratings: 272
Rate this member

Report this Post09-30-2007 10:11 AM Click Here to See the Profile for jetmanClick Here to visit jetman's HomePageSend a Private Message to jetmanDirect Link to This Post
The question is, do I have a faulty fuel gauge or faulty sender?

I figured out an easy to determine if your fuel gauge is bad of if the difficulties are in the sending unit in the gas tank. I’ll get to that in just a second, first a little preface.

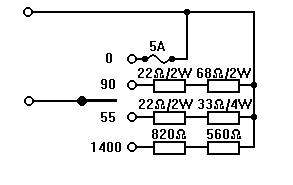
There are no clear answers in the forum search except to test the fuel sending unit with a meter, should read 0 ohms at empty and 90 ohms at full while testing the pink wire to the fuel gauge. I also found out that if you ground out the pink wire to the fuel gauge it would read empty.

My fuel tank was near empty, gauge was reading halfway. If I ground my pink wire and the gauge reads/shows empty, faulty fuel sending unit. If I ground my pink wire and gauge doesn’t go to empty, I have a faulty gauge. (C’mon faulty gauge, fingers crossed.)

Problem is that I’m not dropping the gas tank in the apartment parking lot, I don’t understand ohms, there isn’t a pink wire direct on the gauge and there's a bunch of pinkish colored wires everywhere in harnesses. The fuel gauge plugs in just like an electrical plug into a socket into a circuit board. So after tearing the entire gauge console down this is what I discovered for future reference. (Drum roll please)

Remove the back of the gauge console, it’s five T-15 torx on top and two 7MM on the bottom sides. Here is a view through the windshield although you don't have to tear the entire thing down like I just did.


Turn ignition to “on” and ground out this terminal on the back of the gauge cluster.


My fuel gauge went to from half,,,,


,,, to empty in about 5 seconds.


There you have it! Simple as that! Your old friend jetman just gave you the “easy way” by doing it the hard way until I figured it out. Now to reassemble this entire console, yeeeouch! This is the easiest way to test that I know of and you get to see or index the exact point of absolute empty on your gauge although it is not necessarily the point of which you run out of fuel.

Encouragement is always graciously accepted and if anyone would like to add something, please by all means do so.

------------------
jetman
Silver 86 SE 2M6 4-speed, with
"check wallet light"

IP: Logged
PFF
System Bot
Joseph Upson
Member
Posts: 4951
From:
Registered: Jan 2002


Feedback score: (2)
Leave feedback


Total ratings: 88
Rate this member

Report this Post09-30-2007 10:30 AM Click Here to See the Profile for Joseph UpsonSend a Private Message to Joseph UpsonDirect Link to This Post
Thanks for that update, but I just tore my dash down to reset the needle to read empty when the tank is empty and since tearing the dash down is no easy feat, an even easier way to determine if it's the gauge or the sending unit is to unplug the fuel tank harness at the firewall and ground the pink wire which should be in the middle with ignition on for the same results.

For those needing to remove the needle to restore the gauge back to normal specs from a previous change associated with a bad sending unit that was finally replaced consider this. After the needle is removed lubricate the gauge. Since I took mine out after it appeared to be a little stiff, I set it down and draped a paper towel over it with a little hole in it to pass the tube from the WD40 nozzle through to avoid dowsing the gauge and gave it one or two squirts and cleaned up the excess. The sweeping motion on reinstall was remarkably faster than before and this is a good indication that pulling the needle off and pushing it back on can actually cause some binding in the gauge.

Afterwards I installed the gauge, put the needle on gently just enough to sweep with the shaft and at the same time be able to readjust it with my finger and once at the proper location carefully pushed it on after stabilizing my hand to avoid moving it from the desired position. Then I tugged on it lightly and moved it left and right to make sure it was not hanging.
IP: Logged
jetman
Member
Posts: 7811
From: Sterling Heights Mich
Registered: Dec 2002


Feedback score: (4)
Leave feedback


Total ratings: 272
Rate this member

Report this Post09-30-2007 11:44 AM Click Here to See the Profile for jetmanClick Here to visit jetman's HomePageSend a Private Message to jetmanDirect Link to This Post
 
quote
Originally posted by Joseph Upson:

Thanks for that update, but I just tore my dash down to reset the needle to read empty when the tank is empty and since tearing the dash down is no easy feat, an even easier way to determine if it's the gauge or the sending unit is to unplug the fuel tank harness at the firewall and ground the pink wire which should be in the middle with ignition on for the same results.


Thank you.

I searched the archives but I sure didn't see that little tidbit of information or I didn't understand it when I read it.
I went out, took a picture of the harness that you are talking about. It's the three wire connector in the center of the picture on the passenger side of the firewall, I can clearly see the bright pink wire.


Wow, live and learn.
Sometimes I have difficulty visualizing written words, hopefully this picture will help someone else.


IP: Logged
josef644
Member
Posts: 6939
From: Dickinson, Texas USA
Registered: Nov 2006


Feedback score:    (71)
Leave feedback


Total ratings: 103
Rate this member

Report this Post09-30-2007 12:38 PM Click Here to See the Profile for josef644Send a Private Message to josef644Direct Link to This Post
I got two pack of resisters from the Radio Shack, 50's and 100's They came in packs of 5 for $0.97 each. You take one, remember which one it is and vice grip it to a ground, turn on the ignition, unplug the three wire connecter. Hook a wire to the pink part of the car's harness,(pink wire) and the other end to the unused end of the resister. If you have the 100 OHM on there, the fuel gauge should go to just over trhe full mark. The 50 ohm will read about a half a tank, and if you just ground the pink with no resister you should read empty on the gauge.
Your method is a good way also. I guess you could use the resisters up there to do the same thing I did in the engine bay.

Joe
IP: Logged
Joseph Upson
Member
Posts: 4951
From:
Registered: Jan 2002


Feedback score: (2)
Leave feedback


Total ratings: 88
Rate this member

Report this Post09-30-2007 04:33 PM Click Here to See the Profile for Joseph UpsonSend a Private Message to Joseph UpsonDirect Link to This Post
Also given the nature of the sending unit circuit you should be able to install a variable resistor that works like a volume on a stereo to help adjust the gauge reading without any invasive work if the gauge is not to far off. It would only require connecting to the pink wire and ground anywhere on the car while the plug is still connected. It would be most effective if the needle did not go all the way down to "E" on an empty tank and would be a parallel circuit so as long as you set the resistance lower than what the gauge was actually getting from the sender it would lower the resistance bringing the needle down more since usually the problem is with the sender never reaching actual 0 ohms.

If on the other hand the needle is reading well below empty on an empty tank you would need to put the resistor in line between the gauge and the sending unit to add resistance and bring the needle up, this would be much safer than trying to modify the resistor card with its micro thin wire winding.
IP: Logged
Whuffo
Member
Posts: 3000
From: San Jose, CA
Registered: Jul 2003


Feedback score: N/A
Leave feedback


Total ratings: 155
Rate this member

Report this Post10-04-2007 05:51 PM Click Here to See the Profile for WhuffoClick Here to visit Whuffo's HomePageSend a Private Message to WhuffoDirect Link to This Post
 
quote
Originally posted by Joseph Upson:

Also given the nature of the sending unit circuit you should be able to install a variable resistor that works like a volume on a stereo to help adjust the gauge reading without any invasive work if the gauge is not to far off. It would only require connecting to the pink wire and ground anywhere on the car while the plug is still connected. It would be most effective if the needle did not go all the way down to "E" on an empty tank and would be a parallel circuit so as long as you set the resistance lower than what the gauge was actually getting from the sender it would lower the resistance bringing the needle down more since usually the problem is with the sender never reaching actual 0 ohms.

If on the other hand the needle is reading well below empty on an empty tank you would need to put the resistor in line between the gauge and the sending unit to add resistance and bring the needle up, this would be much safer than trying to modify the resistor card with its micro thin wire winding.


This isn't going to work the way you want. Empty on the gauge means zero ohms resistance at the sender. If it's 10 ohms and you want to make it read zero - well, let's simplify a bit and just eliminate half of the error. Put a 10 ohm resistor in parallel with the sender; the gauge sees 5 ohms and reads closer to empty.

But when the tank is full and the sender is at 90 ohms - that 10 ohm resistor in parallel will cause the gauge to see 9 ohms and the gauge reads just above empty. That's not what we wanted at all.

To make a 10 ohm sender show 0 ohms to the gauge you'd have to put a 0 ohm resistor in parallel; may as well just ground the sender wire. No good at all.

You'll have better luck with a sender that reads high by repositioning the pointer on the gauge to point to empty when the sender reads its minimum value.
IP: Logged
pontiacman63383
Member
Posts: 819
From: warrenton, mo
Registered: Jun 2007


Feedback score: (1)
Leave feedback

Rate this member

Report this Post10-04-2007 06:02 PM Click Here to See the Profile for pontiacman63383Send a Private Message to pontiacman63383Direct Link to This Post
Thats a great way to check your gauge but a bad ground from the sinding unit will also give you false readings so dont assume that if your gauge checks out right that it has to be the sinding unit.
IP: Logged
spark1
Member
Posts: 11159
From: Benton County, OR
Registered: Dec 2002


Feedback score: (1)
Leave feedback


Total ratings: 175
Rate this member

Report this Post10-04-2007 11:26 PM Click Here to See the Profile for spark1Send a Private Message to spark1Direct Link to This Post
Click on the image to see Oliver's idea.

IP: Logged


All times are ET (US)

T H I S   I S   A N   A R C H I V E D   T O P I C
  

Contact Us | Back To Main Page

Advertizing on PFF | Fiero Parts Vendors
PFF Merchandise | Fiero Gallery
Real-Time Chat | Fiero Related Auctions on eBay


Copyright (c) 1999, C. Pennock