I'm getting ready to change the spark plugs on my 88GT and I'm wondering if there are any tricks you guys can pass on to me that will help me. A friend of mine told me that his car has some plugs that are hard to reach also, he disconnects the dogbone and either pushes or pulls the car a bit to tilt the engine thus making it a lot easier to get to the hidden plugs. Anyone ever heard of this?? Any suggestions at all would help me out and make this job easier and quicker for me. Thanks to anyone that helps out.
IP: Logged
11:49 PM
PFF
System Bot
Aug 21st, 2007
James Bond 007 Member
Posts: 8872 From: California.U.S.A. Registered: Dec 2002
I JUST changed my plugs like... 1 hour ago for the first time. I found it extremely helpful to have a 2nd person to hold a light and stuff. I also took off the deck lid and that helped oodles as well. Im 6'1 200lbs so its was a very uncomfortable job thats for sure. It helps to have one of those angle doohickies for your ratchet, and an extension. Good luck, I found it helpful to put towels down in spots i was laying, it hurts your chest alot (well it did for me :P).
IP: Logged
12:55 AM
Xanth Member
Posts: 6886 From: Massachusetts Registered: May 2006
If you're a small guy its not too bad, I can easily reach the plugs without moving the engine or disconnecting the deck lid. If you use one of those spark plug sockets with the rubber insert, make sure you get the socket to seat all the way. On the forward plugs it is more difficult because you can't see what you are doing. I just use a short extension on a spark plug socket and all is well.
Be careful also to make sure you just turn the plug, and don't twist them. If you break it off in the head you will have a good bit of work cut out for you. If the plugs have never been changed they may break anyway.
------------------ www.FieroDomain.com Over 120 Fiero Links, Articles, Images, Diagnostics
"If any car is both the parade and the rain, it is the Fiero"
IP: Logged
09:14 AM
Dennis LaGrua Member
Posts: 16142 From: Hillsborough, NJ U.S.A. Registered: May 2000
You remove the dogbone and buy an engine mover/shifter tool that attaches to both brackets. With a box wrench you tighten the bolt on the tool and the engine moves forward . This allows plenty of room for you to reach behind the engine and change the plugs. It's not an absolute necessity to have the engine mover tool but I believe no Fiero owner should be without one and it's a one time investment
------------------ 87GT 3.4 Turbo- 0-60 5.2 seconds 2006 3800SC Series III swap in progress Engine Controls, PCM goodies, re-programming & odd electronics stuff " I'M ON THE LOOSE WITHOUT THE JUICE "
[This message has been edited by Dennis LaGrua (edited 08-21-2007).]
IP: Logged
09:54 AM
Sebringdcp Member
Posts: 43 From: Baltimore, Maryland Registered: Mar 2007
The easiest way I have found to remove the front plugs is to remove the trunk lid. This will actually get you a good bit of room to change the plugs. It requires no special tools and does not require rocking the engine on its mounts.
Removing the lid can be done by one person if your fairly strong but I would recommend two people. Before removing the lid scribe or mark a line where the hinge meets the lid, this will help you realign the lid when reinstalling it.
To Remove the lid: 1. Open the trunk 2. Remove the vent covers on each side of the trunk, this will help when you reinstall the trunk lid. 3. Remove the ground wire to the underside of the lid. 4. Remove the wire for the remote trunk release if you have one. 5. While holding the trunk in the open position remove the bolts holding the hinges to the trunk. The hinge will remain in the open position and help hold the trunk from slipping down too far. 6. Remove the trunk lid by sliding it up and out of the hinges.
To reinstall the lid: 1. Place the lid back over the hinges and slide down into position. 2. Intall the mounting bolts snug but not tight (basically hand tight) 3. Slowly lower the trunk lid while checking alignment. 4. When satisfied with the alignment latch the trunk lid. 5. Tighten the mounting bolts (accessed through the missing vent holes) 6. Reinstall the vents
[This message has been edited by Sebringdcp (edited 08-21-2007).]
IP: Logged
11:22 AM
p8ntman442 Member
Posts: 1747 From: portsmouth RI Registered: Sep 2003
you guys are nuts. I can change the plugs on the front bank in 11 minutes without unbolting anythin else. Get a spark plug socket, a 3" extension and a small ratchet. Dont use flexable links or you could easily snap a plug off. Just reach back there and do one at a time with your eyes closed. Just feel your way around.
IP: Logged
11:41 AM
Old Lar Member
Posts: 13798 From: Palm Bay, Florida Registered: Nov 1999
I use lots of penetrating oil on the plugs as after 50K miles and 8 years, mine were in pretty tight. I too removed the trunk lid to get my hands have access to the front plugs. Clean around the plug to get the junk from there so it doesn't fall into the cylinder once the plug is out.
IP: Logged
01:01 PM
Formula Owner Member
Posts: 1053 From: Madison, AL Registered: May 2001
I'm with p8ntman442. It probably takes me more than 11 minutes, but I just use a spark plug socket and an extension, reach around the engine and work by feel. I don't unbolt anything.
Also, be sure to use anti-sieze on the new plugs.
IP: Logged
02:24 PM
Qcksilver Member
Posts: 84 From: Magnolia, DE, USA Registered: Aug 2006
Wow, thanks for the helpful suggestion to all. I plan on replacing the plug wires & distributor cap also. I wanna get a red set to match the engine. any suggestions in this area? What's the difference between 8.0mm wires and 8.5mm wires? other than the obvious size of the wire I mean. As far as the plugs go I was thinking maybe some AC Delco-Rapidfires from Autozone.
IP: Logged
03:11 PM
jetman Member
Posts: 7808 From: Sterling Heights Mich Registered: Dec 2002
I use lots of penetrating oil on the plugs as after 50K miles and 8 years, mine were in pretty tight. I too removed the trunk lid to get my hands have access to the front plugs. Clean around the plug to get the junk from there so it doesn't fall into the cylinder once the plug is out.
Absolutely! PB blaster is my best friend, use anti-sieze on the plug threads too.
I used a swivel head socket with a 3-inch extension on the window side, no problems, just a bit tight, my trouble mirror helps.
Red cap and rotor, MSD or Wells were available from Auto-zone. Hint, the MSD part number cross referenced to a 4.3 GM engine (same part). IIRC the Wells had the brass terminals too. My old notes also showed a Conrad DR2012G Autozone too, I had the red Taylor 8-MM wires on my 87 GT, part number # 074224, just be sure to double check my part numbers, notes are really faded.
IP: Logged
03:39 PM
PFF
System Bot
Mr.PBody Member
Posts: 3172 From: Cincinnati, Ohio, USA Registered: Oct 2006
Took me an hour to do them the first time. Used a 3/8 inch drive with a 3" extention and a universal joint. Using a true spark plug socket with the rubber grommet helps.
This has to be repeated. you need, no MUST clean out around each plug very well. remember that tons of crud falls in there.
You do not want the crud in the cylinder ready to scratch things up or even bust a ring on startup. I use an inspection mirror and a "ow my eyes!" bright LED flashlight to look as much as I can into each well, I typically flush them hard with PB blaster and then 100psi air after letting it sit for 5 minutes to clean them out pretty good. I modified a duster attachment to take a length of 1/4 inch copper tubing so I can get the full force of the air right into the plug well.
IP: Logged
05:18 PM
Fieroseverywhere Member
Posts: 4242 From: Gresham, Oregon USA Registered: Mar 2006
My one suggestion I can add is to take the fiero to the car wash and clean the engine off as good as you can. Make sure to get around the front plugs. Stuff likes to pile up there. If you have pine trees around your plugs will probably break off. The acid from the needles eats the metal right off of the plug. Nasty mess that. Mine had about 1/64th of metal left. Zero torque and they were tost. Must have been 10 years since the last time they were changed. Good luck to you.
[This message has been edited by Fieroseverywhere (edited 08-21-2007).]
IP: Logged
08:48 PM
Aug 22nd, 2007
Qcksilver Member
Posts: 84 From: Magnolia, DE, USA Registered: Aug 2006
Thanks a bunch, going tomorrow probably to get the plugs, wires & such. hopefully they have what I need in stock, otherwise I'll be ordering it and waiting. I'll let you know how it goes.
IP: Logged
08:55 PM
Mr.PBody Member
Posts: 3172 From: Cincinnati, Ohio, USA Registered: Oct 2006
This sounds crazy but I used a vacuum cleaner to suck all the leaves and crap out of the area around the plug so it wouldn't fall into the hole when I pulled the plug out. I will post pics in a bit.
IP: Logged
09:09 PM
Xanth Member
Posts: 6886 From: Massachusetts Registered: May 2006
Not crazy at all. The design is nearly seems intended to let junk into the cylinders. I never tried a vacuum cleaner, I have used compressed air and a small screwdriver to scrape a way loose junk. A lot of crap blew out of there the first time I did the front plugs.
[This message has been edited by Xanth (edited 08-22-2007).]
Use regular plugs ,, no benifit from more expensive plugs.. a paint brush can help to remove crap or loosen it while dry ,before you blast with fluid of choice,old mechanic trick is rubber hose using mouth to replace compressor and air tank..you can direct hose right at spark plug,place other end in mouth and give best gay blow job to plug,, in some cases a box wrench can be placed on plug wrench for easy first turn,better feel..
IP: Logged
01:41 AM
Qcksilver Member
Posts: 84 From: Magnolia, DE, USA Registered: Aug 2006
so should i get the 8mm plug wires or the 8.5mm? will it actually make any difference in performance? how about cold plugs? i hear they actually disapate heat faster which is better for your engine, is there any truth to that?
IP: Logged
05:20 PM
Xanth Member
Posts: 6886 From: Massachusetts Registered: May 2006
If you have a mostly stock engine, you should stick with the stock parts. No need for high-performance wires or other than stock recommended plugs. Better wires won't hurt, but the gain would probably be negligible and not worth the money.
Cold plugs can lead to fouling I believe, I have had that happen before on one car that would foul the plugs after idling or running too slow for too long a time. I would have to take them all out clean them before the car would run again.
[This message has been edited by Xanth (edited 08-23-2007).]
IP: Logged
05:30 PM
Aug 24th, 2007
Fieroseverywhere Member
Posts: 4242 From: Gresham, Oregon USA Registered: Mar 2006
so should i get the 8mm plug wires or the 8.5mm? will it actually make any difference in performance? how about cold plugs? i hear they actually disapate heat faster which is better for your engine, is there any truth to that?
If you want your plug wire to fit in the stock routing position you should probably get stock size wires. On a low HP motor there is no benifit to big expensive wires and plugs. The heat at which a plug burns is more important. For stock motors I use AC delco. They work very well and are built to last. Good luck.
IP: Logged
10:45 AM
PFF
System Bot
Formula88 Member
Posts: 53788 From: Raleigh NC Registered: Jan 2001
Good quality wires are more important than the size. I use and recommend Taylor Spiro-Pro 8mm wires. You can get them from Summit Racing and they are red with white lettering, like the original wires. They also have the factory style spark plug boots and can use the OEM spark plug boot heat shields. The part number is TAY-74224 for the red wires. They are also available in blue and black.
If your engine is stock, you want to run the stock heat range plugs. A colder plug will foul and a hotter plug will overheat. You only run colder plugs if you've modified the engine where the combustion pressures and temps are higher, requiring a colder plug. I use either NGK UR5 or the factory AC Delco R42-TS plugs.
IP: Logged
11:02 AM
Mr.PBody Member
Posts: 3172 From: Cincinnati, Ohio, USA Registered: Oct 2006
I used Autolite #23s for my car. I saw a head off comparison of the stock delcos versus the Autolites. The Delcos stick one thread into the combustion chamber, and the back of the needle faces the intake port. The Autolites fit flush and the open part of the needle faces the intake ports. It was a $9.84 experiment I tried out, they seem to work fine but then again I had oil coated fouled Champions in there from the previous repairman. I don't know if there is really a improvement but I saw a dyno test online where they tried a 4cyl cavalier with the plugs in their stock location facing all over the place, then the put in plugs where the open part of the needle faced the intake port. It dynoed like a full 1 HP more woot woot. So who knows. Heres my pic
IP: Logged
12:54 PM
Qcksilver Member
Posts: 84 From: Magnolia, DE, USA Registered: Aug 2006
Good quality wires are more important than the size. I use and recommend Taylor Spiro-Pro 8mm wires. You can get them from Summit Racing and they are red with white lettering, like the original wires. They also have the factory style spark plug boots and can use the OEM spark plug boot heat shields. The part number is TAY-74224 for the red wires. They are also available in blue and black.
If your engine is stock, you want to run the stock heat range plugs. A colder plug will foul and a hotter plug will overheat. You only run colder plugs if you've modified the engine where the combustion pressures and temps are higher, requiring a colder plug. I use either NGK UR5 or the factory AC Delco R42-TS plugs.
Sweet! Thanks for the info and the link. I will probably go with these wires from summit racing since I definately want to use the stock boot heat shields. I just bought chrome powdercoated boot covers so it would be a shame to not be able to use them. Thanks again.
Plugs can be aligned on the front side of V 6! but index mark plug then mark spark plug socket being care full to place plug wrench in sequence with mark on plug yes this is worth doing because it adds small gain in hp and efficiency of engine with no cost once you do this it is easy the next time and only adds 10 minutes to install time.. I use to do this on 2 cyl triumph & BSA motorcycle engines along with carefull plug gaping it was very effective plug gaps must be uniform center electrode must be in perfecft aligment with hook that comes over it,, the spark plugs are often misaligned out of the box.. I use the sliding scale ajuster now but a wire gapper is the only way to fly for performance this is one of the details used in building race engines,with proper gap and index there is small gain (very small) this is worth while to person who values performance (former moped mechanic)
IP: Logged
01:51 AM
Mr.PBody Member
Posts: 3172 From: Cincinnati, Ohio, USA Registered: Oct 2006
i ordered the taylor wires (TAY-74224) today and called every autozone near me for the DR2012G distributor & rotor kit but no one has red ones in stock, only gray. I looked on the Autozone web site and it comes up with this http://www.autozone.com/sku...rtProductDetail2.htm Check it out, the brand is Gold. ?? is this good or bad? anyone ever heard of it? it does look red, sort of. Any suggestions?
IP: Logged
01:39 PM
2002z28ssconv Member
Posts: 1436 From: Orlando, FL Registered: Jun 2005
And if you don't have a swivel socket, extension, or vacuum/air coompressor that fits back there... or if your arms are just too big to fit between the firewall and the engine, or if you just want to be able to have a visual inspection before pulling the plugs out...
Removing the dogbone and two cradle bolts under the rear bumper will allow the entire engine to tip away from the wall when you lift the back of the car. It's easy and takes less than 10 minutes.
[This message has been edited by 2002z28ssconv (edited 08-26-2007).]
IP: Logged
01:58 PM
Qcksilver Member
Posts: 84 From: Magnolia, DE, USA Registered: Aug 2006
And if you don't have a swivel socket, extension, or vacuum/air coompressor that fits back there... or if your arms are just too big to fit between the firewall and the engine, or if you just want to be able to have a visual inspection before pulling the plugs out...
Removing the dogbone and two cradle bolts under the rear bumper will allow the entire engine to tip away from the wall when you lift the back of the car. It's easy and takes less than 10 minutes.
by "tip away from the wall" you mean tilt back exposing the plugs better right? Also by "lift the back of the car" you mean use a jack on the rear i'm sure, but any particular spot that's better to make this tilt happen? I've heard of this "tilting the engine" thing before but does it really work? does it damage anything that's connected around the engine or does every wire & metal or rubber line have enough play to do this without something breaking or becoming disconnected? a friend told me about this but he said let the car roll forward or back (which ever makes the engine tilt in your favor) a little, not the using a jack and lifting the car method. thanks for the info.
IP: Logged
02:11 PM
2002z28ssconv Member
Posts: 1436 From: Orlando, FL Registered: Jun 2005
Right, the weight of the car is still on the wheels, therefore cradle, therefore no tilt. You will have to lift the back of the car to get the cradle to seperate from the frame. If you have jackstands, lift the car with a jack centered under the rear cradle crossmember. Throw a couple jack stands under the stock lift points and slowly lower the jack. If you drop it too far you CAN do some damge. But the 2-3" we're talking about here... it will be fine. The coolant hoses will flex. The clutch line will flex. The engine will hit the trunk before anything elses will bust. It's basically the same as what your friend said to do with removing the dog bone and using transmission to torque the engine away from the wall. The difference is that you won't be fighting against the motor/transmission mounts, possibly tearing them.
IP: Logged
02:48 PM
Qcksilver Member
Posts: 84 From: Magnolia, DE, USA Registered: Aug 2006
I got ya, 2002z28ssconv. thanks for the tip. any advice on my earlier question above about the distributor cap & rotor kit from autozone? I've been trying to find a red one to match the engine but it's getting very hard to find a company with a red one. everyone tells me autozone but the only one they have isn't msd, wells or conrad like they say i sould get. anyway what do i do, should i just go with the one on the autozone web site that i listed above or get a different one and maybe just paint it? any help or advice would be great from anyone. thanks
IP: Logged
02:58 PM
PFF
System Bot
2farnorth Member
Posts: 3402 From: Leonard, Tx. USA Registered: Feb 2001
Right, the weight of the car is still on the wheels, therefore cradle, therefore no tilt. You will have to lift the back of the car to get the cradle to seperate from the frame. If you have jackstands, lift the car with a jack centered under the rear cradle crossmember. Throw a couple jack stands under the stock lift points and slowly lower the jack. If you drop it too far you CAN do some damge. But the 2-3" we're talking about here... it will be fine. The coolant hoses will flex. The clutch line will flex. The engine will hit the trunk before anything elses will bust. It's basically the same as what your friend said to do with removing the dog bone and using transmission to torque the engine away from the wall. The difference is that you won't be fighting against the motor/transmission mounts, possibly tearing them.
If it's a stick shift don't drop it very far. The shifter cables won't stretch. I had to take my shifter cables off when I did the front manifold. The 2-3 inches should be okay though.
IP: Logged
03:03 PM
Formula88 Member
Posts: 53788 From: Raleigh NC Registered: Jan 2001
Right, the weight of the car is still on the wheels, therefore cradle, therefore no tilt. You will have to lift the back of the car to get the cradle to seperate from the frame. If you have jackstands, lift the car with a jack centered under the rear cradle crossmember. Throw a couple jack stands under the stock lift points and slowly lower the jack. If you drop it too far you CAN do some damge. But the 2-3" we're talking about here... it will be fine. The coolant hoses will flex. The clutch line will flex. The engine will hit the trunk before anything elses will bust. It's basically the same as what your friend said to do with removing the dog bone and using transmission to torque the engine away from the wall. The difference is that you won't be fighting against the motor/transmission mounts, possibly tearing them.
This is how I do it on my car, but I always have a problem with the center of gravity being too far aft. If I put jackstand just forward of the front cradle mounts (still aft of the stock jacking locations), the entire car wants to pivot down when I try to lower the cradle. I have to take the rear wheels off and put them on the hood for ballast to get the weight to balance out.
If you disconnect all the necessary hoses and cables, you should be able to drop the rear of the cradle quite a ways without it hitting the rear trunk wall. That's how I've changed the clutch on my car in the past.
IP: Logged
03:55 PM
2002z28ssconv Member
Posts: 1436 From: Orlando, FL Registered: Jun 2005
Don't disconnect the front bolts. Those are a pain to get lined back up.
Also don't use a jack under the trunk floor. It will collapse.
By supporting the cradle with the jack, it is supporting most of the weight of the engine. I you have the jack stands directly in front of where the cradle mounts to the body of the car, you'll have plenty of weight to keep the front down. Again, just lower it slowly and watch for any obstructions or hoses/lines/wires/cables getting too tight.
[This message has been edited by 2002z28ssconv (edited 08-26-2007).]
IP: Logged
05:28 PM
Qcksilver Member
Posts: 84 From: Magnolia, DE, USA Registered: Aug 2006
I got ya, 2002z28ssconv. thanks for the tip. any advice on my earlier question above about the distributor cap & rotor kit from autozone? I've been trying to find a red one to match the engine but it's getting very hard to find a company with a red one. everyone tells me autozone but the only one they have isn't msd, wells or conrad like they say i sould get. anyway what do i do, should i just go with the one on the autozone web site that i listed above or get a different one and maybe just paint it? any help or advice would be great from anyone. thanks
Thanks for the tips to all. I'm so glad there is a forum like this! any advice about my distributor cap & rotor kit issue? I quoted it here so you wouldn't have to look for it.
IP: Logged
06:56 PM
Formula88 Member
Posts: 53788 From: Raleigh NC Registered: Jan 2001
Don't disconnect the front bolts. Those are a pain to get lined back up.
Also don't use a jack under the trunk floor. It will collapse.
By supporting the cradle with the jack, it is supporting most of the weight of the engine. I you have the jack stands directly in front of where the cradle mounts to the body of the car, you'll have plenty of weight to keep the front down. Again, just lower it slowly and watch for any obstructions or hoses/lines/wires/cables getting too tight.
That's how I do it. Jack under the center of the rear cradle crossmember, and jack stands just in front of the front cradle bolts.
IP: Logged
07:20 PM
Formula88 Member
Posts: 53788 From: Raleigh NC Registered: Jan 2001
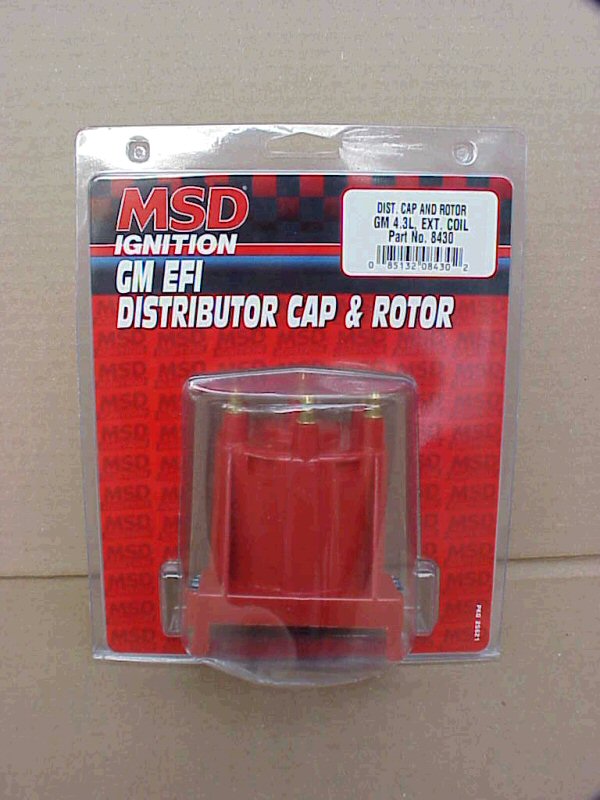
MSD makes a red distributor cap with brass contacts for the Chevy 4.3 V6. It works on the 2.8 as well. That's what I'm running on my Formula.
It's available from Summit Racing. Part number: MSD-8430
Formula88 is correct, that is the cap and rotor.
Part number, MSD-8430, Wells DR2012-G, Conrad DR-2012-G. They may be produced by the same manufacturer as they all have brass contacts and quality appears to be equal.
IP: Logged
08:05 PM
Qcksilver Member
Posts: 84 From: Magnolia, DE, USA Registered: Aug 2006