Just a couple of pics and notes from changing out my A/C compressor today.
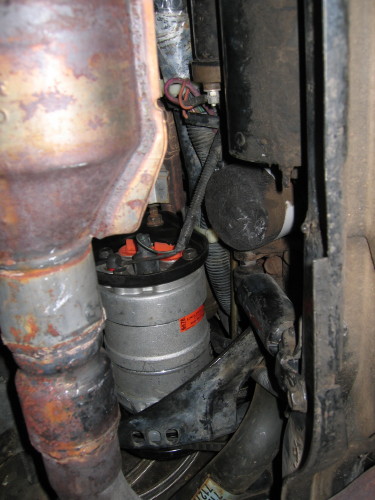
When taking the compressor out it was easier to get to the top right hand (closest to the compressor clutch) mounting bolt if the left hand mount plate (the one that bolts to the rear of the compressor) is completely removed first. Then you can reach it at a slight angle with a 6" extension and ratchet. I was able to remove the compressor by prying the exhaust forward and squeezing the unit between the cradle cross-member and the exhaust. This was not easy at all and I may consider just dropping the exhaust next time.
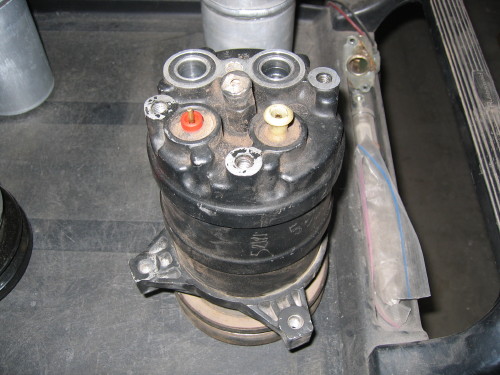
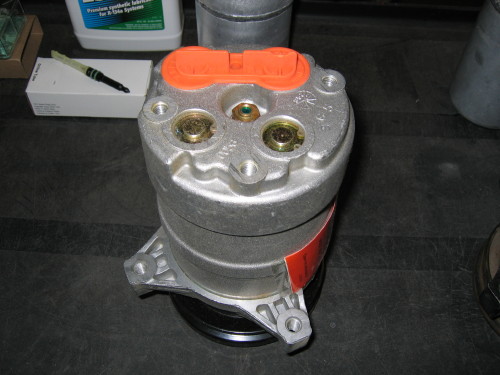
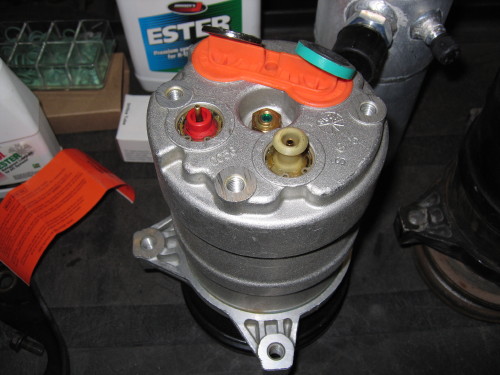
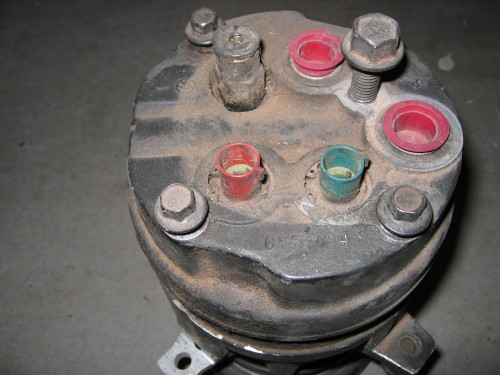
The pics show the old and new compressors. I had to remove, clean and transfer the pressure switches on the back of the compressors.
You can use either PAG or Ester oil with a 134a system. GM recommends PAG. I am using Ester. I have had good luck with both. Just don't mix them.
It is a good idea to change the orifice tube and accumulator when changing the compressor. Also it is a good idea to flush the system with a suitable solvent.
I always use new o-rings whenever a connection is opened.
When putting the new compressor back in you will find it difficult to tighten the top right hand mounting bolt unless you have a special wrench. If you wait until you get that bolt on and tight before installing the left hand mounting plate you can tighten the right hand top bolt as tight as you want (with the belt in place and snug) and then install the left hand mounting plate. (the one on the rear of the compressor) I could have gotten pics of this but it was such a hassle getting the compressor up between the exhaust and cradle that I was too tired and greasy to grab the camera. It took two hours to get the compressor mounted back on the car. About 1 hour and 45 minutes to cram it up there and 15 minutes to get the bolts in. sigh....
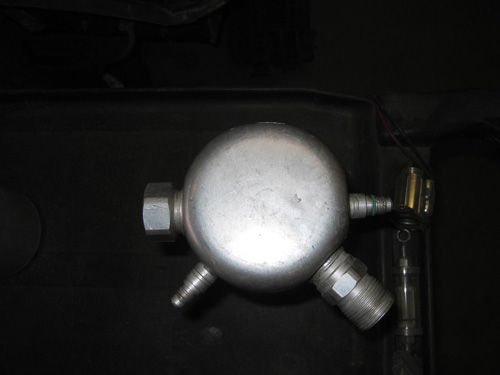
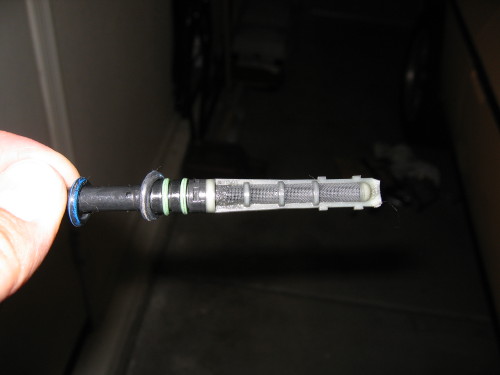
Here is the old accumulator, note how the smaller schrader valve ports are close to the inlet and outlet ports
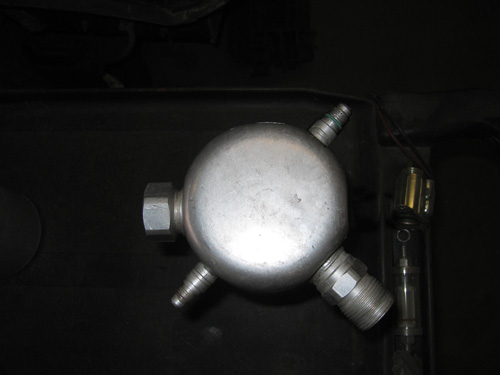
Here is a quick photo-shop to show how the new part number from GM looks. This will not work on the cars that use a low pressure cycle switch.
I had to take back the GM accumulator and get this "Cool Air & Electric" # 33181, 207-564 to have one that matches the original equipment.
Old compressor, worked great until it threw a rod.
New compressor with switch plugs.
New compressor with switches installed
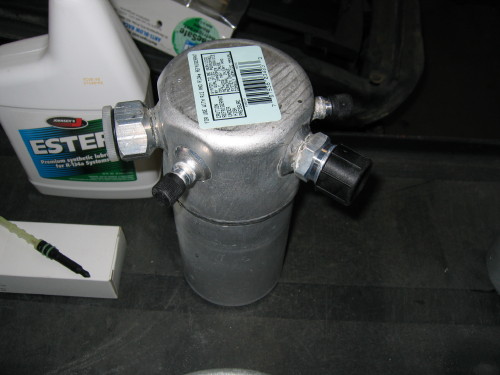
O-rings, orifice tubes (using the vov style this time) and Ester oil
Comments and corrections welcome.
IP: Logged
03:10 AM
PFF
System Bot
cptsnoopy Member
Posts: 2587 From: phoenix, AZ, USA Registered: Jul 2003
I went back out to start flushing the system. I took the lines off the condenser only to find that the condenser is a parallel condenser and it cannot be flushed easily. I will have to buy a new one. Normally this is not required but if the compressor fails or other contamination is known or suspected to be in the system, all the parts need to be flushed, just to be sure.
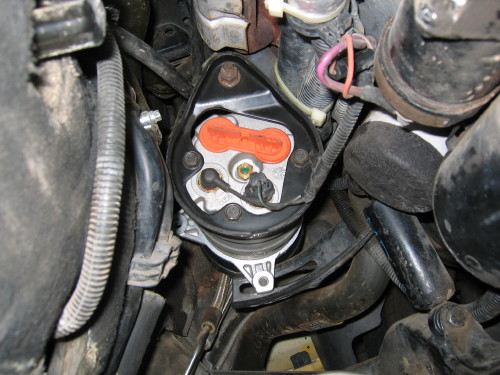
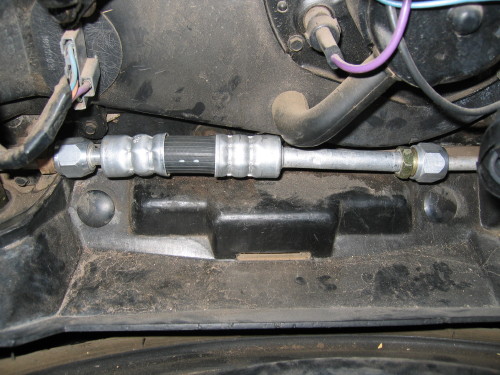
Here is a shot of the compressor installed. The lines will be installed after the rest of the system has been flushed.
Here is the space that the compressor was forced through. Not quite enough room for this...
This is what a contaminated orifice tube looks like. Not too bad but still some crud.
This is where the orifice tube is located. Under and behind the accumulator. (the accumulator is removed in this photo)
This is why I need to replace the condenser. I cannot guarantee that both paths (sets of tubes) will get clean. If one is blocked the solvent and air pressure can just go through the other tube.
IP: Logged
04:32 AM
StockGT Member
Posts: 386 From: O.C. , California Registered: Feb 2007
Good tip on the accumulator ! The wrong part is GM # 2724666 or ACDelco # 15-1585 for V6 applications ?
What brand and p/n did you use for the compressor and orifice tube ?
Will you be adding an inline filter ? Will you be changing the pressure cycling switch ? I would like to know the temperature of the air blowing from the vents, once your conversion is complete. Yes, getting the AC working is on my "Needs Fixing" list.
IP: Logged
11:03 AM
Brian Lamberts Member
Posts: 2691 From: TUCSON AZ USA Registered: Feb 2003
I would like to know the temperature of the air blowing from the vents, once your conversion is complete. Yes, getting the AC working is on my "Needs Fixing" list.
When the conversion is done correctly (and carefully) the outlet temperature should be 34 degrees F. The Fiero AC system is "transplanted" from a larger car; I think it's from a Citation. There's lots of reserve capacity, so even using the less efficient R134A there'll still be plenty of cooling.
IP: Logged
04:19 PM
Whuffo Member
Posts: 3000 From: San Jose, CA Registered: Jul 2003
The updated GM part number for the accumulator is 2724666 and ACDelco # 15-1585. These are the correct numbers but the updated part does not work for any Fiero that uses a pressure cycle switch. The parts guy at OneSource auto was able to find an after market part for the old version which does work. If all we had available were the ACDelco part then you could probably make it work by extending the wires and putting the pressure cycle switch on the front port pointing forward. That would still make it difficult to hook up the low side refrigerant hose on the port pointing aft.
The HR-6 (called H-6) on this compressor is a new unit from Harrison. It is right around $400. GM # 1136478, ACDelco # 15-20248
The orifice tube is an aftermarket type called a VOV. It is supposed to give a little better cooling at lower RPM's. They cost $28 each compared to around $5 for the stock orifice tube so you really have to want it to pay the extra money. I am hoping that I will not need to open the system again for a long time so I opted for the VOV. The part number is V2002 for the standard duty and V2003 for extreme duty (Phoenix, AZ). the 4seasons part numbers are 38902 (V2002) and 38904 (V2003).
I will not be adding an inline filter but I do think it is nice insurance just in case.
I probably will change the pressure cycling switch. I changed it two years ago when the stock one started acting up. You can buy these for under $20 that are already adjusted for 134a.
I will post the OAT vs the temp blowing out of the vents if this works...
IP: Logged
04:32 PM
cptsnoopy Member
Posts: 2587 From: phoenix, AZ, USA Registered: Jul 2003
When I replaced my 87 2.5l commpressor I couldn't get the old high and low pressure sensors out of the back of the compressor no matter what. Was very careful but still broke them trying to get them out and had to buy new.
What is the "magic" trick to get those out. Looks like you did successfully.
IP: Logged
08:13 PM
cptsnoopy Member
Posts: 2587 From: phoenix, AZ, USA Registered: Jul 2003
When I replaced my 87 2.5l commpressor I couldn't get the old high and low pressure sensors out of the back of the compressor no matter what. Was very careful but still broke them trying to get them out and had to buy new.
What is the "magic" trick to get those out. Looks like you did successfully.
After pulling the snap rings out, I used a small flat blade screw driver to clean the crud out of the hole that is just above the switch body. Then I very carefully pulled and rocked the switch until the o-ring let go and it came out. I used a crescent wrench below the lip that holds the plug on the bottom switch and a pair of pliers to pull on the red switch. I figured that there was a very good chance of breaking the switches but I got lucky this time.
IP: Logged
09:08 PM
PFF
System Bot
cptsnoopy Member
Posts: 2587 From: phoenix, AZ, USA Registered: Jul 2003
I ripped out the condenser mounting nuts (rubber well nuts) and I did not have time to wait for shipping if I ordered them online. My friend (who will someday paint my 88GT) mentioned that he had seen some at ACE hardware so off to the store I went. To my surprise, he had seen them and they seem to fit perfect. I got 4 of them along with 4 washers and bolts (1/4x20) for just under $7. I don't know if they are as good as the stock ones but they should work for now.
New setup on the top, old one on the bottom.
IP: Logged
10:43 PM
Aug 16th, 2007
cptsnoopy Member
Posts: 2587 From: phoenix, AZ, USA Registered: Jul 2003
The coldest air I saw was 36f but for the most part it was right on 40f. This was with 90f ambient and the a/c set to max and full blower. Now to see how long it lasts.
I'm in the process of converting to R-134a, so I've already replaced the accumulator & orifice tube (Advance Auto $2.88). The problem I'm running into, though, is the low side pressure shoots up to under 50psi and the compressor cuts-off, then re-engages & shoots up again to 50 again. So, with high pressure on the low side and low pressure on the high side, would you think this is more of a problem w/ the compressor itself, or the switches on the compressor?
Also, if the above pictures, what switch does what? I know one must be the high, the other the low. Thanks!
------------------ -jason '88GT (5spd) '90GTZ
IP: Logged
05:23 PM
cptsnoopy Member
Posts: 2587 From: phoenix, AZ, USA Registered: Jul 2003
I'm in the process of converting to R-134a, so I've already replaced the accumulator & orifice tube (Advance Auto $2.88). The problem I'm running into, though, is the low side pressure shoots up to under 50psi and the compressor cuts-off, then re-engages & shoots up again to 50 again. So, with high pressure on the low side and low pressure on the high side, would you think this is more of a problem w/ the compressor itself, or the switches on the compressor?
Also, if the above pictures, what switch does what? I know one must be the high, the other the low. Thanks!
That actually sounds backwards. Your low side pressure should slowly drop and then if it gets too low the compressor should cycle off and then back on. The only time your low side pressure should increase with the compressor running is if you add more air over the evap. coils. (turning the fan on high from low)
Double check your connections to the gauges. what is your pressure on the low and high side with the system off? They should be equal and around 80 to 110psi. When the compressor starts running the low side should immediately drop and the high side should rise. The low side should run in the range of 20 to 50 psi (when cycling) and the high side should run around 200 to 300psi) I don't like to see the high side more than 300 though.
If your system is doing what you describe then something is not working and I don't think the switches can cause the low side to rise with the compressor running.
IP: Logged
06:58 PM
cptsnoopy Member
Posts: 2587 From: phoenix, AZ, USA Registered: Jul 2003
On my 87 the pressure switches had 2 contacts and not as much plastic to get ahold of. They just shattered when I tried to wiggle them out.
Just a note for anyone doing this with a 87 or 88.
Was that a v-5 compressor from a 4cylinder Fiero? I will be trying to swap switches on one of those for my 88 in the near future. I may have the same luck you had.
Yes it was the V-5, my switches in the back had two pin conectors and would not come out. There wasn't enough plastic sticking out to get ahold of and it just broke off.
I ordered new switches and installed those, probably for the best because the new ones were correct for r-134a.
The 87 and I imagine the 88s do not have a switch in the front on the accumulator, everything is on the back of the compressor as far as I can tell.
IP: Logged
07:39 PM
cptsnoopy Member
Posts: 2587 From: phoenix, AZ, USA Registered: Jul 2003
Yes it was the V-5, my switches in the back had two pin conectors and would not come out. There wasn't enough plastic sticking out to get ahold of and it just broke off.
I ordered new switches and installed those, probably for the best because the new ones were correct for r-134a.
The 87 and I imagine the 88s do not have a switch in the front on the accumulator, everything is on the back of the compressor as far as I can tell.
I believe you are correct for the 4cylinder cars but I am pretty sure the 6cylinder cars had the DA-6 and a low pressure clutch cycle switch through 88. Here is a pic of my old V-5 with the switches. I would love to know what these switches are for. I should get new ones also since I plan on using 134a.
The updated GM part number for the accumulator is 2724666 and ACDelco # 15-1585. These are the correct numbers but the updated part does not work for any Fiero that uses a pressure cycle switch. The parts guy at OneSource auto was able to find an after market part for the old version which does work. If all we had available were the ACDelco part then you could probably make it work by extending the wires and putting the pressure cycle switch on the front port pointing forward. That would still make it difficult to hook up the low side refrigerant hose on the port pointing aft.
I bought an accumulator off of ebay - in typical ebay fashion, it says it is the right one for my car, but how can I tell for sure?
IP: Logged
01:48 PM
cptsnoopy Member
Posts: 2587 From: phoenix, AZ, USA Registered: Jul 2003
Originally posted by Madess: I bought an accumulator off of ebay - in typical ebay fashion, it says it is the right one for my car, but how can I tell for sure?
Check the numbers that you quoted against what the ebay seller is using. If they are using a different manufacturer then you may need to see if you can get their cross-reference number. The top picture in this thread is what the accumulator should look like. (along with the one I show as new.)
IP: Logged
06:21 PM
spark1 Member
Posts: 11159 From: Benton County, OR Registered: Dec 2002
Yes it was the V-5, my switches in the back had two pin conectors and would not come out. There wasn't enough plastic sticking out to get ahold of and it just broke off.
I ordered new switches and installed those, probably for the best because the new ones were correct for r-134a.
The 87 and I imagine the 88s do not have a switch in the front on the accumulator, everything is on the back of the compressor as far as I can tell.
The high and low cut-out switches on the V5 are there to protect the compressor. The same switches work for either R12 or R134a.
[This message has been edited by spark1 (edited 08-17-2007).]
IP: Logged
10:41 PM
Rocky Top Member
Posts: 139 From: Greeneville, Tennessee Registered: Nov 2004
I'm not an A/C guru by any means. But . . . . . I have an 86 4-cyl. coupe and recently had a "new" compressor from O'Reilly's installed by an experienced A/C man. Also replaced the evaporator canister and orifice tube. Used R-134.
As I understand it the compressors used on the 4-cylinder cars are what they call variable displacement compressors. Don't cycle on and off like the ones used on 6-cylinder Fieros. Makes filling with refrigerant somewhat more difficult for some reason.
Don't ask me how they work. All I know is I push the A/C button and it works.
Mine has been working fine all summer. Has been over 95 here most of the past two or three weeks. Reached 102 a couple days ago. Was 98 today.
IP: Logged
11:30 PM
Aug 18th, 2007
cptsnoopy Member
Posts: 2587 From: phoenix, AZ, USA Registered: Jul 2003
I'm in the process of converting to R-134a, so I've already replaced the accumulator & orifice tube (Advance Auto $2.88). The problem I'm running into, though, is the low side pressure shoots up to under 50psi and the compressor cuts-off, then re-engages & shoots up again to 50 again. So, with high pressure on the low side and low pressure on the high side, would you think this is more of a problem w/ the compressor itself, or the switches on the compressor?
Also, if the above pictures, what switch does what? I know one must be the high, the other the low. Thanks!
That sounds like what I am experiencing. I replaced the compressor and accumulator?(aluminum canister). Using one of those R134a conversion kits I started to put in the first can. The compressor kicked on and the pressure started climbing in to what the gage called the "alert zone". Then it kicked off and the pressure dropped. The compressor then kicked back on and the pressure climbs again. It just repeats the cycle over and over again.
The instructions say to put in a whole can first, but after installing just 1/4 can the pressure gets in the alert zone and I am afraid of tearing something up.
Anyone know what I am doing wrong?
IP: Logged
03:02 AM
sjmaye Member
Posts: 2468 From: Hendersonville, TN USA Registered: Jun 2003
I just tried putting in more freon and it stopped the AC compressor cycling. Now is cooling great. I guess it was just low on freon. Needle now stays in the safe/filled zone.
[This message has been edited by sjmaye (edited 08-18-2007).]
IP: Logged
10:24 AM
josef644 Member
Posts: 6939 From: Dickinson, Texas USA Registered: Nov 2006
I you are installing a V5 you also need to change the compressor control valve. About $85.00 from Napaonline.com . They always come with a R12 valve, and you have to add the 134A on to the compressor. Another way of bleading tyhe cash from your pocket. If you dont change it you are wasteing your time and money. I also purchased new pressure switches from them and the new connectors. If you have a V5 then you don't have a cycleing switch on the accumulater. They don't use one. This has nothing to do with 6 or 4 cylinder, it depends on the compressor that was installed. This is right out of the Pontiac factory repair manuel
IP: Logged
05:33 PM
Aug 19th, 2007
cptsnoopy Member
Posts: 2587 From: phoenix, AZ, USA Registered: Jul 2003
I you are installing a V5 you also need to change the compressor control valve. About $85.00 from Napaonline.com . They always come with a R12 valve, and you have to add the 134A on to the compressor. Another way of bleading tyhe cash from your pocket. If you dont change it you are wasteing your time and money. I also purchased new pressure switches from them and the new connectors. If you have a V5 then you don't have a cycleing switch on the accumulater. They don't use one. This has nothing to do with 6 or 4 cylinder, it depends on the compressor that was installed. This is right out of the Pontiac factory repair manuel
Good info about the compressor control valve. I have a new compressor and I suspect that you are correct about it still being setup for r-12. I have asked several a/c folks about it and they all said don't worry about it. Only online have I come across information that supports changing the valve to get the correct pressures for 134a. I will check with Napaonline.com. Thanks for the link.
Now, here is your challenge, find me a stock fiero 6cyl with a v-5 compressor installed from the factory. I agree that they don't use the ccs but everything I have read about the fiero a/c up to this point indicates that only the 4cyl's came with the v-5. That does not mean I am correct, I have not seen anything that refutes that yet. The easy check would be to see if the ccs is installed on the accumulator. If not it is a v-5. The only 88 that I have seen up close is mine and it was a 4cyl base coupe. Other later model fiero's may all have the v-5...
IP: Logged
12:52 AM
cptsnoopy Member
Posts: 2587 From: phoenix, AZ, USA Registered: Jul 2003
That sounds like what I am experiencing. I replaced the compressor and accumulator?(aluminum canister). Using one of those R134a conversion kits I started to put in the first can. The compressor kicked on and the pressure started climbing in to what the gage called the "alert zone". Then it kicked off and the pressure dropped. The compressor then kicked back on and the pressure climbs again. It just repeats the cycle over and over again.
The instructions say to put in a whole can first, but after installing just 1/4 can the pressure gets in the alert zone and I am afraid of tearing something up.
Anyone know what I am doing wrong?
Are you connecting the pressure hose from the freon can to a port on the accumulator or on the high pressure side below the accumulator and more towards the middle of the car?
[This message has been edited by cptsnoopy (edited 08-19-2007).]
IP: Logged
12:54 AM
PFF
System Bot
sjmaye Member
Posts: 2468 From: Hendersonville, TN USA Registered: Jun 2003
Originally posted by cptsnoopy: Are you connecting the pressure hose from the freon can to a port on the accumulator or on the high pressure side below the accumulator and more towards the middle of the car?
No. I am connecting at the connection at the top of the accumulator between the two large aluminum pipes. I believe this was the low side as I am still living
IP: Logged
03:19 AM
cptsnoopy Member
Posts: 2587 From: phoenix, AZ, USA Registered: Jul 2003
No. I am connecting at the connection at the top of the accumulator between the two large aluminum pipes. I believe this was the low side as I am still living
Lol, yup that is the right one...
IP: Logged
08:11 AM
spark1 Member
Posts: 11159 From: Benton County, OR Registered: Dec 2002
Here is a condensed Q & A from another forum that discussed the V5 control valve swap three years ago: (edited)
quote
Q.....I looked through all the little tags that came with my Four Seasons compressor and it states that the control valve is for a R12 system and to change it to retrofit. I'm assuming I'd have to buy a new GM compressor to get a universal one now?
A.....I created that tag before we found out about the consolidation. (I was the Compressor Product Manager for Four Seasons up until about 4 months ago).
Four Seasons tests and sets all their control valves to the middle of the tolerance. When they don't have good valves, they use new ones, which are set at the mid range.
They just haven't yet discontinued the tag. Don't buy a new control valve. They have 2 numbers; one for R12 and one for R134a - it's the same exact part.
edit: The 4-Seasons catalog still has this note in the Fiero replacement V5 specification (57274):
quote
This compressor is equipped with an R12 Control Valve. If retrofitting to R134a, Control Valve 38846 is recommended for optimum system performance.
edit: The valve number (38846) is still good but it doesn't come up in an online catalog search. It's there when cross-referenced to the OEM valve p/n 2724790 used on the V5 after 1993 (R134a). The earlier R12 valve (2724331) does not cross to a 4 Seasons number in the current catalog.
I think you may get either valve when buying a rebuilt compressor. The only possible problem in using the newer valve with R12 is evaporator icing from running too cold. Using an R12 valve with R134a is less than ideal and may raise vent temperatures a few degrees. The valves are color coded with a dot on the end. I think the red dot is R134a and the brown is R12 but that's just a guess.
Also, GM recommends using a special PAG compressor oil in retrofit V5 systems. The part number is 12346292 or ACDelco 15-100.
[This message has been edited by spark1 (edited 08-24-2007).]
Good info on the control valve issue, When I bought my new compressor I asked about the control valve and they told me it "should be 134a". Of course they were just guessing.
I was wondering if I should re-do the valve.
IP: Logged
04:55 PM
josef644 Member
Posts: 6939 From: Dickinson, Texas USA Registered: Nov 2006
spark1 I dont know what to tell ya except I have a friend who does this all day long here for a living. He told me to change it. He is the type of guy you will beleive when he gives his advice. I had them both out side by sude, and they were different. He hates comebacks, and fixes them right the first time. Also here is a link to Napaonline.com I hope it will work. If not go to Napaonline and enter 207069 into the NAPA part number box and then click the GO button. Link http://www.napaonline.com/m...=430&PartNum=207069. There is a picture of it there also. It was a real easy thing to change before I installed my compressor. Under two minuets. I know $80.00 is a lot of money. I hate sweat dripping off of my forehead while I am driving down the road. Money well spent.
IP: Logged
05:19 PM
josef644 Member
Posts: 6939 From: Dickinson, Texas USA Registered: Nov 2006
cptsnoopy those two switches are important . The High side interupts the clutch if the internal pressure gets to high. It will release again when the internal pressure drops to a certain point, some where above 265lbs. Give or take a dab or two. The low side switch is a safety switch to keep the power off to the compressor clutch until there is a predetermined minunum amount of pressure in the system. Approx. 75lbs , give or take a dab or two. Can you get by without them and wire around them? Yep . Do you want to? Not me.
Some of note I discovered by accident. The V5's have 4 mounting ears behind the clutch. Da6's have 3. Easy way to tell which compressor you have, besides the CCV at about 5 oclock mounted on the engine.
Joe Crawford Texas
[This message has been edited by josef644 (edited 08-19-2007).]
IP: Logged
05:38 PM
Aug 20th, 2007
cptsnoopy Member
Posts: 2587 From: phoenix, AZ, USA Registered: Jul 2003