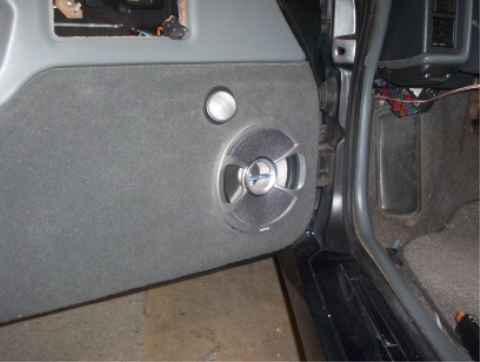
I took out the stock Fiero stereo and speakers and put in a 10 speaker F body Monsoon system. (I took out that system and installed a 12 speaker aftermarket system, and it is MUCH better now) But to do the door speakers I needed to sink the magnets into the doors. But I did not have the clearance to do it because of the window motors. They are right in the way. And the stock window bump stops are very large and wont allow a deep speaker hole. So I need to modify them also. This mod should allow a 6X9 to be flush mounted or even two smaller speakers.
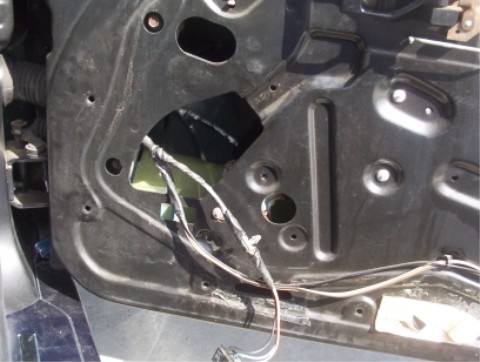
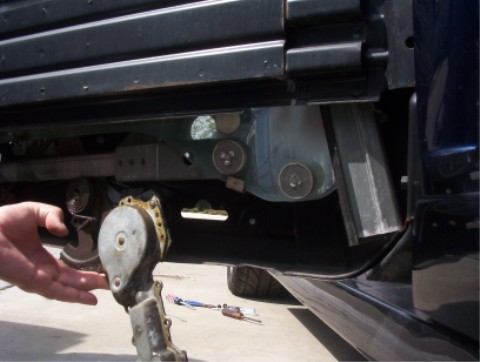
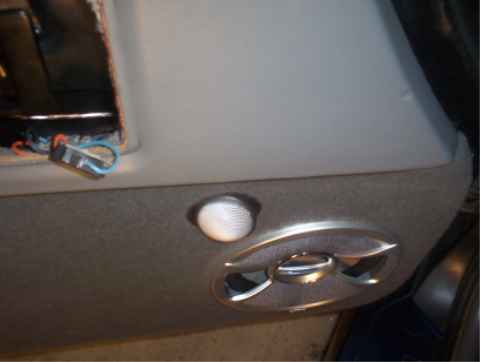
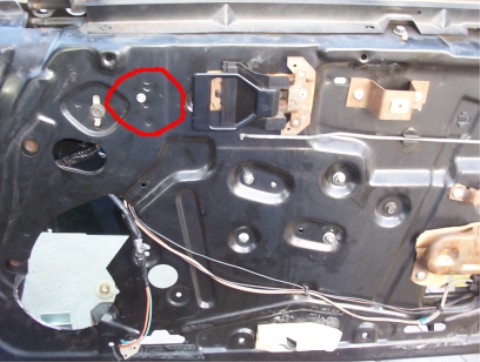
First I took off the inner door panel.
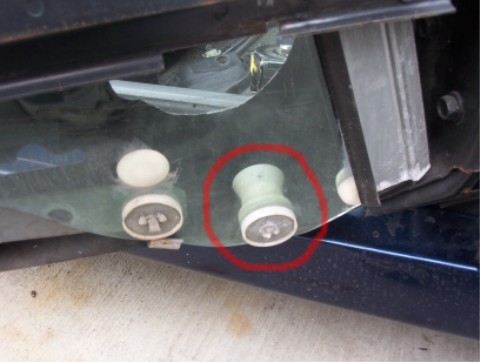
Then I marked the location of the speaker hole, you can see the rivet for the window motor inside the scribed marking.
Then I cut out the hole.
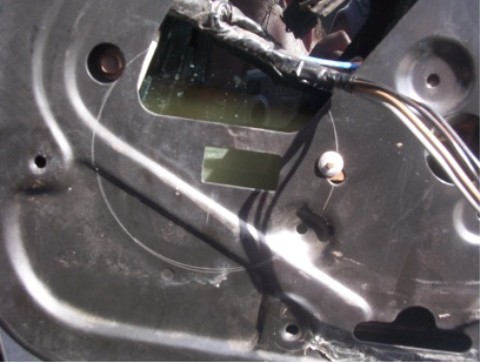
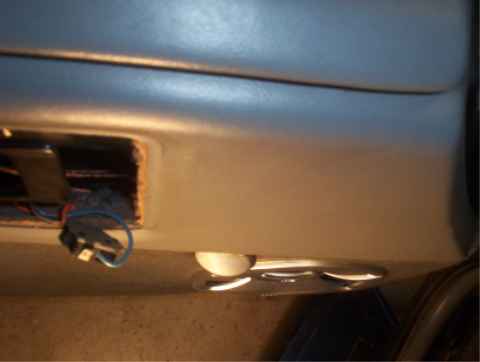
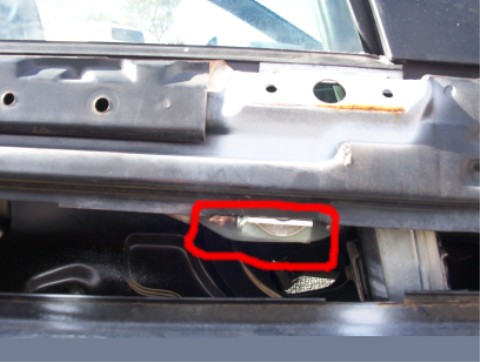
I had to take off the out door skin to get to the window motor.
I drilled out the 4 rivets that hold the window regulator assembly on.
I then rolled the window up all the way and took out the window regulator assem.
------------------
[This message has been edited by Rickady88GT (edited 03-28-2006).]
IP: Logged
02:59 PM
PFF
System Bot
Rickady88GT Member
Posts: 10649 From: Central CA Registered: Dec 2002
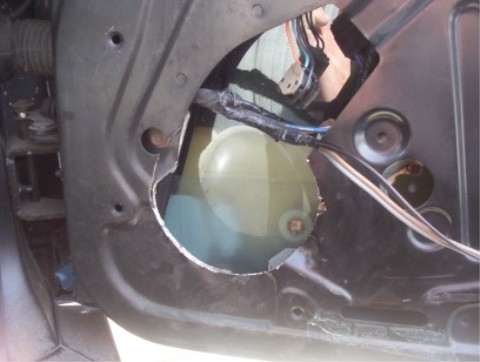
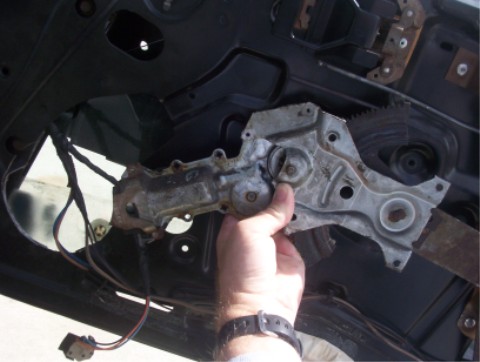
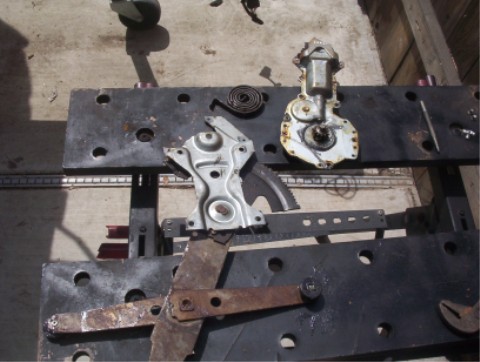
Holding the window reg on the out side of the door, this is the stock location of it.
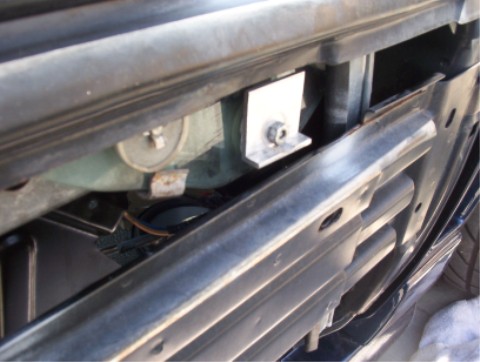
This is the new location of the window motor that will free up ALLOT of space for after market door speakers.
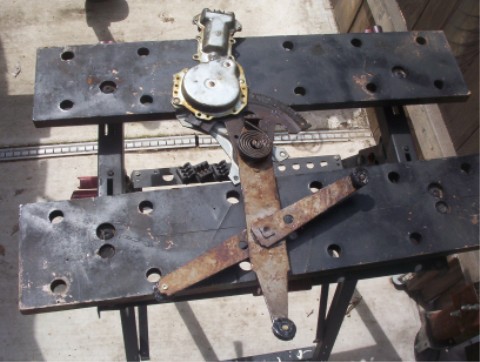
This is the reg with the motor rivets cut off. BE CARE FULL OF THE SPRING. You should "disarm" it before you remove the motor.
I cut off a piece of the reg bracket to relocate it on the reg body.
This is how it now sits on the regulator body. See how the cut out allows the top half to sit over the curves of the lower half.
I then spot welded the two halves together. I spot welded both sides.
I then installed the spring. The spring will go on easier if you move the reg to the full up position, Because the spring helps push the window up, it unwinds as the window goes up. So if the position of the reg is down the spring will need to be wound up to install it.
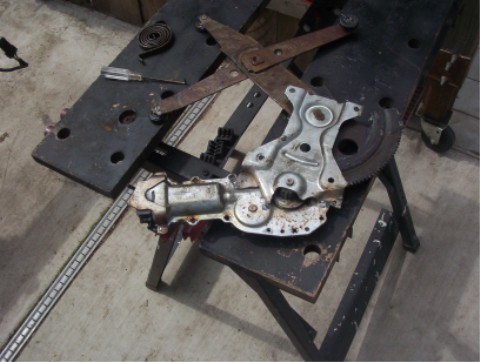
The window regulator is now ready to be installed into the door. The rivets will be replaced with bolts and nuts.
[This message has been edited by Rickady88GT (edited 03-28-2006).]
IP: Logged
03:35 PM
Rickady88GT Member
Posts: 10649 From: Central CA Registered: Dec 2002
I did the driver side first, but took very few pics. So I am doing the pass side and am taking pics to post as I go. So keep in mind that I did this mod for the F body Monsoon system and the speaker baskets required more room than the after market Infinity Kappa Components I am putting in now.
Looking at the pictures of the motor when you hold it outside, I was wondering... What if you would have swapped sides for the motors? Hence installing the driver motor on passenger door, and vice versa. Is that doable? Would save the truble of cutting/welding.
Swapping from left to right would put the forward arm toward the rear not upward as Rickady88GT has done. Then if it was turned over to get the arm forward and in the up possition would the glass armature still fit of would it want to go down?
[This message has been edited by Fiero1Fan (edited 03-28-2006).]
IP: Logged
04:44 PM
Rickady88GT Member
Posts: 10649 From: Central CA Registered: Dec 2002
Looking at the pictures of the motor when you hold it outside, I was wondering... What if you would have swapped sides for the motors? Hence installing the driver motor on passenger door, and vice versa. Is that doable? Would save the truble of cutting/welding.
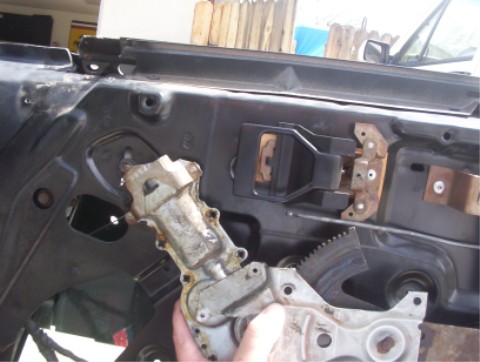
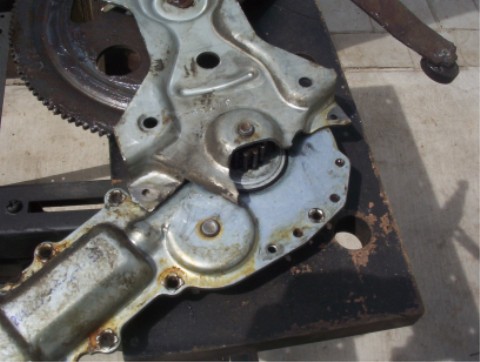
I never thought of that? But I would say that that wont work because just switching the two regs would mean redoing the mounts from the inside of the door to the out side of the door and the motor could interfere with some of the inner workings of the doors? I could think of several other problems with that kind of move too. This project looks complex but it only took me three hours or so to get to this point on one door. This mod keeps all the stock mounting points except one. The motor is now rotated or indexed up higher on the regulator so a new hole will need to be drilled for the end of the motor (the rivet that was inside the scribed line) I chose this location because it did not interfere with any of the window or door inner workings and allowed the entire lower front of the door to be freed up for speakers. If the motor is moved to the wrong location it could get hit by the window as it goes up or down? Basically all I did was take the motor off the reg assem and rotate it like a hand on a clock from the 7 o'clock to the 10 o'clock position then tack weld it back on the reg assem. Then all I need to do is bolt it back in place.
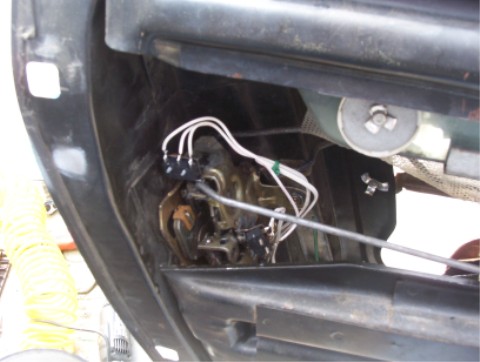
I relocated the wire harness but did not need to modify any wires.
IP: Logged
04:55 PM
Kristian V Member
Posts: 217 From: G�teborg / Sweden Registered: Feb 2006
I thought that by swapping the motors they would end up exactly where you welded yours. But since i never tamperd with those parts my self (Not yet!) I realized there might be some mecanical isues i can't se in the picture.
When you do the other door, hold the motor like you do on one of the pictures above, https://images.fiero.nl/pffimages/Door_mod_9.jpg then turn it 180 degrees so you get the motor pointing up, now the monting holes should be in position to install in the oposite door. and motor pointing up just like the one you welded.
If it doesent fit that way..? Well it was just an id�a...
I already did the driver side door and am carbon copying it on the pass side. But I think that the way the stock reg assem are made that it just cant be used in the opposite door. I had a stock reg some were? But cant find it to show you why it cant work that way. But the bottom line is that the roller bushings at the ends of the scissors will be a critical point of the window system. If they are out of whack then the window wont work.
IP: Logged
06:20 PM
fierce_gt Member
Posts: 1517 From: Winnipeg, Manitoba, Canada Registered: Oct 2002
that's awesome work! although i gotta be honest, i probably won't try it even though that would solve pretty much every speaker problem i've had. i hate working on those doors, so awkward to get to anything, and i always end up getting cut. so i definately respect the work that went into that, not only to install it, but also design it. plus from me for sure
IP: Logged
06:23 PM
PFF
System Bot
Rickady88GT Member
Posts: 10649 From: Central CA Registered: Dec 2002
that's awesome work! although i gotta be honest, i probably won't try it even though that would solve pretty much every speaker problem i've had. i hate working on those doors, so awkward to get to anything, and i always end up getting cut. so i definately respect the work that went into that, not only to install it, but also design it. plus from me for sure
I know what you mean, but by removing the outer door skin this really is painless
IP: Logged
06:29 PM
PaulJK Member
Posts: 6638 From: Los Angeles Registered: Oct 2001
I know what you mean, but by removing the outer door skin this really is painless
on a scale of 1-10, 1 being an oil change, 10 being doing a motor swap and not buying ANY parts for it(ie something really tough), where would you rate this project? to be honest it's the welding and the fact that i'm not really sure how the whole power window mechanism works that is scaring me most. but i'd LOVE to do this otherwise
IP: Logged
11:24 PM
Back On Holiday Member
Posts: 6238 From: Downingtown, PA Registered: Jul 2001
If you don't have the luxury of power windows...is this mod easier or more difficult? I guess it's power window motor vs. window crank clearance? I'm considering a FLUSH mount door speaker since seem people seem to kick the door carpet accidently getting in and out
If you don't have the luxury of power windows...is this mod easier or more difficult? I guess it's power window motor vs. window crank clearance? I'm considering a FLUSH mount door speaker since seem people seem to kick the door carpet accidently getting in and out
With or with out power windows you could cut a hole in the door for a speaker, but it would not help you that much with out modifying the window bump stop. The diameter or placement of the speaker could change to get around the window motor but the real problem is the huge plastic bump stop on the window. It only allows a small amount of speaker depth and needs to be cut down or better yet replaced with a custom stop. I don't have many pics of that mod yet.
I have done a 3100SFI with a 4 speed 4T60E engine swap in an 87 GT, a 3.5 DOHC all aluminum Short Star V6 with a 4 speed 4T65E and both were smog legal in CA, I have done two different types of power steering systems in 88 GT's and I would say the S* swap was by far the hardest thing I have ever done on a Fiero so that would be a 10. The 3100SFI was a MUCH more simple swap and most would say it is a 10 also (keep in mind I had to get it done the way the State of California wanted it done) but I would say it was a 8 or 9. the power steering would be a 6 and the window mod is a 3. The Sub box for this sound system was about as much work as the window mod. This is the third version of the box or Gen III. So I think that the final speaker box would have been MUCH easier if I did not have to R&D the entire thing. But before I did the first window mod on my driver door I have never seen the window mod either. So I did all that R&D too. So the pass side is a breeze after doing the driver door.
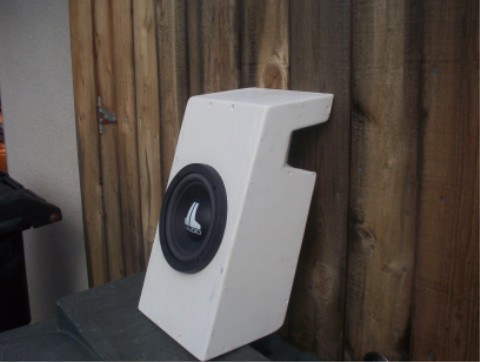
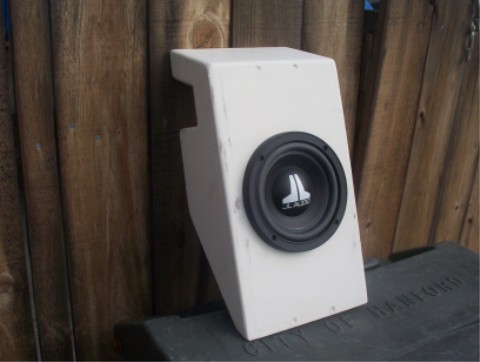
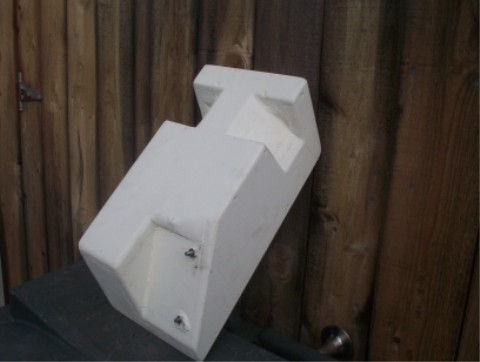
I made this box to fit under the stock center console. I took off the glove box door and will make a speaker grill to cover the the speaker. So the center console will look totally stock and have a sub in it.
[This message has been edited by Rickady88GT (edited 03-29-2006).]
IP: Logged
03:39 AM
Rickady88GT Member
Posts: 10649 From: Central CA Registered: Dec 2002
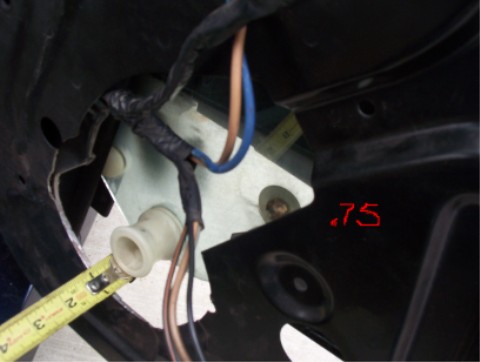
Today's progress. The depth of the speaker is limited to the height of the stock window stop. At about .75 the window stop does not give you much room. So I took it off and replaced it with a piece of aluminum angle stock that is about 2x2 and about .20" I don't know the exact specs because it was a piece of scrap from another project that seemed to work for this project
This is the stock Fiero window stop that I took off. I cut off the back side of the rivet and it just came right off.
This is a pic of the new window stop. It does not use the stock adjustable bump. It uses the impact beam as a stop. It is critical to drill the hole in the correct place so the window will roll up to the right height.
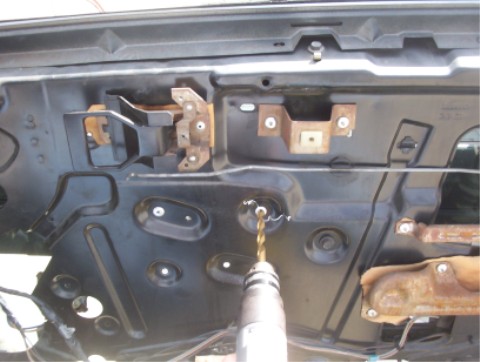
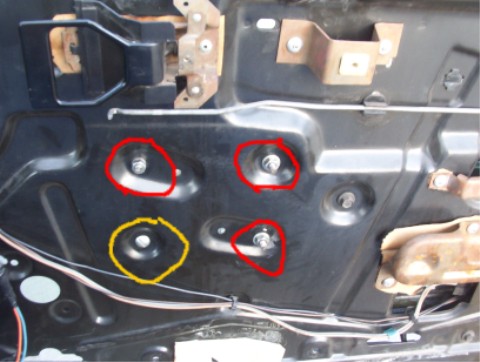
This is 4 of the 5 motor (regulator mounts) that I replaced with nuts and bolts. The red are standard bolts but the yellow one is inserted from the opposite direction because of the regulator gear clearance.
this is the 5th mounting bolt and is holding down the end of the motor.
This is the new bump stop hitting the the side impact beam. It is a good system......So far. I have had the driver side done like this for maybe a year? The only difference is that the stock adjustable stop is coated, but I cat tell the difference.
IP: Logged
11:51 PM
Mar 30th, 2006
Rickady88GT Member
Posts: 10649 From: Central CA Registered: Dec 2002
The wire harness is not modified but the plastic hold down was pulled out to stretch the harness closer to the new motor location. The new motor location is hard to reach with the wire connector so it may take a bit of Patience skills to get the plug on the motor. I had the motor at about half way up so I could get the plug on the motor so you may plug in the motor and test out the range of motion a few times before you bolt the reg assem in. Just set the reg at mid point before you bolt it in. You will not be able to plug in the motor then blot the reg to the door.
Now that the window motor has been moved, it is time to do a full down mod so the window will not stick up above the dew wipes at full down position.
You had mentioned that you use the piece of angle iron for the new window stop. As you are no longer using the plastic roller then you don't need the front bump stop that the roller hits up against. Correct? What about using that bump stop instead of the angle iron piece that you used? Or is the bump stop used for something else? I am wondering because that bump stop piece is coated with rubber and you wouldn't have the metal hitting metal like with the angle iron piece.
Timo
[This message has been edited by Fiero1Fan (edited 05-11-2006).]
IP: Logged
08:57 PM
Jun 12th, 2006
Fierofreak00 Member
Posts: 4221 From: Martville, NY USA Registered: Jun 2001
I forgot about this thread. The car sounds great. I would do this to all my Fieros, but the stereo equipment is too expensive to put in all my cars.
I did not use angle iron for the new window stop. It was angle Aluminum. Yes you could dip it in some type of coating, but I do not think I will. The window does not seem to bang as it stops. The mew bump stops are a very close fit. I don't think the stock stop will fit if you try to use it?
IP: Logged
01:15 PM
cjgable Member
Posts: 1198 From: Fort Worth, Tx, USA Registered: Dec 2001
Originally posted by Rickady88GT: I did not use angle iron for the new window stop. It was angle Aluminum. Yes you could dip it in some type of coating, but I do not think I will. The window does not seem to bang as it stops. The mew bump stops are a very close fit. I don't think the stock stop will fit if you try to use it?
Just wondering if you had a measurement of the stop from the center of the hole to the bend? I just didn't want to pull my outer skin off.
Thanks, Tim
IP: Logged
10:20 AM
Rickady88GT Member
Posts: 10649 From: Central CA Registered: Dec 2002
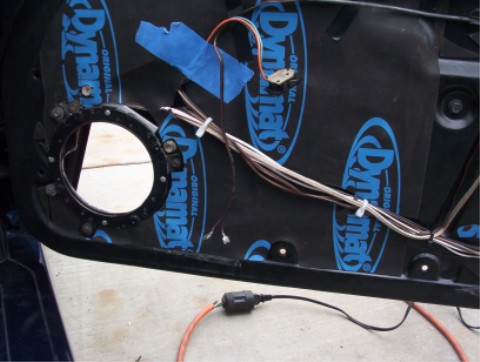
I did add some Dynamat and a new section of door strengthener to stiffen the area around the speakers. I hate the rattling of speakers. I need to see if I have the pics?
I would just take off the door skins. It is not that hard. I think I even got pics of the removal? It is not posable to do the mod without the door skins off? At least I cant think of a way to do it with skins on? The job will take 3X longer to do, IF it can be done with skins on?
IP: Logged
08:13 PM
Jun 15th, 2006
Mickey_Moose Member
Posts: 7570 From: Edmonton, AB, Canada Registered: May 2001
...actually I just need to add the stop, I was able to get the speakers to fit in the door without moving the window motor...however the stop is still an issue for me. I figure I can just change the stop out through the speaker hole without removing anything else.
Just need to dimensions of the hole placement and the length of the short side (so I know how long it needs to be so it will contact the rail on the door.
Thanks, Tim
[This message has been edited by Mickey_Moose (edited 06-15-2006).]
IP: Logged
12:15 PM
Rickady88GT Member
Posts: 10649 From: Central CA Registered: Dec 2002
The stop needs to be thin enough to fit between the window and side impact beam. So if you drill out the stock stop rivet and use a clump of modeling clay stuck to the window where the stop needs to be. You could try to roll the window up and down and measure the gap. Then make a new bump stop to fit between the gap. BUT as I recall, I had to bend out the very top edge of the impact beam to allow the new stop to fit behind it. And maybe bend in the bottom edge of the new top stop contact edge? The stop needs to be substantial enough to stop the window even if the window is being pulled in and out as it is going up (you don't want the stop to miss the new contact edge) And I had to adjust the stop for the proper height. So with manufacturing tolerance being different car to car, your window stop will certainly be different than mine, because the window tracks may be adjusted differently.
IP: Logged
01:01 PM
Rickady88GT Member
Posts: 10649 From: Central CA Registered: Dec 2002
you can see that the new bump stop needs to be small enough to fit between the side impact beam and the window. But needs to be able to hit the stop at the top.
wires and roller switches? This is actually part of the engine swap. I needed to add the switches for the PCM inputs.
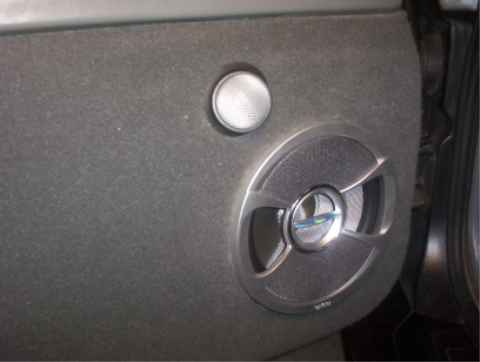
I could not find a pic of the door stiffener I made to fill the gap around the speaker. The door is MUCH stiffer now than it was in stock form. This way the speaker should have a better sound. You can see the aluminum L stock behind the speaker mounts under the Dynamat.
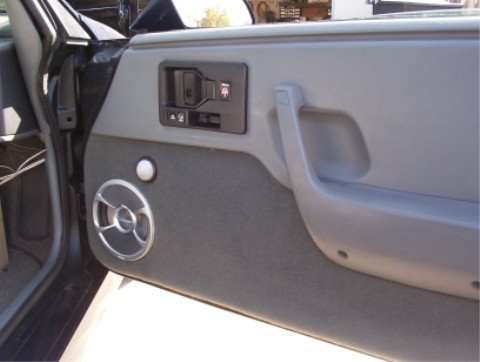
New door speakers are in.
[This message has been edited by Rickady88GT (edited 06-15-2006).]
IP: Logged
09:17 PM
PFF
System Bot
Jun 16th, 2006
Mickey_Moose Member
Posts: 7570 From: Edmonton, AB, Canada Registered: May 2001
Wanted to just point something out that I noticed the other day while I had my door apart.
There is no need to modify the window motor unit. All you would have to do is to swap the left and right motor assemblies. The spring has to be reversed on each unit but that is all from what I can tell (there might be an issue with the wiring, you might have to reverse the leads to the motor travels in the correct direction). EDIT: no change inthe wiring is needed, just install the right door motor unit in the left side and vice versa, plug in the connector and it works just fine. Just did this myself, and yes it frees up a lot of door space for speakers.
Excellent mod Rickady88GT
This would hopefully make the whole process easier for others as there would be no cutting and repositioning of the motor and as a result you would still maintain all the structural strength as it came from GM. I found that by repositioning the motor you lose some of this strength. No fussing about getting the angle right as it's already there.
Tim
[This message has been edited by Mickey_Moose (edited 10-06-2006).]