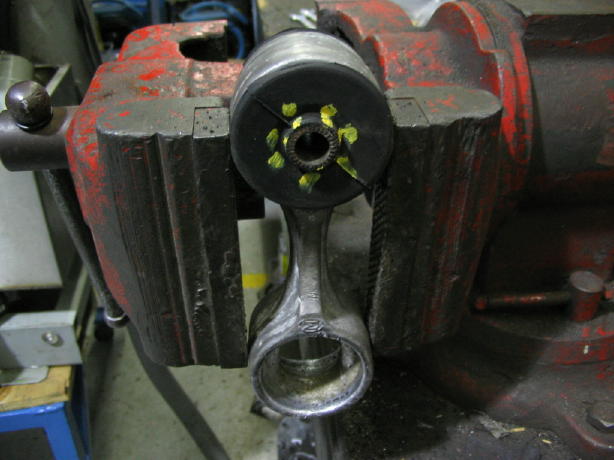
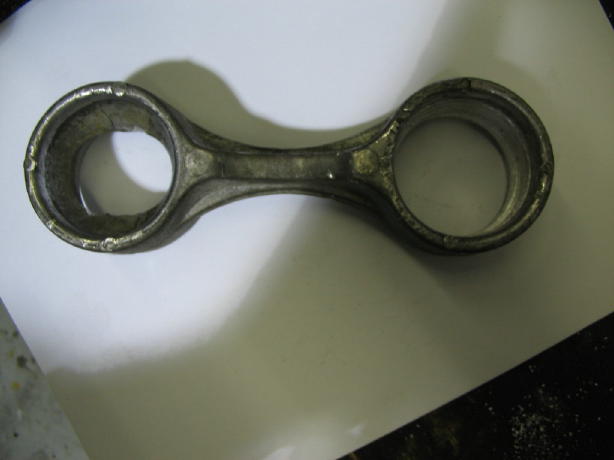
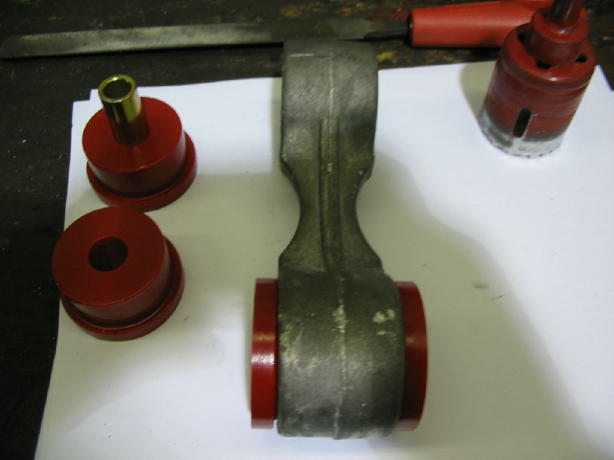
My 87 automatic, 6-cylinder has one of the longer dog-bones with the “rib” on the inside of the dog-bone as opposed to my 86 which has the rib on the outside. It has to be modified to accept the standard Prothane 7-501 Fiero torque strut bushings. Ok, lets get going!
The easy way to remove the old bushings is to drill several 1/8-inch holes along the sleeve of the bushing to weaken it.
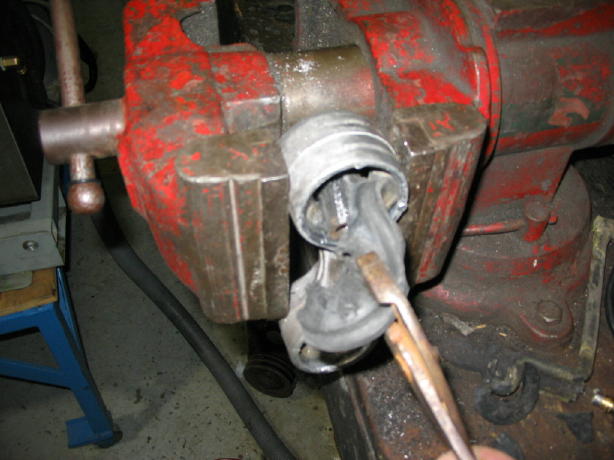
You can remove it with pliers.
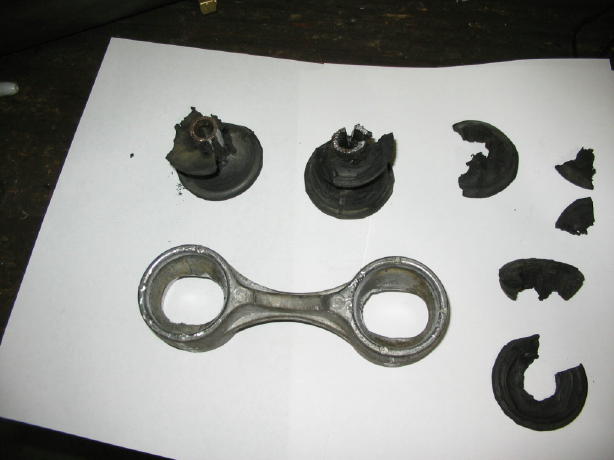
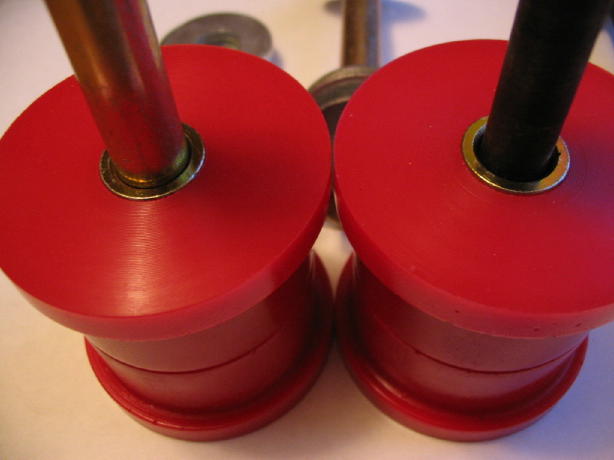
You can see the hour-glass shape on the old bushings.
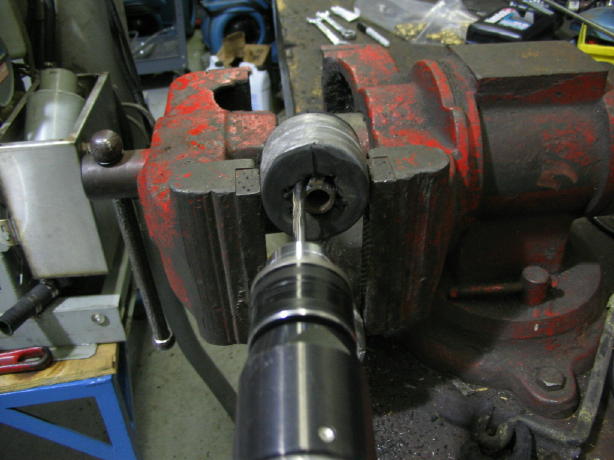
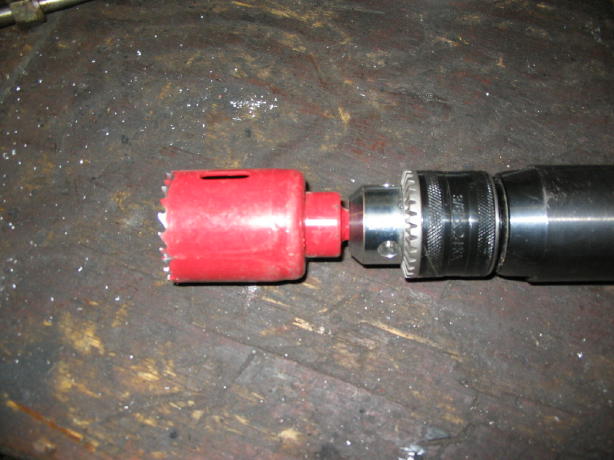
I used a slow speed air drill to cut the material.
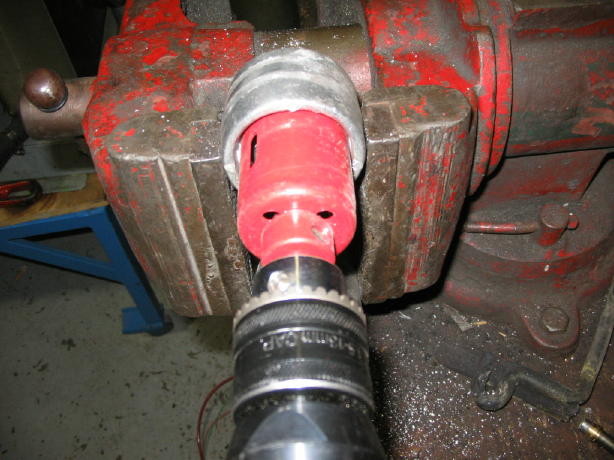
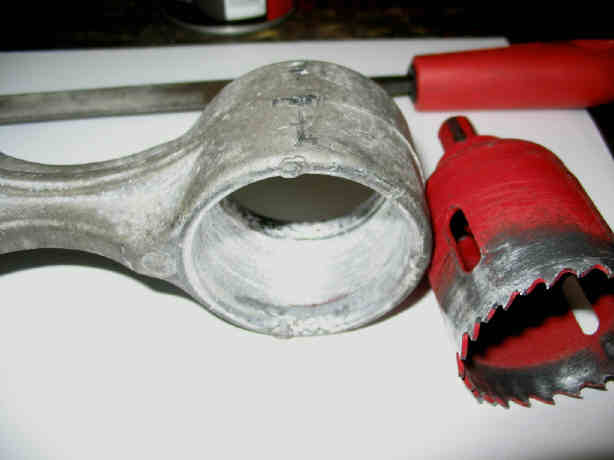
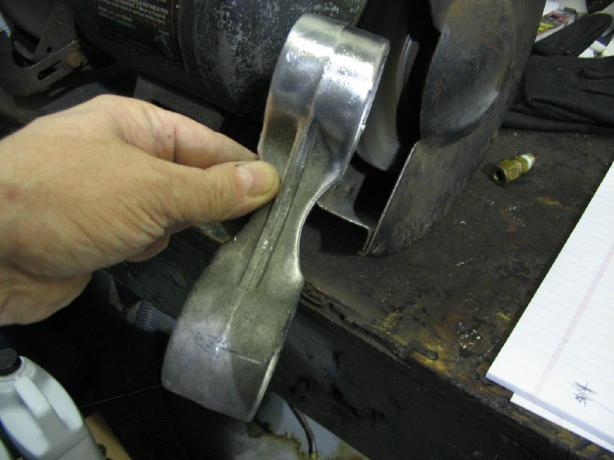
I used a 1 & ľ inch (44MM) round drill to bore out the ribbed section of the dog-bone. The material is aluminum and it cut rather easily. I did drill by hand but I recommend using a drill press to keep the bore true and straight.
[This message has been edited by jetman (edited 12-28-2005).]
IP: Logged
10:41 PM
PFF
System Bot
jetman Member
Posts: 7811 From: Sterling Heights Mich Registered: Dec 2002
You can see the difference, left side untouched, the right hand side has been bored out.
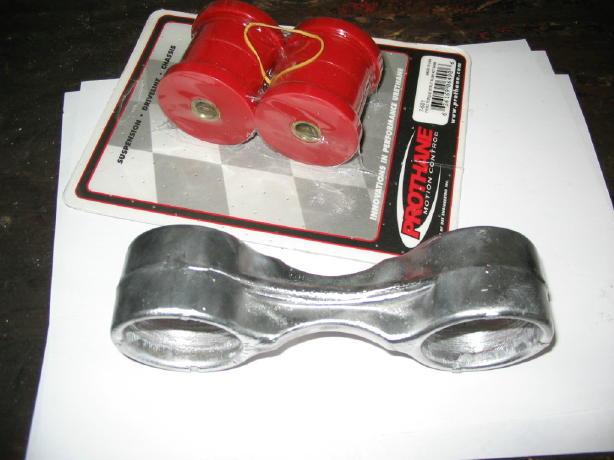
I touched up my test fitting with a hand file.
Putting on the shine with the wire wheel!
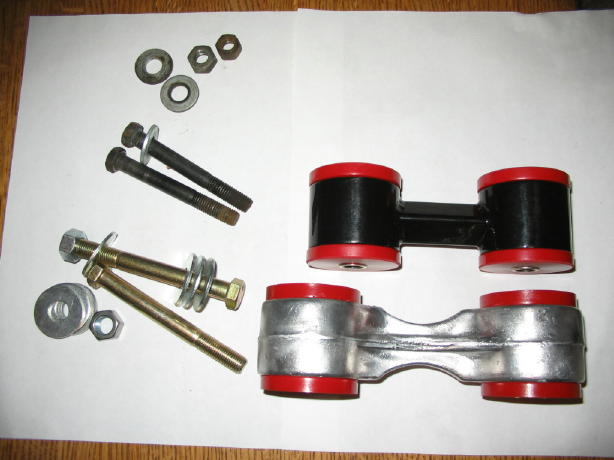
The Fiero Store carries the Prothane bushings, F.S. part # 52897 for $19.95 and they gave me 10% off since I am a member of PFF. I like to support the Fiero Store, they help keep my car running.
[This message has been edited by jetman (edited 12-28-2005).]
IP: Logged
10:42 PM
jetman Member
Posts: 7811 From: Sterling Heights Mich Registered: Dec 2002
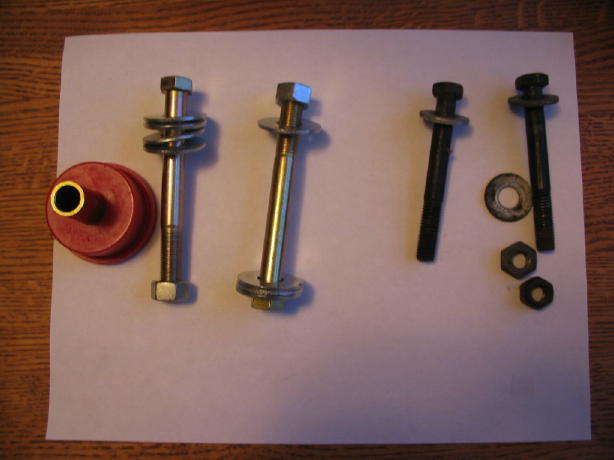
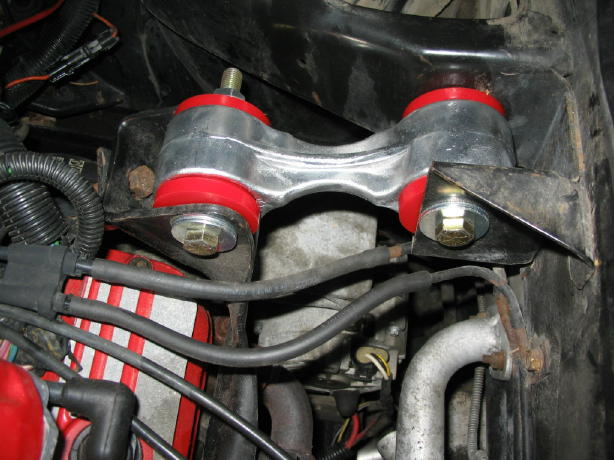
I used larger diameter bolts, 7/16-inch x 4-inch long as opposed to the stock 3/8-inch. As you can see, there is very little slop and the V-6 engine mounts accept the larger bolts without any modifications. I also did this on my 86 Fiero because I got the clunking noises until I switched to the larger bolts.
The left side has the larger 7/16-inch diameter bolt, the right hand side has the 3/8-inch stock bolt. You can see the amount of slop with the stock bolt (right side) in the bushing. Since I switched to larger bolts, my clunking noise has disappeared.
Side by side, next to the ultimate dog-bone. You can see the difference in length. I just could not imagine trying to crank my engine back to accept the ultimate dog-bone. Yes, I know that everyone says that it is just one size fits all of the V-6 Fiero’s but so many of us with the 87 V-6 automatic have mentioned the difference in length. Quite a few of us have the longer dog-bone on our 87 V-6 automatics and cannot use the ultimate dog-bone.
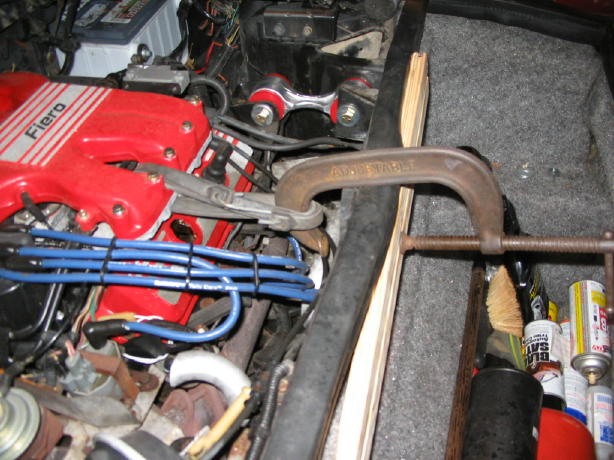
One man engine persuader, a “C-clamp and a bungie strap.
Looking good! “It’s the dog, bow-wow, bow-wow, bow-wow!”
After the weather warms up a bit I may cut down the bolts by about a half inch for a better look. My thoughts are that I didn’t want the threads mashed up by the engine mounting brackets so I purchased bolts with a long shoulder.
A couple of notes for everyone.
In retrospect, if I were to do this again, I would choose a drill bit slightly smaller than 1 & 3/4-inch and finish the final fitting with a large curved file. I didn't keep my drill perfectly straight and had a slight touch of slop on one half side of one bushing.
This technique should work on all of the 87 and 88 dog-bones that have the tapered bushings if you want to keep a stock look.
The jury is still out on the strength of the dog-bone with some material cut away but I figured it was worth a try. Your results may vary
This modification didn’t take long at all, anyone with some mechanical ability can do this.
It took some time to write this up for my PFF friends. As always, your comments, suggestions compliments and even wise cracks are welcome as this makes me feel appreciated and motivated towards future picture projects.
Interesting idea! (boring out the dogbone) I took the easy way out and ground down the new bushings on my trusty bench grinder. You just gotta go slow and keep test-fitting until you grind the inside of the bushings to the proper angle and end up with a small gap between the outer lip of the bushing and the dogbone. Mine has been trouble-free...
On your other point....I agree, I wouldnt try to bore out the holes without properly clamping the dogbone down to a drill press!
Kit (86 GT Auto)
IP: Logged
11:42 PM
Dec 29th, 2005
css9450 Member
Posts: 5590 From: Glen Ellyn, Illinois, USA Registered: Nov 2002
I used larger diameter bolts, 7/16-inch x 4-inch long as opposed to the stock 3/8-inch. As you can see, there is very little slop and the V-6 engine mounts accept the larger bolts without any modifications. I also did this on my 86 Fiero because I got the clunking noises until I switched to the larger bolts.
Hmmm I am going to have to try this. I never considered the dogbone as a source for my occasional clunking.
IP: Logged
01:01 PM
jetman Member
Posts: 7811 From: Sterling Heights Mich Registered: Dec 2002
Hmmm I am going to have to try this. I never considered the dogbone as a source for my occasional clunking.
The stock bushings have a serrated edge that bites into the steel mounting brackets and this helps keep it in place. The replacement bushings do not and this allows for some slippage and was the source of my clunking on my 86.
IP: Logged
01:36 PM
jetman Member
Posts: 7811 From: Sterling Heights Mich Registered: Dec 2002
Originally posted by jetman: If you like my contributions, let me know with some encouragement, thanks everyone
quote
Originally posted by lurker: +. like that?
Thanks lurker. I went back and edited that last sentence. I was tired when I wrote that and it did not convey the spirit of sharing this with my friends.
IP: Logged
02:04 PM
Dec 30th, 2005
jetman Member
Posts: 7811 From: Sterling Heights Mich Registered: Dec 2002
Good job! I used Rodney's adjustable dog bone when I installed my 3.4L but, if I'd seen this first, I may have rebuilt the original. I used 7/16" bolts with the adjustable too, so it wouldn't have any slop. Except for not looking as original, I do like the idea of how the adjustable allows you to match the dog bone to the engine's natural position instead of having to pull the engine over to match the dog bone.
IP: Logged
12:26 PM
Nooner Junior Member
Posts: 4 From: Calgary, Alberta, Canada Registered: Oct 2005
Hi, I am in the process of purchasing an "ultimate dogbone" for my 87GT with 5-speed. After your comments about differant lengths for this year I'm wondering if anyone can give the c/c dimension for these before I commit. BTW good job on the rebuild (I may end up doing that myself) Thanks
"Note: To position strut in support, push the engine rearward with a horizontal load of 200-250 Newtons. Load is applied on a line directly through center of support slots. Tight bolt with load applied."
That is around 50 lb-ft of force so GM is expecting the engine to be too far forward and wants you to pull it back. They clearly want some tension on the dogbone. The 86 has the dampener (which is more of a spring load than a shock) and this would pull the engine forward once the dogbone is installed. When I install the dampener, it goes right into place telling me the engine is in the right location before the dogbone is installed.
On the other hand, with the shorter dogbone it does seem to take far more than 50 lb-ft on some cars to get the shorter dogbone to align.
How is the vibration at idle on yours with the poly dogbone? I have one with poly only on one end and even then the vibration goes way up in the passenger compartment.
[This message has been edited by TK (edited 12-30-2005).]
IP: Logged
12:36 PM
jetman Member
Posts: 7811 From: Sterling Heights Mich Registered: Dec 2002
Hi, I am in the process of purchasing an "ultimate dogbone" for my 87GT with 5-speed. After your comments about differant lengths for this year I'm wondering if anyone can give the c/c dimension for these before I commit. BTW good job on the rebuild (I may end up doing that myself) Thanks
The only folks who have reported a different sized bone are those with the 87 automatics, everyone else can use the ultimate dog-bone from what I understand on their V-6 engines.
IP: Logged
03:03 PM
triker Member
Posts: 454 From: Yreka, Ca. USA Registered: Apr 2000
Thanks TK, I've only got about 2000 miles on mine so it shouldn't have hurt anything. As soon as it quits raining, I'll make the adjustment to put some load on mine.
IP: Logged
03:19 PM
Electrathon Member
Posts: 5241 From: Gresham, OR USA Registered: Dec 2002
First I would like to commend you on the write up. Excellent job documenting the procedure.
I do have a couple things to add though.
From GM, all 2.8 dogbones are the same length. There are a number of aftermarket ones out there that are longer, but this was not the way the car came from the factory. If the factory length bone does not fit, you have engine mount issues. A longer bone is an easy bandaid, and it does work.
The factory bolts are not 3/8, but are 10mm. Slightly smaller than 7/16 and larger than 3/8. If you are having trouble keeping the 10mm bolts tight, the 7/16 are a good idea.
Personally I would have trimmed the bushings, not removed matal which is the structural strength of the bone. The issue with using the internal rib bones is that the main hole through the bone is not the same size as the bushings, it is slightly larger. You can see that one of your bushings is tipped in one of the pics. The bushings fit loose in the bone except for the center area that was bored out, allowing for more movement. They will work, but the fit is of poor quaility.