Pennock's Fiero Forum
  Technical Discussion & Questions - Archive
  Need a picture of GM control arm bushing removal tool

T H I S   I S   A N   A R C H I V E D   T O P I C
  

Email This Page to Someone! | Printable Version


Need a picture of GM control arm bushing removal tool by derangedsheep
Started on: 09-20-2005 04:08 PM
Replies: 16
Last post by: TK on 10-09-2005 01:20 AM
derangedsheep
Member
Posts: 3089
From: Myerstown, PA
Registered: Mar 2003


Feedback score: N/A
Leave feedback


Total ratings: 114
Rate this member

Report this Post09-20-2005 04:08 PM Click Here to See the Profile for derangedsheepSend a Private Message to derangedsheepDirect Link to This Post
Just like the subject says. I need a picture of this tool so I can make my own.

-Steve

------------------

87 GT Auto: 2.25" Goerlich XLerator exhaust, 17" Volution VRD-16 wheels with Potenza RE950s
AIM: derangedsheep | email: elcodjsteveo@yahoo.com | CarDomain | Fiero Presentation
~In Memory of Lorena Fuller (27Jan88 - 15Nov04) and Jason Dubble (21Jun87 - 01Apr05)~

IP: Logged
PFF
System Bot
ditch
Member
Posts: 3780
From: Brookston, IN
Registered: Mar 2003


Feedback score: (4)
Leave feedback


Total ratings: 157
Rate this member

Report this Post09-20-2005 05:06 PM Click Here to See the Profile for ditchSend a Private Message to ditchDirect Link to This Post
just had to

IP: Logged
Jake_Dragon
Member
Posts: 32987
From: USA
Registered: Jan 2001


Feedback score: (5)
Leave feedback


Total ratings: 403
Rate this member

Report this Post09-20-2005 05:13 PM Click Here to See the Profile for Jake_DragonSend a Private Message to Jake_DragonDirect Link to This Post
IP: Logged
derangedsheep
Member
Posts: 3089
From: Myerstown, PA
Registered: Mar 2003


Feedback score: N/A
Leave feedback


Total ratings: 114
Rate this member

Report this Post09-20-2005 05:36 PM Click Here to See the Profile for derangedsheepSend a Private Message to derangedsheepDirect Link to This Post
Thanks ditch but I'm putting in rubber bushings, the sleeves have to come out.

Jake_Dragon - How well did it work? I might go to Autozone and rent a ball joint press if it worked well.

Still though, if anyone has a picture of the GM tool, post it!

IP: Logged
Jake_Dragon
Member
Posts: 32987
From: USA
Registered: Jan 2001


Feedback score: (5)
Leave feedback


Total ratings: 403
Rate this member

Report this Post09-20-2005 05:41 PM Click Here to See the Profile for Jake_DragonSend a Private Message to Jake_DragonDirect Link to This Post
It worked out pretty well, are you replacing your bushings with new rubber?
The only thing it will push out the steel sleeve as well.
I just pushed out the bushing steel sleeve and all then pressed in new bushing that came with new steel sleeves.
IP: Logged
TK
Member
Posts: 10013
From:
Registered: Aug 2002


Feedback score: (2)
Leave feedback


Total ratings: 200
Rate this member

Report this Post09-20-2005 07:47 PM Click Here to See the Profile for TKSend a Private Message to TKDirect Link to This Post
 
quote
Originally posted by derangedsheep:

Just like the subject says. I need a picture of this tool so I can make my own.

-Steve

If get a chance I will take pics of my homemade tool (pipes, washers and threaded rod). I just replaced the bushings in the rear arms and haven't installed them yet so I can assemble the tool on the arms and show you what is needed.

My tool duplicates the function but not the method exactly. Mine uses a threaded rod that goes through the pipes and center of the bushing to apply pressure on the bushing so it wants to pop out into a larger pipe that fits over it on the flange side. I crank it down and hit the center of the bushing housing with a hammer a chisel and the bushing pops out. Then I reverse it and apply pressure to the bushing flange and it draws it into the arm.

TK

[This message has been edited by TK (edited 09-20-2005).]

IP: Logged
derangedsheep
Member
Posts: 3089
From: Myerstown, PA
Registered: Mar 2003


Feedback score: N/A
Leave feedback


Total ratings: 114
Rate this member

Report this Post09-20-2005 11:07 PM Click Here to See the Profile for derangedsheepSend a Private Message to derangedsheepDirect Link to This Post
Just bumping this up.
IP: Logged
tesmith66
Member
Posts: 7355
From: Jerseyville, IL
Registered: Sep 2001


Feedback score: (3)
Leave feedback


Total ratings: 135
Rate this member

Report this Post09-21-2005 09:14 AM Click Here to See the Profile for tesmith66Send a Private Message to tesmith66Direct Link to This Post
I use a hammer and a vise.

------------------
1986 SE 350 V8

IP: Logged
tta583
Member
Posts: 155
From: Ky, US.
Registered: May 2005


Feedback score: N/A
Leave feedback

Rate this member

Report this Post09-21-2005 01:03 PM Click Here to See the Profile for tta583Send a Private Message to tta583Direct Link to This Post
I know this is not what you are looking for but it may be yet another alternative. I bought one of these some time ago:

http://www.harborfreight.com/cpi/ctaf/Displayitem.taf?itemnumber=33497

They often go on sale for $99. Not a high quality "Pro" deal but it does the job. I origionally got it to do all the rear suspension busings in my TA. I figured by the time I paid someone to do it on their press I could have bought one of my own. Plus doing it myself I did not have ot worry about the arms getting bent or deformed. Since then I have done control arm and trailing arm bushings for several cars not to mention U-joints on my F350. In that job alone it again paid for itself. It is also rather narrow so it is easy to store up against a wall.

There is all so some smaller models, like work bench top deals:

http://www.harborfreight.com/cpi/ctaf/Displayitem.taf?itemnumber=4711

The only down side I see where is when you do A-arms the clearance under the press table is needed for the side of the arm you are not working on.

To see them all go to http://www.harborfreight.com and type "shop press" into the search field.

If you do grab a press you may want to look at one of these as well:

http://www.harborfreight.com/cpi/ctaf/Displayitem.taf?itemnumber=46074

Only 20 bucks. If you are working alone on a long part, like a drive shaft, you can use it to support the tail end of the part while you work at the head end with the press.

BTW, what ever you use I suggest you get some metal conduit. Cut it to short sections to tuck inside the cavity in the arm on which you are working. Those stamped parts tend to collapse. If you are doing an A-arm the arms tend to flex together. A longer piece wedged between will give some support. I generally still end up taking an adjustable wrench or 2 and bending back/reshapeing the ends if they become distorted.

Good Luck.

Brent

[This message has been edited by tta583 (edited 09-21-2005).]

IP: Logged
derangedsheep
Member
Posts: 3089
From: Myerstown, PA
Registered: Mar 2003


Feedback score: N/A
Leave feedback


Total ratings: 114
Rate this member

Report this Post09-21-2005 01:44 PM Click Here to See the Profile for derangedsheepSend a Private Message to derangedsheepDirect Link to This Post
The nearest Harbour Freight is almost an hour away. I want to make my own out of pipes and bolts from Lowes or Home Depot.
IP: Logged
TK
Member
Posts: 10013
From:
Registered: Aug 2002


Feedback score: (2)
Leave feedback


Total ratings: 200
Rate this member

Report this Post09-25-2005 05:22 PM Click Here to See the Profile for TKSend a Private Message to TKDirect Link to This Post
Here are the tools I've fabricated. There might be $25 worth of parts to do all control arm and cradle bushings to replace the rubber. None of this will apply to poly.

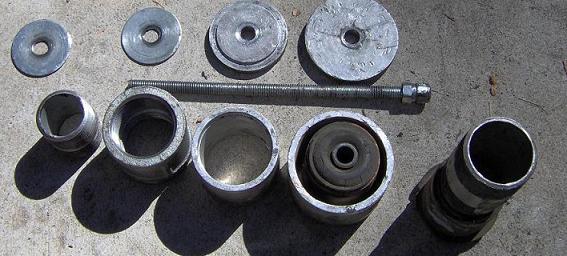
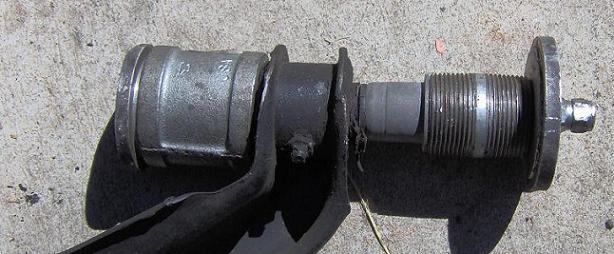
Below are the pieces I've collected to remove and install front/rear control arm and cradle bushings. The two knurled cylinders were custom made for me by a machinist buddy, but it wasn't necessary. There are pipe sections that do exactly the same thing. This is a top shot showing a cradle bushing in one sleeve. When removing the bushings you need a "receiver" sleeve to allow the bushing to pass into it while pressing on the other side.

Below is a side shot of the same tools. On the right is the pipe I use to put pressure on the bushing to push it out. Different sizes are needed for different bushings. It need to be no larger than the sleeve so it will pass into the control arm during the bushing removal..

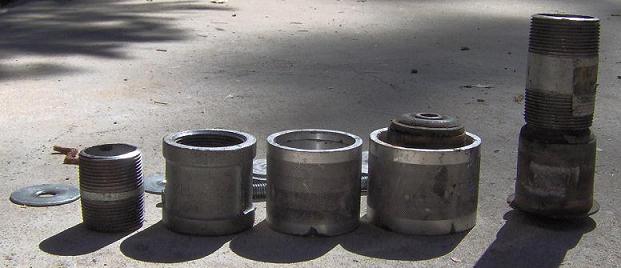
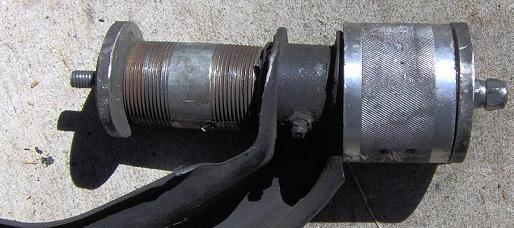
Below is the tool installed to remove the bushing. What size pipes are needed only depend on which bushing you are removing.

You tighten the nuts on the end to put pressure on the bushing which tries to drive it into the receiver pipe. This pressure won't just pop the bushing out, but once you have it tightened as much as you can, hit the center of the bushing sleeve with an hammer and chisel or air chisel to bent it inward. This will collapse the sleeve and it will pop out. Quite satisfying actually when it pops.

Not shown is a small quarter circle I place between the loops to keep them from squeezing together. If you don't do this the bushing will hang up in the loops. You want to keep them somewhat parallel while removing and installing the bushing.

Below is the tool installed to press in the bushings. The sleeve on the left needs to fit over the rubber and press on the bushing's lip. I apply a thin coating of vaseline to the bushing to let it slide in. Tightening the nuts on each end will draw the busing into the loops. Often it won't seat completely so I tap lighty on the driving pipe and the bushing will slowly seat. Also, taping on the loop will assist in seating the bushing.

Once installed and flush with the arm loop I clean off the vaseline. No, the vaseline won't make the bushing pop out.

Again, not shown in the quarter circle between the loops to keep them parallel.

Tap in the inside of the bushing to check the tightness. The fit is a pinch on the sleeve by the arms.

Note: I've never had this problem with Fiero arms, but on G body arms the bushings will sometimes be loose. They feel tight, but you can pop them out with a light tap of a hammer. If that occurs, have the bushing tack-welded in three spots around the loop. The welds can be easily ground off if you need to replace the bushings in the future.

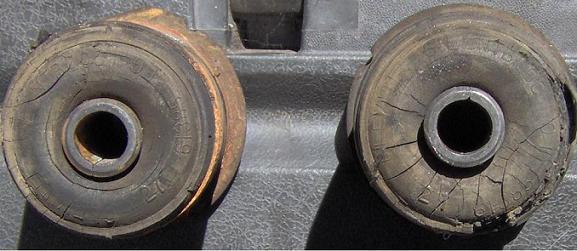
Below is one side of the cradle bushings I removed. Those are pretty shot. I installed poly but not by burning them out. Prothane has this problem of being off by .100" on the front bushings so I buy new rubber bushings, mill out the rubber, correct the poly bushing (mill off .100" of the inside of the lip) and press it into the sleeve. Then I install the bushings using the right combination of the pipes above. The rear cradle bushings are also .100" too thick so I correct that before installation too. Prothane gave me 10 sets of cradle bushings to play with on other cars but I never did hear from them if they corrected the error. Since I won't need any for a long time I haven't bought any to check.

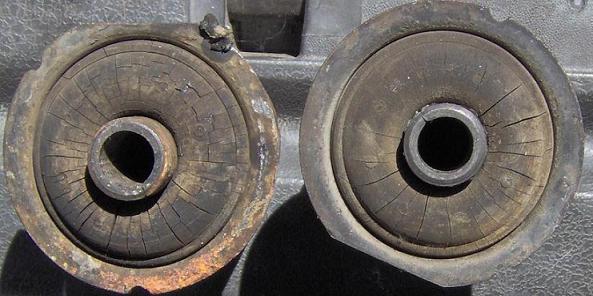
A shot of the other side of the cradle bushings. Nice cracks.

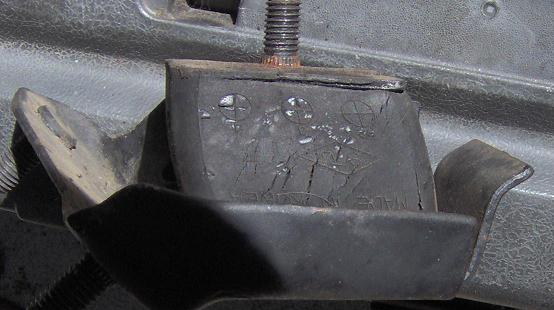
A shot of the front trans mount. Notice the cracking and sagging.

A note: In the control arm pics above you can see the Herb Adams spherical bearings and the grease fitting. Since I installed my other arms with new rubber bushings and ball joints, I used my spherical bearing arms for this demo.

Yes, the arms work great with the spherical bearings but they are a bit too harsh for street use on rough roads. With poly cradle bushings they would have been brutal.

I think from these shots you get the idea on how to fabricate the special tools to remove and install all Fiero bushings.

Finally, I don't use poly in control arms so I won't be able to answer any poly control arm installation questions. This was intended for the rubber crowd. I'm more than happy to discuss rubber installation.

Terry

[This message has been edited by TK (edited 09-25-2005).]

IP: Logged
PFF
System Bot
derangedsheep
Member
Posts: 3089
From: Myerstown, PA
Registered: Mar 2003


Feedback score: N/A
Leave feedback


Total ratings: 114
Rate this member

Report this Post09-26-2005 04:10 PM Click Here to See the Profile for derangedsheepSend a Private Message to derangedsheepDirect Link to This Post
Thanks. I'll see if I can make something similar.
IP: Logged
Cooter
Member
Posts: 6328
From: Alabama, USA
Registered: Jun 99


Feedback score:    (11)
Leave feedback


Total ratings: 138
Rate this member

Report this Post09-26-2005 10:21 PM Click Here to See the Profile for CooterSend a Private Message to CooterDirect Link to This Post
Terry- you have a PM.
Not PMS, I think that is something different.
IP: Logged
TK
Member
Posts: 10013
From:
Registered: Aug 2002


Feedback score: (2)
Leave feedback


Total ratings: 200
Rate this member

Report this Post09-26-2005 10:25 PM Click Here to See the Profile for TKSend a Private Message to TKDirect Link to This Post
Check you PM for the cure.
IP: Logged
TK
Member
Posts: 10013
From:
Registered: Aug 2002


Feedback score: (2)
Leave feedback


Total ratings: 200
Rate this member

Report this Post09-27-2005 01:05 AM Click Here to See the Profile for TKSend a Private Message to TKDirect Link to This Post
Now check your PM for the bill.
IP: Logged
Hulk
Member
Posts: 615
From:
Registered: Oct 2004


Feedback score: N/A
Leave feedback

Rate this member

Report this Post10-09-2005 12:24 AM Click Here to See the Profile for HulkSend a Private Message to HulkDirect Link to This Post
 
quote
Originally posted by TK:

This was intended for the rubber crowd. I'm more than happy to discuss rubber installation.

------------------
86 Fiero GT
-Stage eleventy billion...

04 Mustang Cobra
-K&N FIPK (first mod, woo-hoo!)

IP: Logged
TK
Member
Posts: 10013
From:
Registered: Aug 2002


Feedback score: (2)
Leave feedback


Total ratings: 200
Rate this member

Report this Post10-09-2005 01:20 AM Click Here to See the Profile for TKSend a Private Message to TKDirect Link to This Post
 
quote
Originally posted by Hulk:


Is that a word you need to restrict?

IP: Logged


All times are ET (US)

T H I S   I S   A N   A R C H I V E D   T O P I C
  

Contact Us | Back To Main Page

Advertizing on PFF | Fiero Parts Vendors
PFF Merchandise | Fiero Gallery
Real-Time Chat | Fiero Related Auctions on eBay


Copyright (c) 1999, C. Pennock