Servicing door hinges are one of those rotten "Fiero jobs" that are difficult until you learn the tips and tricks. I serviced my passenger door first, then my drivers door. I'll pass along these tips that I learned the hard way so that your hinge repairs will go well for you.
You can purchase just the bushings, Help # 38376, or the pins with bushings, Help # 38407, at the auto parts store. The help pins are supposed to fit only the lower hinges, you will need Rodney Dickmans pins for the upper hinges. Rodney is a good guy, I like helping him out with a purchase whenever I can.
Hint,,,,Get Rodneys spring compressor tool or beg, borrow one to use!
The tools that I used.
You need good light and an uncluttered area. I worked over a large piece of cardboard for comfort while kneeling. I had extra towels on hand and as usual forgot to protect my seat with them. Permatex hand cleaner to wash hands frequently, you're handling doors, that will keep your interior clean.
Spray your door hinges with a little PB blaster before you begin the work. This will help when you have to knock the door pins out.
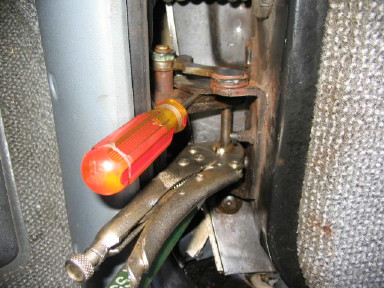
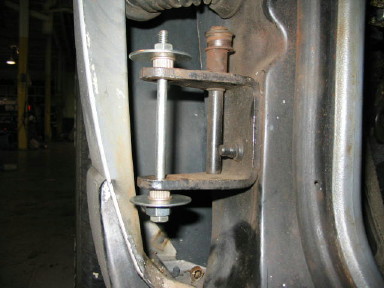
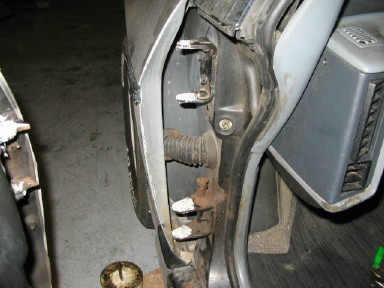
Hint,,,,Take the pressure / load off the bushing before you attempt to remove the pin by tapping a flathead screw driver into the hinge next to the bushing. You are trying to lift up the door hinge from the frame hinge by a 1/32 to an 1/ 16 of an inch. For some reason the pin is knocked out with the load off of the hinge bushing.
This is the view of my passenger door, see how I have the flathead screwdriver in the hinge. I'm telling you the truth on this one, I don't know why this works, but it does and this tip will save you a ton of aggravation. Believe me, I fought a battle trying to remove the pins until I hit upon this trick.
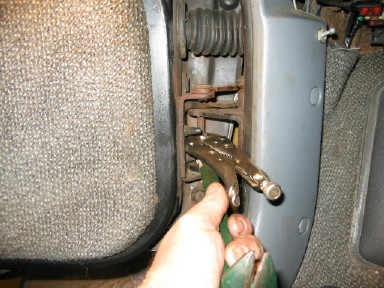
A couple of pins were stubborn to say the least. I clamped a vice grip on the pin and used a small pry bar to leverage it against the hinge.
This really works well, the pictures shows the orientation of the tools.
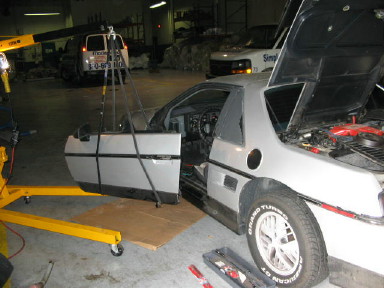
Hint,,,, I used an engine hoist with two used serpetine belts as my "assistant" to hold the door instead of a car jack although I have thrown a rope over a tree branch and used a ratchet strap on the door as my "assistant". You want to support the door, not lift it. If you see the car lifting, back down a bit. You want to achieve a neutral balance on the door so there is very little weight on the hinges.
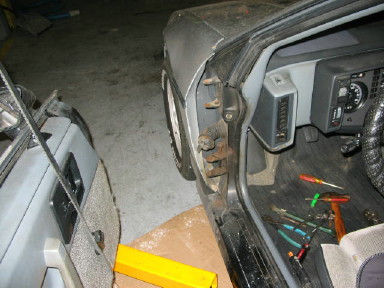
I cut and later reconnected the single wire the runs from the frame to the door so I could get the door out of my area while I was working.
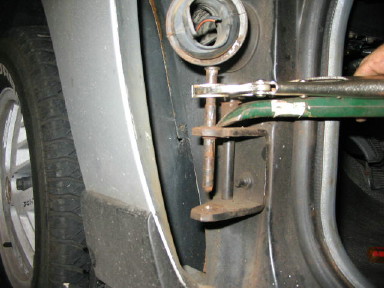
Hint,,,,You will need two 1/4" shoulder bolts 4-inches and 4-1/2 inches long, 1/4 bolts and a couple of flat washers. These are your "helpers". You need these to "press" your new bushings into the hinges. You are actually tightning the bolt / nut during this "pressing" process. This really worked well for me.
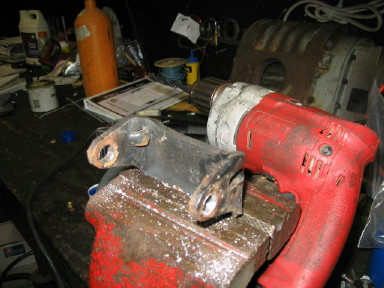
Used longer bolt as my bushing press tool on frame hinge. I later changed my mind about the placement of the top bushing.
This is my drivers door with my "pressing tool" ready to go.
Used short bolt on door bushings, neat idea, works like a charm.
A couple of small picks are very handy to remove the retaining clip on the hinge pin. If someone knows "the easy way" to remove these clips, please let all of us know!
I also found that cutting one of the old pins to 1" from the "head" end will make a perfect tool for knocking out the old bushings. I also used a punch on a few pins to pursuade them out.
I "scribed" my upper hinge on the frame with "white-out" so I could easily wash it off after the process was finished. Yeah, that lasted all of a minute, I scribed the next one with a chisel. "That's gonna leave a mark". Well that got the hinge back in the exact spot.
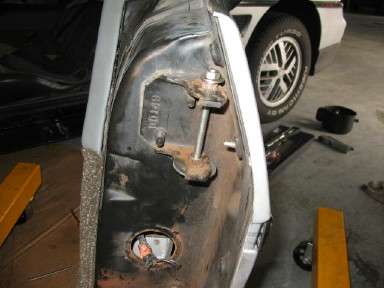
I removed the upper frame hinge bracket (two 13MM bolts) and drilled it with a 31 / 64th drill bit to accept the new bushings. I did not remove or drill out the lower frame hinge because I really didn't want to tear into the interior of my car to gain access to the bolts.
Almost forgot about the grease on the bushings! Yes I did place a plastic washer for extra support in the lower hinge.
Hint, Installed my upper frame, top bushing from the inside up. If you install the bushing down into the frame hinge you will knock it out as you drive the pin up into position.
In short, support door, remove hinge retaining clips, door spring, hinge pins, bushings, and reinstall the new components. I'm too embarassed to say how long the passenger door took but the drivers door took less than two hours including all the set up and clean up.
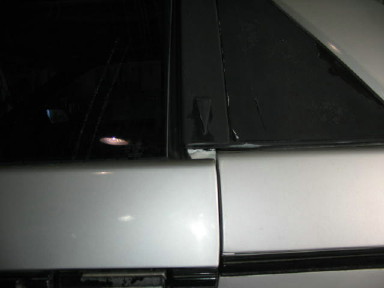
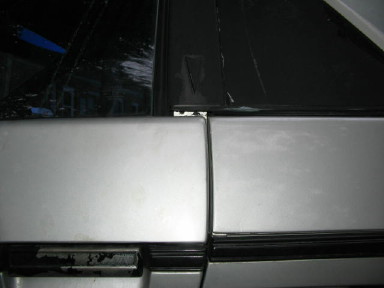
A couple of before and after pictures showing the door sagging just before it comes into contact with door striker bolt. Man alive, what an improvement and no more clunk, clunk, clunk over bumps.
Before,,,,,,
After!
Such a nice improvement! Gee wizz, I was just thinking that it takes longer to do the picture write up about this hinge repair than it takes to do the actual job! No worries! Just my little contribution to my Fiero friends!
Don't forget to check out theogres cave for good information there and an excellent tip on a plastic washer to use in your door hinge.
Ok everyone, thanks for letting me share my experience with all of you, I hope that you enjoyed it and hopefully I have passed along some usefull insights into the hinge repair job.
cool-bye
[This message has been edited by jetman (edited 08-19-2005).]
IP: Logged
01:07 AM
Gordo Member
Posts: 2981 From: East Guilford, NY, USA Registered: Mar 2002
I just did this a couple days ago to both of the doors on my wifes coupe. I used Rodney Dickman's method without removing the door. I like your idea for reinstallation of the bushings. Will use it next time.
[This message has been edited by Gordo (edited 08-19-2005).]
IP: Logged
06:41 AM
FieroLinks Member
Posts: 397 From: Spring Hill, FL, USA Registered: May 2002
I'm preparing to do this to my driver's door. I got an extra hinge off a donor car. I'll rebuild it like you've shown here and just replace it on the car. I already have the interior out for carpet and headliner replacement, so it a good time to do it.
Thanks for the write-up.
-FieroLinks
IP: Logged
08:25 AM
Mickey_Moose Member
Posts: 7594 From: Edmonton, AB, Canada Registered: May 2001
Thank you so much! Thank you for the compliment, means alot coming from you, JazzMan.
Very nice of everyone to chime in here, makes me feel appreciated for the effort. The car sounds alot quieter over bumps, worth the work. I'm sure that someday this thread will help out a few of our fellow forum members when they have to service their doors.
My thoughts are that you can hang a door from a tree branch, cherry picker, the kids swing set or from the rafter in the garrage. The big key in this job for me was trying to remove the door pins. Once I figured that aspect out, it was pretty much smooth sailing after that. I still have some minor issues with the door striker bolts, little bit of rattle, I'll take care of that soon.
I am planning on rebuilding my 87 Fiero doors, if there is a picture or question about this, please let me know, I'll be happy to document it as I perform the work.
jet
You should go ahead and do one with showing how to remove the wiring without cutting, definitely.
JazzMan
IP: Logged
12:34 AM
jetman Member
Posts: 7811 From: Sterling Heights Mich Registered: Dec 2002
Originally posted by JazzMan: You should go ahead and do one with showing how to remove the wiring without cutting, definitely. JazzMan
I just knew someone was going to ask that question! My 87 has power everything, it's going to be a bit more involved. I will document every step concerning the wiring when I do this rebuild.
Excellent writeup. I love it when people take the time to do such thorough write-ups. This is a job I will be performing shortly as well, and it's very comforting to have such clear documentation at my disposal when I go through with it. I have a question.
quote : Originally posted by jetman: I removed the upper frame hinge bracket (two 13MM bolts) and drilled it with a 31 / 64th drill bit to accept the new bushings.
Are the new bushings a slightly different size, or is this just to tidy up the original hole, and make it easer to insert the new bushings? On a related note, I've started a thread about my current door woes. Unfortunately, I'm replacing the pins and bushings as part of an uglier job. I'm really rather concerned, maybe you guys have some advice for me? https://www.fiero.nl/forum/Forum2/HTML/066140.html David
[This message has been edited by Notchie Luvin David (edited 08-20-2005).]
IP: Logged
10:40 AM
PFF
System Bot
jetman Member
Posts: 7811 From: Sterling Heights Mich Registered: Dec 2002
Dave, the upper frame hinge does not bushings in it. My door pins have elongated the holes so I did "the fix" by drilling out the holes to accept the same stock sized bushings. I had to perform the more advanced procedure in this well written thread.
There were no bushings in the top hinge? Must have changed by year or something. My 87 SC has factory bushings in the top hinge.
Adding them was a good idea.
Did they take allot to seat? Most times I work on doors I just tap them in with a block of wood and a small hammer.
I like hanging it with the engine lift. Much easier than the jack I use. I can do them myself with a jack but it's not easy. You can mess up a door real quick if it slips.
Putting the nylon washer in as mentioned in my cave will help save you from having to do this again soon even if the grease washes out. I've had that in mine a few years now and the bushings still fit like new top and bottom because all they have to take is rotaton of the pins. I used common oil based grease when I did them and most of that washed out some time ago.
------------------ Dr. Ian Malcolm: Yeah, but your scientists were so preoccupied with whether or not they could, they didn't stop to think if they should. (Jurasic Park)
There were no bushings in the top hinge? Must have changed by year or something. My 87 SC has factory bushings in the top hinge.
I will have to look at the 88, but the part he was refering to is the part of the hinge that mounts to the car. The part that mounts to the door has the bushings, but the other part does not, it is just a steel 'U' type bracket. That being said, maybe the newer cars have bushings on both sides of the hinge.
IP: Logged
12:40 PM
Blacktree Member
Posts: 20770 From: Central Florida Registered: Dec 2001
Nice write-up. I wish I had this as a reference when I rebuilt my door hinges a couple years ago.
I'd just like to add a note about the hinge pin retainers. They're not easy to remove. But the tabs that stick out can be broken with a small flathead screwdriver and some careful prying (bend the tabs back and forth until they break). IMO, breaking the tabs is alot easier than trying to completely remove the retainers.
Originally posted by Blacktree: I'd just like to add a note about the hinge pin retainers. They're not easy to remove. But the tabs that stick out can be broken with a small flathead screwdriver and some careful prying (bend the tabs back and forth until they break). IMO, breaking the tabs is alot easier than trying to completely remove the retainers.
Actually they are easy... the clip is split down one side. All you have to do is spin it round and spread the split. Then slide it up/down the pin toward the small end. Once out of the notch in the pin, it will keep right on going as you extract the pin. This trick is especially handy when you want/need to reuse the pins.
I've done mine already, but will have to add a bushing to the top hinge, as the hole is bigger than the pin. I didn't even think to check that when I was replacing the pins/bushings.
The wiring is no problem. There are connectors inside the hole on the frame that you can unplug.
------------------ FORMERLY KNOWN AS: sqoach (so, uh...yeah.........I'm not a noob) :p
IP: Logged
09:04 PM
Aug 21st, 2005
fiero-iwan Member
Posts: 352 From: Eindhoven,Netherlands,Europe Registered: Mar 2003
Hi Guys Nice write up! I rebuilt my hinges too but I took them off the car and doors. Now I want to reinstall them but cannot find the torque specs for bolting them to the door and the frame. Anybody able to provide the torque values please? (Note: the bottom hinge has a larger bolt which screws in from the "cabbin"-side)
Thanks for any help. Oh also any tips for correct allignment of the hinges are also welcome, as I cleaned the doors and frame too well I cannot see where the hinges used to be positioned...
Iwan
IP: Logged
09:05 AM
Oct 17th, 2005
2000RagTop Member
Posts: 3999 From: Sussex, (Milwaukee) Wi. USA, Earth Registered: Jun 2003