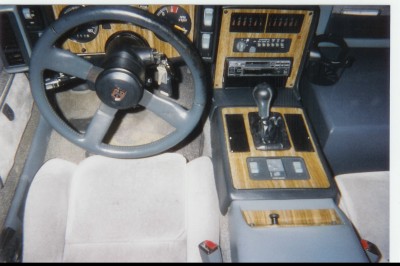
I just tried making some replacements for the stock parts with actual wood, I don't have the tools needed to make it look precise enough for my extremely high standards. Does anyone know where I can find some of the sticky-back vinyl sheets that are woodgrain? I can just take my time with that and make it come out really good.
IP: Logged
03:56 PM
PFF
System Bot
Gokart Member
Posts: 4635 From: Mashpee, Ma. USA Registered: May 99
Walmart or Christmas Tree Shop. That's how I did mine in my previous Fiero 5 years ago. I then coated them 3 times with polyurethane. I have to admit wood grain does look much better in beachwood/tan interior like I have now.
IP: Logged
06:52 PM
maxsideburn Member
Posts: 558 From: Lafayette, LA USA Registered: Feb 2005
You want contact shelf liner. It's a sticky vinyl.. Put it on, cut it perfectly, then hit it with a few layers of clear-coat. Then, if you want it to look really nice, use a two part clearcoat.
Your failure with real wood may have been do more to using the wrong wood than your expertise. Take a look at 1/8" or 1/16" aircraft plywood. You can find it at hobby shops. It stains up really nice and can be worked with exacto knives etc. With some high gloss poly it will look great.
why not woodgrain laminate? (formica) the edges would be black looking if i'm not mistaken
hmmm maybe i'll try that!
------------------ Denise, SE PA Black 86 SE, Jasper 2.8, 5spd iszsu (Carlise 1st place winner stock highmile notchback 2yrs! ) 86 SE stock 2.8, Ttop, 4spd muncie, restored, Yellow
IP: Logged
10:02 PM
PFF
System Bot
maxsideburn Member
Posts: 558 From: Lafayette, LA USA Registered: Feb 2005
why not woodgrain laminate? (formica) the edges would be black looking if i'm not mistaken
hmmm maybe i'll try that!
This is what Id go with too. Its REAL wood and you can finish it with urathane or just leave it as is and it wont fade out like 'printed' vinyl. Thats what a lot of the professional dash kits are made from.
IP: Logged
07:35 AM
maxsideburn Member
Posts: 558 From: Lafayette, LA USA Registered: Feb 2005
ok well after spending countless hours and lots of money on this project (all because my center console piece is scratched really badly) i'm now working on some aircraft plywood ones. I got 1/16, it pretty tough to cut with an exacto knife, but it can be done. It's taken me about 2 hours just to cut the first two holes in the instrument bezel, but it's getting there. I don't want to risk using power tools which could mess up all of my work, but it sure is slow going. Any suggestions to speed up the process are welcome. I've already tried my dremel tool with some cutting wheels, WAY too clumsy for this kind of work.
I will try to post some pics later of the instrument cluser bezel I'm working on.
People who work wood and laminates use what are called "pattern bits" on a router. they come in undercut and top cut. they have a bearing that will follow the edge of the pattern, coutertop, or in your case the holes in the plastic . they will give a perfect copy of the original. you can lay the old plastic coverrs on top of the new plywood or laminate. Use a router table. with an undercut bit which will actually have the bearing be showing at the top. not easy, but doable for the average woodworker.
Cut where your lines are (score deeply) w/ an Exacto knife (severs the grain) then use a snall coping saw from the hobbystore, use the finest (highest tooth count) blade you can find. Cut on the waste side of the line. Also check w/ a dental supply outfit, my pop was a dentist who did his own lab work and had some of the finest little coping saw blades you'd ever like to see, used 'em for cutting the models from impressions apart for crowns and bridges and such. Some of those blade were like a human hair, and just about as easy to break I might add. Norm
IP: Logged
12:39 AM
maxsideburn Member
Posts: 558 From: Lafayette, LA USA Registered: Feb 2005
well I just wasted some more money on a saw.......that brings the total to nearly $40 and still no progress at all. I don't have the tools to do the wood perfectly, and the stupid shelf paper stuff keep having defects in it when I cut it so I give up. $40 down the drain, when I'm out of work and down to less then $200, this sucks. My suggestion, just paint your panels, it will look like a$$ but only cost you a couple of bucks.
People who work wood and laminates use what are called "pattern bits" on a router. they come in undercut and top cut. they have a bearing that will follow the edge of the pattern, coutertop, or in your case the holes in the plastic . they will give a perfect copy of the original. you can lay the old plastic coverrs on top of the new plywood or laminate. Use a router table. with an undercut bit which will actually have the bearing be showing at the top. not easy, but doable for the average woodworker.
Denise
I prefer to use flush trimmer router bits in a trim router. They are very cheap and last forever on laminates and even veneer.
The bearing bits are ok, and come with the bearing either on the top or on the bottom of the cutting area, but most of the ones we have are worn and have so much slop in the bearing taht the finished product usually comes out a little smaller than what the original was. You can get them in a variety of configurations, including beverled, is you want to avoid the sudden 90 degree transition to your overlay--a ledge. http://www.oldham-usa.com/Products/BitsMain/LaminateMain.htm
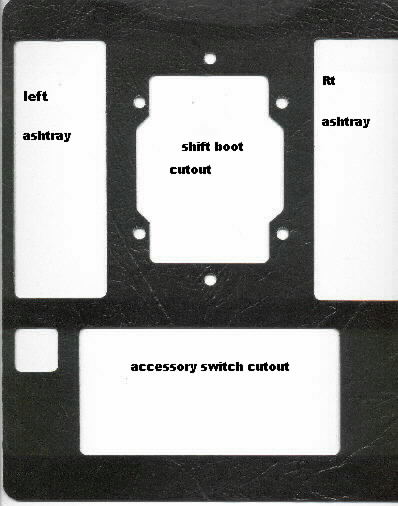
I've switched over tho, to using a cnc program and will be posting the G codes for the stero/ac surround, the instrument surround, and the 4 spd shift surrounds, as soon as I get them tweaked. I made this one from imitation black leather laminate. It wouldn't all fit on my scanner.
[This message has been edited by maryjane (edited 07-01-2005).]
IP: Logged
08:57 PM
Jul 2nd, 2005
Helo-mech Member
Posts: 161 From: Sauk Rapids, Minnesota, USA Registered: Feb 2002
Ive been considering doing the real wood method myself. I am planning on using my scroll saw to make the initial cuts and hand filing the corners and details, anyone use a method like that?
[This message has been edited by Helo-mech (edited 11-13-2005).]
IP: Logged
07:07 PM
Francis T Member
Posts: 6620 From: spotsylvania va. usa Registered: Oct 2003
Get yourself a dremmel drill and few cutting attachments. Ruff cut the holes and use the dremmel with very small router type bits to get close enough to sand. It will go so quick that even if you mess one up you won't get all that made because it will easy to do another. I've that stuff on my RC air craft and RC warships for years. It's not hard to do. Yeah I know you may need to buy a dremmel, but you'll lots of other uses out of it.
IP: Logged
08:51 PM
PFF
System Bot
Jul 3rd, 2005
maxsideburn Member
Posts: 558 From: Lafayette, LA USA Registered: Feb 2005