Wiht no classes for the summer it's time to start modding. I'm doing as the subject says poly all four corners, aluminum cradle mounts, and 11.25" brake up grade. I've done a little suspension work here and there but this will be a learning experience.
Front Sarting point
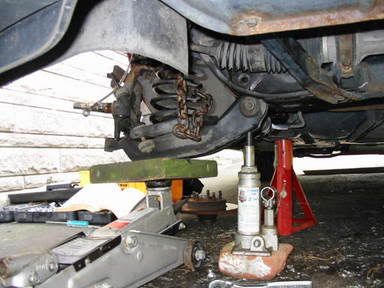
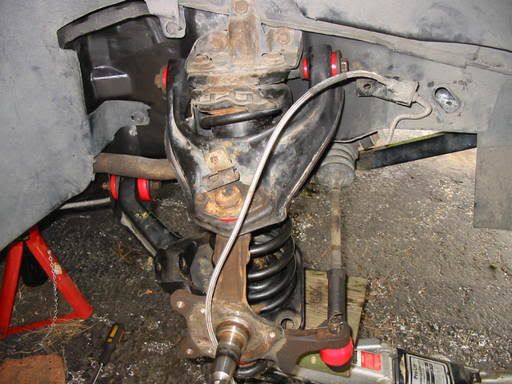
I ended up unbolting and lowering the lower control arm with two jacks before pressing out the upper and lower ball joints. This would work if one was just checking the bushings or didn't want to tear down the suspension completely. Make sure you chain the spring to the upper control arm for saftey.
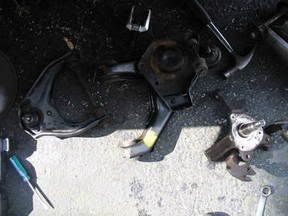
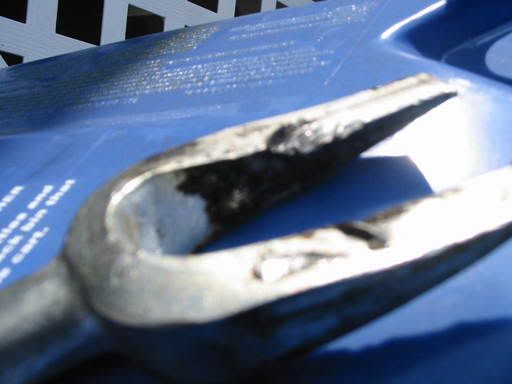
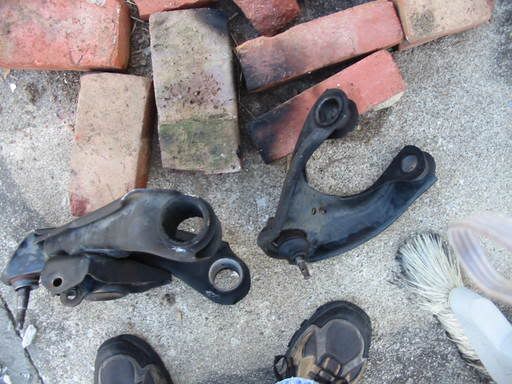
Here's the control arms and spindle the bolts came off with relative ease after being soaked with liquid wrench. I also had to loosen the steering rack to remove one of the lower control arm bolts and the brake line to get the upper control arm bolt out. My worn suspension. This is what the ball joints did to the pickle fork before switching to a press style ball joint remover.
more tomorrow
------------------ 87 GT - Poly dogbone, RD comp short shifter, Ultimate Getrag Shift Kit, No Cat, FS rear sway bar, poly suspension spring/summer 05' 87 Accord - Stock w/ dents and character
AHHHH the memories you brought back. Been there done that. It was a learning experience, but I did have fun doing it. Cursed a few times, but in the end I was happy.
------------------ 87 Fiero GT White / Blue Pearl T-Top, 3400 Turbo, 11.25" brakes Whaletail, Mecham Scoops, ZR1 Scoop T/A Fender Vents, Much Much More
My ply kit came from Summit and the solid cradle mounts from darrell morse. A little more work done.
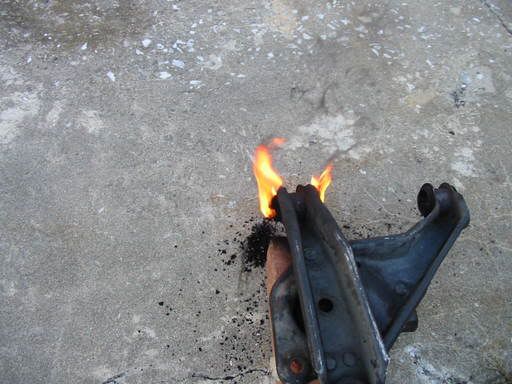
The more evenly you heat the bushing the less likely it will shoot out. After the inner sleeve is out you can pry the rest of the bushing out with a flathead screwdriver or push it out with a ball joint puller and a washer.
All bushings out
IP: Logged
04:23 PM
May 22nd, 2005
USFiero Member
Posts: 4879 From: Everywhere and Middle of Nowhere Registered: Mar 2002
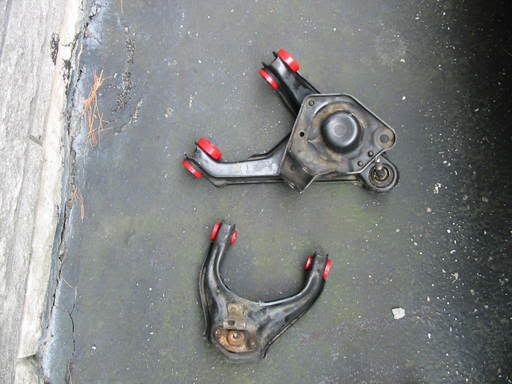
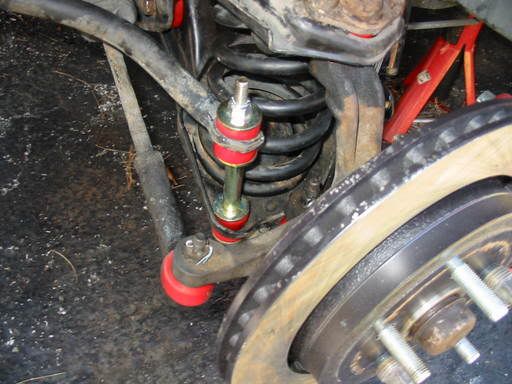
Progress has been made! The sleeves have been cleaned out and smoothed with a dremel tool and the poly has been installed. I did not find the need to freeze the poly in order to get it to fit in the sleeves. Almost all of them went in easily with hand pressure, then I pushed the inner sleeve in by hand as well. The ones I couldn't do by hand I used a $30 1/2 ton press.
After install:
Mounted to the car:
The upper arm is torqued to spec per the chiltons manual and the lower will be torqued when I have a normal suspension load on that corner of the car. I am now beginning to work on the labaron brake conversion using sluppy123's brackets. They mount to the spindle using 2" 7/16 grade 8 hex head bolts, with a lock washer. This setup requires you to open up the bracket mounting holes on the spindle to 7/16. I torqued the bolts to 80ft lbs, which is what the chiltons manual uses for the 88 fiero caliper bracket. Pics to come later.
IP: Logged
11:08 AM
Jun 7th, 2005
createnm2 Member
Posts: 137 From: Lexington, KY Registered: Oct 2003
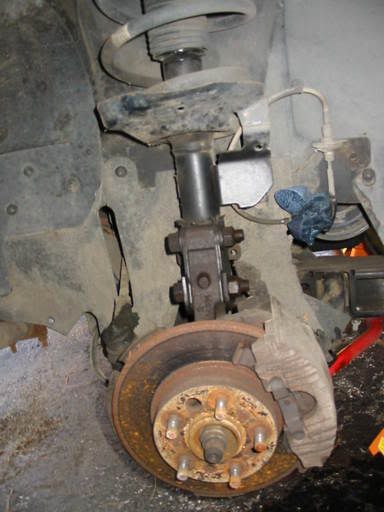
The dust shield needs needs to be modified to make clearence for the labaron rotor. I cut the outer lip off of it, then bent the rest of the shield back. After remounting the shield next came the modified hub.
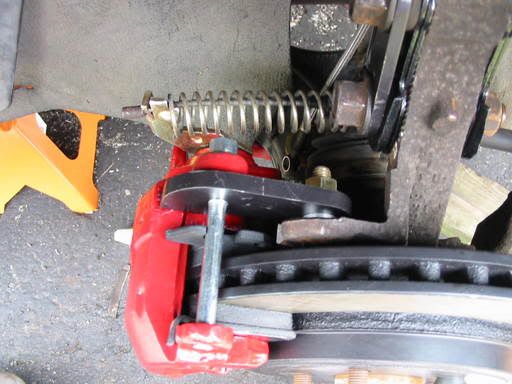
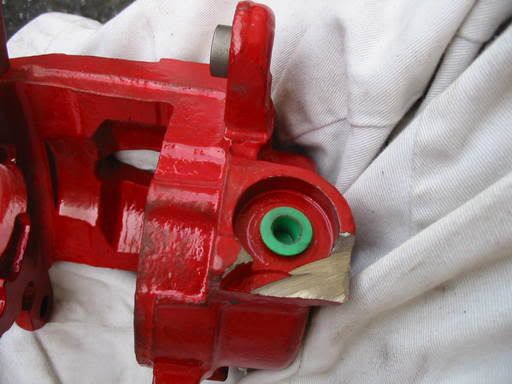
After mounting the rotor and caliper I found the stock opening for the brake line is blocked by the lower caliper bracket bolt. So some of the casting on the caliper need to come off to open up the space. This will give the line the clearence it needs off to the side of the bolt instead of between the caliper and the bolt. I have not seen anyone mention this problem and wonder if it has to do with this particular casting of the caliper or is it a standard problem.
Here's a shot of the assembly where you can see how the spacers are placed and how the dust shield is bent. It is by no means a perfect solution. Perhaps when I learn to weld I may rebuild the shield to look stock.
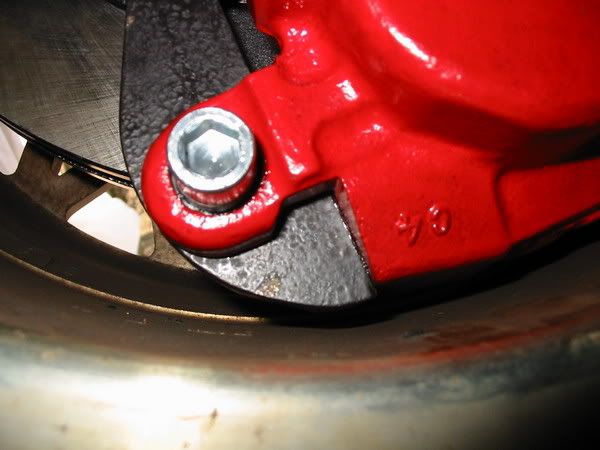
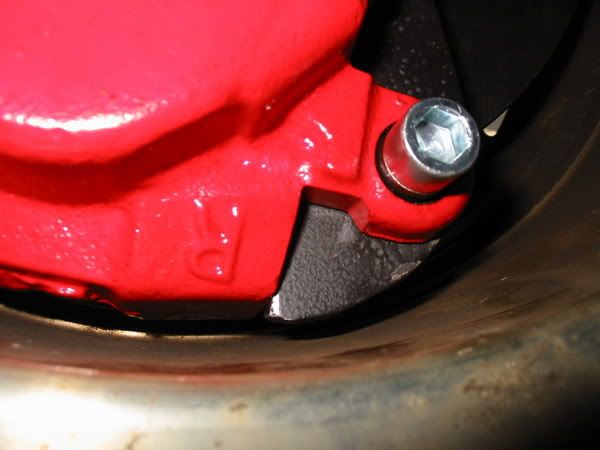
After mounting the caliper and the rotor I put a 87 GT wheel to see if it clears and if not to make modifications to the caliper. It cleared just fine. Shots of both ends of the caliper and under the wheel. Looks good.
Aside from remounting the swaybar, which will get done and covered when I do the front left side next, that is pretty much all that is to be done on this side. Brake bleeding won't happen until the other three corners are done and the master cylinder is replaced. Once the front left side is done I will drop the car long enough to torque the lower control arms to spec then start on the rear suspension and brakes. If winter hasn't set in by then the cradle bushings will be done last.
[This message has been edited by createnm2 (edited 06-07-2005).]
IP: Logged
12:32 AM
Jun 9th, 2005
opm2000 Member
Posts: 1347 From: Versailles, Ky USA Heart of the Bluegrass Registered: Dec 2000
Originally posted by createnm2: After mounting the rotor and caliper I found the stock opening for the brake line is blocked by the lower caliper bracket bolt. So some of the casting on the caliper need to come off to open up the space. This will give the line the clearence it needs off to the side of the bolt instead of between the caliper and the bolt. I have not seen anyone mention this problem and wonder if it has to do with this particular casting of the caliper or is it a standard problem.
ah you used the camaro caliper instead of the blazer/cadillac caliper - no need to do that with the blazer/cadillac caliper. I found it easy to just order the front and rear calipers for an 85 cadillac seville - the fronts are basicly identical to the camaro except in the mounting location of the hose and bleeder.
IP: Logged
09:34 AM
PFF
System Bot
John Boelte Member
Posts: 1012 From: Indianapolis, IN, USA Registered: Jun 2002
You could have gotten around that dust shield problem by just cutting them off... I'm not sure what protection they will offer like that if any at all. They may come back a bit and start rubbing the back of the rotor which would be a PITA. I cut mine off where they first start to curve so I could keep the dust shield around the hub. They worked out nicely. (This was done for the vette brakes)
(here's mine)
[This message has been edited by Jncomutt (edited 06-22-2005).]
Slow goes the work. I had the work done at Big Auger Machine chop in Lexington. The work they did looks good and so far fits good but I wanted to make sure the back was done right too. The ball joints and tie rod ends were all stiff with no play so I kept them. I should have the front left done Tuesday if all goes well then on to the back.
Will
IP: Logged
11:35 PM
Jun 21st, 2005
USFiero Member
Posts: 4879 From: Everywhere and Middle of Nowhere Registered: Mar 2002
How was re-installing those springs? I cut a coil out of mine and it was still a treat putting that all back together. I would really recommend replacing the lower front balljoints (I know it will be a huge pain now that you have it all together) since so many PFF posts talk about the catastrophic failure of original BJs. If you'd like to lower the front end I've heard good things about Rodney Dickman's replacement lowers to lower the front by an inch or so.
IP: Logged
11:41 AM
createnm2 Member
Posts: 137 From: Lexington, KY Registered: Oct 2003
The reinstall of the springs wasn't too bad except for being unsafe for a small period of time. The way I did it was to push the LCA down and push the spring onto it's seat. While holding it there I placed a bottle jack underneath the swaybar endlink mount and jacked it up until I didn't need to keep pressure on the spring to hold it in place( foot pressure will keep it on the seat until the LCA is raised some and two people would make the job easier). Then I immediately chained the spring incase it decided to come flying out. That is the dangerous part. The rest is just reinstall of the spindle.
IP: Logged
12:55 PM
Jun 22nd, 2005
createnm2 Member
Posts: 137 From: Lexington, KY Registered: Oct 2003
A little update. I got the left side back together and will be reinstalling the swaybar and starting on the rear hopefully. I cleaned up the dust shields as Jncomutt recomended and while installing the new caliper bracket I found that when it was torqued properly it would warp due to the area around the bolt holes not being level. A little bit of grinding, less than 1mm probably, fixed the problem of the caliper pins not lining up properly. This side also needed a small amount of grinding on the caliper front for clearence of the wheel(machine boses). It had about a standard washer's worth of space between the wheel and the caliper.
------------------ 87 GT - Poly dogbone, RD comp short shifter, Ultimate Getrag Shift Kit, No Cat, FS rear sway bar, poly suspension spring/summer 05' 87 Accord - Stock w/ dents and character
IP: Logged
12:13 AM
Jun 27th, 2005
createnm2 Member
Posts: 137 From: Lexington, KY Registered: Oct 2003
The swaybar has been mounted and I have moved on to the back of the car. When removing the swaybar mark one end to ensure proper installation. The pictures I've been taking covered my butt on that problem, as to on one side the hole for the endlink is kind of squared off.
Now for the rear corners.
The best method for doing this upgrade is to remove the LCR without disconecting the strut or the tie-rod. After swaping the bushings reinstall the LCR then disconnect the tie-rod, while supporting the spindle and LCR with a jack or someting stable. I used twine to also support the spindle from the lower strut bolt holes, on the spindle, to the upper strut bolt holes, on the chassis. For the brake portion a sawzall is very handy to remove part of the original brake caliper bracket casting and a grinder to remove about 1/2 an inch off of the brake shield to clear the new rotor. Pics for this will be coming tomorrow.
IP: Logged
12:33 AM
Jun 28th, 2005
aaronrus Member
Posts: 870 From: bradenton, FL USA Registered: Nov 2003
Due to upcoming events(getting married in one month) I had to put a rush on finishing the suspension and brakes and hold off on the cradle bushings, which kept me from being more detailed with the rest of the buildup. Here's some pics of the rear finished.
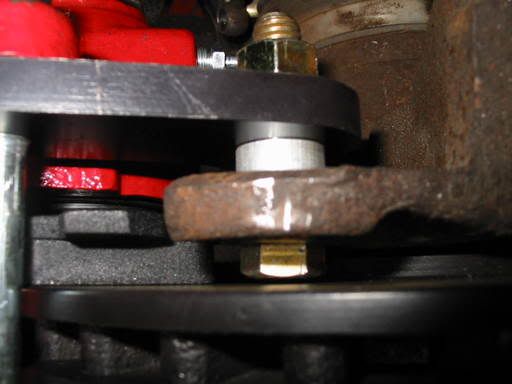
The second pic shows the caddy parking brake lever being used. In walts instructions it says to use the fiero's lever but I believe the caddy one would be fine. This pic shows the clearence between the caliper bracket bolt head and the rotor. It is a very tight fit and the knuckle needs to be ground down in order for the bolt head to clear. When measuring the clearence on this keep in mind that the rotor will sit closer when it is completely torqued down when a wheel is mounted. I made this mistake and had to have the rotor lathed. The rest of the install is pretty straight foward. Follow bleeding instructions per the chiltons/hayes manual. Then have a good alignment done. Make sure the LCR are not torqued to spec unless the car is off jackstands and sitting at normal ride height.
My final thoughts on the suspension is that is feels much tighter, but I also removed 18 year old rubber and worn out struts and shocks. The brakes feel much better, but I will definitely consider an adjustable proportioning valve to help balance the braking power. There is a much more pronounced nose dive under anything but normal braking. The pedal travel is good. In about two weeks or so I will start picking on the car post more. Until later peoples.


.JPG)

 I too, am a weekend pyromaniac, burining control arm bushings just for fun