Pennock's Fiero Forum
  Technical Discussion & Questions - Archive
  Started the hood vent install today...with pics

T H I S   I S   A N   A R C H I V E D   T O P I C
  

Email This Page to Someone! | Printable Version


Started the hood vent install today...with pics by Zoom88
Started on: 09-18-2004 08:36 PM
Replies: 30
Last post by: Zoom88 on 10-04-2004 07:50 AM
Zoom88
Member
Posts: 3838
From: Louisiana
Registered: Oct 2001


Feedback score:    (6)
Leave feedback


Total ratings: 137
Rate this member

Report this Post09-18-2004 08:36 PM Click Here to See the Profile for Zoom88Click Here to visit Zoom88's HomePageSend a Private Message to Zoom88Direct Link to This Post
Decided to start the Hood vent mod today.
I purchased the hood vent from Rockcrawl.
http://fp.enter.net/~rockcrawl/index2.html
You have to Email him for info. or to purchase a hood vent from him. They are of excellent quality.

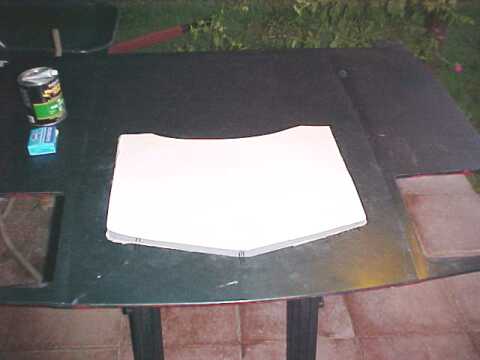
Sorry I didn't think of taking pics until after I cut the hole out. But Rockcrawl's instructions are very clear.
Here is a brief summary of what I did. This is not in the instruction nor is it required. Its just the way I did it. I got a sheet of poster board and made a template.
I then layed the template out on the hood and centered it according to the instructions.

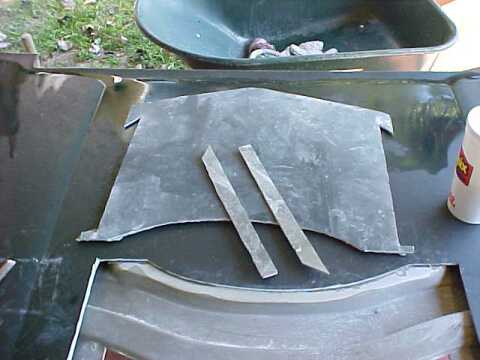
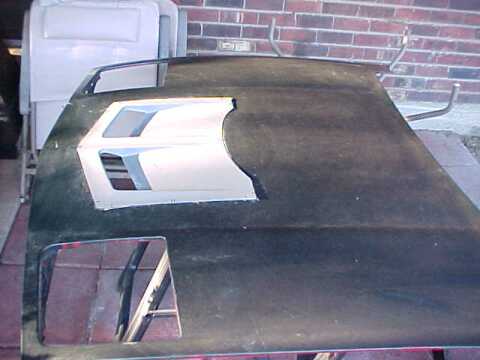
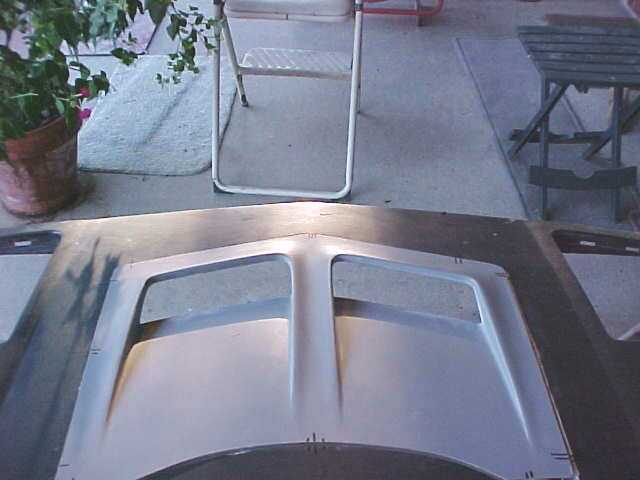
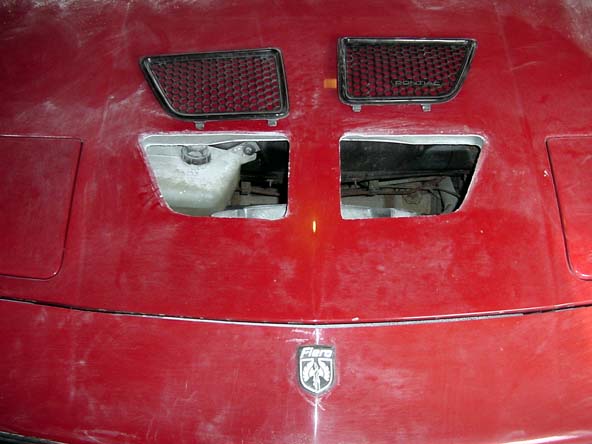
I can't stress how important it is to check and double check your measurements.
I then place a couple of pieces of tape on it to keep it in place while I traced it on to the hood.
After that I used a dremel tool with a reinforced cutting wheel on it.
Just a note before we go on that the hood is made up of 2 layers the top of the hood is one layer and the underside is the other. They can be seperated and this is what you want to acheive first.
We do this by carefully cutting only through the top layer. It is not that hard, if you go slow and watch carefully you will see when you have cut through the first layer. Once it is cut you can use a screw driver or something with a flat end on it to pry the top layer off of the bottom layer. The reason you have to pry it up is because it is spot glued together but is not that hard to seperate.
I then cutout the hole in the bottom layer just enough for the section of the vent that sits down into the hood itself, (section of the vent that you cut the air holes in)

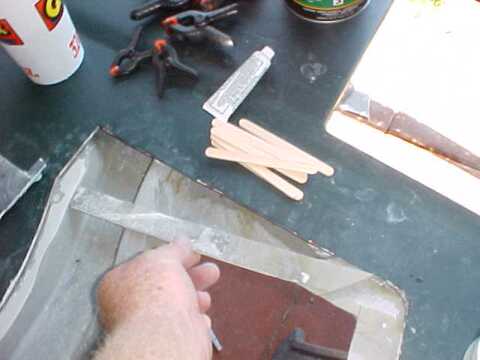
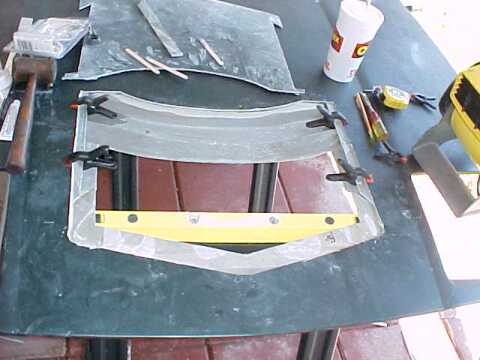
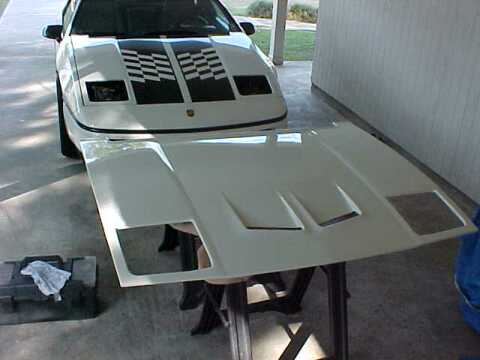
Once you have every thing trimmed up and cleaned like you want it I then took the piece of panel I cut out and cut 2 strips to use as support along the sides where there is no support or ledge for the hood vent to sit on. You can see it better in the pics.
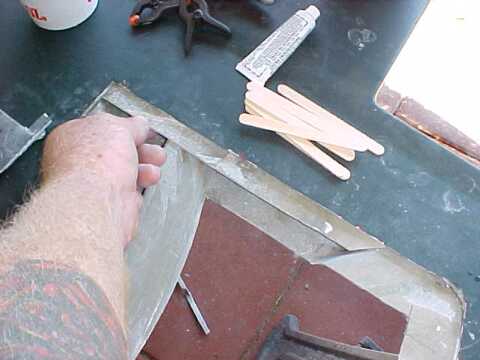
Checking fit.

Put some glue on them and glue them in. Used Evercoat made by Plastikworks SMC adhesive.
Same stuff I will use to glue the hood vent onto the hood.

Clamp down and let dry


IP: Logged
PFF
System Bot
Zoom88
Member
Posts: 3838
From: Louisiana
Registered: Oct 2001


Feedback score:    (6)
Leave feedback


Total ratings: 137
Rate this member

Report this Post09-18-2004 08:47 PM Click Here to See the Profile for Zoom88Click Here to visit Zoom88's HomePageSend a Private Message to Zoom88Direct Link to This Post
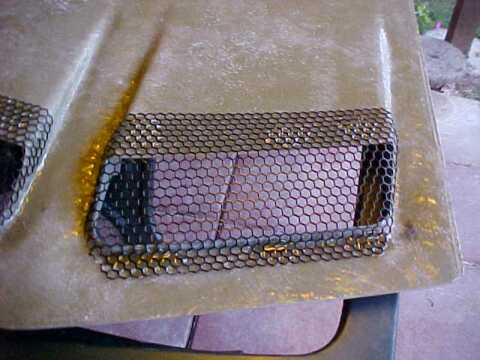
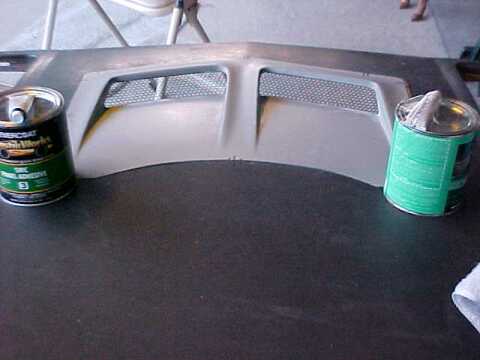
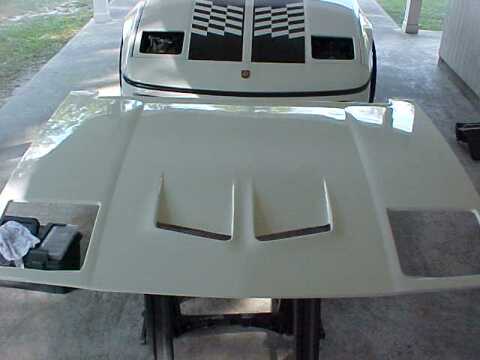
Thats as far as I got today. Other than I did cut out the holes in the vent itself.
And then cut and bent some screen mesh to fit the holes. I used the octagon mesh you find on the backs of some rear engine vents.

I painted them and and am at a stand still now until I decide what would be the best way to secure them to the hood vent.
I will add to this thread once I start working on it again.

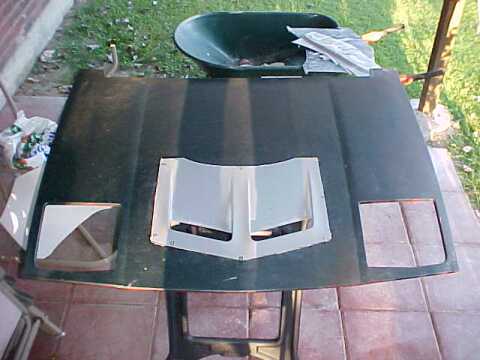
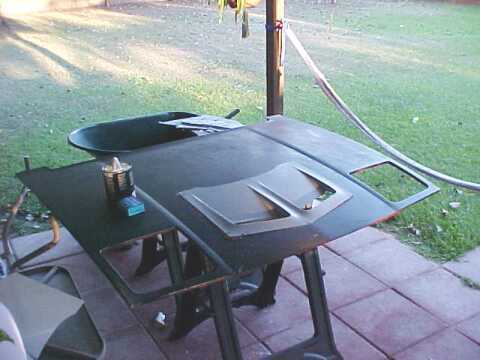
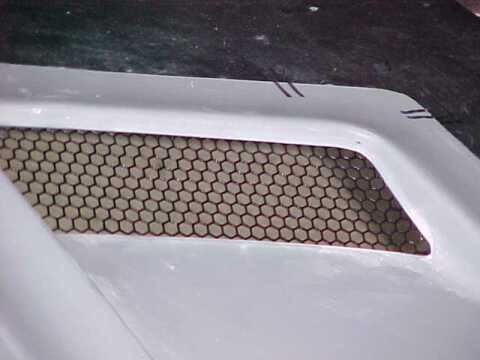
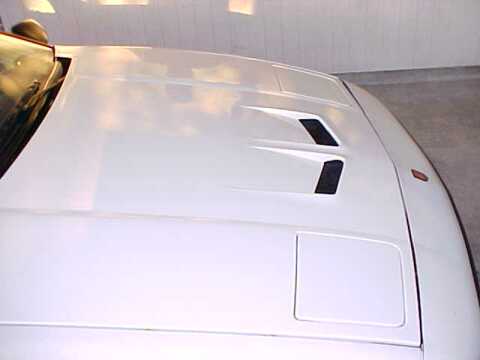
Here are some pics of it just sitting in place ready to be glued down.
Another note is to get the top of the vent and the hood itself level it must be shimmed. I used flat tooth picks and super glue them in place on the lip the vent will sit on. I stacked the tooth pics in areas it needed to be thicker.

IP: Logged
yons
Member
Posts: 914
From: colliers,wv
Registered: Sep 2003


Feedback score: N/A
Leave feedback

Rate this member

Report this Post09-18-2004 09:54 PM Click Here to See the Profile for yonsSend a Private Message to yonsDirect Link to This Post
looks great so far post some pics of it when you get it done

------------------
If you need anything give them a call Chimera Customs
727-939-1014

IP: Logged
Her86GT
Member
Posts: 1173
From: Ontario, Canada
Registered: May 2001


Feedback score: N/A
Leave feedback


Total ratings: 53
Rate this member

Report this Post09-18-2004 10:01 PM Click Here to See the Profile for Her86GTClick Here to visit Her86GT's HomePageSend a Private Message to Her86GTDirect Link to This Post
It's looking really good and familiar! I know Pete always says that he wished he didn't rush when he did mine because the chemicals shrink and sink into the cracks. If you can, let it sit for a couple of weeks before you are completly ready to paint. Mine was seamless for about two weeks then it sank. The seam was then really noticable. When I had my bumper damaged in the spring, the body shop redid around the extractor vents for me and painted again. It now looks good again. Just a thought.

Becky

IP: Logged
NotAFieroAnyLonger
Member
Posts: 4413
From: 75762/Texas/USA
Registered: Dec 2003


Feedback score: N/A
Leave feedback


Total ratings: 255
Rate this member

Report this Post09-18-2004 10:05 PM Click Here to See the Profile for NotAFieroAnyLongerSend a Private Message to NotAFieroAnyLongerDirect Link to This Post
 
quote
Originally posted by Her86GT:

It's looking really good and familiar! I know Pete always says that he wished he didn't rush when he did mine because the chemicals shrink and sink into the cracks. If you can, let it sit for a couple of weeks before you are completly ready to paint. Mine was seamless for about two weeks then it sank. The seam was then really noticable. When I had my bumper damaged in the spring, the body shop redid around the extractor vents for me and painted again. It now looks good again. Just a thought.

Becky

Becky...
What did Pete use for it.??

Zoom.. Look's great and I can tell that it is alot easier doing it like this instead of doing it from scratch....

SmoothGT!

------------------
----------------------------------
*Custom-Shaved HandBuilt!!*
*FIRST-EVER CHOPTOP-WIDEBODY GT!!*

(( 4.9L-V8-5speed)) swap soon
-----------------------------------------------

IP: Logged
fiero67
Member
Posts: 2397
From: Maine
Registered: Jan 2003


Feedback score:    (13)
Leave feedback


Total ratings: 107
Rate this member

Report this Post09-18-2004 10:08 PM Click Here to See the Profile for fiero67Send a Private Message to fiero67Direct Link to This Post
awesome work in progress. I was wondering what it looked like between the two panels of the front hood. Thanks and keep the pics coming. John

------------------

IP: Logged
PBJ
Member
Posts: 4167
From: London, On., Canada
Registered: Jan 2001


Feedback score: (1)
Leave feedback


Total ratings: 147
Rate this member

Report this Post09-18-2004 10:08 PM Click Here to See the Profile for PBJSend a Private Message to PBJDirect Link to This Post
 
quote
Originally posted by NotAFieroAnyLonger:


What did Pete use for it.??


I have no idea, I used what was recommended by the painter, I know it came out of a double barrel tube that mixes in the nozzle. Sorry not much help.

Pete

IP: Logged
CTFieroGT87
Member
Posts: 2520
From: Royal Oak, MI
Registered: Oct 2002


Feedback score:    (13)
Leave feedback


Total ratings: 59
Rate this member

Report this Post09-18-2004 11:00 PM Click Here to See the Profile for CTFieroGT87Send a Private Message to CTFieroGT87Direct Link to This Post
What type of saw did you use to cut the hood itself? I'm about to do this too.
IP: Logged
1MohrFiero
Member
Posts: 4363
From: Paducah, Ky
Registered: Apr 2003


Feedback score:    (37)
Leave feedback


Total ratings: 157
Rate this member

Report this Post09-19-2004 08:08 AM Click Here to See the Profile for 1MohrFieroSend a Private Message to 1MohrFieroDirect Link to This Post
Looks really good Zoom. Cut it out, you are giving me too many ideas!

------------------

IP: Logged
Zoom88
Member
Posts: 3838
From: Louisiana
Registered: Oct 2001


Feedback score:    (6)
Leave feedback


Total ratings: 137
Rate this member

Report this Post09-19-2004 08:38 AM Click Here to See the Profile for Zoom88Click Here to visit Zoom88's HomePageSend a Private Message to Zoom88Direct Link to This Post
 
quote
Originally posted by CTFieroGT87:

What type of saw did you use to cut the hood itself? I'm about to do this too.

I used a dremel tool with a reinforced cutting wheel on it.

IP: Logged
Zoom88
Member
Posts: 3838
From: Louisiana
Registered: Oct 2001


Feedback score:    (6)
Leave feedback


Total ratings: 137
Rate this member

Report this Post09-19-2004 09:03 AM Click Here to See the Profile for Zoom88Click Here to visit Zoom88's HomePageSend a Private Message to Zoom88Direct Link to This Post

Zoom88

3838 posts
Member since Oct 2001
 
quote
Originally posted by yons:

looks great so far post some pics of it when you get it done

Thanks, I appreciate it !!

 
quote
Originally posted by Her86GT:

It's looking really good and familiar! I know Pete always says that he wished he didn't rush when he did mine because the chemicals shrink and sink into the cracks. If you can, let it sit for a couple of weeks before you are completly ready to paint. Mine was seamless for about two weeks then it sank. The seam was then really noticable. When I had my bumper damaged in the spring, the body shop redid around the extractor vents for me and painted again. It now looks good again. Just a thought.

Becky

A BIG THANK YOU to you Becky for your help, the tips, Pics and the measurement I asked you for. I will take your advice and let it sit for a few weeks before sending it to the painter.

 
quote
Originally posted by NotAFieroAnyLonger:

Zoom.. Look's great and I can tell that it is alot easier doing it like this instead of doing it from scratch....

SmoothGT!

Thanks, makes it alot easier also when you have quality merchandise to work with !!!

 
quote
Originally posted by fiero67:

awesome work in progress. I was wondering what it looked like between the two panels of the front hood. Thanks and keep the pics coming. John

Thanks, John

 
quote
Originally posted by 1MohrFiero:

Looks really good Zoom. Cut it out, you are giving me too many ideas!

What You mean I did cut it out !!!
No really I appreciate it and if I can help you with any of those ideas in the future just let me know !!!

IP: Logged
PFF
System Bot
wetpoop
Member
Posts: 921
From: Baltimore Maryland USA
Registered: Feb 2004


Feedback score: N/A
Leave feedback

Rate this member

Report this Post09-19-2004 04:35 PM Click Here to See the Profile for wetpoopSend a Private Message to wetpoopDirect Link to This Post
looks good I really like that style vent. Maybe one day I'll get it together to do that.
IP: Logged
Zoom88
Member
Posts: 3838
From: Louisiana
Registered: Oct 2001


Feedback score:    (6)
Leave feedback


Total ratings: 137
Rate this member

Report this Post09-19-2004 08:17 PM Click Here to See the Profile for Zoom88Click Here to visit Zoom88's HomePageSend a Private Message to Zoom88Direct Link to This Post
Here is a pic of one of the screens I made I used clear epoxy to hold it in you can still see where ever I put the Epoxy.

Here is a close up.

Hopefully I'll have time to glue the vents down to the hood tomorrow evening.

IP: Logged
wetpoop
Member
Posts: 921
From: Baltimore Maryland USA
Registered: Feb 2004


Feedback score: N/A
Leave feedback

Rate this member

Report this Post09-19-2004 09:51 PM Click Here to See the Profile for wetpoopSend a Private Message to wetpoopDirect Link to This Post
were did you get the honeycomb mesh screen?
IP: Logged
JamesCurtis
Member
Posts: 2019
From: Omaha, NE
Registered: Oct 2003


Feedback score: N/A
Leave feedback


Total ratings: 64
Rate this member

Report this Post09-19-2004 10:21 PM Click Here to See the Profile for JamesCurtisSend a Private Message to JamesCurtisDirect Link to This Post
+ from me! i was thinkin about doin the exact same thing. Keep up the great work!

James

IP: Logged
TaurusThug
Member
Posts: 4271
From: Simpsonville, SC
Registered: Aug 2003


Feedback score: N/A
Leave feedback


Total ratings: 102
Rate this member

Report this Post09-19-2004 11:53 PM Click Here to See the Profile for TaurusThugSend a Private Message to TaurusThugDirect Link to This Post
only if i had to place to take my car apart... you get a plus from me because that looks like its gonna look REALLY slick when its painted

------------------
'86 Fiero GT

www.KylesFiero.tk www.XoticRydz.tk

IP: Logged
Roylmohr
Member
Posts: 1269
From: Galion,OH
Registered: Feb 2003


Feedback score: N/A
Leave feedback

Rate this member

Report this Post09-20-2004 12:10 AM Click Here to See the Profile for RoylmohrSend a Private Message to RoylmohrDirect Link to This Post
Yep looks really good and I love the screen too. You will really like the cooling benifits of that hood as well. My cars runs alot cooler now since I made my hood vent.

Good work keep us posted.

IP: Logged
Rickker
Member
Posts: 268
From: Kingston, ON Canada
Registered: Feb 2002


Feedback score: N/A
Leave feedback

Rate this member

Report this Post09-20-2004 10:02 AM Click Here to See the Profile for RickkerSend a Private Message to RickkerDirect Link to This Post
Well done, Zoom88! Nice pics and very helpful step by step information. I have been researching the various different hood vent designs and approaches, and this one seems hard to beat. Looking forward to seeing more pics leading to the finished product.

...Rickker
'88GT/3800SC

IP: Logged
MinnGreenGT
Member
Posts: 11545
From: Lakeville, MN 55044
Registered: Jul 2001


Feedback score: (1)
Leave feedback


Total ratings: 274
Rate this member

Report this Post09-20-2004 10:12 AM Click Here to See the Profile for MinnGreenGTClick Here to visit MinnGreenGT's HomePageSend a Private Message to MinnGreenGTDirect Link to This Post
Looking Good Zoom!

Becky's advice is right on! - mine is back at the painters right now for that very reason... it settled noticably less than a month after we finished painting it. Doh!

------------------

Looking for Fiero posters?

IP: Logged
Zoom88
Member
Posts: 3838
From: Louisiana
Registered: Oct 2001


Feedback score:    (6)
Leave feedback


Total ratings: 137
Rate this member

Report this Post09-20-2004 12:36 PM Click Here to See the Profile for Zoom88Click Here to visit Zoom88's HomePageSend a Private Message to Zoom88Direct Link to This Post
 
quote
Originally posted by wetpoop:

were did you get the honeycomb mesh screen?

I used the honeycomb mesh you find on the backs of some rear engine vents.

 
quote
Originally posted by JamesCurtis:

+ from me! i was thinkin about doin the exact same thing. Keep up the great work!

James

Thanks, You will be happy !!

 
quote
Originally posted by TaurusThug:

only if i had to place to take my car apart... you get a plus from me because that looks like its gonna look REALLY slick when its painted

Thanks, I am sorta the same way. I work on mine were ever I can. I'm in the dog house right now because I am working on the back patio/porch doing this hood. And this is where the wife keeps all her plants. She has this one plant I keep running into and breaking off the limbs.

 
quote
Originally posted by Roylmohr:

Yep looks really good and I love the screen too. You will really like the cooling benifits of that hood as well. My cars runs alot cooler now since I made my hood vent.

Good work keep us posted.

Thanks, I can't hardly wait to get it finished ....but I am going to restrain myself and take my time !!

 
quote
Originally posted by Rickker:

Well done, Zoom88! Nice pics and very helpful step by step information. I have been researching the various different hood vent designs and approaches, and this one seems hard to beat. Looking forward to seeing more pics leading to the finished product.

...Rickker
'88GT/3800SC

Thank you, I will post the pics once I get it painted....will probably be within the next month. I am going to take the advice of several members and let it sit for awhile before painting and see if any shrinkage or cracks develope.

 
quote
Originally posted by MinnGreenGT:

Looking Good Zoom!

Becky's advice is right on! - mine is back at the painters right now for that very reason... it settled noticably less than a month after we finished painting it. Doh!

Thanks MinnGreenGT, I appreciate your advice and info. exchanged in our Emails. Look out my car is going to catch up with yours soon !!!
Still have the fender vents to go and I am going to change my side scoops. Once that is done I believe I will call it quits on the body mods and get to work on a motor.


Thanks to everyone once again, I really appreciate all the comments !!

[This message has been edited by Zoom88 (edited 09-20-2004).]

IP: Logged
rockcrawl
Member
Posts: 2528
From: Lehigh Valley, PA
Registered: Jul 2000


Feedback score: N/A
Leave feedback


Total ratings: 96
Rate this member

Report this Post09-20-2004 04:58 PM Click Here to See the Profile for rockcrawlClick Here to visit rockcrawl's HomePageSend a Private Message to rockcrawlDirect Link to This Post
Let the hood bake in the sun for a couple days before it gets painted. Tell the painter to put an extra coat of clear on the hood. If the filler shrinks later you can wet sand the clear and buff it out and the lines will disapear. If it shrinks within a few days after painting, don't be in a rush to buff it out, wait a month or two to let it fully cure. You'll only need to do it once and there will be less chance of sanding through the paint if you only do it once.
IP: Logged
PFF
System Bot
Zoom88
Member
Posts: 3838
From: Louisiana
Registered: Oct 2001


Feedback score:    (6)
Leave feedback


Total ratings: 137
Rate this member

Report this Post09-20-2004 07:59 PM Click Here to See the Profile for Zoom88Click Here to visit Zoom88's HomePageSend a Private Message to Zoom88Direct Link to This Post
 
quote
Originally posted by rockcrawl:

Let the hood bake in the sun for a couple days before it gets painted. Tell the painter to put an extra coat of clear on the hood. If the filler shrinks later you can wet sand the clear and buff it out and the lines will disapear. If it shrinks within a few days after painting, don't be in a rush to buff it out, wait a month or two to let it fully cure. You'll only need to do it once and there will be less chance of sanding through the paint if you only do it once.

Thanks Rockcrawl, I appreciate your input !!
Love the scoop by the way !

IP: Logged
Blacktree
Member
Posts: 20770
From: Central Florida
Registered: Dec 2001


Feedback score:    (12)
Leave feedback


Total ratings: 350
Rate this member

Report this Post09-21-2004 12:46 PM Click Here to See the Profile for BlacktreeClick Here to visit Blacktree's HomePageSend a Private Message to BlacktreeDirect Link to This Post
I get my honeycomb mesh here.
IP: Logged
Zoom88
Member
Posts: 3838
From: Louisiana
Registered: Oct 2001


Feedback score:    (6)
Leave feedback


Total ratings: 137
Rate this member

Report this Post09-21-2004 02:40 PM Click Here to See the Profile for Zoom88Click Here to visit Zoom88's HomePageSend a Private Message to Zoom88Direct Link to This Post
 
quote
Originally posted by Blacktree:

I get my honeycomb mesh here.

Very nice info !! Thanks Blacktree...worth a + from me if I haven't already given you one !!!!

IP: Logged
Zoom88
Member
Posts: 3838
From: Louisiana
Registered: Oct 2001


Feedback score:    (6)
Leave feedback


Total ratings: 137
Rate this member

Report this Post09-21-2004 02:42 PM Click Here to See the Profile for Zoom88Click Here to visit Zoom88's HomePageSend a Private Message to Zoom88Direct Link to This Post

Zoom88

3838 posts
Member since Oct 2001
Keeping in mind Rockcrawls advice. The hood went to the painters today !!!
IP: Logged
wetpoop
Member
Posts: 921
From: Baltimore Maryland USA
Registered: Feb 2004


Feedback score: N/A
Leave feedback

Rate this member

Report this Post09-21-2004 04:35 PM Click Here to See the Profile for wetpoopSend a Private Message to wetpoopDirect Link to This Post
BlackTree that link is worth a + from me too
Zoom88 make sure we get pics when you get it back.
IP: Logged
Zoom88
Member
Posts: 3838
From: Louisiana
Registered: Oct 2001


Feedback score:    (6)
Leave feedback


Total ratings: 137
Rate this member

Report this Post09-27-2004 07:24 PM Click Here to See the Profile for Zoom88Click Here to visit Zoom88's HomePageSend a Private Message to Zoom88Direct Link to This Post
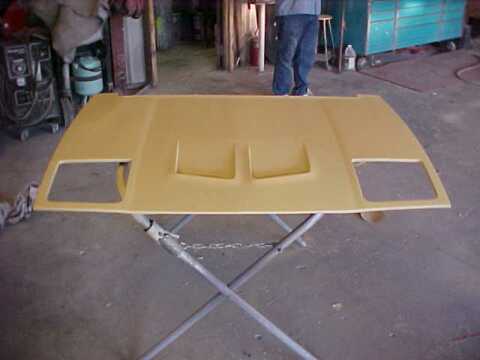
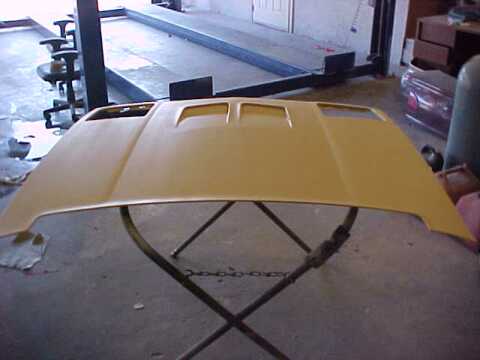
Visit to the paint shop. Hood is to be blocked sanded tommorrow and it should be ready Wednes. !!
I had them fix one of the lips that the headlight door sits on, everything looks good so far !!! Can't stand the wait !!
And no I am not painting it yellow !! (wife wanted to know why I had it painted yellow)

[This message has been edited by Zoom88 (edited 09-27-2004).]

IP: Logged
1MohrFiero
Member
Posts: 4363
From: Paducah, Ky
Registered: Apr 2003


Feedback score:    (37)
Leave feedback


Total ratings: 157
Rate this member

Report this Post09-27-2004 07:36 PM Click Here to See the Profile for 1MohrFieroSend a Private Message to 1MohrFieroDirect Link to This Post
That really looks nice. I know it is killing you to wait.

What part of Louisiana are you in? I am applying for a job at Barksdale AFB (Shreveport). I should know if I get it within a few weeks.

IP: Logged
Zoom88
Member
Posts: 3838
From: Louisiana
Registered: Oct 2001


Feedback score:    (6)
Leave feedback


Total ratings: 137
Rate this member

Report this Post09-27-2004 07:50 PM Click Here to See the Profile for Zoom88Click Here to visit Zoom88's HomePageSend a Private Message to Zoom88Direct Link to This Post
 
quote
Originally posted by 1MohrFiero:

That really looks nice. I know it is killing you to wait.

What part of Louisiana are you in? I am applying for a job at Barksdale AFB (Shreveport). I should know if I get it within a few weeks.

Thanks
I live just outside of Baton Rouge.


IP: Logged
Zoom88
Member
Posts: 3838
From: Louisiana
Registered: Oct 2001


Feedback score:    (6)
Leave feedback


Total ratings: 137
Rate this member

Report this Post10-01-2004 07:41 PM Click Here to See the Profile for Zoom88Click Here to visit Zoom88's HomePageSend a Private Message to Zoom88Direct Link to This Post
Ok its been a long day but the Hood is finished. Sun is just starting to go down so the lighting is not so good but I will take others later.

IP: Logged
Zoom88
Member
Posts: 3838
From: Louisiana
Registered: Oct 2001


Feedback score:    (6)
Leave feedback


Total ratings: 137
Rate this member

Report this Post10-04-2004 07:50 AM Click Here to See the Profile for Zoom88Click Here to visit Zoom88's HomePageSend a Private Message to Zoom88Direct Link to This Post
IP: Logged
PFF
System Bot


All times are ET (US)

T H I S   I S   A N   A R C H I V E D   T O P I C
  

Contact Us | Back To Main Page

Advertizing on PFF | Fiero Parts Vendors
PFF Merchandise | Fiero Gallery
Real-Time Chat | Fiero Related Auctions on eBay


Copyright (c) 1999, C. Pennock