Thought I'd show how I repaired one of my busted wing stantions. I had gotten a really good deal on the wing setup, so I wasn't complaining about the stantion too much. I had searched around, and finding a replacement stantion or pair of stantions is difficult, without buying an aftermarket set or a whole wing setup. I didn't have the bucks to buy an aftermarket set. I figured, what is it going to hurt if I try to repair my broken stantion? It's already broke. If anything I am out a little cash, maybe $10.00, and time. On the good side I gained experience and if all goes right, I get the stantion back into good condition.
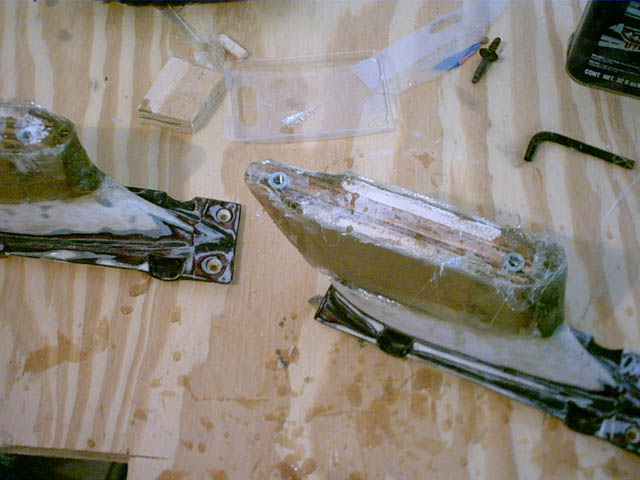
The stantion looked as if someone tried to steal the spoiler right off the decklid by pulling up on one side, noticed it was breaking the spoiler/stantion, not the deck, and decided not to take it afterall.
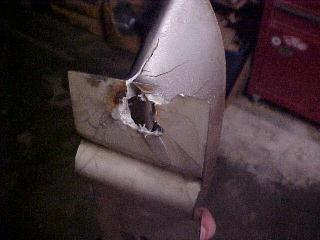
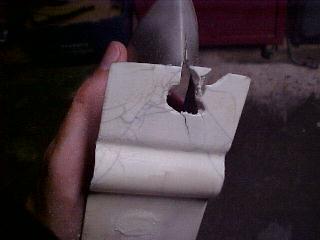
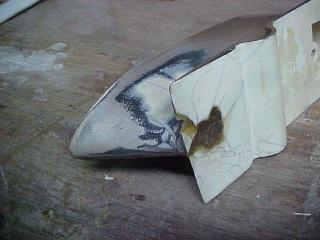
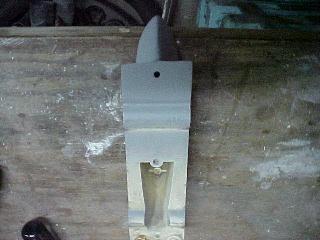
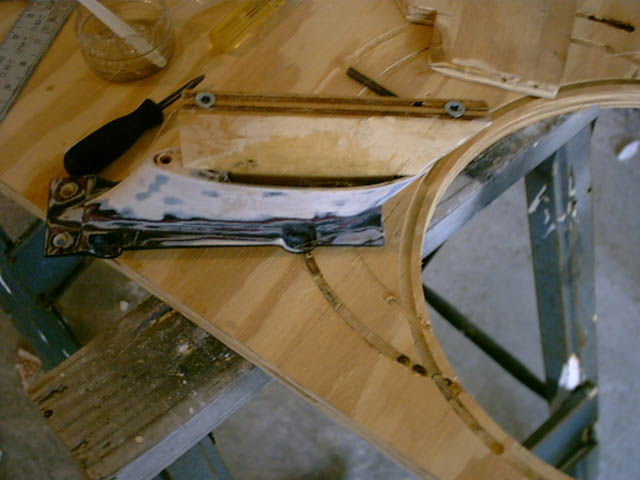
Here is the damaged stantion, right where the screw goes.
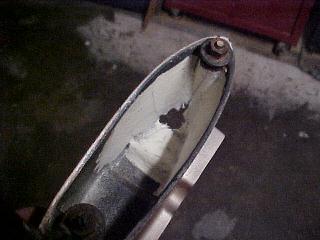
I used a dremel type tool to clean up the dirt and rough up the damaged area
didn't get a pic, but next on the exterior of the stantion I smoothly covered the damaged area with masking tape, to mold the resin to the original shape when poured inside the stantion. Before doing this project, I experimented with a couple epoxies and with fiberglass resin on the top of the stantion. I roughed up the flat spot on the top and tried to bond the epoxies and resin (different times of course) to a popsicle stick. After the adhesives cured I pulled up on the stick. In my experiement, the fiberglass resin bonded best with the stantion, so that is what I went with.
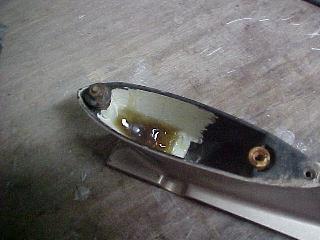
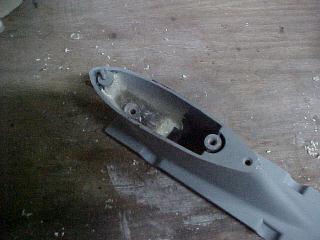
next I poured a small amount of resin into the damaged area on the inside of the stantion along with several small squares of fiberglass mat for reinforcement
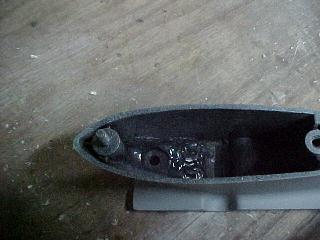
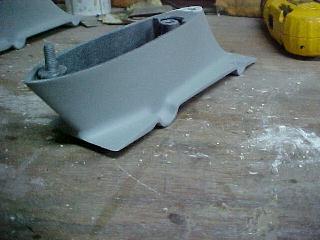
here is the stantion after the resin cured and the tape pulled. You will see a small spot where I did not get enough resin. I sanded the area and added a bit more resin, and smoothed it out. You can also see small hairline cracks on the exterior of the stantion. I sanded the paint off there and filled with resin slowly building it up where you couldn't see the lines any longer and sanded some more.
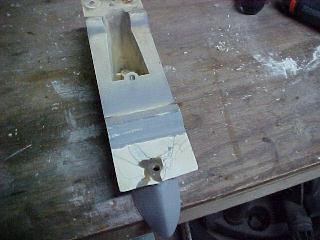
Next I used the other stantion, lined it up top to top to mark the location for the screw hole. Once I checked and double checked the location, I used the correct size bit and drilled a new screw hole. The resin will be too deep for the original screw to go all the way through, so I took a wood boring bit and carefully drilled down into the inside screw hole just enough to allow the original screw to protrude through the other side of the stantion. I then took a regular bit and matched up the size of it with the head of the screw and on the inside, in the screwhole, I drilled down slightly to give the screwhead a good resting spot.
cont'd
------------------ '87 2.8v6 5spd
IP: Logged
11:40 AM
PFF
System Bot
cjgable Member
Posts: 1198 From: Fort Worth, Tx, USA Registered: Dec 2001
I then, more for cosmetics and like it was originally, took some black spray paint and painted over the inside where the resin is.
Here is the top of the stantion repaired and sanded
after a little primer
The back of the stantion took some sanding the primer off, refilling some hairline cracks and reprimering again to smooth it out.
While I did this several months ago, maybe a year the stantion still looks good. You cannot tell it had been repaired from the exterior. I did let the stantion sit for several days before actually primering to make sure the resin is fully cured, and to minimize any shrinkage that may have occured.
I have carefully tugged on the wing while bolted to the decklid and noticed zero problems. I don't want to pull too hard as I really don't want to repair it again. It does take some time and patience. I hope this helps some of you with single stantions.
Chris
------------------ '87 2.8v6 5spd
[This message has been edited by cjgable (edited 09-11-2004).]
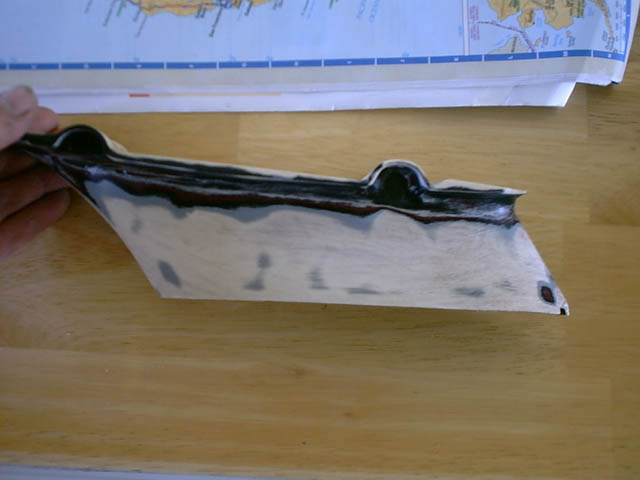
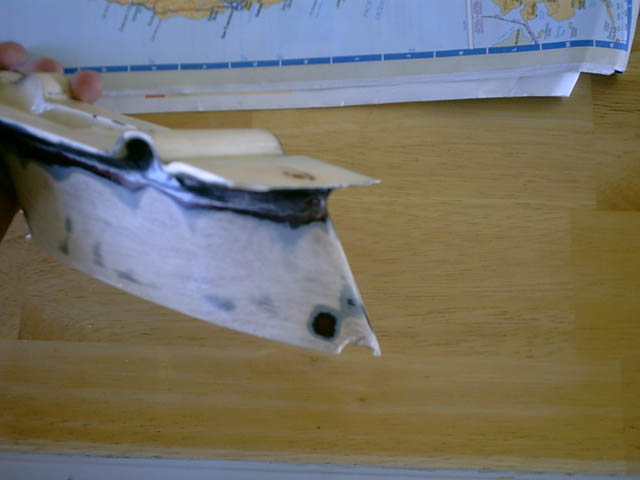
I've sanded the sides down to bare plastic (as much as I could..). This is obviously going to give the best bonding with the resin. It may be okay to just rough up the paint, but why take the chance of having to do it over again? So anyways, 30 minutes with 60 grit sandpaper gives the above results. You can see the small spot I'm going to have to repair as well.
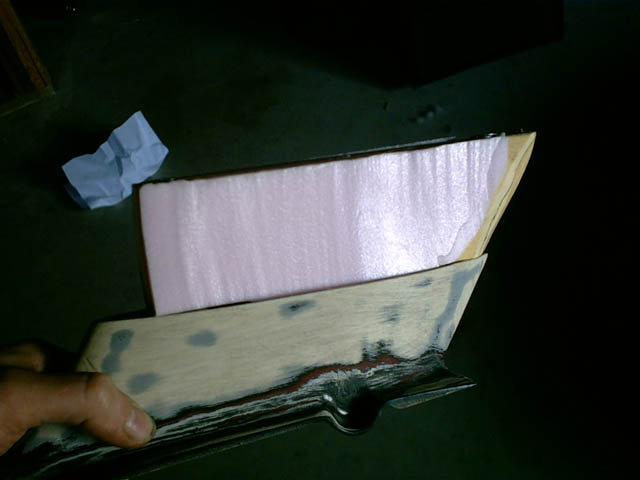
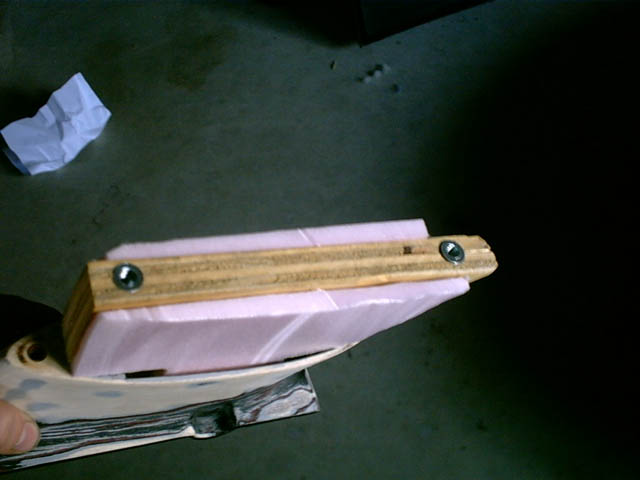
What's the plan right now? Well... I want something that can really take some weight. So, I'm not sure if I am going to use fiberglassed wood as a "base extender" or fiberglassed foam. I like the wood idea because it is so sturdy, but it's just so hard to cut/shape compared to foam So I'll probably end up using foam. Stay tuned.....
Glass in a piece of plywood as a rib that runs front to back and the height you want, then use foam to fill and shape, then glass over the foam. The plywood will make it strong and give a good place to use the nutserts for the bolts.
JazzMan
IP: Logged
02:59 PM
ryan.hess Member
Posts: 20784 From: Orlando, FL Registered: Dec 2002
Glass in a piece of plywood as a rib that runs front to back and the height you want, then use foam to fill and shape, then glass over the foam. The plywood will make it strong and give a good place to use the nutserts for the bolts.
JazzMan
Hohoho... that's a good idea!
IP: Logged
03:08 PM
ryan.hess Member
Posts: 20784 From: Orlando, FL Registered: Dec 2002
Ryan. When you get the process perfected you'll have a corner on the market for raised stands. A little bird told me just a couple days ago that Fiero Warehouse will no longer have raised stands available for sale effective..... now . Glad I've already got a couple sets
Russ
IP: Logged
08:19 PM
ryan.hess Member
Posts: 20784 From: Orlando, FL Registered: Dec 2002
Originally posted by Russ544: Nice job to both of you !
Ryan. When you get the process perfected you'll have a corner on the market for raised stands. A little bird told me just a couple days ago that Fiero Warehouse will no longer have raised stands available for sale effective..... now . Glad I've already got a couple sets
Russ
Uh oh! Better delete my posts and start selling these things
IP: Logged
08:25 PM
gumert Member
Posts: 400 From: Hunderton, NJ Registered: Mar 2004
Looks good dude. I didn't expect you to add-on so quick I would definitely get all the paint off the bonding surface best I could. The last thing you want to do is have to reglass it because it didn't stick too well. This is awesome. Anyone got any busted stantions they don't want j/k.
Chris
IP: Logged
09:24 PM
Sep 14th, 2004
ryan.hess Member
Posts: 20784 From: Orlando, FL Registered: Dec 2002
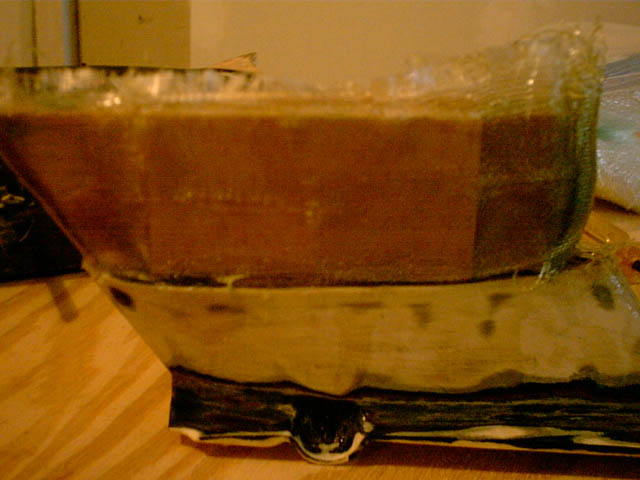
I'll update you guys tonight. I decided to go with balsa as a 'filler' instead of foam, just because then I can lay the glass right on top of it without worrying about melting.. plus it'll be that much stronger. Soooo... I'll post pics and dimensions tonight when I get some more free time.
IP: Logged
11:04 AM
ryan.hess Member
Posts: 20784 From: Orlando, FL Registered: Dec 2002
The worst part... glassing over the plywood and balsa to match the thickness of the stands:
yeck...
My advise to future 'glassers... let it get somewhat tacky before you lay it on... and only do 1 layer at a time... small amounts of resin/glass are easier to work with than a pile.
IP: Logged
04:18 PM
cjgable Member
Posts: 1198 From: Fort Worth, Tx, USA Registered: Dec 2001
I think the balsa wood would be a good idea. Patience and time, it's gettin' there. Ya know what I found works real well for mixing the resin is the plastic containers you get cake icing in. I peel the wrapper and mark off the outside with a black permanent marker in ounce increments. If little resin is left in the container, after it has cured, you can squeeze the container and work the container around a little and the cured resin will pop out of the bottom. If you have too much left over, just keep using and chunk it when you are done.
IP: Logged
06:28 PM
PFF
System Bot
ryan.hess Member
Posts: 20784 From: Orlando, FL Registered: Dec 2002
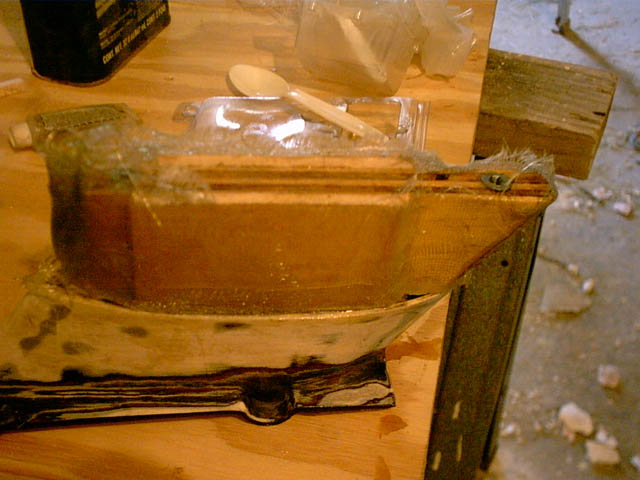
...still building up the fiberglass... so far I've gone through quite a bit. about 10 plastic cups, 12 plastic spoons, 4 pairs of gloves, maybe 8oz of resin, and maybe(?) 4 sq. feet of fiberglass cloth, and a little bit of fiberglass mat. Getting closer to the final shape, will have pics in a bit. Total cost for me is ~$10 (I had most of the supplies already)
IP: Logged
05:10 PM
ryan.hess Member
Posts: 20784 From: Orlando, FL Registered: Dec 2002
Sanding? Why, what ever do you mean? When I finished with the bondo, it was ready for paint
j/k...
It still needs some touchup bondo work in a few dimpled areas... but other than that it's good to go. Now... I have 2 questions.
1) How long do I need to wait for it to cure before I can prime/paint it?
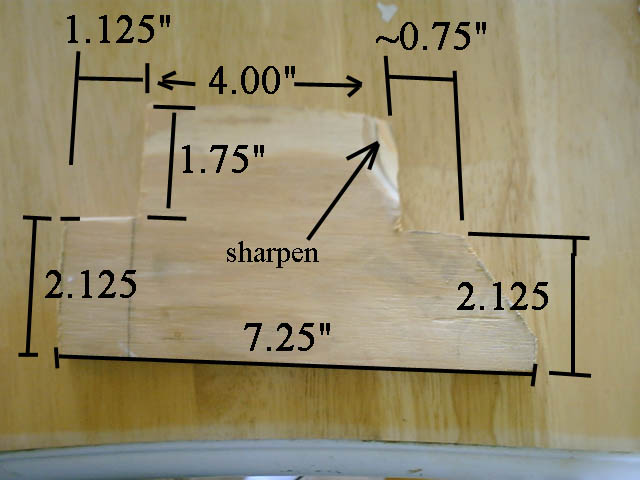
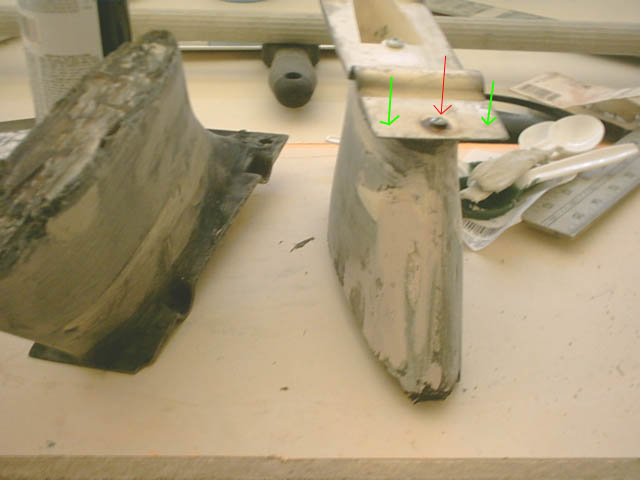
2) Do you know where to get the "wing anchors" that go inside the stock wing, so you can attach the stands to it? Basically, I learned that the front hole is now dead thanks to my plywood I'm looking to install 2 "new" screws into the wing and stand(s) where the green arrows are. I guess my question is, how can I secure them?
IP: Logged
06:02 PM
ryan.hess Member
Posts: 20784 From: Orlando, FL Registered: Dec 2002
Originally posted by ryan.hess: 2) Do you know where to get the "wing anchors" that go inside the stock wing, so you can attach the stands to it? Basically, I learned that the front hole is now dead thanks to my plywood I'm looking to install 2 "new" screws into the wing and stand(s) where the green arrows are. I guess my question is, how can I secure them?
These things:
I need to copy the bottom 'dual screw pattern' (as seen above) to the top.
IP: Logged
06:06 PM
cjgable Member
Posts: 1198 From: Fort Worth, Tx, USA Registered: Dec 2001
I think you should still be able to use that single screw hole, you will have to do similiar to what I did and countersink it waayyy in there. Take a bit and match it up sizewise with the other hole and drill from the spoiler side of the stantion all the way through, then use a larger bit, just larger than the screw head, and go in from the other direction just enough to let the screw protrude.
After a day or so, I lightly primed mine to make sure it was smooth, sanded, filled in low spots, then primed again.
As far as the anchors, if you still go that way, I will have to search for the thread, but it seems someone mentioned some place in Florida that offered them. I am sure they can be had other places.
IP: Logged
06:32 PM
ryan.hess Member
Posts: 20784 From: Orlando, FL Registered: Dec 2002
Good idea... but I don't have any drill bits long enough to go through Guess it'll be cheaper/easier to do it that way though... Wonder if home depot's open......... I bet I'll have to get a masonry bit to get one long enough.
IP: Logged
08:40 PM
cjgable Member
Posts: 1198 From: Fort Worth, Tx, USA Registered: Dec 2001
Got it done. Just needed a long 1/4" bit, and a regular 7/16" bit. Have'ta go slow with the big bit though... in the end it really tries to bite through the plastic. I'm going to give it a week to fully cure, then I should be able to give final painted/installed pics
IP: Logged
09:48 PM
PFF
System Bot
Sep 21st, 2004
cjgable Member
Posts: 1198 From: Fort Worth, Tx, USA Registered: Dec 2001
Sounds good Ryan,. I had to do the same, the big bit did bite hard in the resin near the bottom. I believe I even had to add a bit more resin because it bit too hard


 )
)


 So I'll probably end up using foam. Stay tuned.....
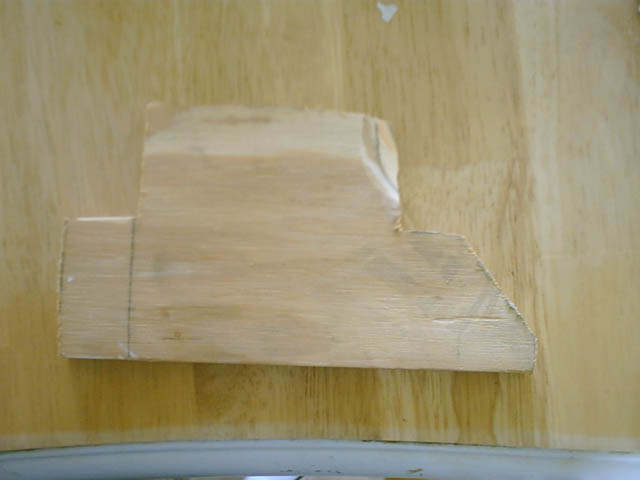


 Guess it'll be cheaper/easier to do it that way though... Wonder if home depot's open......... I bet I'll have to get a masonry bit to get one long enough.


