Pennock's Fiero Forum
  Technical Discussion & Questions - Archive
  Rear wheel bearings "HOW TO" disassemble and repack with pics

T H I S   I S   A N   A R C H I V E D   T O P I C
  

Email This Page to Someone! | Printable Version


Rear wheel bearings "HOW TO" disassemble and repack with pics by 84Bill
Started on: 07-03-2003 05:57 PM
Replies: 13
Last post by: 84Bill on 07-07-2003 11:52 AM
84Bill
Member
Posts: 21085
From:
Registered: Apr 2001


Feedback score: N/A
Leave feedback


Total ratings: 461
User Banned

Report this Post07-03-2003 05:57 PM Click Here to See the Profile for 84BillClick Here to visit 84Bill's HomePageSend a Private Message to 84BillDirect Link to This Post
I have decided to detail how to disassemble the rear wheel bearing assembly so that it can be repacked with fresh grease.

Ogre feel free to use the pics and text for the cave if you deem it worthey.

Step 1
Obviously remove the bearing from the car. If you will note there is an O-ring on the knuckel side of the bearing housing. DO NOT put it back on without the O-ring or it will rust into the knuckel and you will have a helluva time getting it back out.

Step 2
Use something large enough in diameter to fit inside and catch the lip of the hub shaft. I found that a 1-1/16" socket works well. You could use a brass drift pin but you do not want to bugger up the end of the hub shaft. Place it in a vice and give it a couple of moderate whacks and the shaft will pop out.

Step 3
Using a drift pin and working around in a circle VERY gently rap on the bearing cage until the bearing and seal pops out. If you hit it hard enough to knock a ball out of the cage you are hitting it WAY to hard.

[This message has been edited by 84Bill (edited 07-03-2003).]

IP: Logged
PFF
System Bot
84Bill
Member
Posts: 21085
From:
Registered: Apr 2001


Feedback score: N/A
Leave feedback


Total ratings: 461
User Banned

Report this Post07-03-2003 05:59 PM Click Here to See the Profile for 84BillClick Here to visit 84Bill's HomePageSend a Private Message to 84BillDirect Link to This Post
Step 4
Pop the balls out of the cage and clean everything well. Inspect the balls for any pits or discoloration. Look at the hub shaft and housing races and look for any imperfections.
NOTE: do not worry about the 2 dark bands, they are a result of surface hardening and is normal.


Step 5
Grease the housing races and ball sets and install them into the housing. NOTE: the V shape in the cage points to the center of the housing So be sure both face that way.
Gently tap the seal back onto the housing. PACK the housing with grease, Do not pack it to tightly or the grease will expand and pop the seals off. Be sure to get in under the seal and build it up so it is level with the bearing cage (leaving some voids). Put a dab of grease around the hub shaft where the seal rides then slide the hub shaft into place Smear grease around the race / ring and slip it into place and gently tap it on the hub shaft working around in a circle until it is fully seated.
There will be a noticable pitch change when the ring is fully seated.

Step 6
Squish some lock tite or RTV sealant around between the seal and the housing where they meet.

You are done. Now go for a drive but make sure you put the bearing hub back on and everything back together before you do.

[This message has been edited by 84Bill (edited 07-04-2003).]

IP: Logged
theogre
Member
Posts: 32258
From: USA
Registered: Mar 99


Feedback score: N/A
Leave feedback


Total ratings: 568
Rate this member

Report this Post07-03-2003 08:23 PM Click Here to See the Profile for theogreClick Here to visit theogre's HomePageSend a Private Message to theogreDirect Link to This Post
That is interesting... I knocked a bad one appart once just to see how bad it was... It was relly ugly. No saving that... Never messed with a good one.

I may put that in the cave when time permits. If you can get some clearer pictures it would be a help. I'm not quite sure what I'm looking at in a couple of those but I get the drift of it. A tip I found doing macro/close work with my digital cammera... Turn off the flash (If you camera will allow it.) and use natural light or several electric lights placed around the work area.

Where are you holding it with the vice? I was thinking of using a large 3 jaw gear puller or a harmonic balancer puller. (you'd need nuts for the balncer puller bolts... and longer puller bolts...)

What grease did you use? I've been trying to think what grease would be best... I was thinking use the same "disk brake" rated bearing grease you would use on standard taper bearings for a front hub.

On that socket size... did you mean 1 and 1/16? 11/16 was way too small when I tried. to mess with an old hub just now. On some hubs a 1 and 1/8 socket may fit better. The one I was just messing with is a dead aftermarket service hub and is slightly different from OE. (I always save bad parts just for this type of farting around.... Drives my sig-other nuts...)

One bit of caution... For those that are going to try this... IF your hub is already making noises it may be beyond cleaning and regrease. This would be better for cars that have sat parked for years or have been thru a flood or just as preventive maintenance.

If anyone does try this please be very careful. It's not very dificult to damage a good bearing. Make sure you properly torque the axle nuts!

------------------
Nobody loves me. Everybody hates me. Guess I'll just go eat worms.

IP: Logged
84Bill
Member
Posts: 21085
From:
Registered: Apr 2001


Feedback score: N/A
Leave feedback


Total ratings: 461
User Banned

Report this Post07-03-2003 08:41 PM Click Here to See the Profile for 84BillClick Here to visit 84Bill's HomePageSend a Private Message to 84BillDirect Link to This Post
Thanks Ogre
Unfortunaly my digital camera is toast
I used my Web Cam to get the pics and that is the best it could do.

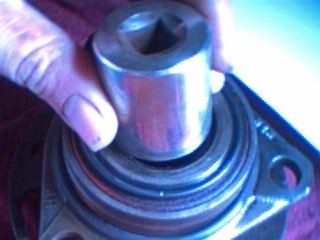
Good catch, it is actually a 1 and 1/16th socket 1" is just a tad to loose and tends to move around but in a pinch it will work

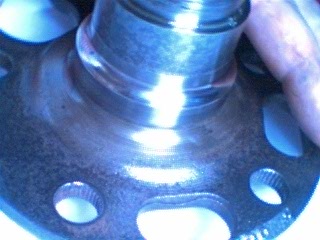
I have had success in knocking the hub shaft out by just holding it in my hand. It is really not that tight to where a puller is needed.

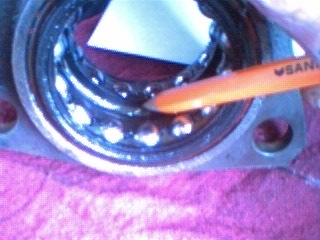
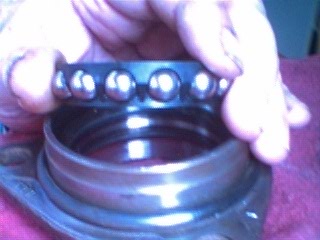
I used standard heavy duty bearing grease, the same used for taper bearings.

YES!
I do agree that if the bearing is already making noise then it is shot, however the seals can be salvaged just in case you need one later.

YES!
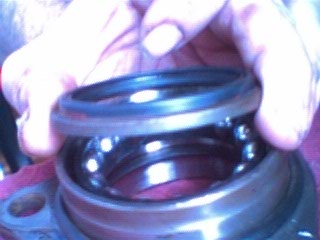
You could damage the bearing cage and or seal. Worse, get dirt in the grease and mess up the bearing after a few miles.


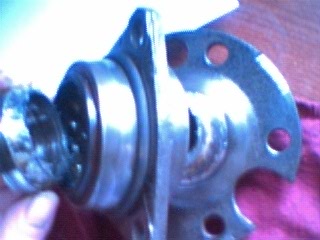
Like any other seal replacement or bearing repack great care must be taken to ensure no damage will happen and no dirt gets in the grease.

However like every other bearing on the car it is essential to repack them every so often to ensure long life.
Granted 99.99% of fiero rear bearings have never been repacked since new, I figured why push it.

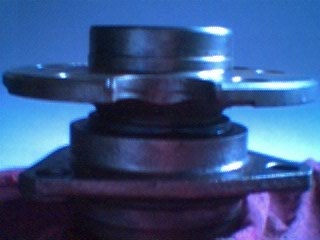
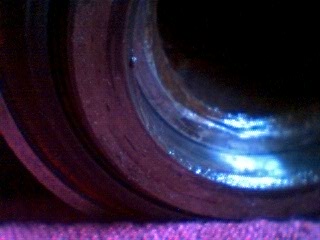
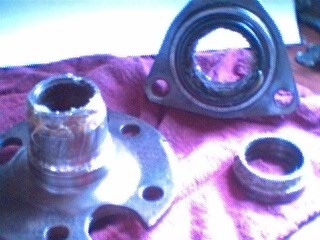
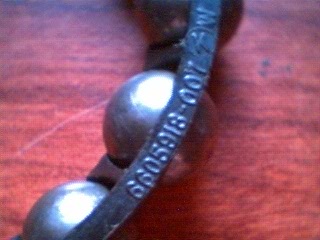
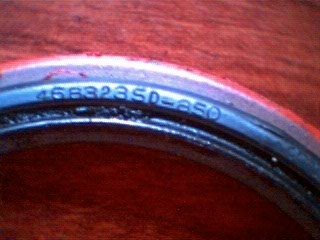
The bearing hub pictured above was freshly done a month ago but I decided to take it apart and show all. The bearing was not making any noise. When I originaly took it apart the grease was a bit on the dry side for my liking.

One other thing worth noting is the ball type bearings can handle MUCH higher loads than a taper bearing can and does not need to be serviced as often.
When you think about it the rear bearings on my 185,000 mile car have never been repacked. That tells ya 2 things about the bearing.
1 it will last a long time.
2 I had better repack them soon.

[This message has been edited by 84Bill (edited 07-04-2003).]

IP: Logged
GTDude
Member
Posts: 9056
From: Keysville, Virginia, USA
Registered: Nov 2001


Feedback score: N/A
Leave feedback


Total ratings: 287
Rate this member

Report this Post07-03-2003 10:41 PM Click Here to See the Profile for GTDudeDirect Link to This Post
In my opinion, the bearings should never need repacking unless the car has been in a flood or sat for an extremely long time. I question this practice anyway, but I never argue with sucess....lol.

Phil

------------------
87 FIERO GT 2.8 5spd
0-60 in 6.8 seconds!
87 FIERO CPE 2.5 5spd
86 FIERO SE 2.5 AUTO
87 FIERO GT 2.8 4SPD
If you found my advice helpful, please take the time to give me a positive rating. Thanks

IP: Logged
84Bill
Member
Posts: 21085
From:
Registered: Apr 2001


Feedback score: N/A
Leave feedback


Total ratings: 461
User Banned

Report this Post07-03-2003 10:50 PM Click Here to See the Profile for 84BillClick Here to visit 84Bill's HomePageSend a Private Message to 84BillDirect Link to This Post
 
quote
Originally posted by GTDude:

I never argue with sucess....lol.

Phil

And you always always ALWAYS! post a message with that damnable smilley face, you can't possibly be that damn happy all the time.

Anyway, what exactly is your reservation for this idea?

IP: Logged
Fierobsessed
Member
Posts: 4782
From: Las Vegas, NV
Registered: Dec 2001


Feedback score: N/A
Leave feedback


Total ratings: 147
Rate this member

Report this Post07-04-2003 10:06 PM Click Here to See the Profile for FierobsessedSend a Private Message to FierobsessedDirect Link to This Post
Anyone care to do a 88 front hub??? mines starting to get alittle loose, I pulled it and took the cap off and it looks like a one time use thing. Anyone know if it can be taken care of?

------------------
84 Indy fiero Quad 4 HO (almost done!!)
85 2m? Getting parted out soon
Silver 88 GT, Newest addiction.

IP: Logged
84Bill
Member
Posts: 21085
From:
Registered: Apr 2001


Feedback score: N/A
Leave feedback


Total ratings: 461
User Banned

Report this Post07-05-2003 12:12 AM Click Here to See the Profile for 84BillClick Here to visit 84Bill's HomePageSend a Private Message to 84BillDirect Link to This Post
An 88 front hub is a disposible unit.
I do have a few spares I could part with or you could get one from the fiero store.
IP: Logged
theogre
Member
Posts: 32258
From: USA
Registered: Mar 99


Feedback score: N/A
Leave feedback


Total ratings: 568
Rate this member

Report this Post07-05-2003 03:37 PM Click Here to See the Profile for theogreClick Here to visit theogre's HomePageSend a Private Message to theogreDirect Link to This Post
Technically I can think of a bunch of reasons for not messing with them but it mostly comes to people doing a sloppy job of it and causing a good unit to fail. It's not a job I'd recomend to someone that has never worked with bearings before.

On the other hand... You absolutely have to do this to a flood car. Water in a bearing is a bad thing no matter how you figure. It doesn't take a huge amount of pressure for water to get into wheel bearings and other places you think are sealed.

Many people write off all flood cars but the reality is that if you get them cleaned out promptly they are perfectly fine most of the time. It all depends on how fast you get at them and how well you clean them.

A stored car is a tougher call... Depends allot on the storage conditions whether I'd worry about that or not.

It's really nice to know that they can be worked on if you need to.

IP: Logged
mrfixit58
Member
Posts: 3330
From: Seffner, Fl, USA
Registered: Jul 99


Feedback score: N/A
Leave feedback


Total ratings: 113
Rate this member

Report this Post07-05-2003 04:35 PM Click Here to See the Profile for mrfixit58Send a Private Message to mrfixit58Direct Link to This Post
Bill,

Great information. I was looking for something like that the other day. A couple of questions:

* Were you able to purchase a new seal? And, if so, do you have the part number?

* Same question for the "O" ring.

Good job,

------------------
Roy

double-click on this link to follow my interior build-up
[URL=https://www.fiero.nl/forum/Forum1/HTML/023174.html]
https://www.fiero.nl/forum/Forum2/HTML/031255.html
*** UPDATED 1/24/03 ***

Blue 87 GT w/ 4th generation Firebird interior.
Suncoast Fieros

IP: Logged
84Bill
Member
Posts: 21085
From:
Registered: Apr 2001


Feedback score: N/A
Leave feedback


Total ratings: 461
User Banned

Report this Post07-05-2003 05:59 PM Click Here to See the Profile for 84BillClick Here to visit 84Bill's HomePageSend a Private Message to 84BillDirect Link to This Post
Yesterday I repacked the right rear bearing on my 88 coupe. The left side was making noise and was replaced with one I had repacked some months ago.
When I opened the hub assembly I could see right away that it would not have lived much longer. The grease was dry and cracked in the center between the 2 bearings was as black as tar and smelled like burnt transmission fluid. I cleaned it up, checked it over, regreased it and reinstalled it on my car.
I took it for a drive around Philly international and saw a really nice 84 parked in the old scott paper building lot. Scribed the forum info on it and went home.

[This message has been edited by 84Bill (edited 07-05-2003).]

IP: Logged
PFF
System Bot
84Bill
Member
Posts: 21085
From:
Registered: Apr 2001


Feedback score: N/A
Leave feedback


Total ratings: 461
User Banned

Report this Post07-05-2003 06:01 PM Click Here to See the Profile for 84BillClick Here to visit 84Bill's HomePageSend a Private Message to 84BillDirect Link to This Post

84Bill

21085 posts
Member since Apr 2001
Thanks Ogre, mrfixit

I do not know if there are replacement parts but I do have part numbers if you wish to try.

I do not recomend getting replacement ball sets because of the nature of construction. The bearing races are not separate but rather machined radiuses on the housing, hub shaft and cap. If any of these are damaged then replacement ball set will do you no good. It would be nice to get a fresh set of ball bearings and seals for a good hub you want to rebuild it.

I have noticed that the majority of bad hubs I have opened up seem to have the damage isolated to the ball sets. They get this haze finish and are not shiney and bright like a good ball set is and the races seem to be nice and shiney and normal.


Anywho
here are the part numbers if you wish to hunt them down. Keep me posted on what you find because I would be interested in the seals myself.

Seal P/N 4683235D-850
Bearing P/N 6605918-007

I believe the Ogre has some information in his cave about the O-Ring. That's where I got the info on why it was important.

I also read in the service manual that it is recomended that chassis lube be used on the inside of the knuckel and around the outside of the housing to prevent rust.

[This message has been edited by 84Bill (edited 07-05-2003).]

IP: Logged
theogre
Member
Posts: 32258
From: USA
Registered: Mar 99


Feedback score: N/A
Leave feedback


Total ratings: 568
Rate this member

Report this Post07-05-2003 11:05 PM Click Here to See the Profile for theogreClick Here to visit theogre's HomePageSend a Private Message to theogreDirect Link to This Post
The big O ring shouldn't be hard to find... it probably doesn't have to be exact. Hydraulic or plumbing suppliers may have it.

For an exact ring... Plumbing supply as in real plumbers use... not your local Home Depot.

A posible close fit source for that O ring is your local Home Depot, Lowes, Etc, store.... Look in plumbing. It seems around the same size that is used to seal filter canisters in some reverse osmosis systems. If the RO ring is bigger diameter you could cut it and tack it with super glue or some other adhesive... Again.. it doesn't have to be perfect for this job.

As noted above, The job of that ring is to seal out water that could make the hub rust solid. A coating of grease in the knuckle and on the hub would also be a good idea.

That hub area is not entirely sealed.... There is a "drain" notch below the axle seal in the knuckle. If you tread in deep water, it will get inside the knuckle.

IP: Logged
84Bill
Member
Posts: 21085
From:
Registered: Apr 2001


Feedback score: N/A
Leave feedback


Total ratings: 461
User Banned

Report this Post07-07-2003 11:52 AM Click Here to See the Profile for 84BillClick Here to visit 84Bill's HomePageSend a Private Message to 84BillDirect Link to This Post
Punt...
One more time around the park james
IP: Logged


All times are ET (US)

T H I S   I S   A N   A R C H I V E D   T O P I C
  

Contact Us | Back To Main Page

Advertizing on PFF | Fiero Parts Vendors
PFF Merchandise | Fiero Gallery | Ogre's Cave
Real-Time Chat | Fiero Related Auctions on eBay


Copyright (c) 1999, C. Pennock