Pennock's Fiero Forum
  Technical Discussion & Questions - Archive
  How I installed the EL gauges

T H I S   I S   A N   A R C H I V E D   T O P I C
  

Email This Page to Someone! | Printable Version


How I installed the EL gauges by connecticutFIERO
Started on: 06-09-2003 11:22 PM
Replies: 15
Last post by: v8fiero355 on 09-08-2003 08:28 AM
connecticutFIERO
Member
Posts: 7696
From:
Registered: Jun 2002


Feedback score:    (6)
Leave feedback


Total ratings: 224
Rate this member

Report this Post06-09-2003 11:22 PM Click Here to See the Profile for connecticutFIEROSend a Private Message to connecticutFIERODirect Link to This Post
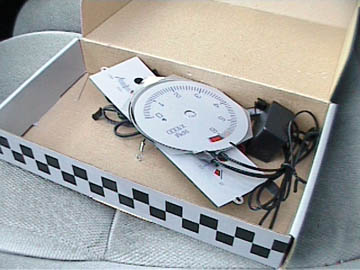
I bought some of the snazzy new silver gauge faces with blue or green indiglo style lights off of Ebay, and someone here asked me to do a write up on how to install them. SO here is a quick run down on what you need to do. (this is for backlit gauges)

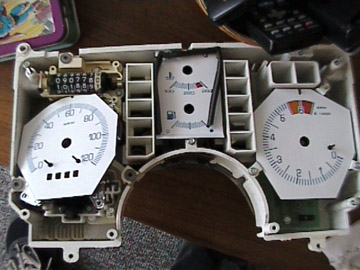
Remove the Gauge clusters from the car (you can figure that out on your own).

You need to install the new gauge faces over the top of the originals or whatever you have on there now. These new faces are not tinted and don't have the warning writing on the aux gauges.

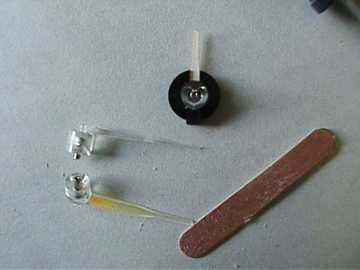
You can either remove your needles (requires careful recalibration later on), or you can just remove the black caps on the needles (not an easy task even with a tiny screw driver and needle nose pliers). You must do one or the other to slip on the new faces.

I recommend pulling the needles because it would be silly to have blue gauges and orange needles. I used a mixture of glow paint and flouescent blue paint from Joanne fabrics (any craft store).

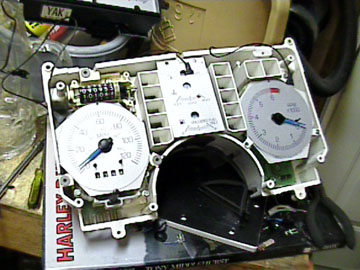
You use any old adhesive you like to secure the new gauge faces over the top of the old. I used 3M spray glue super 77 cause thats what I had.

The new gauge faces have wiring coming out of the top of each unit, they all plug into the relay and switch wiring. I needed to bend them to fit in some places and cut some plastic off the inner gauge housing to keep from screwing through the wring in one spot. You may or may not encounter this.

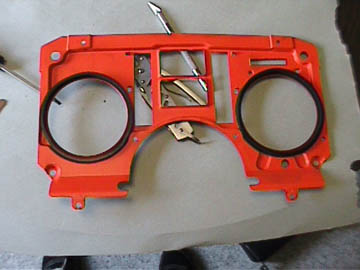
If you do want to paint your needles, you must first scrape off all the old orange paint. Use a nail file and a razor. Takes a lot of time but works like a charm. The needles pop right off with a pair of needle nose pliers or strong fingers. You also want to paint the back of the black out cover because it is bright orange and will reflect orange into your odometer and needle holes.

THE WIRING:

It took me two tries to ge the wiring right. I waned to be able to turn on my headlights or gauge lights by using the regular stock switch in my Fiero. So I spliced into the headlight and dimmer switches power supply but I used the incoming power instead of the outgoing power. So my gauges were constantly lit up.

I corrected this by READING THE FIERO HAYNES MANUAL. Which is what I should've done in the first place.

You must connect the gauge face power wire to the grey wire on the headlight switch. And you can you use the black wire coming from the dimmer switch. Thats how I did anyhow. They look amazing. Only downside is I have the stock dimmer for my gauge needles and odometer and the aftermarket green/blue switch and dimmer for the gauge faces. You can mount the new switch anywhere you please.

Leave all the bulbs in the back as they light up the warning lighs, odometer, and gauge needles. You won't notice them too much at night anyhow.

LMK if I left anything out or if you have any questions.

[This message has been edited by connecticutFIERO (edited 06-09-2003).]

IP: Logged
PFF
System Bot
TK
Member
Posts: 10013
From:
Registered: Aug 2002


Feedback score: (2)
Leave feedback


Total ratings: 200
Rate this member

Report this Post06-09-2003 11:41 PM Click Here to See the Profile for TKSend a Private Message to TKDirect Link to This Post
At full brightness do you think you could see them clearly behind 20% tint during the day?
IP: Logged
Fierotech
Member
Posts: 710
From: Toney, AL
Registered: Dec 2001


Feedback score: (1)
Leave feedback

Rate this member

Report this Post06-09-2003 11:56 PM Click Here to See the Profile for FierotechClick Here to visit Fierotech's HomePageSend a Private Message to FierotechDirect Link to This Post
 
quote
Originally posted by TK:

At full brightness do you think you could see them clearly behind 20% tint during the day?

That sounds so much like a question I would ask, it's SCARY.

How's it going, Terry?

Jeremy

IP: Logged
connecticutFIERO
Member
Posts: 7696
From:
Registered: Jun 2002


Feedback score:    (6)
Leave feedback


Total ratings: 224
Rate this member

Report this Post06-09-2003 11:56 PM Click Here to See the Profile for connecticutFIEROSend a Private Message to connecticutFIERODirect Link to This Post
What do you mean? From outside the car? Why would that matter?

They are extremely bright but there is a dimmer. I have mine set at about 3/4.

[This message has been edited by connecticutFIERO (edited 06-09-2003).]

IP: Logged
connecticutFIERO
Member
Posts: 7696
From:
Registered: Jun 2002


Feedback score:    (6)
Leave feedback


Total ratings: 224
Rate this member

Report this Post06-09-2003 11:58 PM Click Here to See the Profile for connecticutFIEROSend a Private Message to connecticutFIERODirect Link to This Post

connecticutFIERO

7696 posts
Member since Jun 2002
Are you talking about tinting the plastic cover plate on the gauge cluster? Tinting the door glass? I don't get it!
IP: Logged
Fierotech
Member
Posts: 710
From: Toney, AL
Registered: Dec 2001


Feedback score: (1)
Leave feedback

Rate this member

Report this Post06-10-2003 12:02 AM Click Here to See the Profile for FierotechClick Here to visit Fierotech's HomePageSend a Private Message to FierotechDirect Link to This Post
Tinting the plastic cover (though cut glass would look better). Off, nice, dark mysterious circles...on, visable gauges (if they're bright enough).

Smack me upside the head if I got it wrong, Terry...

Jer

IP: Logged
BV MotorSports
Member
Posts: 4821
From: Oak Hill, WV
Registered: May 2001


Feedback score:    (7)
Leave feedback


Total ratings: 189
Rate this member

Report this Post06-10-2003 12:06 AM Click Here to See the Profile for BV MotorSportsSend a Private Message to BV MotorSportsDirect Link to This Post
I have simular gauges. Mine are the blue/white EL's. Only trouble I had was the connector "tab" from the overlays interfered with the housing on the fuel/temp and aux pod. Only minor trimming was needed. I was too worried about trying to bend the "tabs" too far.
Great stuff for the price!

Steven

------------------
'02 Subaru WRX 14.61@91.87mph bone stock
'87 Fiero GT 4.9/4T60e, ZEX nitrous 65hp shot, 88 cradle w/ coil overs, Poly everything, Upgraded sway bars, 16X7 M11's, 11.25 "Zettner" front brakes, Complete MSD ignition w/ 6AL box, Custom 3" SLP exhaust, Grand Sport Corvette paint, Carbon fiber interior trim, '98 T/A CD w/ ETR, White face guages, Pillar mounted AutoMeter O2, Hella H4 conversion and maybe someday it will be done!

Always have engines, fiero parts and accessories for sale. Custom engine swaps and chassis modifications are available.

IP: Logged
connecticutFIERO
Member
Posts: 7696
From:
Registered: Jun 2002


Feedback score:    (6)
Leave feedback


Total ratings: 224
Rate this member

Report this Post06-10-2003 01:06 PM Click Here to See the Profile for connecticutFIEROSend a Private Message to connecticutFIERODirect Link to This Post
bump for the daytime crew
IP: Logged
87GTSleeper
Member
Posts: 852
From: Ozark Mountains
Registered: Apr 2003


Feedback score: N/A
Leave feedback


Total ratings: 68
Rate this member

Report this Post06-10-2003 01:34 PM Click Here to See the Profile for 87GTSleeperSend a Private Message to 87GTSleeperDirect Link to This Post
Thanks a million! I was the one who asked for the write-up. Glad to hear the existing lights don't have to be removed. Do you have any problem seeing the needle at night? What color did you paint the orange bezel? How many questions can I ask before it gets annoying?

Thanks for the info. You get a "+" from me.

[This message has been edited by 87GTSleeper (edited 06-10-2003).]

IP: Logged
connecticutFIERO
Member
Posts: 7696
From:
Registered: Jun 2002


Feedback score:    (6)
Leave feedback


Total ratings: 224
Rate this member

Report this Post06-10-2003 02:05 PM Click Here to See the Profile for connecticutFIEROSend a Private Message to connecticutFIERODirect Link to This Post
As long as the paint you use on the needle is reflective than they should be visible. Mine are reflective and glow in the dark, so they work pretty good. I painted the blackout piece with blue spraypaint. You could use anything really. I think the best would be reflective white.

Any more questions?

IP: Logged
sqoach
Member
Posts: 6383
From:
Registered: Nov 2000


Feedback score: N/A
Leave feedback


Total ratings: 96
Rate this member

Report this Post06-10-2003 06:35 PM Click Here to See the Profile for sqoachSend a Private Message to sqoachDirect Link to This Post
 
quote
Originally posted by connecticutFIERO:


Any more questions?

Yep. How visible is the odometer and tripometer now that you've painted the orange part blue? Did you use a reflective blue, or just regular blue paint?

------------------

IP: Logged
PFF
System Bot
v8fiero355
Member
Posts: 128
From: atlanta, ga, usa
Registered: Apr 2003


Feedback score: N/A
Leave feedback

Rate this member

Report this Post09-03-2003 04:33 PM Click Here to See the Profile for v8fiero355Send a Private Message to v8fiero355Direct Link to This Post
Has anyone done this for the older style gauges like on the 85? (not backlit) I bought the kit, but I'm afraid to trim the new gauges to fit inside of the old gauge face housing. Thanks!
IP: Logged
v8fiero355
Member
Posts: 128
From: atlanta, ga, usa
Registered: Apr 2003


Feedback score: N/A
Leave feedback

Rate this member

Report this Post09-05-2003 04:52 PM Click Here to See the Profile for v8fiero355Send a Private Message to v8fiero355Direct Link to This Post
bump
IP: Logged
Riceburner98
Member
Posts: 2179
From: Natick, Ma, USA
Registered: Apr 2002


Feedback score:    (10)
Leave feedback


Total ratings: 80
Rate this member

Report this Post09-05-2003 09:37 PM Click Here to See the Profile for Riceburner98Send a Private Message to Riceburner98Direct Link to This Post
EEEK! Don't cut the light up gauge faces! They run somewhere around 400 volts, (I think.. Over 100v anyway) cutting them would be a bad thing.. There are certain places (without internal wires) that you could cut, but I wouldn't reccomend it. I looked at using an old '85 speedo for about 2 seconds, before realizing how much work it would be to flatten the '85 metal faces, add the histop pegs (new faces have holes for them..) and add new needles so they'd light up. Waaaay too much work, you'd be better off finding a set of the newer gauges, either the 120mph one, or change the crystal (I think??) to make it work with the 120 face... I just did these the other day, so it's somewhat fresh in my memory.. Just have to hook up the power supply so it comes on with the dash lights.

------------------
Bob Williams
Multi-colored '87 Mutt, a work in progress! (3800SC installation in super-slow-motion progress... It's bolted in now!!! WOOHOO!! Just need coolant and gas lines!)

[This message has been edited by Riceburner98 (edited 09-05-2003).]

[This message has been edited by Riceburner98 (edited 09-05-2003).]

IP: Logged
Black87GT
Member
Posts: 51
From: Netherlands
Registered: Dec 2001


Feedback score: N/A
Leave feedback

Rate this member

Report this Post09-07-2003 01:04 PM Click Here to See the Profile for Black87GTSend a Private Message to Black87GTDirect Link to This Post
Kewl,

I replaced my gauges as well. Also blue letters with silver. I just took the orange pointers off and put the new gauge faces over the old ones. Mine are from speedhut though so they are lighted seperatly.

You then can either remove the old light bulbs or just use the orignal dash-dimmer to switch them off. Even my Airco control and heater in the center light up nicely in blue now.

Only thing is that it is a pain in the ass to recalibrate the gauges again. Speed and Fuel gauge are pretty easy but for the rest you need to connect the computer, and hasle a lot with the pointers. Most gauges are about 95% right now, I think that is as good as it gets, since it is realy difficult to put the pointer 100% since it is a manual process to calibrate them.

[This message has been edited by Black87GT (edited 09-07-2003).]

IP: Logged
v8fiero355
Member
Posts: 128
From: atlanta, ga, usa
Registered: Apr 2003


Feedback score: N/A
Leave feedback

Rate this member

Report this Post09-08-2003 08:28 AM Click Here to See the Profile for v8fiero355Send a Private Message to v8fiero355Direct Link to This Post
I wasn't going to cut the face, just trim the edges that are just the clear part (margins) that wasn't cut neatly when they were made. So, are the sidelit gauges flat instead of bowl shaped? I've never seen any. What year do they come on? THanks!
IP: Logged


All times are ET (US)

T H I S   I S   A N   A R C H I V E D   T O P I C
  

Contact Us | Back To Main Page

Advertizing on PFF | Fiero Parts Vendors
PFF Merchandise | Fiero Gallery
Real-Time Chat | Fiero Related Auctions on eBay


Copyright (c) 1999, C. Pennock