Pennock's Fiero Forum
  Technical Discussion & Questions - Archive
  How do I...

T H I S   I S   A N   A R C H I V E D   T O P I C
  

Email This Page to Someone! | Printable Version


How do I... by Sourmug
Started on: 11-03-2002 12:12 AM
Replies: 9
Last post by: fieroman_5000 on 11-07-2002 03:00 PM
Sourmug
Member
Posts: 4538
From: Calgary, Alberta, Canada
Registered: Sep 2002


Feedback score:    (29)
Leave feedback


Total ratings: 144
Rate this member

Report this Post11-03-2002 12:12 AM Click Here to See the Profile for SourmugSend a Private Message to SourmugDirect Link to This Post
The vinyl and its rubber backing is pulling away from front of the glove box as can be seen in the pic. How do I fix this? Contact cement? Any suggestions?

IP: Logged
PFF
System Bot
SCCA FIERO
Member
Posts: 3808
From: Ogden, Utah
Registered: May 99


Feedback score: (4)
Leave feedback


Total ratings: 93
Rate this member

Report this Post11-03-2002 01:13 AM Click Here to See the Profile for SCCA FIEROSend a Private Message to SCCA FIERODirect Link to This Post
I wouldn't try to fix that one. Find one that isn't as warped as that.

First you will need to pull the foam from between the vinyl and plastic. Clean the part where the glue wil go with Acetone. Then get some thin plastic to take the place of the foam stuff or it just won't sit right. I haven't done the console door... I did the shifter surround, should be about the same though.

I used a glue for R/C car tires and wheels, but superglue should work.

Glue the filler plastic the to frame and glue the vinyl to the plastic filler piece. Use clamps and only glue about 3 inches at a time. Let the glue set for a couple of hours. Take your time and do it right.

Mine has held up for about 3 years so far.

IP: Logged
My7Fieros
Member
Posts: 3357
From: Germantown, TN
Registered: Jun 2000


Feedback score: N/A
Leave feedback

Rate this member

Report this Post11-03-2002 01:49 AM Click Here to See the Profile for My7FierosSend a Private Message to My7FierosDirect Link to This Post
sorry, double post

[This message has been edited by My7Fieros (edited 11-03-2002).]

IP: Logged
My7Fieros
Member
Posts: 3357
From: Germantown, TN
Registered: Jun 2000


Feedback score: N/A
Leave feedback

Rate this member

Report this Post11-03-2002 01:51 AM Click Here to See the Profile for My7FierosSend a Private Message to My7FierosDirect Link to This Post

My7Fieros

3357 posts
Member since Jun 2000
 
quote
Originally posted by SCCA FIERO:

First you will need to pull the foam from between the vinyl and plastic. Clean the part where the glue wil go with Acetone.


Exactly!
 
quote
I haven't done the console door... I did the shifter surround, should be about the same though.

It pretty much is

 
quote
I used a glue for R/C car tires and wheels, but superglue should work.

NEGATIVE!!! DO NOT USE SUPERGLUE. It causes a white "ghost" effect that is damn near impossible to get off. Use a two part epoxy.

 
quote
Glue the filler plastic the to frame and glue the vinyl to the plastic filler piece. Use clamps and only glue about 3 inches at a time. Let the glue set for a couple of hours. Take your time and do it right.

Thats absolutly right.

 
quote
Mine has held up for about 3 years so far.

Ditto!

------------------
The Force will be with you, always.

IP: Logged
theogre
Member
Posts: 32246
From: USA
Registered: Mar 99


Feedback score: N/A
Leave feedback


Total ratings: 568
Rate this member

Report this Post11-03-2002 03:08 PM Click Here to See the Profile for theogreClick Here to visit theogre's HomePageSend a Private Message to theogreDirect Link to This Post
No!!! Don't use super glue! Besides the white cloud it often leaves on things, it doesn't work well on many plastics.

You have to get everything very clean. The better you do cleaning the better the glues will bond.

When I did the shifter suround I used purple pipe cleaner as the last cleaning. Be careful with this stuff... it stains. It contains MEK so use it out doors. (Methyl Ethyl Ketone)

I used "Seal-All" glue that was less than a dollar at K-mart. This one also has MEK in it so it's an out door job too.

I only did it over the summer but it seems to be holding well.

I used big binder clips to clamp it. (The black things with wire handles in office supplies) Those would be too small for the storage box.

Part of getting a good bond is holding everything still. Once things are where you want them, go away fro a couple hours at least. The less you mess with it the better it will stick.

Don't try to do the whole thing at once either. This isn't something to do when you are pressed for time.

------------------
11-Sept-01, The day the world as we knew it ended.

IP: Logged
Sourmug
Member
Posts: 4538
From: Calgary, Alberta, Canada
Registered: Sep 2002


Feedback score:    (29)
Leave feedback


Total ratings: 144
Rate this member

Report this Post11-04-2002 12:41 AM Click Here to See the Profile for SourmugSend a Private Message to SourmugDirect Link to This Post
Thanks for the replies. I figure I'll try to fix this one, if it doesn't work I needed a new one anyway.

Thanks again.

Sourmug

IP: Logged
Sourmug
Member
Posts: 4538
From: Calgary, Alberta, Canada
Registered: Sep 2002


Feedback score:    (29)
Leave feedback


Total ratings: 144
Rate this member

Report this Post11-05-2002 11:17 PM Click Here to See the Profile for SourmugSend a Private Message to SourmugDirect Link to This Post
Ok! I finished the repairs to the vinyl cover and it looks great! I will post a picture and some sketches showing how I did it. It really looks like new.

Sourmug

Darn spelling.....

[This message has been edited by Sourmug (edited 11-06-2002).]

IP: Logged
Sourmug
Member
Posts: 4538
From: Calgary, Alberta, Canada
Registered: Sep 2002


Feedback score:    (29)
Leave feedback


Total ratings: 144
Rate this member

Report this Post11-07-2002 01:03 AM Click Here to See the Profile for SourmugSend a Private Message to SourmugDirect Link to This Post
Ok! Here’s what I did to fix the glove box door cover.

First: I removed the vinyl cover from the plastic door backing plate. Some of the foam stayed on the plate while most came with the vinyl.

Second: I carefully removed all the foam and the old glue from both the vinyl cover and the plastic plate. All the old glue must be removed or the new glue will not properly bond.

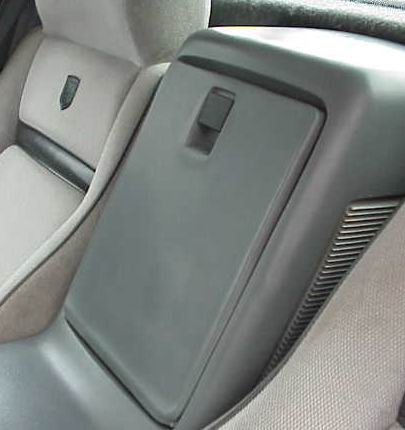
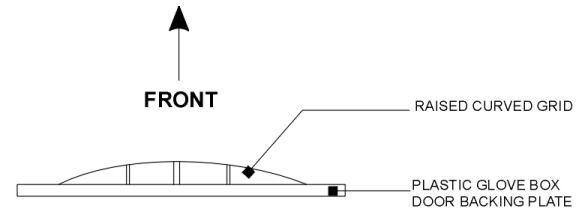
The first sketch shows the front of the plastic backing plate. There is a curved grid of reinforcement plastic that sticks out of the surface of the plate. I removed all the foam and glue even from between the grid. There are also a few other raised areas as noted, these are basically flat “plateaus”.

The second sketch shows a section through the plate and shows how the grid is curved and does not come to the edge of the plate.


Third: I cut out a sheet of 2mm thick polystyrene plastic sheet the same outside dimension as the backing plate. I also removed a “T” shape at the top to correspond with the upper raised area, latch hole and curved depression.

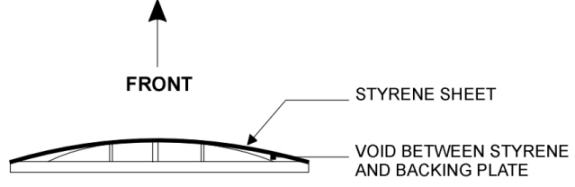
Fourth: I applied two-part epoxy to the raised grid and the edges of the plastic backing plate and clamped down the polystyrene sheet along the edges. This will force the styrene into a curve similar to the raised grid. There will be small void spaces created towards the edge of the backing plate, as the grid does not extend to the very edge.

The third sketch shows the applied styrene sheet and the resulting voids. These voids do not appear to affect the quality of the reconstruction.

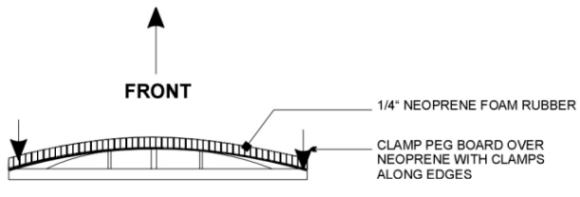
Fifth: I applied a polyurethane glue (Elmer’s Probond) to the surface of the now curved styrene sheet once the epoxy had set. The neoprene foam rubber was cut to suit and set onto the styrene. A sheet of peg board of the same size was used to clamp down the neoprene. First I clamped one edge and then the opposite edge which forces the peg board to match the curve of the styrene. There were a few bumps in the neoprene where the peg board holes were, but the quickly went away once the piece was unclamped.

The fourth sketch shows the neoprene applied to the styrene.

I repeated the fifth step for the vinyl cover and then used epoxy to seal the edges.

It worked great and I will post a picture tomorrow.

Sourmug

[This message has been edited by Sourmug (edited 11-07-2002).]

IP: Logged
Sourmug
Member
Posts: 4538
From: Calgary, Alberta, Canada
Registered: Sep 2002


Feedback score:    (29)
Leave feedback


Total ratings: 144
Rate this member

Report this Post11-07-2002 12:53 PM Click Here to See the Profile for SourmugSend a Private Message to SourmugDirect Link to This Post

Sourmug

4538 posts
Member since Sep 2002
Here's the picture!

IP: Logged
fieroman_5000
Member
Posts: 1407
From: Ann Arbor, MI, USA
Registered: Oct 2001


Feedback score: (1)
Leave feedback

Rate this member

Report this Post11-07-2002 03:00 PM Click Here to See the Profile for fieroman_5000Send a Private Message to fieroman_5000Direct Link to This Post
wow...that looks really good! Nice job!

Fieroman

------------------
~ Shane
AIM: fieroman500

Love it, admire it....tear it apart!

IP: Logged


All times are ET (US)

T H I S   I S   A N   A R C H I V E D   T O P I C
  

Contact Us | Back To Main Page

Advertizing on PFF | Fiero Parts Vendors
PFF Merchandise | Fiero Gallery | Ogre's Cave
Real-Time Chat | Fiero Related Auctions on eBay


Copyright (c) 1999, C. Pennock