
 
     |
| Trinten's SBC/F23 build - The work has begun! (Page 64/76) |

|
zkhennings
|
DEC 13, 04:07 PM
|
|
|
Really nice work all around
|
|
|
|
Trinten
|
DEC 16, 12:14 AM
|
|
Fuel level sender
ISS Pro was great to work with. I sent them an email, they emailed me back within an hour to ask when it would be a good time for one of their techs to call me.
Don called when they said he would, he went over everything with me, tank placement, headroom for the cap, other things they could do to the unit, they were even open to making the lead wires any length I wanted.
So it'll have a coating to protect the electronics from E85, the appropriate length (they go by half-inch increments). They had it made for me in less than 3 days, and the price, with shipping, is the same as it would have been buying one that didn't have the features I needed (namely being E85 compatible) from one of their resellers on Summit!
He even took the time to make sure I understood how the tube style senders work (theirs in particular has a 9-step sender), so it won't be as 'smooth' as the arm-coil-resister style. I'm not too worried about it, I don't like getting under a quarter of a tank of fuel in any car I drive.
[This message has been edited by Trinten (edited 03-26-2023).]
|
|
|
|
Trinten
|
JAN 15, 12:07 AM
|
|
Small updates for the moment.
First up is I bought the Fiero car cover through the Fiero Store, and so far I am really impressed by it. It came with extra plastic grommets, it was very well fitted, seemed well constructed. We'll see how it holds up.
Recently I worked on fitting in the rear wheel well covers, I bought all new hardware from Fiero Store, because it's inexpensive and then not fighting rust and grime, Both sides required some trimming, the passenger side less than the driver side. This was mostly because of the Corvette suspension and some other places where Mike had massaged things to make the clean fitting openings for the intercooler tubing.
To help make the wheel well covers look 'cleaner', Mike gave me the name of a company he uses to buy neoprene sheets. Apparently some G-Body cars had neoprene parts to their wheel well covers to act as flexible flaps, so we're going to apply that same approach here. I took pictures of the progress, but figured I'd wait till they were done, take pictures, and post it all up together.
We started doing our checklist to do wiring for the FAST TCU. As I did with the XFI, I'll be contacting my wire supplier for the appropriate striped wire color combinations once Mike let's me know what colors we need for my setup. I want to do as much as I can to use colors that will be consistent with the FAST diagrams, to make any future troubleshooting or repairs easier. Hopefully the wire company won't have a large backlog that we need to wait through.
Beyond the stuff on my car, Mike has been busy working with the G-body race team with prepping their car for the season, and starting to see what pieces he needs to do his F23/3800 swap on a Fiero he picked up shortly after mine got to his place. This one is separate from the Indy he'll be restoring. He informed me won't be going with me to Carlisle this year, but will definitely be at the 40th.
As far as other customer projects, someone picked up an off-center stage 2 GN motor, so he's swapping it into that guys Grand National, with the intention of having it ready to go to the big Grand National even in Bowling Green. He's a busy guy.
Remaining checklist for my car that I can think of:
1) TCU wiring
2) finish welding / testing / measuring useable volume of the gas tank / installing it.
3) Routing Intercooler water hose
4) Install my cruise control unit
5) Alignment
6) finish welding the front upper control arm mounting plates once we know it's well centered (hence the alignment being first)
7) install new switch module and key cylinder in the steering column (my request, doesn't seem to be necessary)
8) Toss in a basic interior for now
9) Tune it!
That's a much shorter punchlist than what I had a year ago.
OH! I forgot to mention, for those that don't peruse the forums, I'm sponsoring a Dyno at the 40th Anniversary. See this thread for details:
https://www.fiero.nl/forum/Forum1/HTML/100322.html[This message has been edited by Trinten (edited 01-15-2023).]
|
|
|
|
Trinten
|
FEB 05, 04:55 PM
|
|
Fuel tank completed!
The fuel tank is done!
Highlights: 304 stainless steel (including the weld-on bungs, baffle, trapdoor, etc).
The stainless fill and vent tubes runs to the center section of the tank, filling it from there so it wouldn't be stopped by the trap door (additional fabrication work, but worth it).
We set it up and did a test of usable capacity (how much gravity fed out of the tank when it was level, until the stream reduced to pencil size. Mike referred to this as "sitting idle" usable capacity, citing that if one where to goose the gas a little, fuel would rush back and be retained near the bank of the tank for a while thanks to the trapdoor.
We then tilted the nose up to see how much more was left in the tank. Those number will be posted later... and we are happy with them.
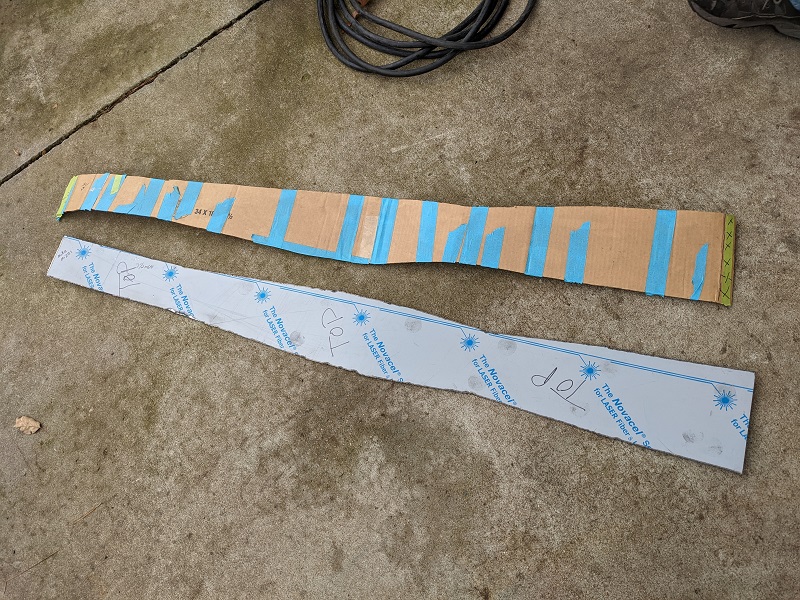
To recap, last year Mike used cardboard to workup a form fitting template to the tunnel in the Fiero. We wanted to use as much of the space as possible.
He then taped the template together, and had hoped a friend of his that owns an industrial overhead door company would have found the time to cut out the more uniform parts and bend them in a brake for us. That didn't happen, so Mike had to put in considerable more time with the plasma cutter and welder to put the tank together.
I'm at about $800 in materials in the tank (the flat stainless, tubes, bungs, stainless trap door).
Onto some pictures!
The rubber filler/breather tubes in the Fiero were sonic welded together, and both were in bad shape. So replacements were sourced. Here a picture of the old filler tube.

Here is the template and top part of the tank before we bent it to follow the 'dip' in the tunnel. This is a great image to show some of the complexity that went into the tank. After the bends were introduced, it made tack welding a few spots a two man job, as there wasn't a good way to get clamps to hold things where they need to stay and still be able to weld.
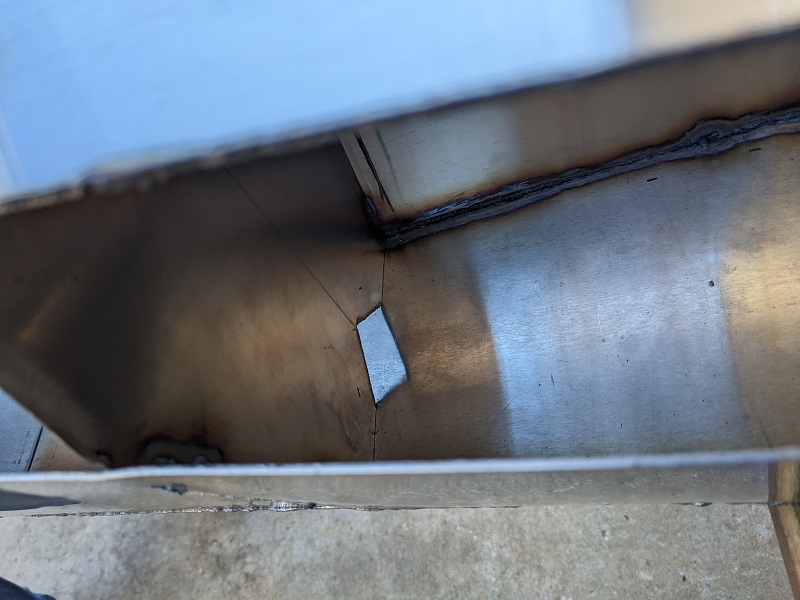
Before Mike welded on the additional bottom extension I suggested (it's still not the lowest part of the car, don't worry). I took the opportunity to take some pictures of the front baffle. There is an identical notch on the opposite side. He used the baffles as internal structures to secure many of the pieces to a 'core'. The position of the baffles was picked by where the tank straps sit, insuring rigidity.
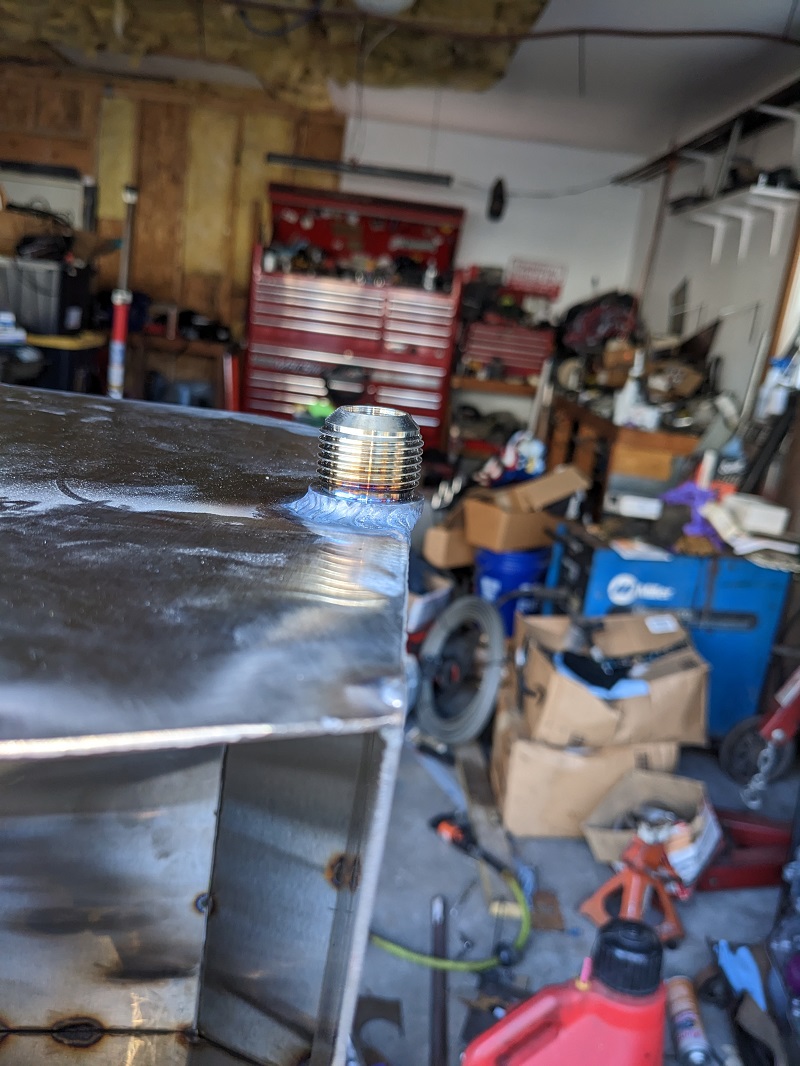
Next up is the stainless supply bung. We discussed the idea of having a "blister" of some kind, that would create an internal 'dip' for fuel to drop into, but we decided against it, as that would have become the lowest point under the car, and a higher chance of something happening that would compromise the tank. Besides, with the trap door, it should keep fuel back there without issues, negating most of the benefit.
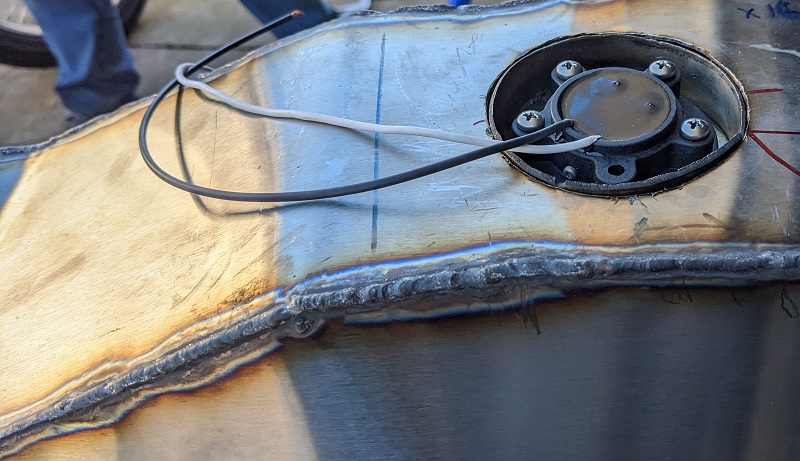
I talked about the fuel sender alright. Mike's measurements were spot on for it, meeting their requirement for space at the bottom of the tank, and let Mike recess the mounting point of the fuel sender. Here's a picture of it during a test fit, before he welded it into place.
In the tunnel there is this pocket that we originally wanted to make use of. Unfortunately, in our first test fit we found that it would be impossible to have enough wiggle room to connect/disconnect fittings and hoses, since the nose would be wedged into the pocket and the back of the tank would have to 'swing' up and down into position. So Mike had to cut off that portion and weld it back up. Capacity lost was minor, less than a quarter of a gallon.
Here's picture of it setup for our leak and capacity testing. There is some minor distortion/waviness to the metal. Stainless steel really dislikes being TIG welded in cold weather.
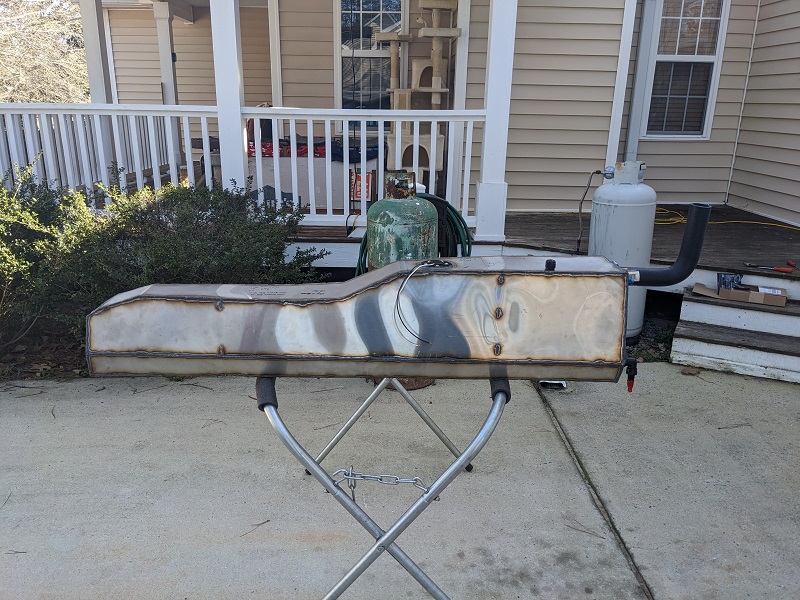
We capped off everything (including small breather vent) and filled it up to the top of the larger fill tube, which is above the tank. This, and rotating the tank, allowed us to make sure all the welds were tested. We found one pinhole. Not bad for so much welding!
After that, it was "idle usable capacity" test time! Place your bets! (we did!)
We used a 5 gallon bucket, and filled it up 3 times before the stream from the tank got to be less than pencil sized in width. That's 15 gallons!!
After lifting the nose a few inches, (now emptying it into a 1 gallon jug - empty windshield wiper jug) we got to a little over the halfway mark. So overall capacity is ~15.5 gallons. Given that the later, larger stock tanks were 11.9 total capacity gallons (and most people guess it's about 10.5 - 10.75 usable capacity), I'll take the 4+ usable gallon increase!
Next weekend will be installation and then pressurizing the fuel system to check for any leaks there. If no leaks, we will begin the idle tuning of the car!
In before the comment: Yes, Rodney Dickman makes exact replacement tanks, and they are top quality. We wanted to see if we could make something to hold more, and we wanted it to be made with 304 stainless. If we ran into issues, or hit a time crunch, Rodney's tank was our backup plan.[This message has been edited by Trinten (edited 03-26-2023).]
|
|
|
|
zkhennings
|
FEB 06, 10:13 AM
|
|
|
Looks great, must have taken forever to weld!
|
|
|
|
Trinten
|
MAR 05, 12:19 PM
|
|
I had hoped by now to be able to post a link to the engine running. Alas we've hit some electrical gremlins that we are now chasing down.
The engine harness is the original one that came with the LS4. This one is temporary since I'm using a Drive By Cable setup, so there were some extraneous wires from the DBW that aren't being used, and some wires that were added for things like the TPS.
Back in November, the FAST setup was talking to the engine, and we were able to get it to run by spritzing some fuel into the throttle body. FAST showed injectors were firing (though nothing to fire, no gas tank at this point), and it obviously had spark because it ran for that few seconds until it ate up the fuel.
A few weeks ago, after installing the tank, the XIM part of the fast was refusing to fire the injectors. We confirmed it was seeing the injectors by doing a fault test. So Mike went through the lengthy troubleshooting (starting with Canbus wires, terminators, etc). Yesterday we finished ohming wires and checking for loose pins, and found our loose culprit.
We were excited, the XIM was now seeing all it's inputs and was trying to fire off the injectors! We put the fuse in for the fuel pump, starting cranking.... no start. Check everything, try again. No start. Confirmed the injectors are spraying fuel (the mufflers and their mounting 'T' is not connected, and after a combined 30 seconds or so of cranking over a few attempts, fuel was at the opening of the exhaust).
Now since it ran for a few moments in November, we didn't think it was a spark issue, but that's the next thing to check. And here's where it's gotten a little strange.
There is spark. Very weak spark, like sometimes you'll 'hear' the spark more than see it.
1. We check voltage coming into the coils. 12.7v.
2. Grounds are good, this grounding to the block, which has good grounds to the frame, because the starter is grounded to the block and is spinning the engine without any issues. We also tested it by grounding the spark plug in different ways (first by touching the threads against a bolt on the block, another time with a wire leading directly to another ground. That second one was my idea, Mike thought it was unnecessary due to the strong starter rotation but he was kind enough to humor me).
3. We double check the dwell times (the D585 coils need a dwell time closer to 4 - 4.5ms, versus the default 5.5)
4. We check a few other plugs, all the same (also, no fouling or anything else, they look good)
5. We swap off a coil for a known good one from an LS1 (and adjust the dwell time for it). No change, spark is still barely there.
So we hook a laptop up to the FAST so we can log what's going on. When cranking:
1. The engine shows 250-300 RPMs, then a moment of "zero", then jumps back up again. It's very consistent. Mike thinks that might be normal for a 24x reluctor wheel, but he's going to check.
2. During those times that the engine shows the 250-300 rpm, the FAST is telling the injectors to go to 100% duty cycle! Mike was surprised by this, comparing start up logs to the FAST system in his car, that is unusual behavior. It also made him go and pull more plugs to see if any of them were fouled. They weren't.
3. We may have either a bad TPS sensor, or there is some EMI that we need to hunt down and fix. FAST is logging an erratic TPS signal, jumping from 0% to ~15%. Mike has one of those clamp shaped tools that you can use to check for EMI, so that is on the list to do later, to see if need a new sensor or need to shield something.
The first thing we're trying to figure out is the weak spark issue. We have good grounds, coil packs are good, voltage is good, so that's our head scratcher right now. If anyone else has any thoughts, please let me know. There's nothing in the FAST configuration (except dwell time) that we could think of or find that would affect this.
|
|
|
|
Trinten
|
MAR 11, 08:34 PM
|
|
We found the problem with our starting issue, and got it running!! Also found more hiccups!
To cover the no-start issue first, the crank position sensor was bad. Mike figured it out by doing a bunch more logging and looking at dashboards on the FAST while he had me crank the engine for a few seconds every few minutes.
This let us test our disassembly options. We took off the passenger wheel, took out the wheel well liner, took off the header bolts of the rear bank, opened the V-Clamp at the end of that header, and with a little wiggling and leverage, slipped the exhaust manifold off the studs and out of the v-band, and then slid it sideways out the side of the car. Not having strut towers is awesome!
Getting the sensor out was a little bit of blind work, but Mike is used to that kind of stuff, so it wasn't an issue. He also found this other testing tool for testing spark. It's difficult to describe and I didn't take a picture of it, the spark plug screws into a collar that has an elongated ceramic center piece and a tall wall around it. He says it needs to show strong spark for it to jump all the way up the ceramic insulator and hit the wall. With the sensor replaced, it did just that!
So now we have spark! We put everything back together (which did take two hands, I had to lean over the side and reach from the front side of the vband to hold it in place while Mike latched it), turn on the fuel pump, try to start it... it sputters, crank crank crank. Sputters... crank crank. Okay. Back to the logs.
We see the TPS is still doing bizarre signaling. To rule out an EMI issue, Mike simply unplugs it. Problem goes away. He plugs it back in, and tries the travel of the TPS. To summarize how bad it was, nothing would register till about half-throttle. At full throttle, it was only reading 85%.
So he goes into his boxes of spare and test parts and pulls out a used GM OEM TPS. We slap that on there.... all the issues vanish.
He then played with the timing a little, added a lot of fuel, and we got it to where it wants to idle. To rule out the IAC (which came with the TB along with the TPS), I've ordered a new one of those as well as a new TPS.
Next weekend will be installing the new TPS and IAC, getting the wideband hooked up to the FAST, start working on the controller for the coolant pump. That could get a little messy. Mike's TIG welder (I think TIG, he has both TIG and MIG) is acting up, and there is still a pinhole in the radiator he needs to fix. But we can't do long running idle tuning without getting the coolant system working properly. So we'll deal with a slow drip of coolant for the time being.
I have a video of it idling without the mufflers on, when I get it uploaded someplace I will post a link.
|
|
|
|
fieroguru
|
MAR 12, 10:32 AM
|
|
|
Vince, glad to see you and Mike working through the gremlins and getting closer to a running/driving swap!
|
|
|
|
Trinten
|
MAR 13, 09:32 PM
|
|
For various reasons I'm not uploading to youtube, so I droppd the video file on the web server that was hosting the defunct NCFiero Forums (I waited too long between version upgrades... and... it went badly. Still not sure what I did wrong. I've tried restoring things a few different ways, including wiping out the DB, wiping out the forum install, putting back on the version I had, restoring the DB I backed up before the debacle... still broke. So it's a lost cause and will eventually go away).
In the meantime though, here is the video (well, audio?) of it running. This is from Saturday, the only tuning done was adding some timing and incrementally more fuel until we got to this point.
This was recorded on an android phone - not sure why the video won't render on the page, plays fine when I open it on my Windows laptop.
|
|
|
|
fieroguru
|
MAR 14, 09:46 AM
|
|
|
Video worked for me. Sounds like it will have a little chop to it!
|
|
|
|