
 
     |
| Trinten's SBC/F23 build - The work has begun! (Page 42/76) |

|
Trinten
|
SEP 15, 11:06 AM
|
|
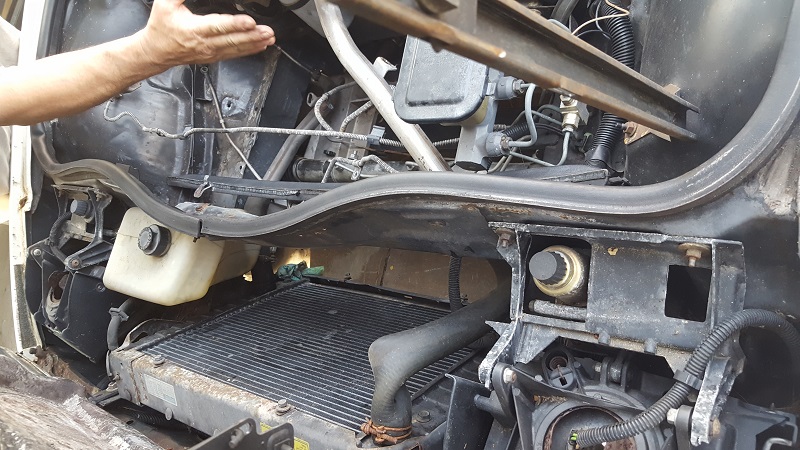
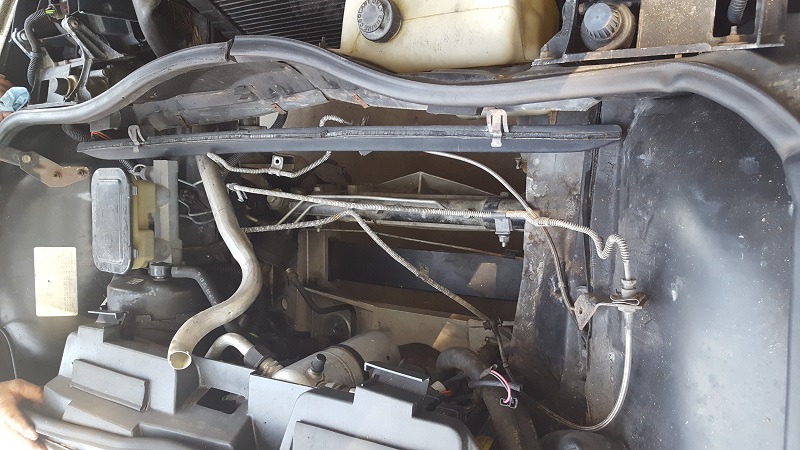
The importance of buying exact replacement parts when you have a modified car, and knowing how to drive stick.
Hi everyone! It's been a few years since I've had the car back, so I wanted to update everyone.
Overall, for such a heavy amount of modification, the car has been amazingly trouble free, there's been a few hiccups, mainly due to the parts. Like I had an odd oil leak I had to chase down, and discovered that my intake was not sitting flush with the engine, so a shop fixed that (partial planing out the bottom of the intake and adjusting the gasket).
Minor crap aside, here is my tale of "How I learned I've been driving a manual wrong... and what it did to my car."
Let me start by saying I effectively taught myself by puttering up and down a back street. From reading I knew "riding the clutch" was bad, but you needed to do a little of it to get rolling from a dead stop. My mistake was I also thought that as you shifted, you should start to give it a little gas near the end of the clutch re-engaging (as you lift your foot) to try to get the flywheel and clutch to be spinning at a closer rate. This would, in my mind, provide a smoother ride, and only marginally impact clutch wear.
The issue was, when driving aggressive, I would do the same thing. The inch or so before my foot was completely off the clutch pedal, I'd start pushing down the throttle. I was making my belt jump off and get chewed up with regularity (5.5K-6K shifts from 2nd on up, belt typically jumped between 3rd and 4th gear).
I foolishly chalked it up to "This is what happens when you have modified toys." and just dealt with it. FieroGuru was baffled, he had put on aroun 700 miles, and said he had some aggressive driving, and had no belt issues. Let me stress here that I am standing behind FieroGuru and the awesome work he has done, this is entirely on me. I'm just giving some background.
So I lived with the belt issues, and always kept a spare. Then one day when putting the belt back on (it had just hopped off, no damage), I notice there's a piece of metal missing from the belt tensioner (I have pics, I will post them up later this weekend). To me it didn't seem to impact it's operation, so I ignored it. Dumb move 2. Or maybe 3 at this point? Anyhow.
A local buddy was helping me out with some stuff, and I mentioned the belt issues. He looks at it and says "That's broken. The stop is gone, so the spring is pulling it forward too much." Oh... well, that might help explain the belt issues. I text FieroGuru, and in <10 minutes he tells me exactly what kind of car it's out of, and even gives me the freaking part number! What a memory!
Off to RockAuto! All the pictures look the same, and since I was buying Gates heavy duty belts, I figure I'll get a Gates tensioner.
It shows up, I go back to Mikes, he takes out the plate holding the tensioner... they are not the same. The Gates is an "improved design" (again, I have lots of pictures, I will edit this and put them all in). The improved design moved the bolt holds ever-so-slightly. Mike marks them with a grease pen and carefully opens up the space on the plate. Then we discover the pulley won't swap over. Now it gets complicated.
I offer for us to go up to a parts store and just grab the exact part number Guru gave me. He likes how beefy the new one looks, and wants to make it work. He built his 700HP Grand National (old school mechanic), so I trusted his expertise and amazing collection of tools he has to get this done. So he digs through his buckets and boxes of parts, and finds another pulley (from a Grand National) that is not ribbed, but is "lipped". He says he's done pulley swaps like that before, and shouldn't impact the belt life. The pulley fits! It's also a little bigger than the old pulley.
New pulley goes on. Tensioner goes on the bracket... and there's some clearance issues when the tensioner rotates. A little more grinding (with him commenting on the strength of the steel plate that the bracket was made from), and it's working. Next challenge... larger pulley, means belt length changes.
For giggles, we tried one of the Gates HD belts, it was not going to work. To the parts store!
I brought the old tensioner and one of the belts, just for comparison. While there, I did pick up a Dayco tensioner that is exactly like my old one. We picked up two different longer belts (I'll list all of the belt sizes when I put the pictures up).
After some trial and error, we got it all together. He was also helping me fix my A/C, so we take it for a test drive to Walmart. This is the first time he's been in the Fiero with me driving (he's driven it a few times). After a little babying, I jump on it in a free-and-clear space. It holds up. As we continue the cruise, Mike says "Well, I found your problem."
"What's that?" I ask.
"You. You don't shift correctly."
... "What?"
"You're giving it gas before the clutch is fully engaged on every gear."
"Right?"
"No. You should let the clutch fully engage before you give it gas."
"That's... going to the ride kind of jerky when I shift."
"If you're shifting when you're not supposed to, yeah. But when you hit it right, it'll still be smooth."
"Well damn, now I know why Guru said my last clutch only had about half it's life left, with only 5 or 10K miles on it."
"Yup."
He then explained with how I was shifting, the tensioner was doing a lot more work, and was snapping around more than it needed to, this whipping effect on the belt made it easy for it pop off. Well damn.
So we get refrigerant, and on the way back I practice what he told me. Sometimes it was not pleasant, but after a little bit, the shifts were almost as smooth as when I was "riding" the clutch a touch at the end.
Driving home was interesting, going into second gear a few times was a head bobbing experience, but 3/4/5 were all pretty smooth.
He also told me about how Buick had a "screw-drive" solid tensioner, and that if I wanted to explore that, he'd try to figure out how to put it into my car - simply to make it easier to put the belt on by myself if I ever have to replace it again at the side of the road or something.
As part of my roadside kit, I'm keeping the old style tensioner, with the pulley Guru gave me, and the belt for that setup, along with the 4 sizes of socket/wrenches I need to swap all of that stuff in the car. I need to put together a roadside bag like Guru's.
Again, I'll edit this with pics on Sunday or Monday, and make a post so everyone will know when the pics have been added.
My thanks to FieroGuru for continuing to be awesome and response when I have questions and I am not near my computer to go through my notes -- as well as the quality of his work, which won some great recognition for clean install/clean wiring at car shows, and a lot of impressed nods from mechanics and engineers alike.
|
|
|
|
fieroguru
|
SEP 15, 07:28 PM
|
|
Vince, glad you figured it out, are enjoying the car, and that it has received several favorable comments about the swap!
You might want to consider a specialized alternator pulley that is called and Overrun Alternator Decoupling pulley (OAD) that will help reduce accessory belt vibrations.
https://aviondemand.com/pro...-vs-overrunning-adp/[This message has been edited by fieroguru (edited 09-16-2017).]
|
|
|
|
La fiera
|
NOV 13, 06:50 PM
|
|
| quote | Originally posted by Trinten:
My thanks to FieroGuru for continuing to be awesome and response when I have questions and I am not near my computer to go through my notes -- as well as the quality of his work, which won some great recognition for clean install/clean wiring at car shows, and a lot of impressed nods from mechanics and engineers alike. |
|
I was very impressed with Guru's work when I saw your car for the first time!!
|
|
|
|
Trinten
|
APR 22, 08:32 AM
|
|
So as the Fiero is down for repairs, and one of the things that needs to be fixed is the headlights/bucket assembly on one side, I've been looking at other options besides putting back in the twin 90mm Hella lamps I had.
I found this - an LED 4x6 headlight assemble I'm considering (though may not get this exact one, I don't care about the RGB 'halo' around it) - https://colorwerkzled.com/c...pre-built-headlights
I also admittedly like the new style of headlights that Acura is using across their entire line. So I'm wondering if the top of the GT bumper can be modified to fit those in there, and then the headlight panels would be patched and smoothed over. This would be problematic as I still intend to do the F355 nose that Amida makes, so I'm factoring in that as well. If anyone has any (technical) thoughts on this, please chime in!
Also, I did realize that I failed to post the pictures I intended to add to my last post. I need to see if I ever moved them off my phone to my computer, and start that process.
|
|
|
|
La fiera
|
APR 22, 09:30 PM
|
|
Nice to see you are bringing the monster back to life! Let me know when you come to Mooresville, I'll break my piggy bank and treat you to Burrito Loco. (This guy can eat!!) 
|
|
|
|
Trinten
|
MAY 26, 08:55 AM
|
|
Hello all!
Start of current build. Page 11. May 2019 The Beginning
I know it's been a while. For those that know me, I like to do my homework, ask annoying questions, do more research, and save up money to pay people far more skilled than I to get things done!
The guy who is doing this next round of upgrades is fairly local to me. I met him 6 or 7 years ago now. What sold me on his skills is the stuff he'd done with his Grand National - a remarkable mix of fabrication (welding) skills, electrical planning, modification, and making things look like they came from the factory that way. He's a career mechanic and loves challenges, but does the "boring routine stuff" to keep cash flowing in. He has toys (both cars and a ridiculous tool chest and other fabrication tools) that I wish I had the space for... and the knowledge to use effectively.
Anyhow!! Onto some details, right?
Transmission update!
I decided to get rid of the manual transmission. Mike (said mechanic) wanted it my F23 for his own Fiero project (he caught the bug from me and fellow Fiero enthusiast Chug). So he has that. Knowing I wanted to go Automatic, I reached out to FieroGuru with a pretty simple question -- what's the strongest automatic out there?
FieroGuru's reply: "Depends on what you wanted out of it. The strongest would be the 4T80, the most interesting would be the 6T75 (using the Ford version that came with the V8)."
Well then... 4T80 it is!
Next I reached out to DarthFiero, who connected me to Dave over at Triple Edge Performance. Dave was really good with a presales call, we talked through everything. He had started investigating building up the 4T80, and had a number of cores, but the business wasn't there for it yet. He did say he slapped a stock 4T80 into one of his cars and had beating on it for over a year with no issues. The conversation ended pretty simply "Throw every trick you have at it for me."
Mike also insisted I get a torque converter with a billet cover, his concern was ballooning and didn't want the fast spinning chunk of metal behind my back to rip through and hurt me if things went south. I'll get to why that's a concern of his later. Transmission first!
Dave said the company he worked with for torque converters could probably do it. So Triple Edge was paid for the transmission and torque converter. The transmission took much longer to be ready than originally anticipated - Dave was transparent on the cause of the delays, which I appreciated. The downside is his TC Company said they couldn't do a billet cover for a 4T80, so they wanted to do one for a 4T65... which means (as Dave tells me), I now need to get a pump input shaft that is 4T65 on one side, and 4T80 on the other. He's looking into details - there is a machine shop that will build it for me once I have those details. And since it'll be a custom part, I'll get two.
I have since found a full blown race shop that will basically fabricate any torque converter.... but their prices start at 3k, and that's for the stuff they regularly do. So putting that on the back burner for now.
Meziere is making the custom flexplate I need. They have been awesome to work with! Again, I ordered two. The price break after the first one was too good to pass up, and again, custom stuff. Plus they gave me the technical sheet for it, so if I ever need one made by them or anyone ever in the future, I just need to give them that sheet!
"Trinten! Shut up and show us a picture!" .... okay, fine.
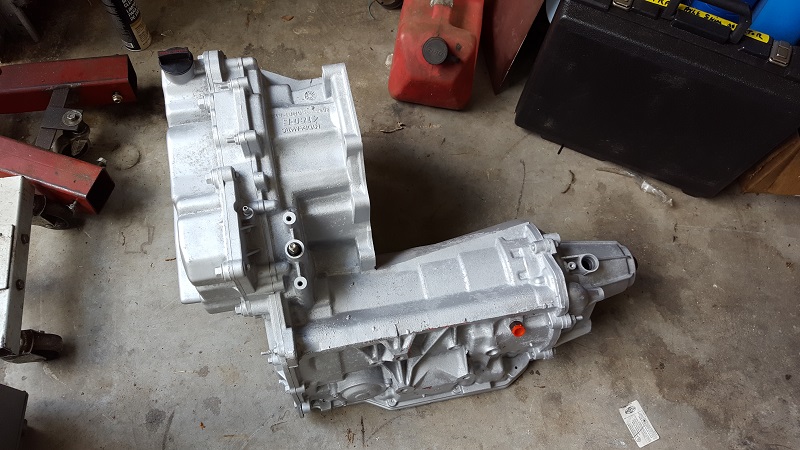
"But Trinten! The 4T80 was never paired with a SBC! It won't work!!!" .... really? Are you sure...? Cause, you know, this:
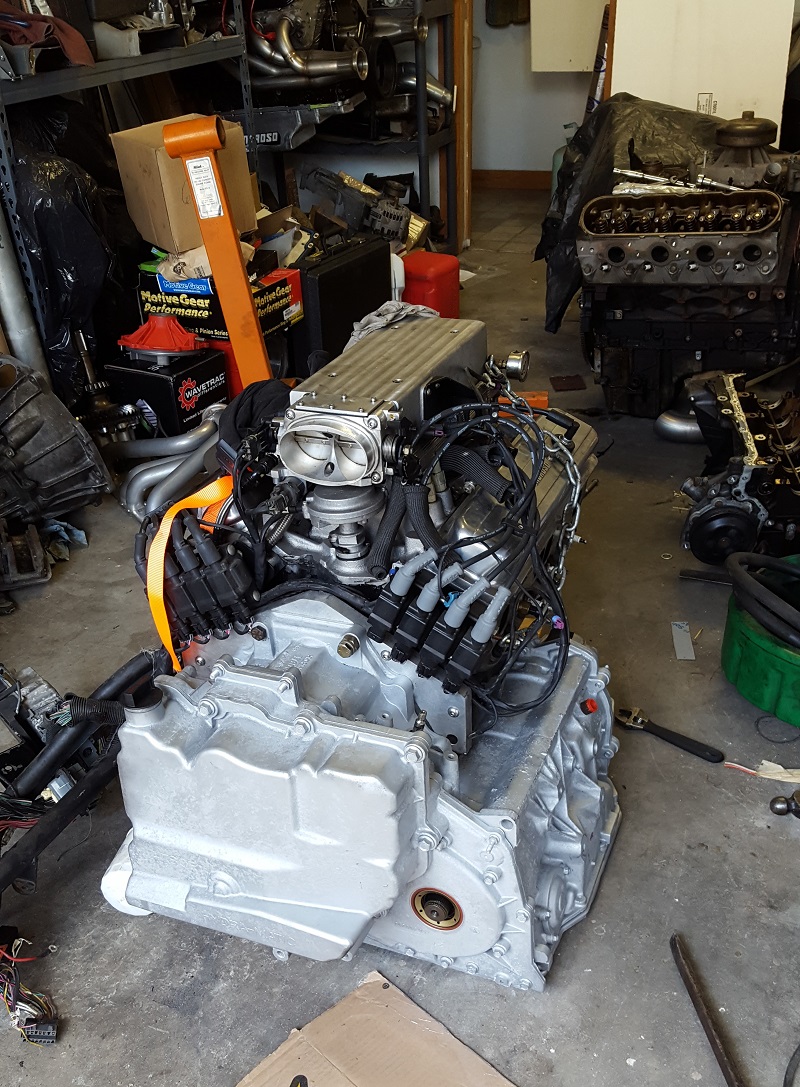
And this:
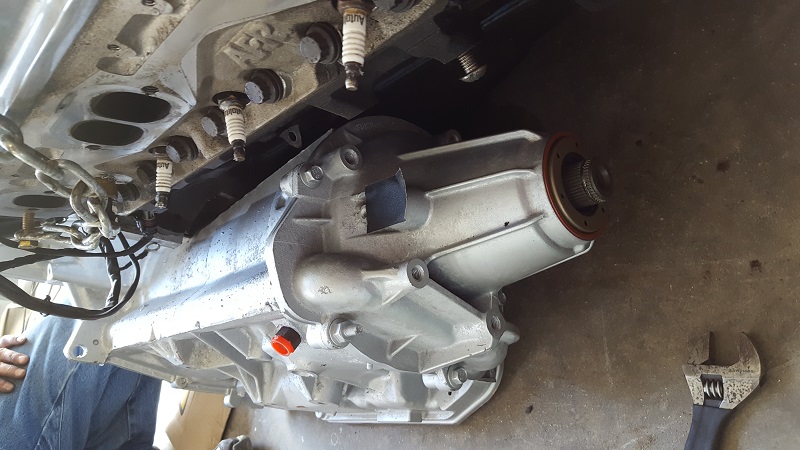
And this:
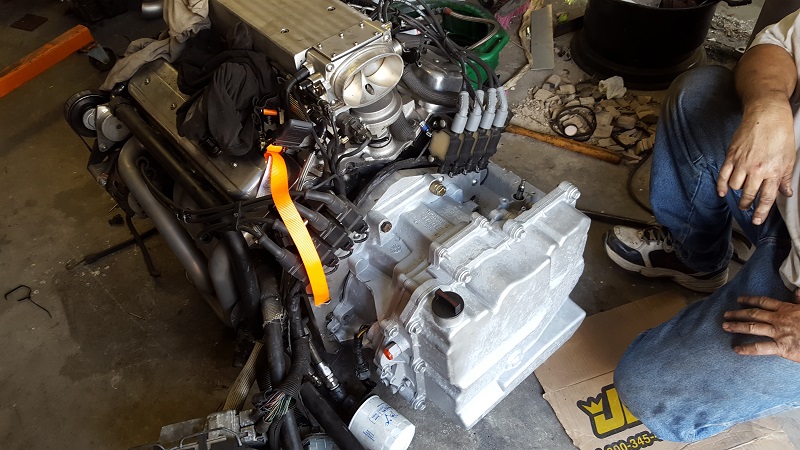
No, that is not me in the picture, that is Mike. And no, he is not missing part of his right ring-finger, it's just a creepy camera angle. You can't stop looking now, can you?
In full disclosure, this did require taking a 2" corner out of the SBC flange for the transmission lobe to clear so the bolt holes will line up. Mike will also be tapping holes on the trans bell housing to take full advantage of all of the bolt holes in the adapter/block. He was also happy that the bracket holes on the lobe line up well with some mounting points on the block, so he's going to build a brace there to help with forces.
Right now the assembly is sitting on a makeshift "stand" The previous pics were from a few weeks ago. This next one was from yesterday, which will lead into my next post!
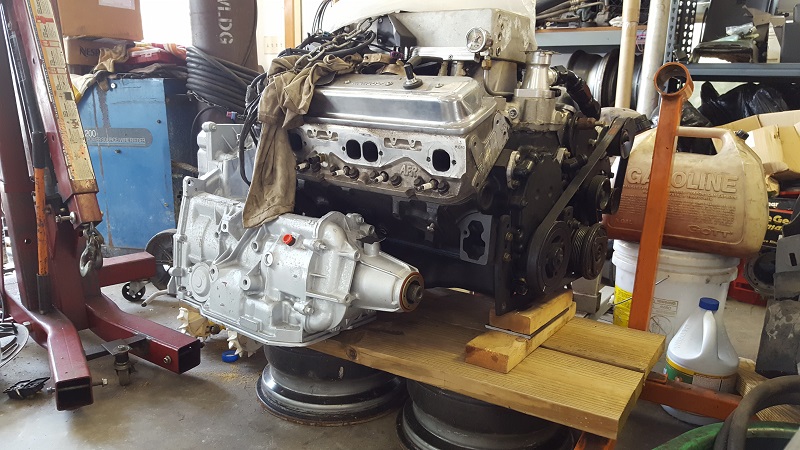
And yes, doing this means modifying the cradle. Wait... did I say modifying the cradle? Hmm, no, Mike says that all the time it would take to modify the cradle, he might as well just build one for me. Out of chromemoly. So that's happening. Custom engine cradle! ... which works out well with some of the upcoming surprises...
To the next post! (edited to start playing with the vbook tags. It'd be cool to be able to print out my build thread and have it handy for physical reference or to show to people)[This message has been edited by Trinten (edited 06-04-2024).]
|
|
|
|
Trinten
|
MAY 26, 09:24 AM
|
|
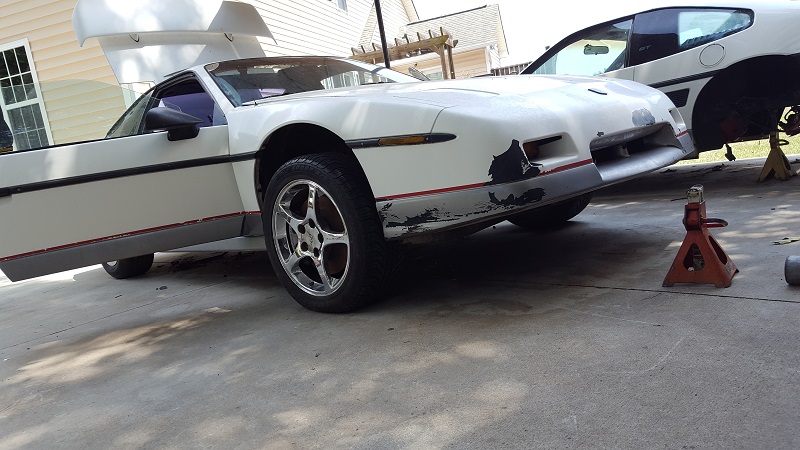
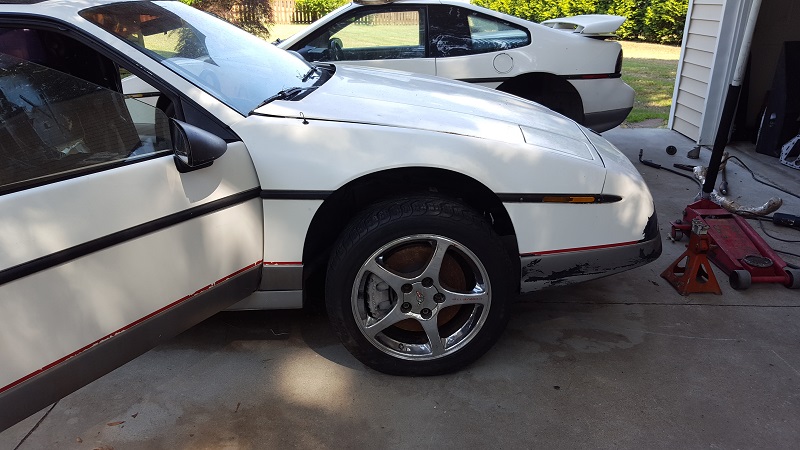
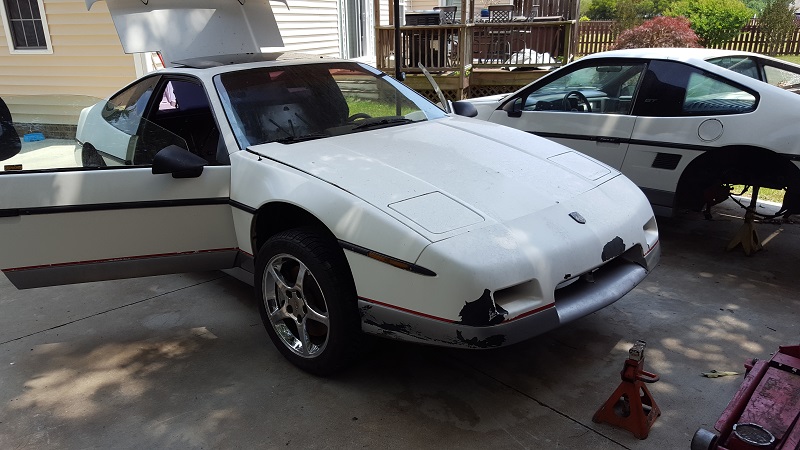
On to Suspension
This time I'm opening up with a picture! Mike has been working on the front-end, getting my awesome new wheels on. Check this out!

Yup, that is a C5 Corvette wheel! What's that? Spacers?? Why would I need Spacers?! Oh, because of the bolt pattern? Not a problem. We used Corvette hubs. And Controls arms. And steering rack.... and transverse spring. What's that Mike? Oh! You just took the entire C5 front end suspension and bolted it up to my Fiero? Awesome!
Background, then more pictures!
Mike drove my Fiero about 4 years ago. He was really impressed with it... mostly. He didn't like the suspension. After accident, when discussing with him my options, he said "If we rebuild the car, we're not using that suspension. We need better stuff." That 'better stuff' is C5 Vette, front and back.
Mike was impressed at how "easy" it was to bolt up the Vette front suspension and make the modifications for mounting points and the steering wheel column. Notice easy is in quotes... because easy is seriously relative at this point.
Picture time!
I have more pictures, but you get the idea right now.
In before the obvious comments!
Yes, the car sits higher right now. I actually like it. It will drop about an inch once all the other stuff is done, and Mike said there is a Vette bump steer kit that will drop it another inch.
Yes, the wheels turn lock to lock and clear everything.
Yes, I will be using the power steering. This will be done by mounting a 2nd Generation Toyota MR2 Spyder EHPS Pump up front. I found and bought three of them, because they are getting rare.
Yes, the wheels stick out. I will be getting flared wheel wells sometime in the future. Bodywork and paint are always last on my list.
Mike cut off the Fiero stock mounting points, and made new mounting brackets that connect to the Fiero Frame and go to the stock Vette mounting points. Apparently these two things are ridiculously lined up.
If anyone else has put a C5 Vette front suspension in their Fiero, I haven't found it/seen it... so I'm tentatively going to say "First!"
I have no pics of the rear yet... because it can't be done until Mike is done with the custom cradle. He said the back is going to sit up high, too. I told him fine, and I actually wanted to see if he could make the back sit up higher than the front... I like the "Raked" look. If you're not a fan of that look, that's fine, it's not being built for you, is it? 
There are more surprises in store, but I'll wait till more is done to post pictures and info.
Also, all of the interior of this Fiero came out, it was the Beachwood tan/brown stuff. Including, I think, Mr. Mike's leather seats! I'm going to be cleaning (almost) all of it up and posting it in the Mall sometime tomorrow, if anyone needs anything. Edit: I thought all the tan stuff was the beachwood stuff, shows how little I pay attention to interior colors.
Here is the link to my TAN/BROWN interior parts for sale: http://www.fiero.nl/forum/Forum4/HTML/077786.html
[This message has been edited by Trinten (edited 06-04-2024).]
|
|
|
|
G-Man
|
MAY 29, 05:51 PM
|
|
Did the starter and oil filter present any problems or are they pretty much like they are in any other SBC/auto swap? How are you controlling the 80?
I'm very interested to see how this combo fits the engine bay and how the added weight affects the ride and handling. It's about 90 lbs or so heavier than the 4t65 which is itself probably a lot heavier then the MT you are taking out.
Oh, and e.t.a: The front of your car is probably sitting higher because it used to support the weight of an engine in the Vette. You might need to add some ballast. I can give you my ex-wife's number if you want?
Gary[This message has been edited by G-Man (edited 05-29-2019).]
|
|
|
|
Trinten
|
MAY 29, 09:37 PM
|
|
LOL,
Thanks Gary, good questions and observations. Yes, Mike said that once the radiator and everything else was back in the front, it would bring it down a touch.
There are aftermarket corvette suspension parts, up to some ridiculous (leaf) spring rates, front and back. So I'm ready to drop coin to get whatever it takes to keep the rear end geometry right.
We're going to keep using the 411 PCM that was controlling my engine before, we're going to reflash it with the Transmission tables for the 4L80, which has the same solenoid layout as the 4T80. So the computer will think it's a 4L80.
I can't answer all the details about how it'll all fit. Mike had multiple ideas of how things were going to fit in there, and what he might or might not modify as he built up the cradle and started doing test fitting and more measurements. I'll hold off on the thoughts he was pitching to me for a few reasons.
1. They're just ideas so far, and I don't know which one will wind up being executed.
2. I won't be able to answer most of the technical questions!
Mike said he'd consider registering here and making some posts. No promises. Once it's done or as it progresses, I'll do my best to answer questions.
|
|
|
|
RCR
|
JUN 01, 11:35 AM
|
|
Very cool, Trinten (and team). 
Before I got neck deep in my rebody, I was looking at the C4 cross member for the front. The dimensions I looked at showed that the locations of the control arms were much further inward than the Fiero and they would interfere with a lot of things. Ultimately I put an 88 suspension in. Awesome that you got the C5 in. I'm still considering the C4 rear, but it still needs a lot of research (and time) before pulling the trigger.
There isn't a clear picture on how the shock is done. Would you be able to go with coil-overs and eliminate the transverse spring? I know you mentioned you kind of like it, but is it truely the lack of weight not bringing it back down, or is the suspension that much taller?
Either way, well done, team.
Bob------------------

My Build
|
|
|
|