
 
     |
| The ClayTonto Fiero Build (Page 4/36) |

|
Fiero STS
|
FEB 20, 12:45 PM
|
|
|
Is it just me or would the rear window look better with the rounded corners at the top?
|
|
|
|
Archie
|
FEB 20, 01:54 PM
|
|
| quote | Originally posted by Fiero STS:
Is it just me or would the rear window look better with the rounded corners at the top? |
|
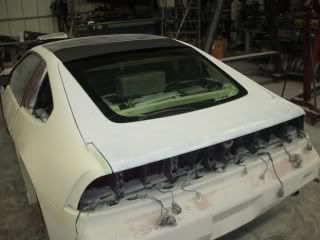
It might look better with rounded corners but we wanted to use the 350Z rear window because of the size & curvature in it. The 350Z window is tempered & you're not going to cut a radius in the corners without breaking it.
On Curley's car we used the same window & you don't notice the sharp corners at the top of the window because we did his without a border at the top of the window. However, on his car we had to put an arc in the roof section behind the sunroof to match the arc in the 350Z rear window.
On this design we wanted the rear Hatch kit to be as easy to install as possible & with no body modifications to the Fiero rear clip. So we needed a border at the top of the window so that we could match the arc of the rear window & so we could put steel inside the rear hatch for bolting the hinges to.
On Curley's car, building it without the border at the top ment that we had to put in a steel bar underneath the top blacked out area of the 350Z window & that bar is what the front of the window is bonded to. (see note below)
As you can tell, a lot of planning went into this hatch before work began & consideration of the compromises was part of that.
You can check out Curley's build thread to find detailed pictures of all of this. http://www.fiero.nl/forum/Forum3/HTML/000053.html
Thanks
Archie
Edited to add...... The rear window on Curley's car t's not bonded in with body filler type "Bondo".
It's bonded as in "Glued" to the bar with 3M Window Weld, which is the stuff you glue (or bond) Windshields in with.[This message has been edited by Archie (edited 02-21-2009).]
|
|
|
|
ClayTonto
|
FEB 20, 01:59 PM
|
|
| quote | Originally posted by Jncomutt:
I think when this car is painted, it would look badass if the area between the sunroof and rear window was painted black to make it appear as one large window. Similar to what was done on the Scion Tc for example...
quick photoshop
|
|
Thanks for the suggestion, I can assure you that area will be painted black. This is what I'm shooting for:

| quote | Originally posted by Austrian Import:
Suggestion:
You could move the HVAC controls to the bottom, and make room for a double DIN stereo to future proof that dash. Worst case, you can always find a compartment tray/lockable tray to put trinkets in if you decide to use a single DIN for now.
|
|
Thanks.I am going to run a motorized flip out in-dash, which will cover the dated HVAC controls when open.[This message has been edited by ClayTonto (edited 02-20-2009).]
|
|
|
|
Archie
|
FEB 20, 08:53 PM
|
|
You know, i don't think there's a thread on this forum thatr has as many pictures on the 1st page as this one.
I'm sorry about that but I'm going to be posting more. I just want to get caught up with this thread to current time. I hate being behind.
So here's some more.
We continue with some work on the tail light covers.
They're made out of fiberglass with a CF finish to the outside face. I don't know how long they've sat around but they're warped a bit...
.JPG)
.JPG)
We took some time to fixture the covers to make them straight then laid a couple of layers of fiberglass into them to try to keep them straight.
There are no provisions to mount the covers so we'll plan our own.
.JPG)
During that time, we also installed the front grills....
When we're doing something like this we make metal mounting tabs & bond them into place around the openings...
.JPG)
Then we glass the mounting tabs on with fiberglass & resin....
.JPG)
Then we can bolt on the grills. Later when the car is painted the grills can be removed for a better paint job.
.JPG)
_1.JPG)
_1.JPG)
......
|
|
|
|
Archie
|
FEB 20, 09:29 PM
|
|
|
|
|
ClayTonto
|
FEB 21, 12:04 AM
|
|
| quote | Originally posted by Archie:
.JPG)
Archie
|
|
 ooh, shiny stuff ooh, shiny stuff
|
|

|
madcurl
|
FEB 21, 01:15 PM
|
|
| quote | Originally posted by Archie:
Not wasting any time.
Archie
|
|
Yeah, no kidding. Keep on posting away.... this is PONTIAC excitement! 
Any pics of the strut tower bar in the pic?
|
|
|
|
normsf
|
FEB 21, 10:48 PM
|
|
|
Hello Archie, you and your crew are doing a great job as usuall. Thanks Norm
|
|
|
|
Archie
|
FEB 22, 12:41 PM
|
|
Once again, I'm sorry there are so many pictures on just one page of this thread.
I was kinda hoping there would be enough replies to take it over to page 2 but I guess not.
I wanted to get all this stuff posted to get the thread up to date so we can post current progress as it occurs.
So now we're back to work on the hatch.....
In addition to the outside surface, we intend to make the area where the window is mounted & the “package tray” area that covers the trunk, all as one part. So it was time to form the package tray area…..
_3.JPG)
_1.JPG)
_1.JPG)
Some sanding filling & smoothing & we’re ready to start the mold making process.
Got to get it just as smooth as you would if it was a finished part.…
.JPG)
_1.JPG)
_1.JPG)
After removing the hatch “Buck” from the car, Kris is spraying the 1st of several coats of Duratec on it.
Notice the triangular shaped framework underneath the “Buck”. That’s a box steel framework we had used to weld the buck to the Fiero chassis to keep it from moving around while did all the work to build the “Buck”.
.JPG)
After about 4 coats of Duratec & drying time, Kris spent a full day of wet snading, polishing & waxing of the “Buck”
Remember, the mold that is going to make the finished product is going to come directly off of this surface. So the quality & smoothness you put in right now is going to be ON EVERY PART that you take out of the finished mold. So if you have a nick or scratch on this "buck", it's easier to fix it now than to fix every part that come out of the mold.....
_1.JPG)
.JPG)
Archie
|
|

|
mcaanda
|
FEB 22, 02:02 PM
|
|
|
I really like that decklid option - I know you said that you were going to offer vent options for it as well. Any timelines on getting some pics of those? ------------------
And it begins again...
|
|
|
|
_1.JPG)
.JPG)
.JPG)
.JPG)