
 
     |
| AC R134 Conversion (Page 1/8) |

|
computer_engineer
|
JUL 15, 05:34 PM
|
|
I am considering converting my R12 A/C system to R134 while my 87GT is torn apart for other reasons. I know I will need the motor running for the work to be completed, so I have several things to do before I can begin work on the A/C system. It may be worth noting that I had put in some R134 when I first got the car, not knowing at all what the hell I was doing. So I am going to try now to undo what I did, and properly convert the system. So....if the lines aren't totally plugged, and the condenser and evaporator can be successfully flushed. What items will I need?
Accumulator (Receiver/Dryer)
Orifice Tube
R134 Low side fitting for new accumulator (does this part come with a new valve, or should I also get a set of valves??)
I also assume I will need a new high-pressure switch to mount on the accumulator, but I have heard that it needs to be rated for R134, and not the R12 that was originally in the system. Where do I get this switch? How can I make sure it will work with the wire harness, and the fitting on the accumulator?
And lastly, I assume that every part the exposes an O-ring or seal, will need to a new O-ring or seal. Should I get the kit from the Fiero store, or is there a better way to get all the seals and fittings, less expensively? How can I make sure if I don't get them from the Fiero Store, that they will fit and I will get the ones I need?
Am I missing anything?
Thanks![This message has been edited by computer_engineer (edited 07-15-2018).]
|
|
|
|
Spadesluck
|
JUL 15, 05:47 PM
|
|
|
|
|
fierofool
|
JUL 15, 07:44 PM
|
|
In so many discussions about conversions, it's been stated that the amount of R134a required is 80% of the capacity indicted for R12. I have just had my compressor replaced (system already coverted) and the paperwork that came with the Four Seasons compressor states that 90% is the requirement for R134a. This works out to 36 oz or 3 12 oz cans for the Fiero.
At the same time, I've been on the sideline of another compressor replacement. Also a Four Seaasons. The difference is that mine was rebuilt from AutoZone and the other was a new compressor from Advance or NAPA. The paperwork with my compressor said that PAG 150 was the oil to be used with R134a, but surprisingly, the new compressor from another vendor didn't specify. The installer called Four Seasons to get the information and they said that Pag 150 was correct. We found contradicting information on another site that said PAG 46 was the correct oil and another said Ester Oil should be used. So, if it's not clearly stated which oil to use, contact the manufacturer or rebuilder of the compressor.
In the link provided by Spadesluck, there are 3 orifice tubes. My experience with the variable, which looked like the one in the center and cost $19.99 at AutoZone, wasn't good. It went too far into the housing and couldn't be pulled out. It had to be pried out, thus destroying it. We went back with the standard orifice tube and it's working just great. RWDPLZ provided much technical information on our projects. Thanks, RWDPLZ.
|
|
|
|
larafan
|
JUL 15, 08:55 PM
|
|
|
After performing the 134 conversion on my 84 Sunbird and Fiero as well as my 86 Sunbird and Fiero I can tell you that if you want the best successful conversion pull all the lines loose and flush each section separately. Flush the condenser and evap top to bottom, the oil will flush out first. I put new compressors on due to the failure rate on rebuilds. I found that the original orifice tube works fine and holds up better that the variable. New dryers and pull the R12 valves from the fittings and replace with good quality adapters with valves in them and don't overtighten. I used the PAG 150 as I had completely flushed my system. Use the part number chart available on the forum to get the right O-rings. The kits are incomplete and generic or just wrong sizes. If your switches in your compressor remove ok then use them. (I bought mine at Napa, the cheap aluminum ones at Autozone are junk.)Same with the dryer. If not then you will need to replace with updated versions with added ground wires. From experience I can tell you that using the originals and orifice cools great and I am in Tennessee where it has been in the 90s with high humidity. It is a great update that has worked very well for me. It is a bit of a pain, but going forward you are working with an updated system. Be sure you get the 8 ozs. of oil in the system and the 80% number on the Freon works as it should.
|
|
|
|
computer_engineer
|
JUL 15, 09:18 PM
|
|
| quote | Originally posted by Spadesluck:
Here is a good link to get you started. R134 Conversion |
|
Wow! That is a lot of parts. Not sure which ones I will need, but I am going to be pulling the lines and flushing them one at a time. I already have the compressor off, so I can make sure all the old oil is drained from it. Once I get the car back on all fours, I can pull the condenser and flush it. Is it much of a challenge to pull the evaporator?
|
|
|
|
larafan
|
JUL 15, 09:21 PM
|
|
|
Don't need to pull evap and condenser. Pull the lines and use a piece of heater hose to exhaust the flush away from the car. Flush from the line in at the top and exhaust from the lower.
|
|
|
|
computer_engineer
|
JUL 15, 10:47 PM
|
|
| quote | Originally posted by larafan:
Don't need to pull evap and condenser. Pull the lines and use a piece of heater hose to exhaust the flush away from the car. Flush from the line in at the top and exhaust from the lower. |
|
That is good news...take every bit I can get. 
I am ordering a flush kit from Amazon. Fortunately, my father-in-law has a vacuum pump and a plenty of flush chemical, so the only other items I will need are the lower cost variety (o-rings, PAG oil, R134, orifice tube, accumulator). I might order the switch on the accumulator, just to make things easier. I don't think I will bother with the switches on the compressor. According to what I have heard, they don't go bad that often, and their failure usually doesn't mean that the system will not function, just no safe-guards for the compressor.  [This message has been edited by computer_engineer (edited 07-15-2018).]
|
|
|
|
computer_engineer
|
JUL 16, 11:51 PM
|
|
|
Which switch is the high cut-off switch and which one is the low,,,on the compressor? There is one colored red, and it looks damaged. [This message has been edited by computer_engineer (edited 07-16-2018).]
|
|
|
|
RWDPLZ
|
JUL 17, 07:39 AM
|
|
The red one is the high pressure cut-off. You can test both by checking for continuity between the center tip and the metal outer shell (should see continuity, not open)
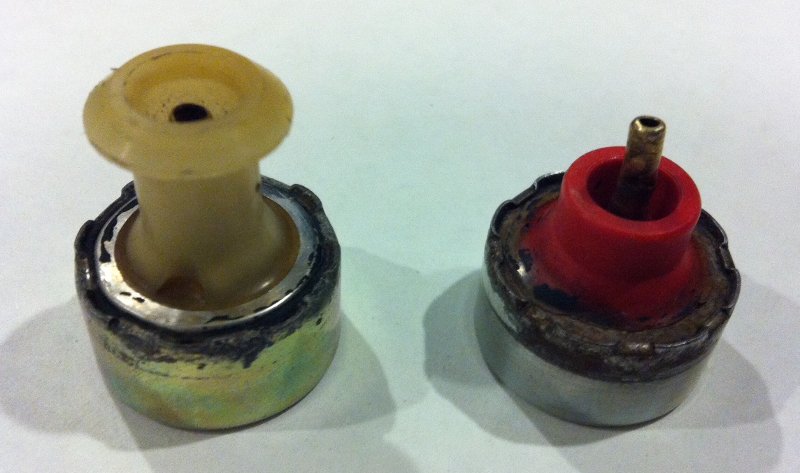
The ones here should be replaced, they're not in good shape.
|
|
|
|
fierofool
|
JUL 17, 10:31 AM
|
|
The project I'm in the sidelines on had problems getting the pressure switches out of the old compressor and broke them. They had to purchase the new 2 wire style switches. We're assuming that these are simply pass-through switches with either wire being grounded to the engine. Is this correct? If not, how are they wired into a single wire system?
Does it matter which port the switch is installed in? I understand that they must be connected to the proper harness, but aren't the two switches sensing a common chamber in the compressor?
Not trying to hijack the thread, but to help to add information to it.
|
|
|
|