
 
     |
| Bringing a 88 Fiero Back to Life with a LFX Swap (Page 8/15) |

|
Skybax
|
JAN 11, 09:35 PM
|
|
| quote | Originally posted by MikesFirstFiero:
The one on the 2.8 fails often since the disty shaft conducts heat from the block and gets up to 150F plus the module itself generates heat. When I remote mounted mine the module temp on a good heat sink dropped to about 115-120F. If you were to buy an off brand there is no guarantee that the semiconductors are really rated for use under high temperatures. |
|
Most original configuration distributor mounted ignition module failures on Fiero are due to...
1. Replacing module and not replacing the pickup coil
2. Replacing module and not using the proper thick white heat sink paste
3. Replacing module and not applying the proper thick white heat sink paste correctly
4. Replacing module and not properly cleaning/prepping the distributor contact surface and vents
5. Replacing module with a substandard aftermarket unit that cannot withstand the heat like the original
...and all 3 of my original 2.8 modules are still good 35 years after the assembly line, the secret to long life is in the details.
|
|
|
|
MikesFirstFiero
|
JAN 12, 12:32 PM
|
|
|
I agree with both Will & Skybax the proper module grounding is essential to correct operation. I still maintain that the design more susceptable to failure due to the critical importance of heat management. One thing I've also found is if you buy a new distributor (probably imported) check that the module is properly seated and the grease applied evenly. One I bought from Taiwan had uneven application of the silicone thermal paste that caused it's module to fry after about a year. Glad I don't have that problem anymore, now I've got new ones.
|
|
|
|
Skybax
|
JAN 12, 05:21 PM
|
|
|
|
|
Zefyr
|
JAN 20, 04:59 PM
|
|
I have very much enjoyed watching your swap progress.
I have been planning to LFX/6T70 swap mine for a few years now, and it looks like I will be able to start on it this summer.
Getting the LFX cruise control to work is something I have been trying to figure out ahead of time, as with a few other things I anticipate being a challenge.
Keep up the good work.
|
|
|
|
MikesFirstFiero
|
JAN 20, 08:03 PM
|
|
A few things I learned by doing this swap into an 88
It will fit but make it as low as possible in the cradle. The engine & trans. will need to be shifted to the driver side a bit, but that's ok. And the cradle wiill need notching on both sides and maybe new cross rails depending on your engine mounts.
Cut down the Impala axles to fit your hubs.
Tilt the engine back a bit so you have good room up front for the Alternator & AC compressor to fit.
The Impala LFX works out well since the exhaust goes under the oil pan keeping the heat low and you can keep the cats too.
To make cruise control with stock electronics it needs ECM, Body Control Module, Serial Data Gateway, ABS controller, Parking brake controller, Gas pedal, Brake pedal switch, Instrument Cluster, Switches for CC & display and the key FOB sensor ring in the center console. Also need the shift knob for manual shifting, push-to-start, Chassis Control Unit for fuel pump and maybe some other stuff I haven't discovered yet. I don't know if you could make it work stand-alone or not.
And a subscription to Mitchell-1 online shop manual for the donor car. For $30/year it's worth it.
The best year models to look for are 2015 to 2017. That will have the newer engine and second gen 6T70. 2018 & later needs serial number matched electronic modules for your donor car.
When you decide to dig into it let me know if I can help. If you are in the Spokane-CDA area look me up. Just send me a PM.
|
|
|
|
Skybax
|
JAN 21, 12:06 PM
|
|
|
Awesome work, and I can't believe how clean the underside is, what a great foundation to start with, and for only a $1000. When the swap is complete and all the bugs worked out, have you considered swapping some body panels (like fastback roof section, side scoops, etc) and having it painted? [This message has been edited by Skybax (edited 01-21-2022).]
|
|
|
|
MikesFirstFiero
|
JAN 21, 04:44 PM
|
|
The car sat in a garage for most of the time before I bought it. The last two or so years it was parked on a concrete driveway in a Seattle neighborhood. I did spend a few hours picking pine needles out of cracks and joints of the body work. Luckily the underside was painted and has no significant rust that I can find. Yes, paint is next but it will always stay a notchie. I did put the GT nose on it and the wing on the back. I don't plan on adding a GT skin to the car. The previous owner was going to put the GT rear on it but I decided to have it look similar to the Indy pace car. I will paint it this spring, probably in the same red color.
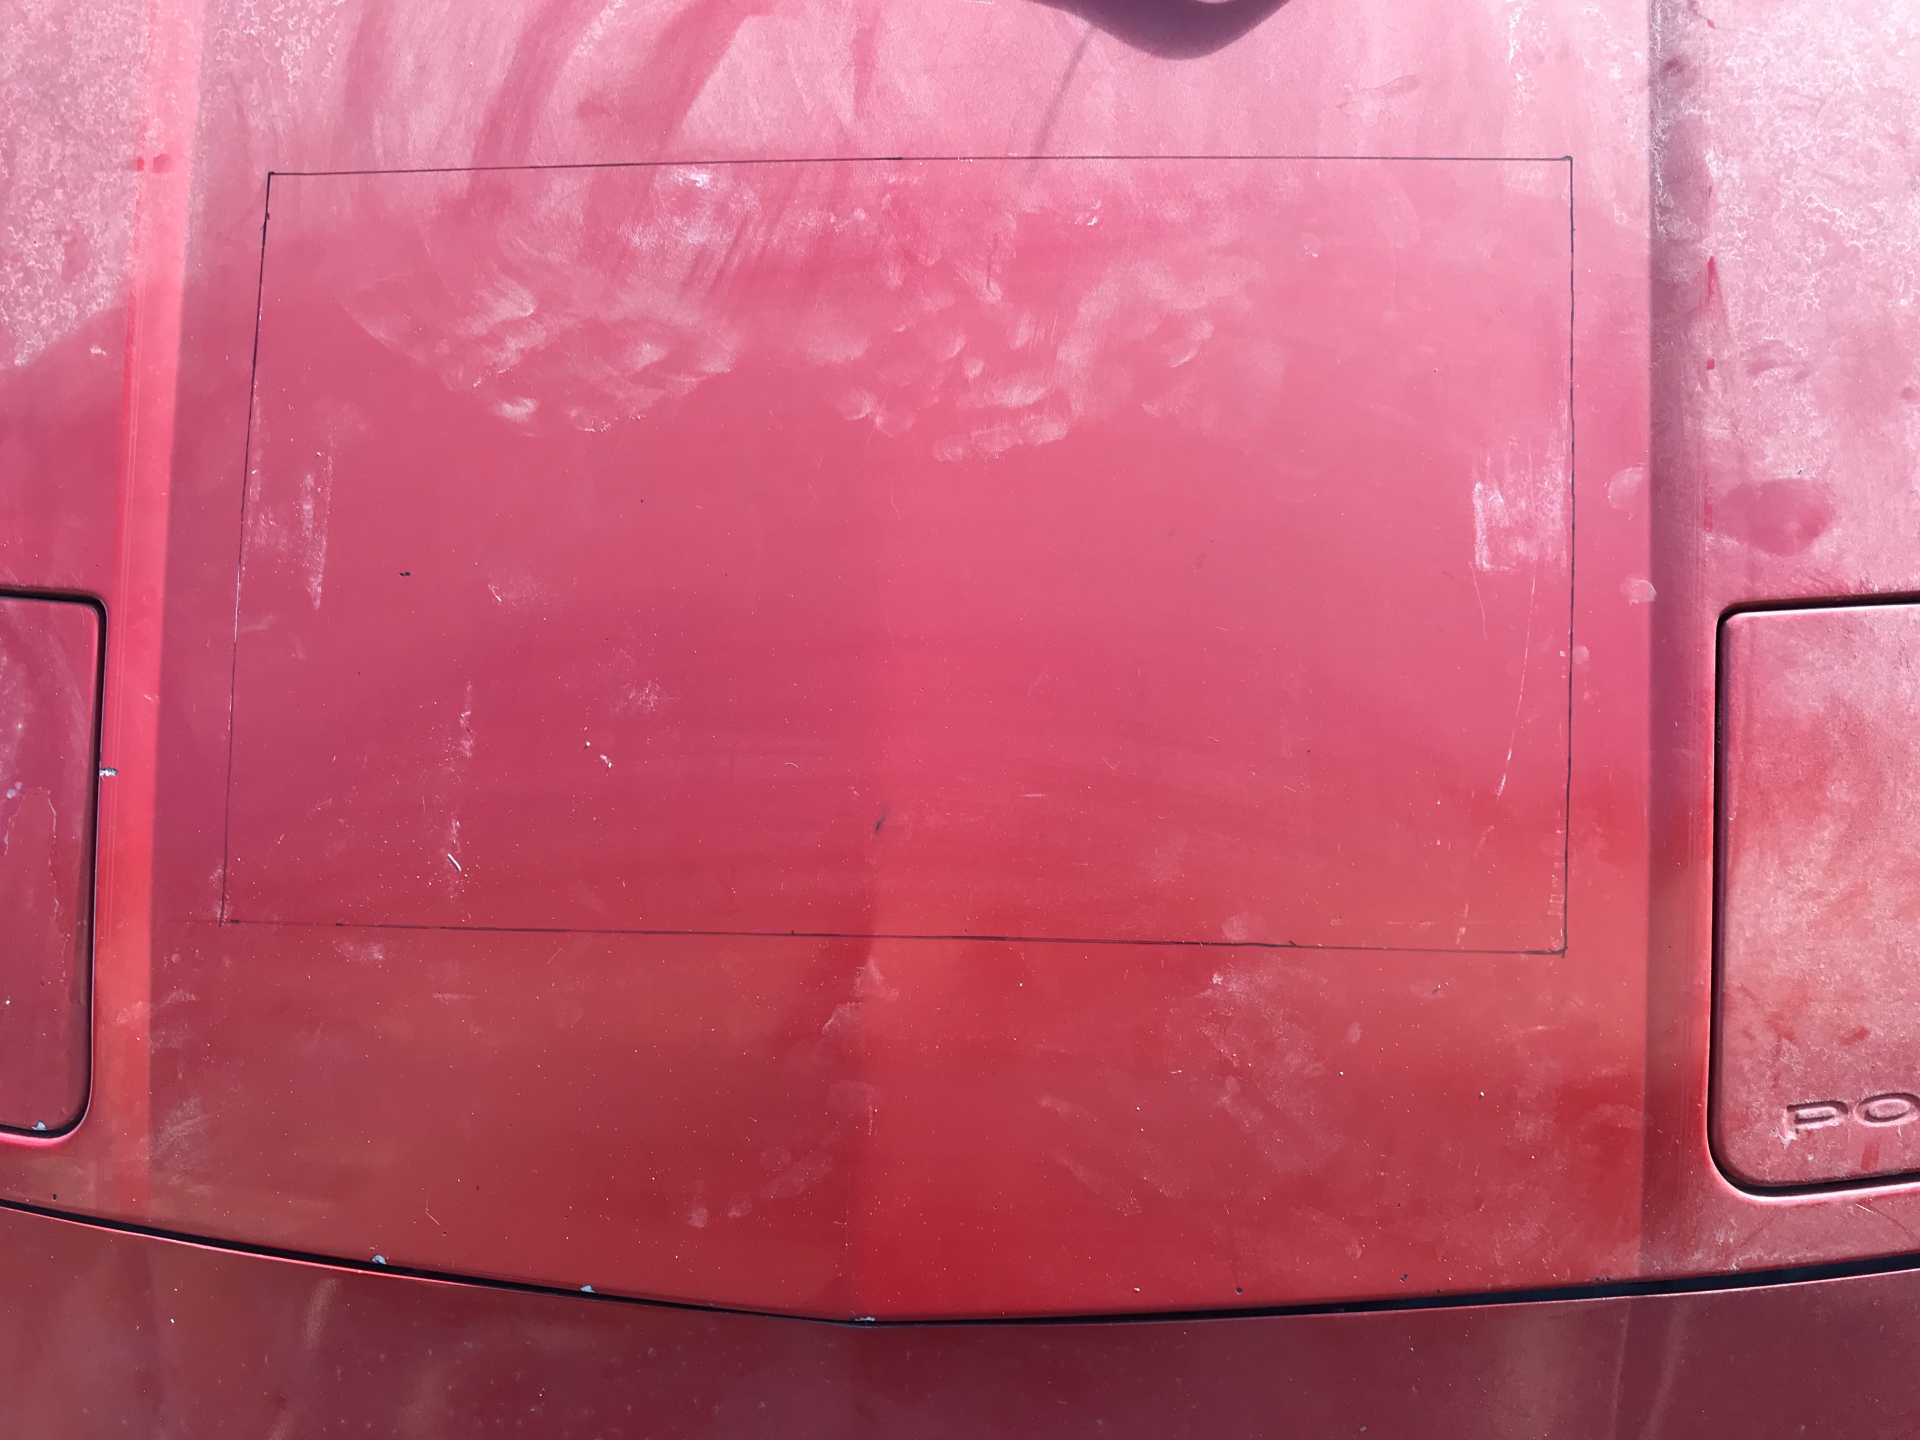
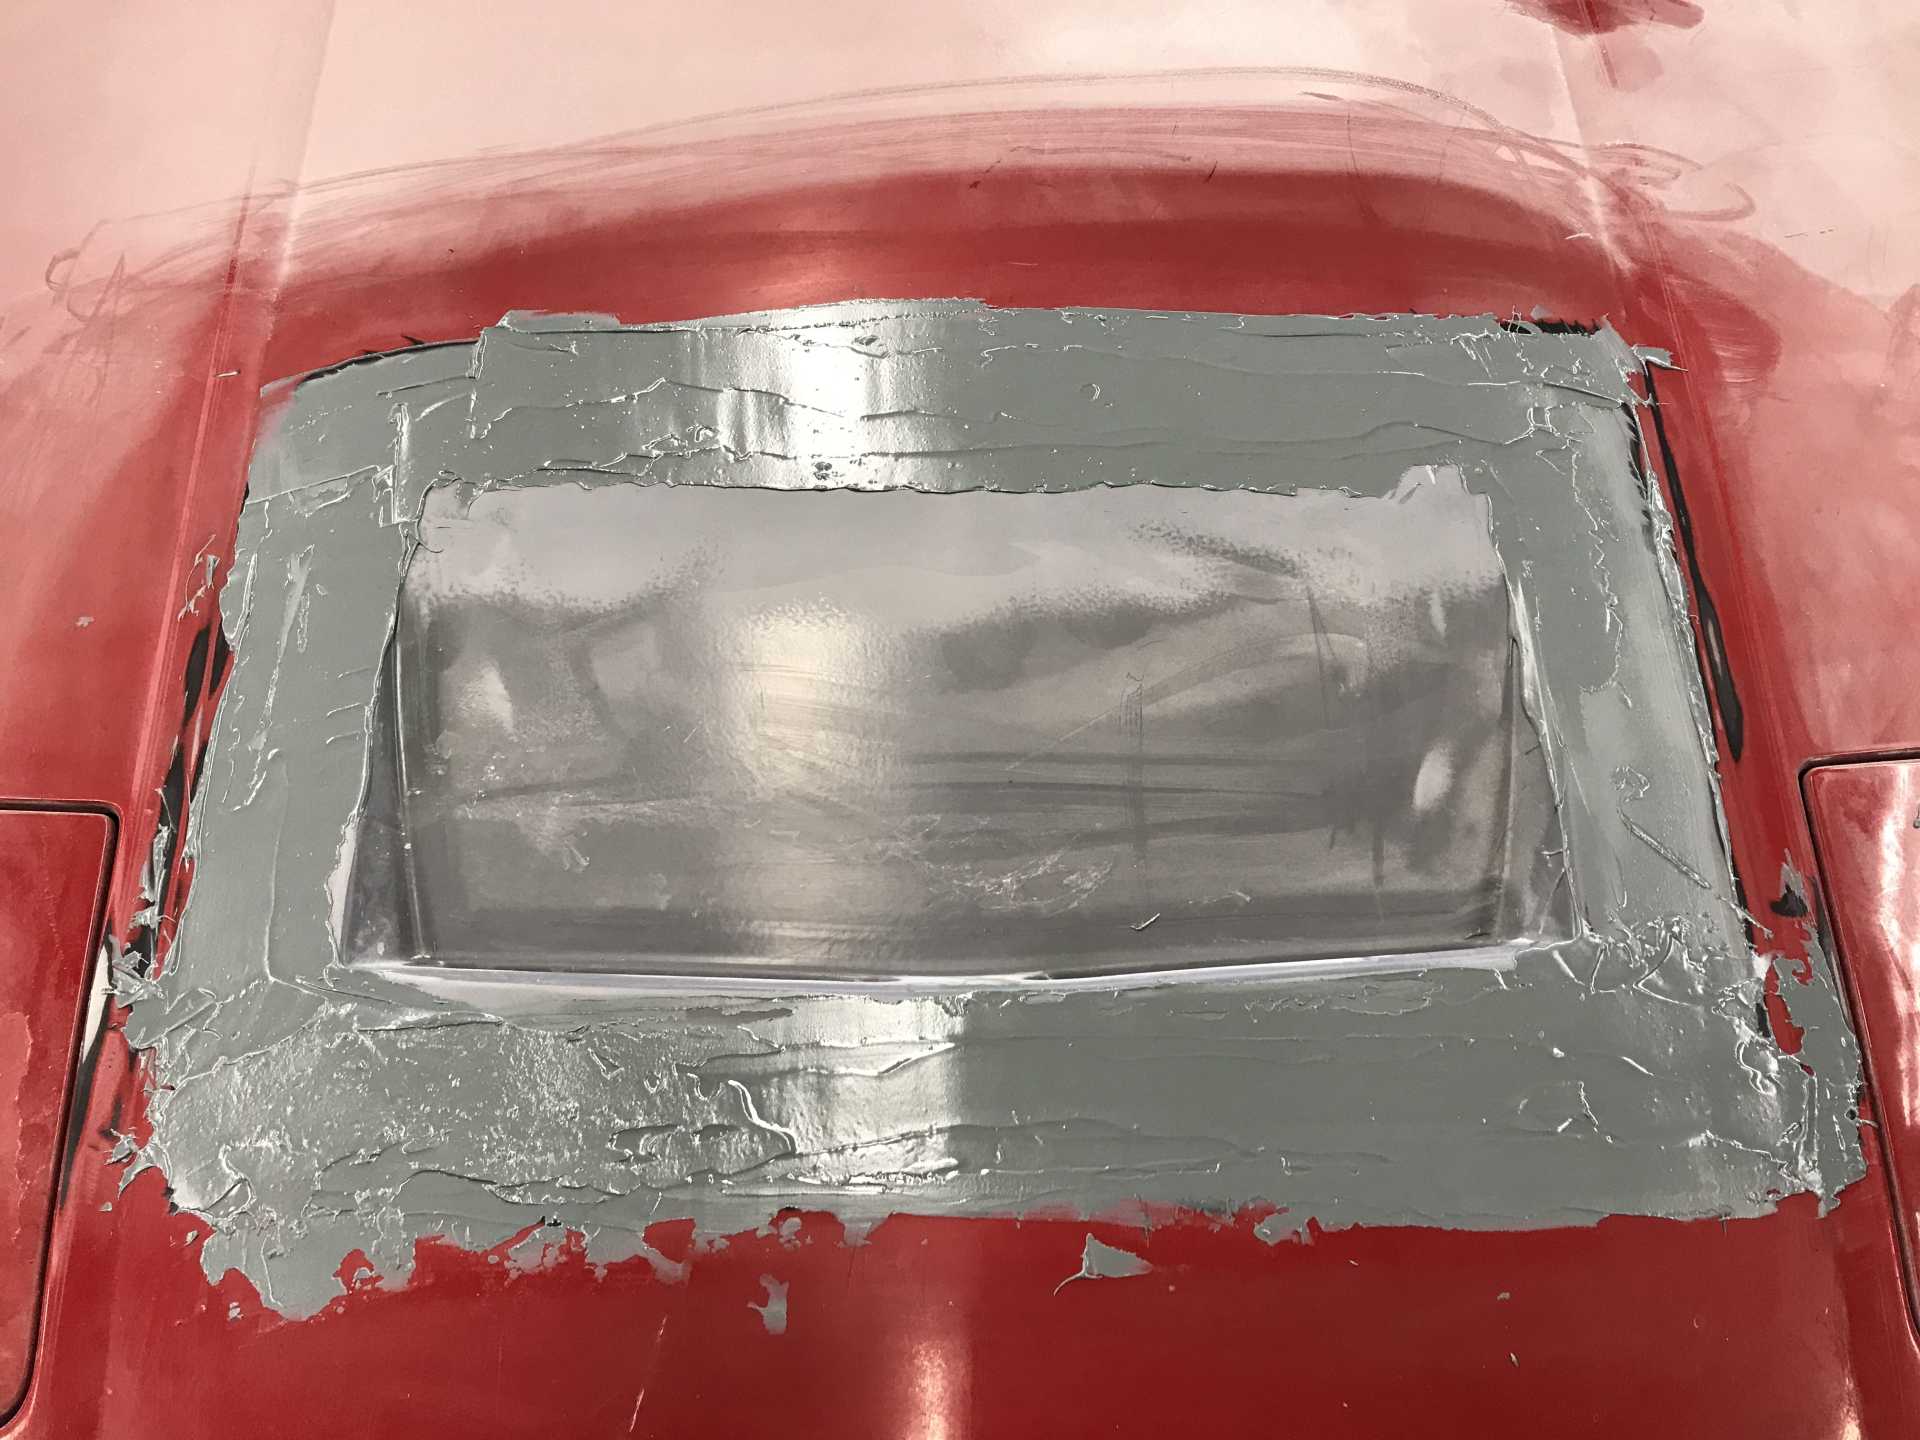
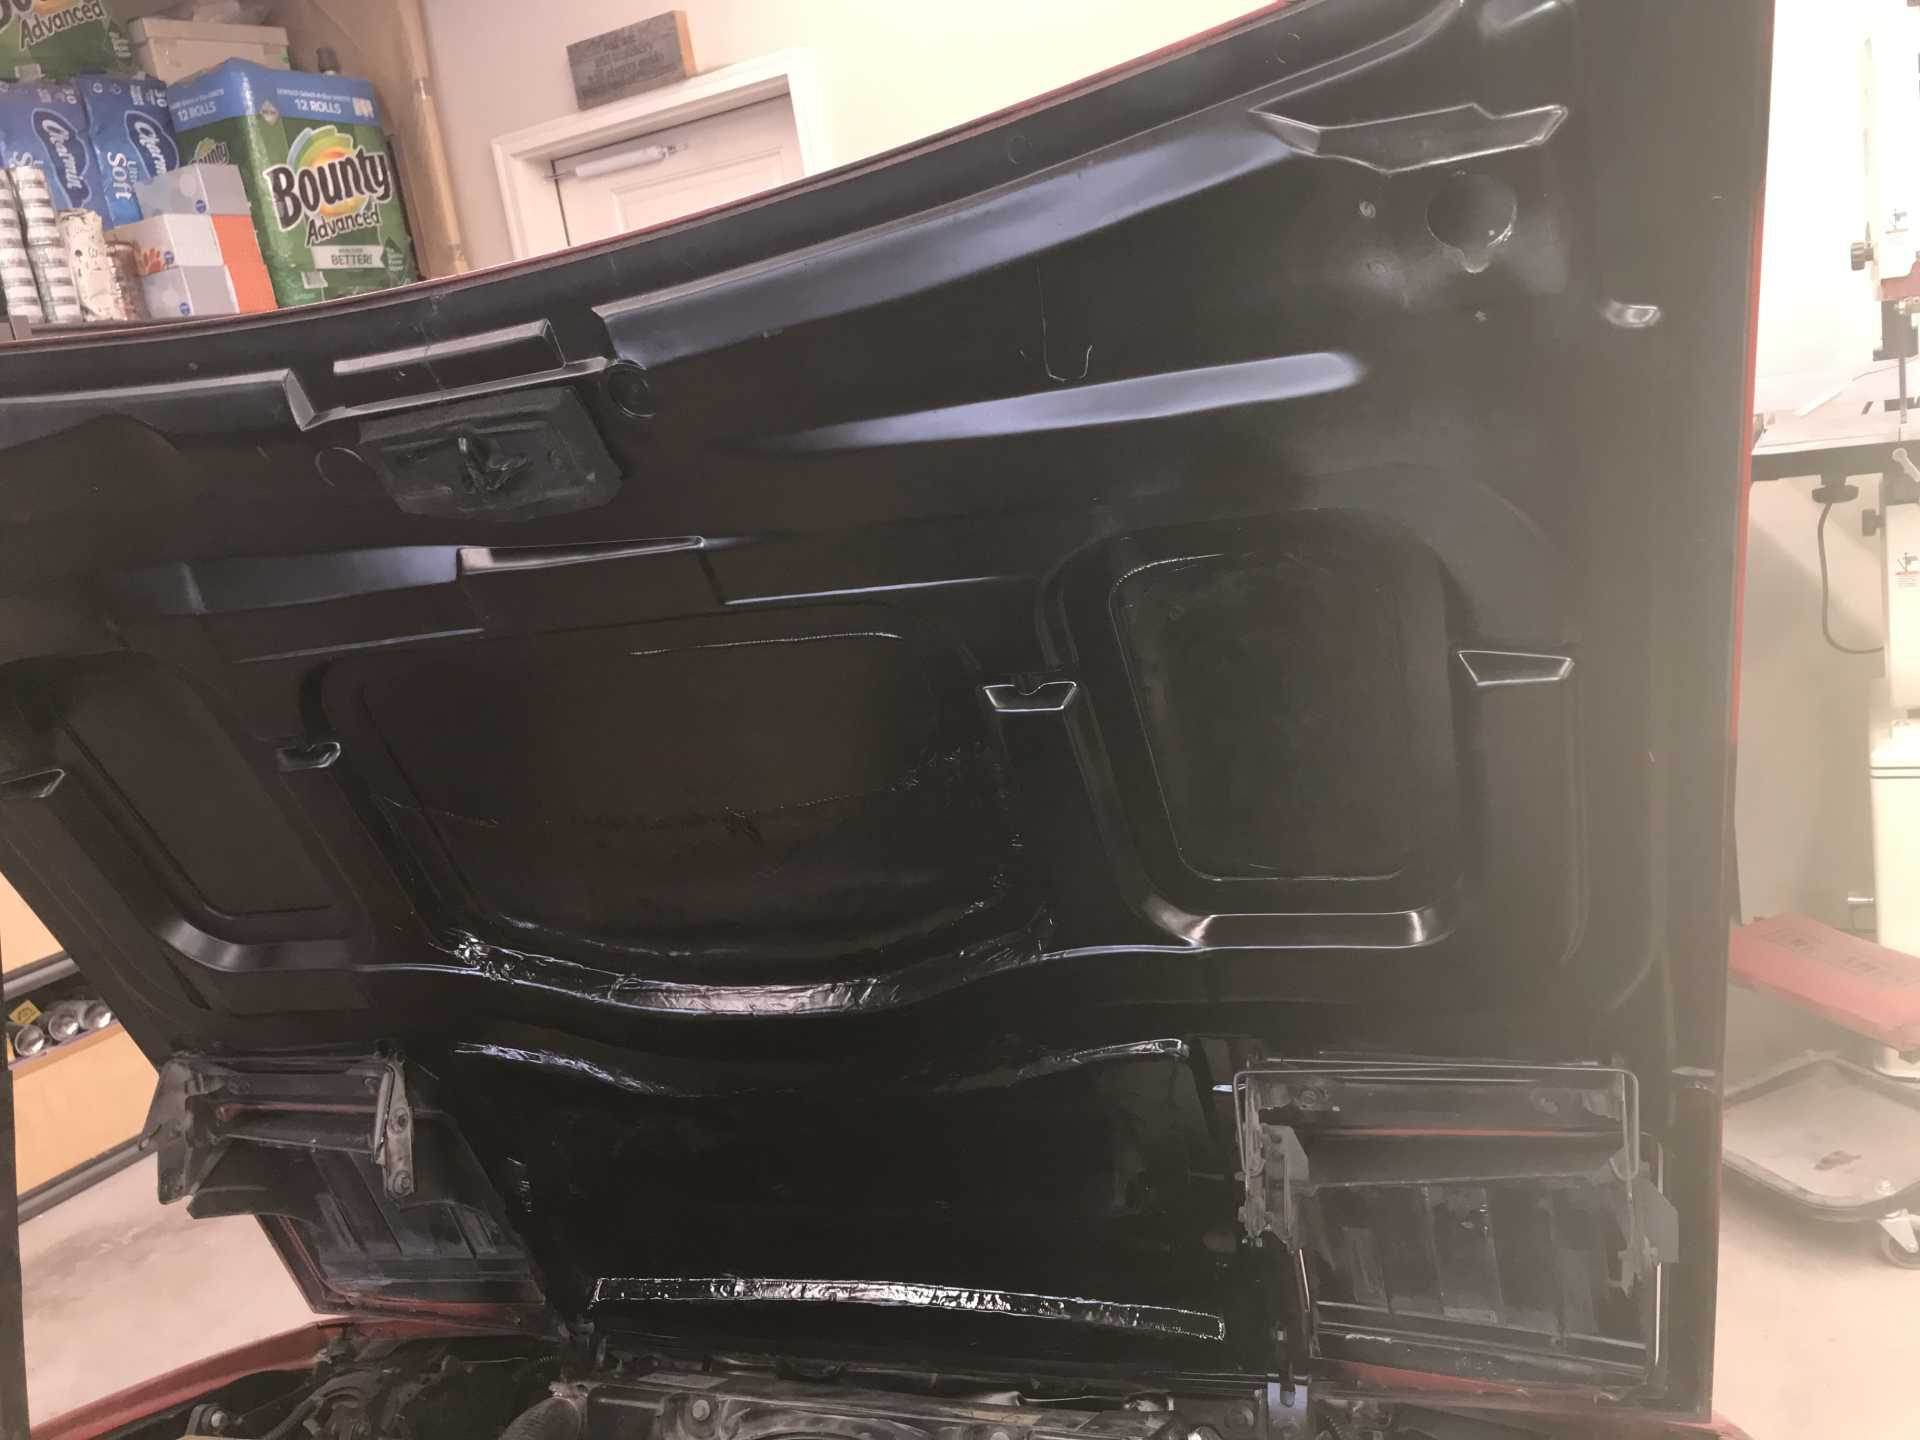
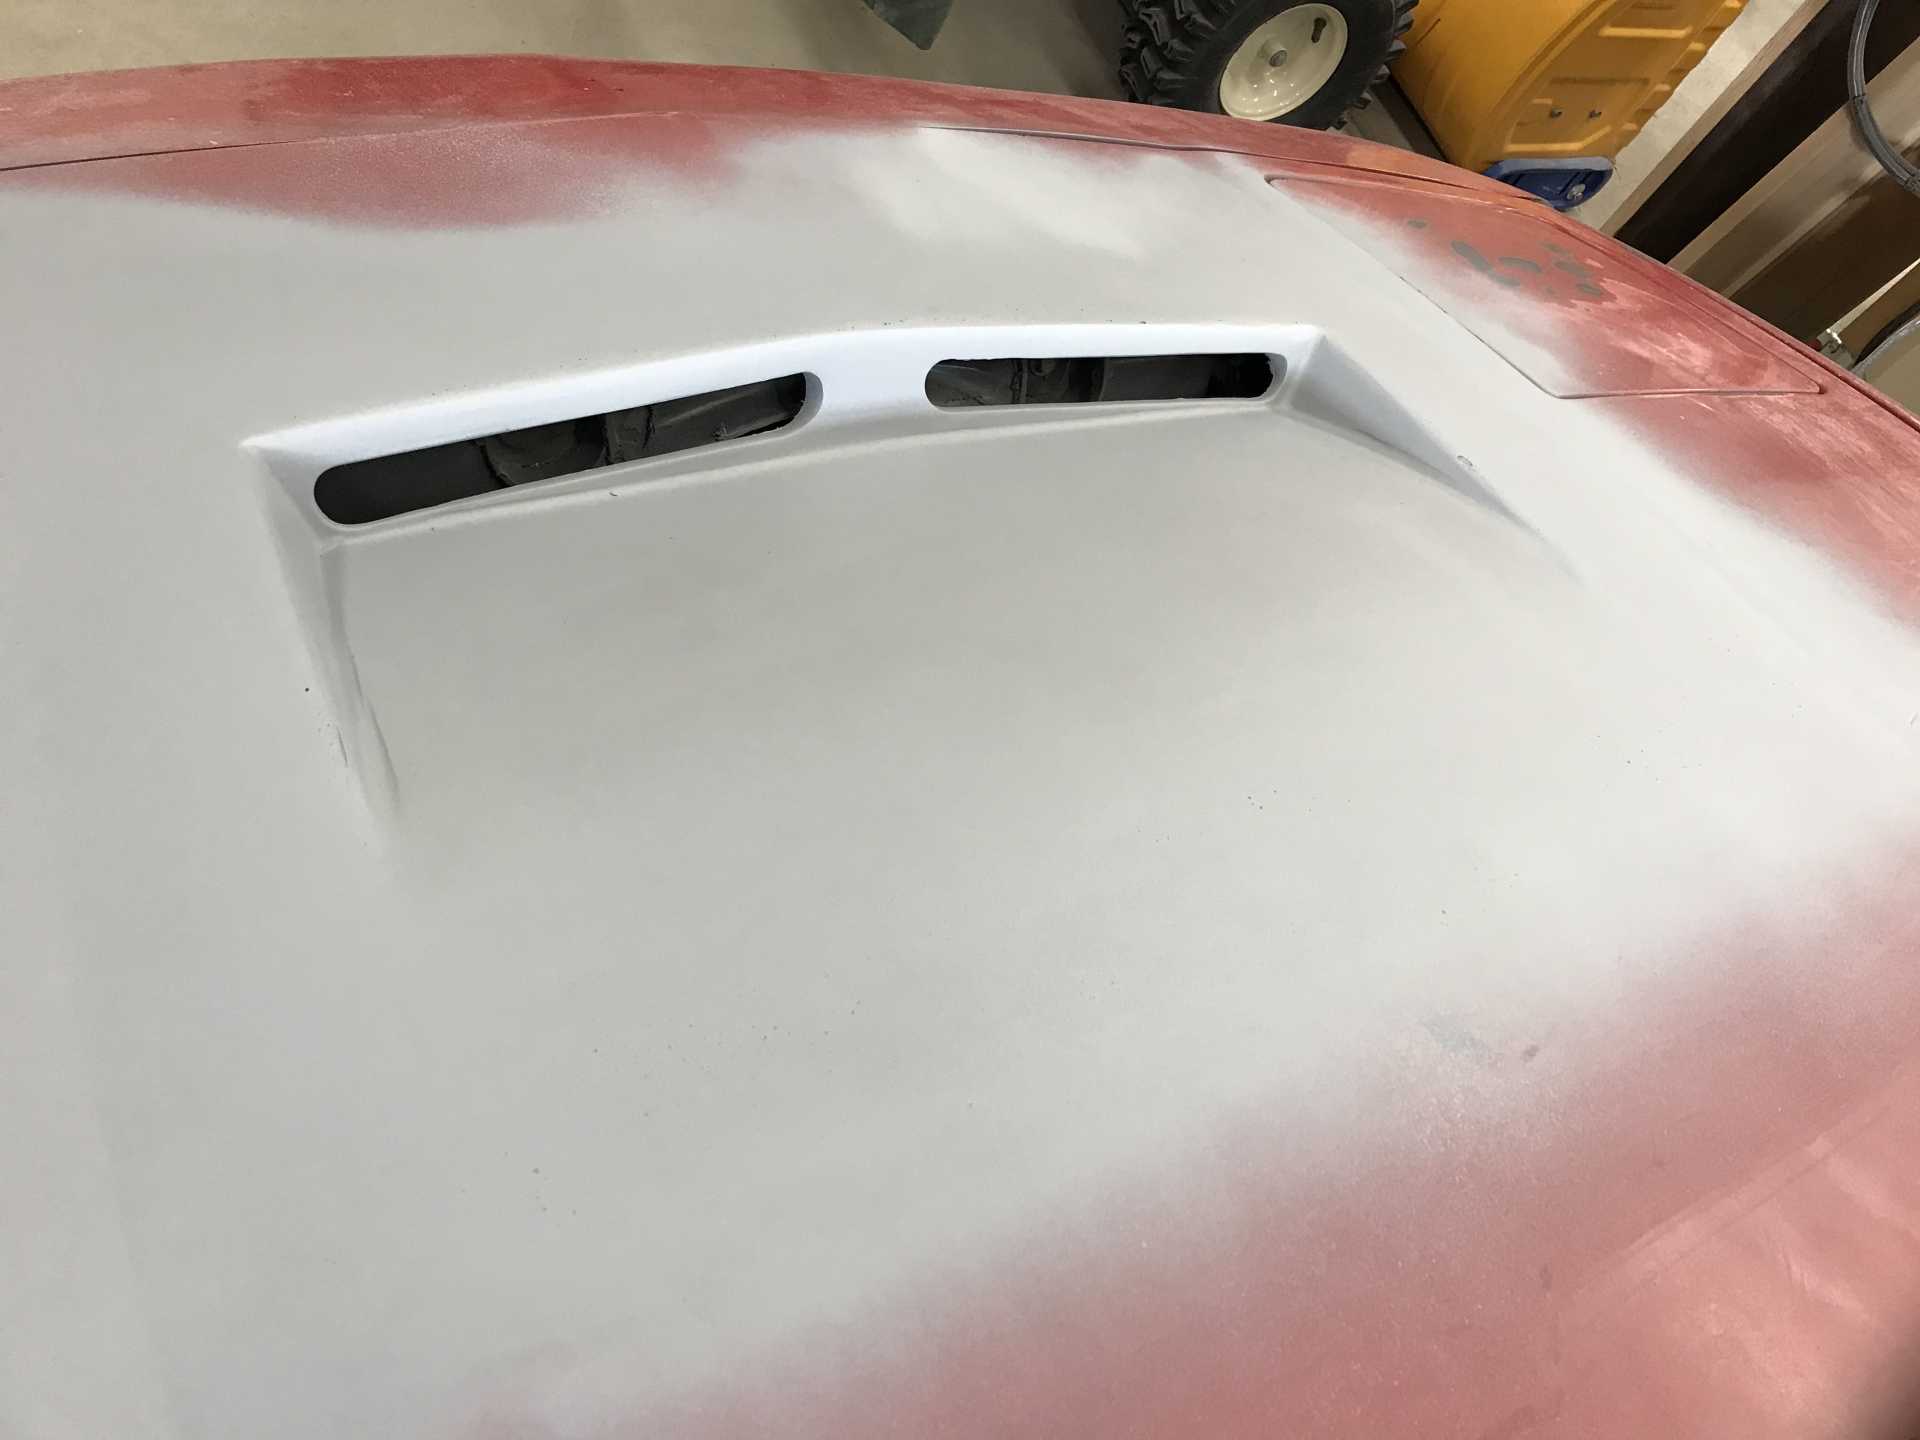
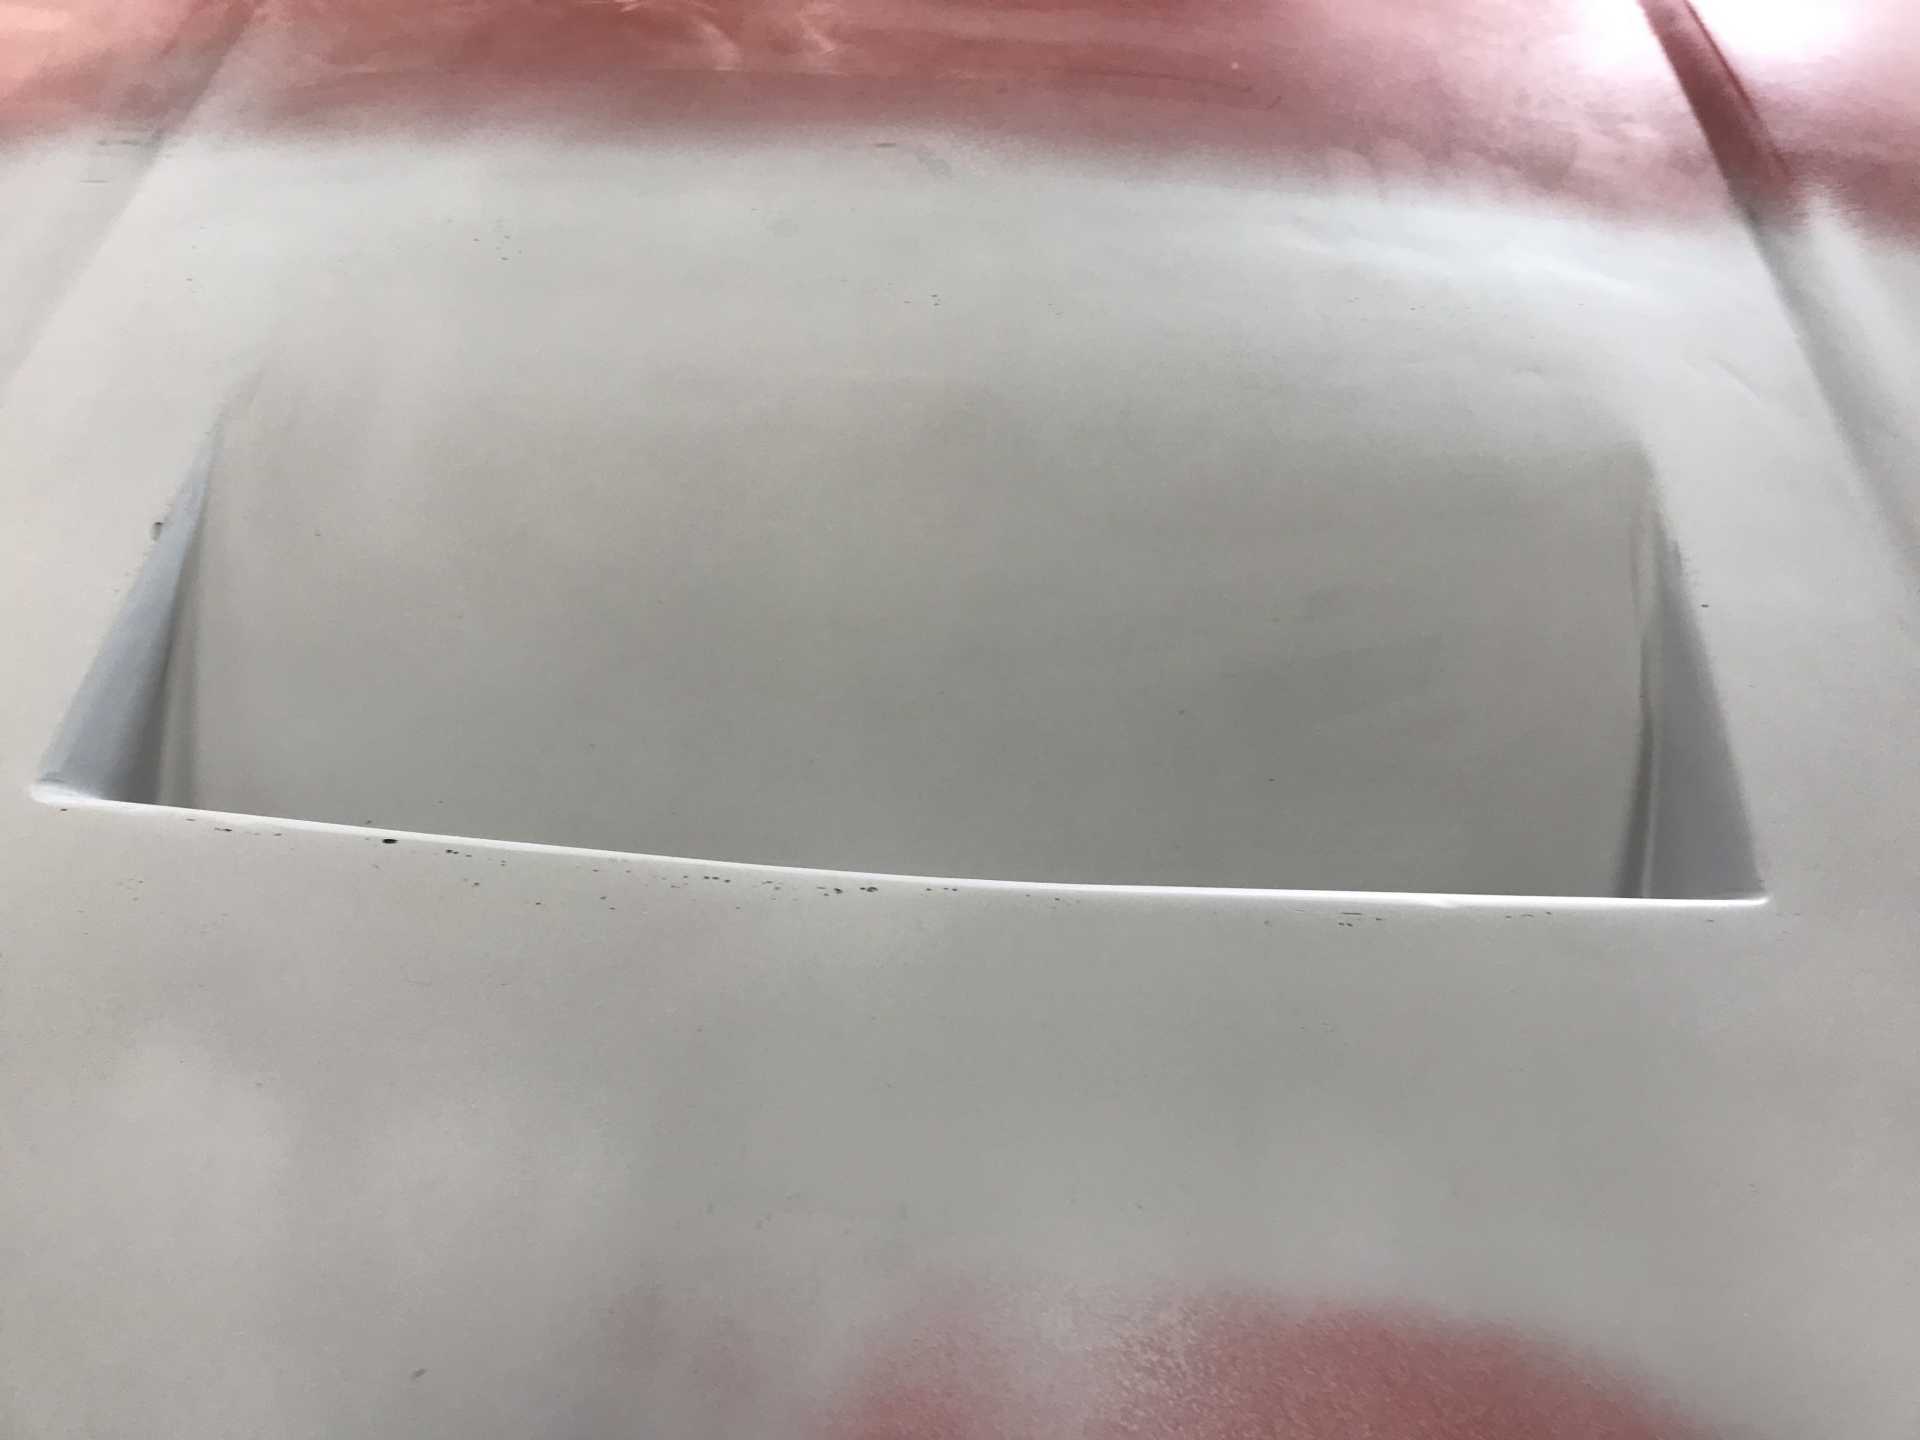
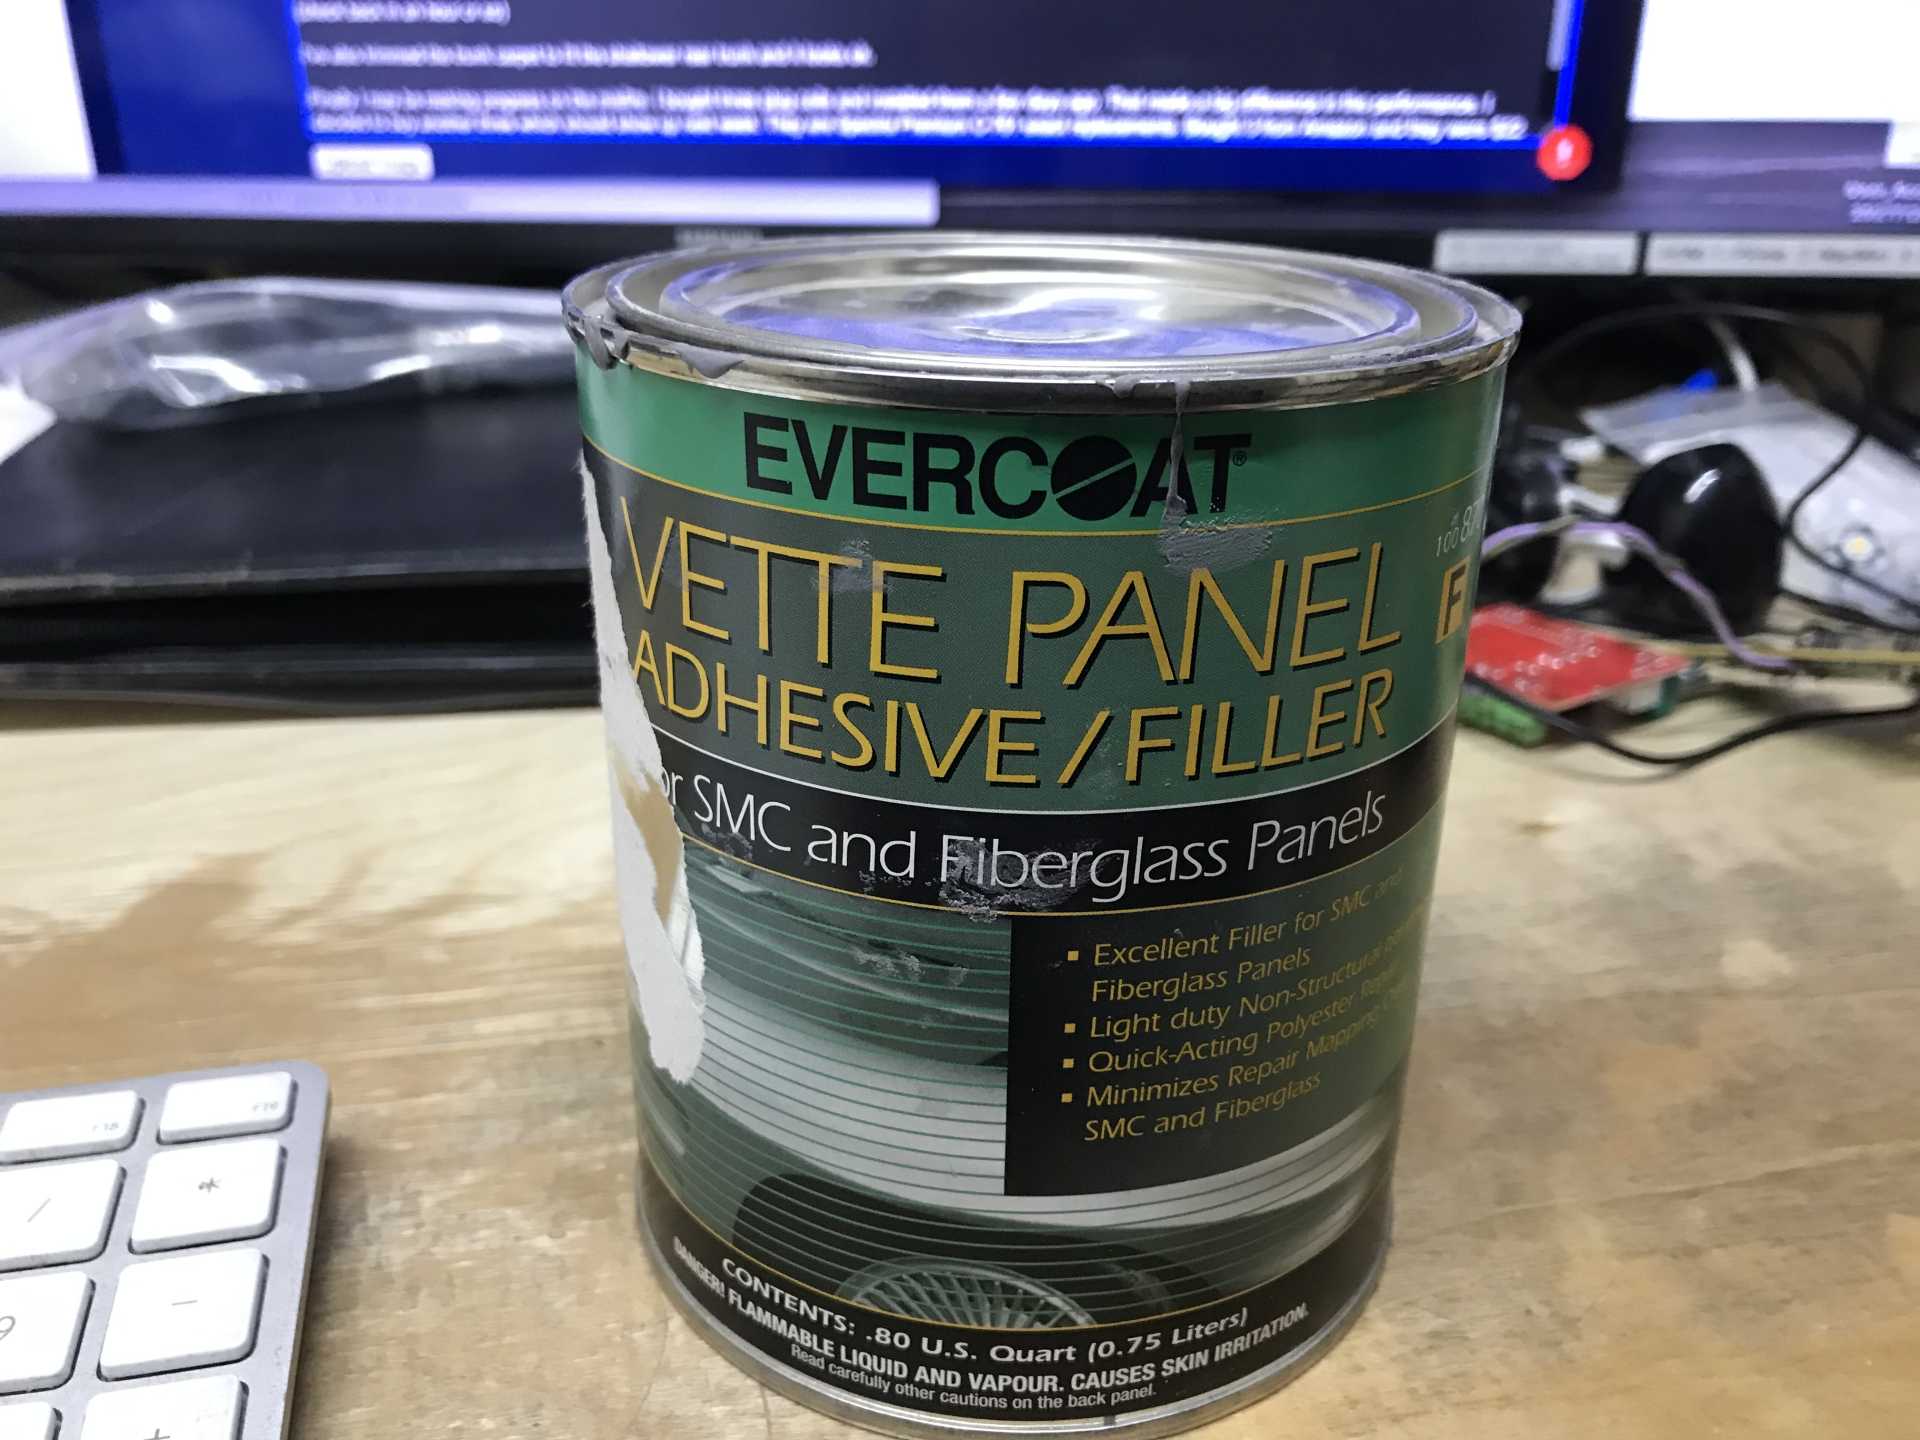
What I have been doing the last couple of weeks is putting V8-Archie's Warber hood vent in the hood. I've just about finished the body work but it will stay in primer until I prep the complete hood and the rest of the car. Here are some photos of the vent installation. It wasn't difficult but I only worked on it about 3 hours per day so it took about a week to get to this point. Only thing with body work is the dust. So with fiberglass I don a 3M P100 mask, goggles and ear muffs when using my angle grinder. I've got a Milwaukee and it is very loud. For finish sanding I use a Makita 5" Orbital with 120/220 grit. The body filler is Evercoat Vette Panel Adhesive/Filler. The real trick to body work is plan on many hours of prep time so it will look good.
I did have a second scrap hood that I experimented with first to determine the location of the cutout. I found the inner frame to be different from the hood on the car. It made a little difference for the mounting of the vent flanges, but nothing difficult.
I followed Archie's instructions for locating the vent. It needs to be 9.5" to 10.0" from the hood lip to the notch or you will have interference problems.
Next using an angle grinder cut through the hood skin only (about 3/16") no deeper or the frame will be weakened.
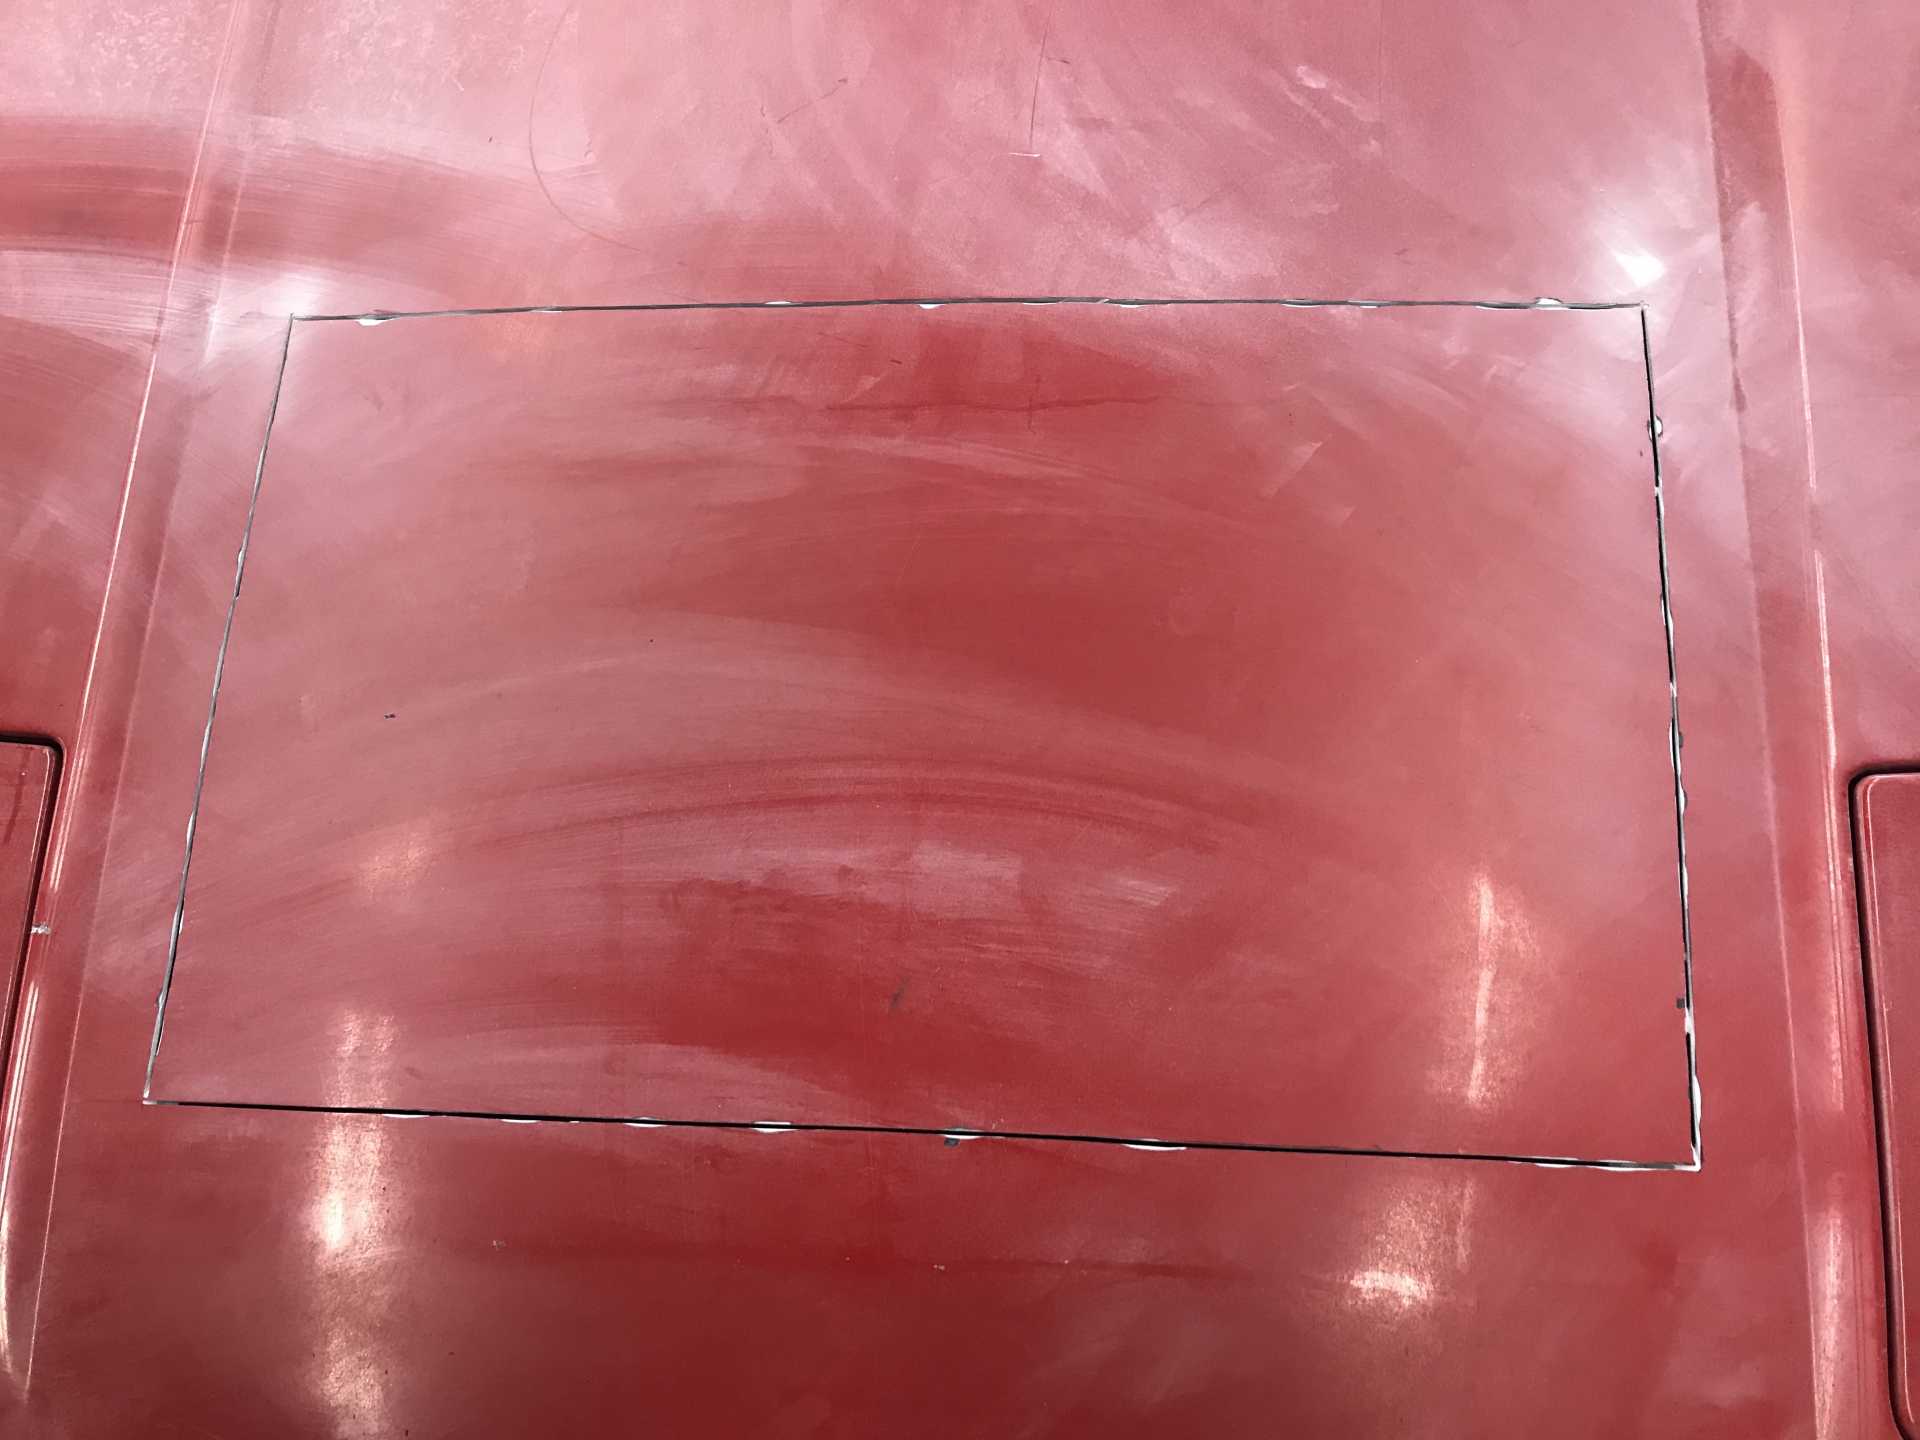
The skin is simply pried off. It is a little bit stubborn, but just keep prying.
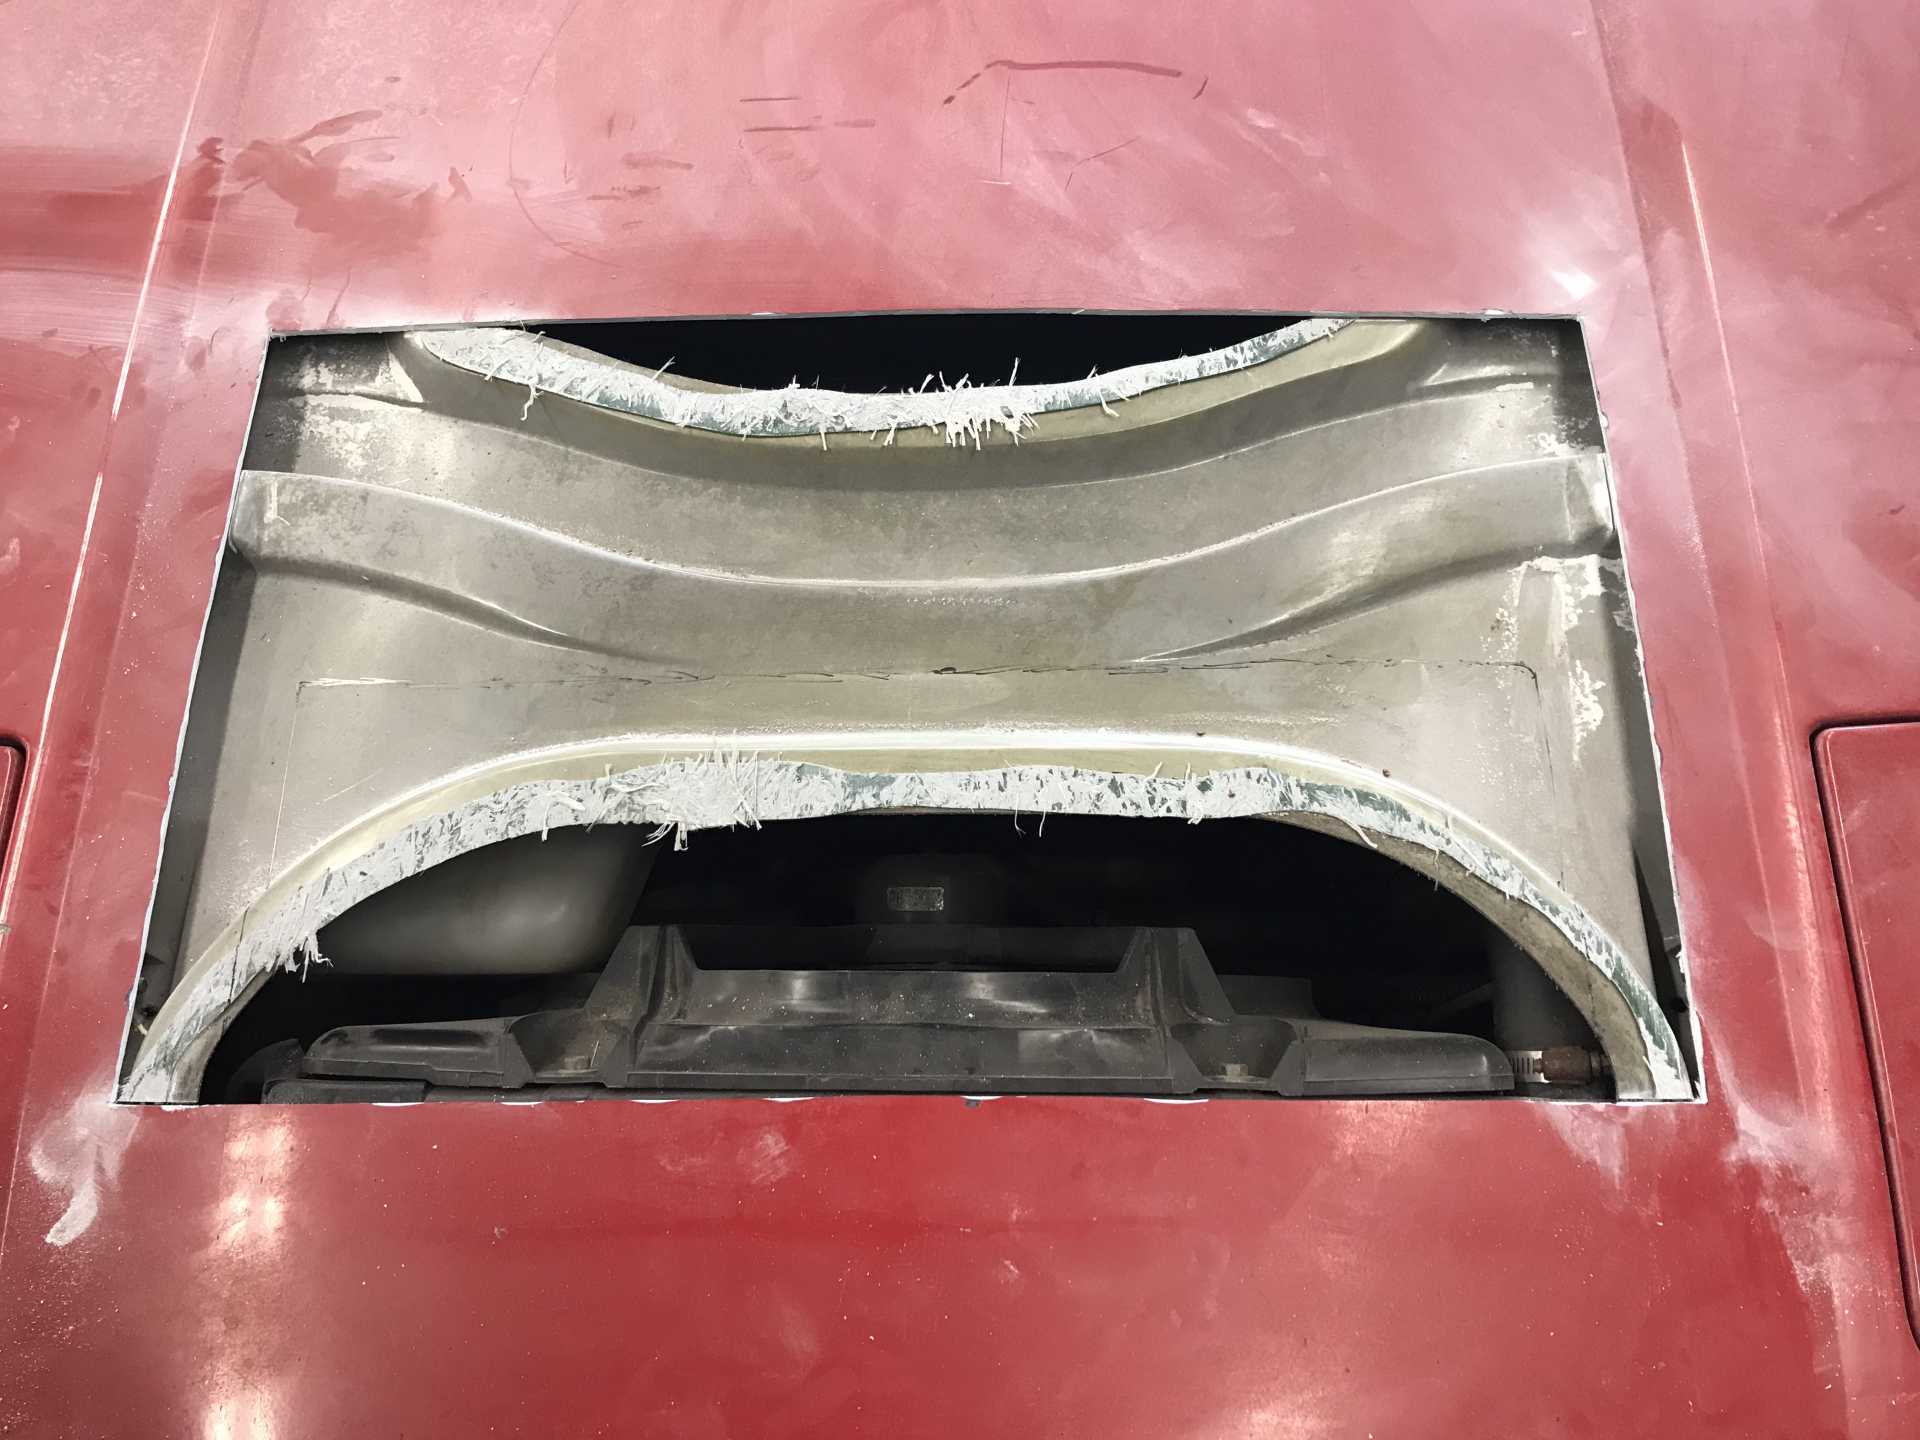
Next the frame is cleaned up and trimmed of the old adhesive and the frame cut to clear the vent.
Now the hood just drops in and the fit is checked. The edges of the joint are beveled to provide room for the filler.
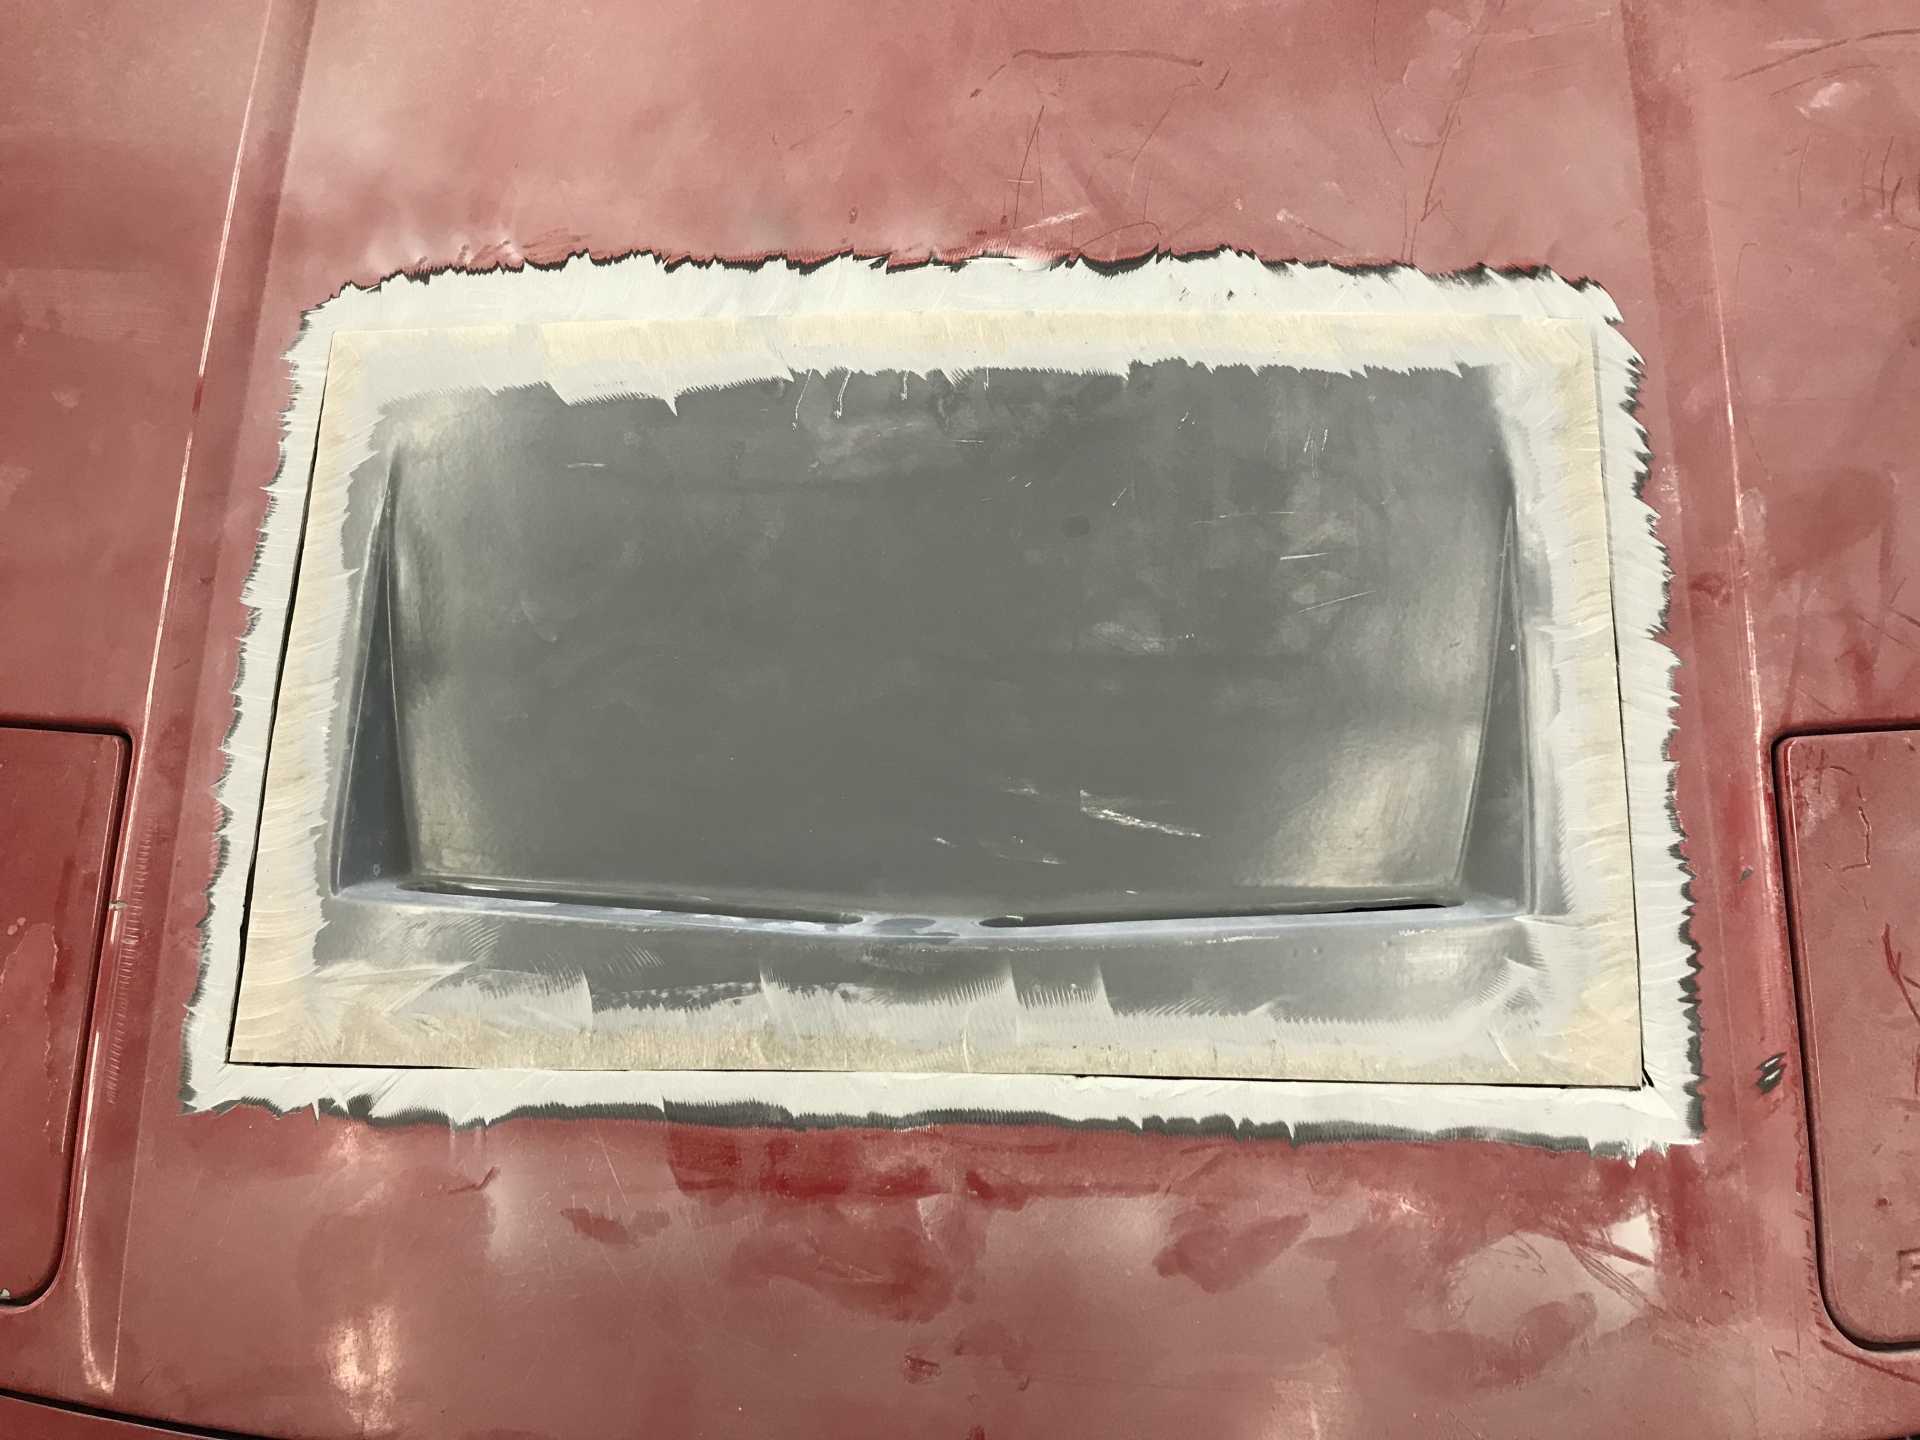
I added flanges to the bottom of the remaining hood skin so there is a positive vertical location for the vent to fit on all four sides.
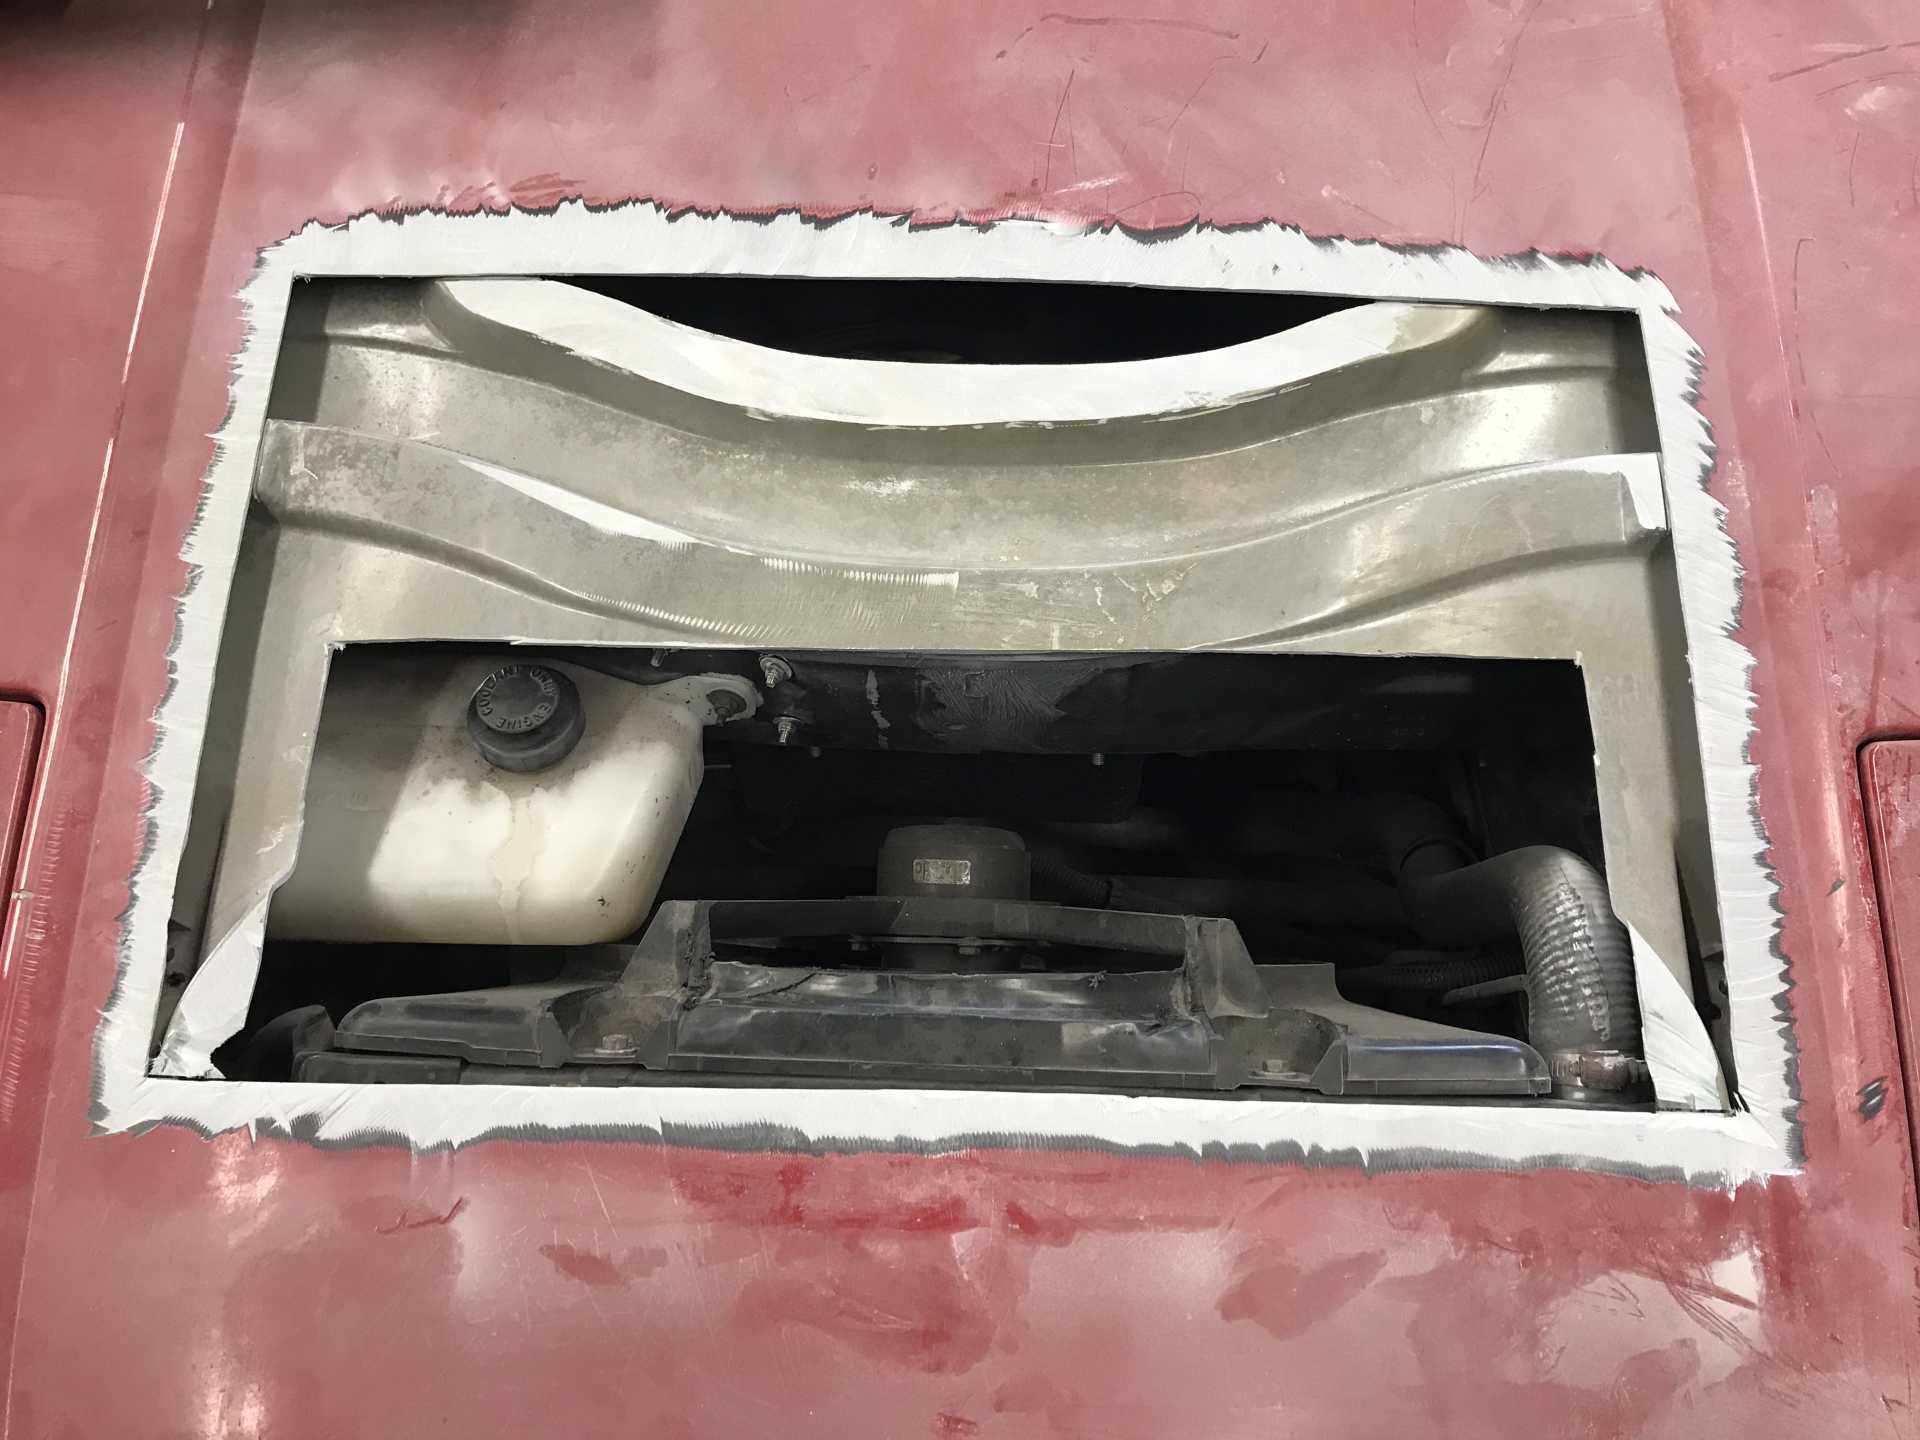
With the flanges in place I was able to trim the bottom of the vent to have the surface be flush with the hood.
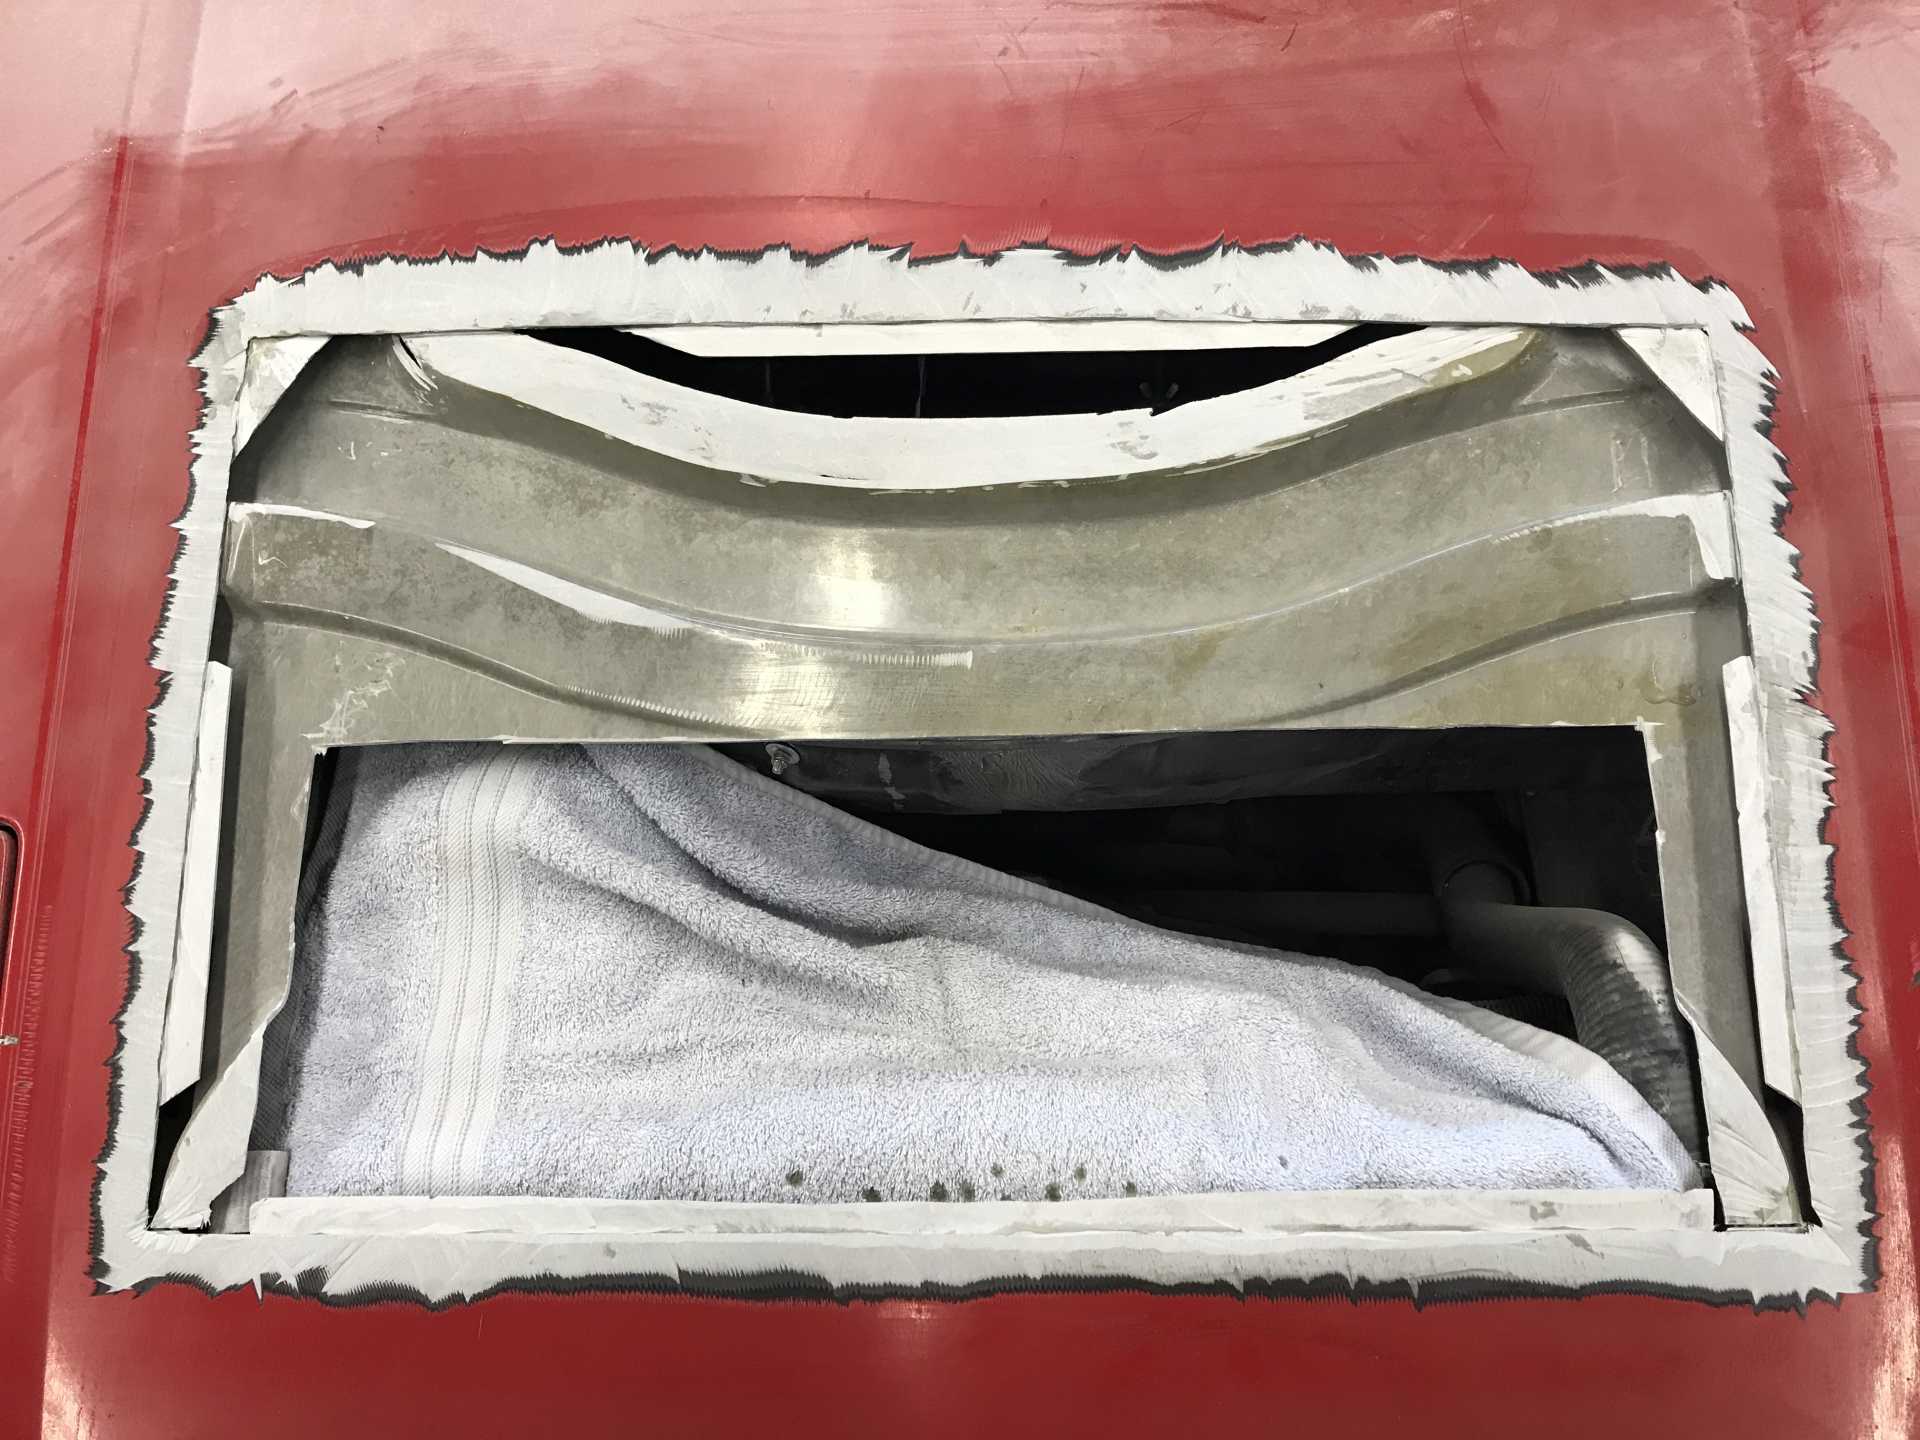
Time to get serious, The vent was resined in place to all the frame and flange contact points. I used weights to make certain all the edges were firmly in place on the frame and flanges. Otherwise there would be more grinding and cutting and dust. This was allowed to sit overnight.
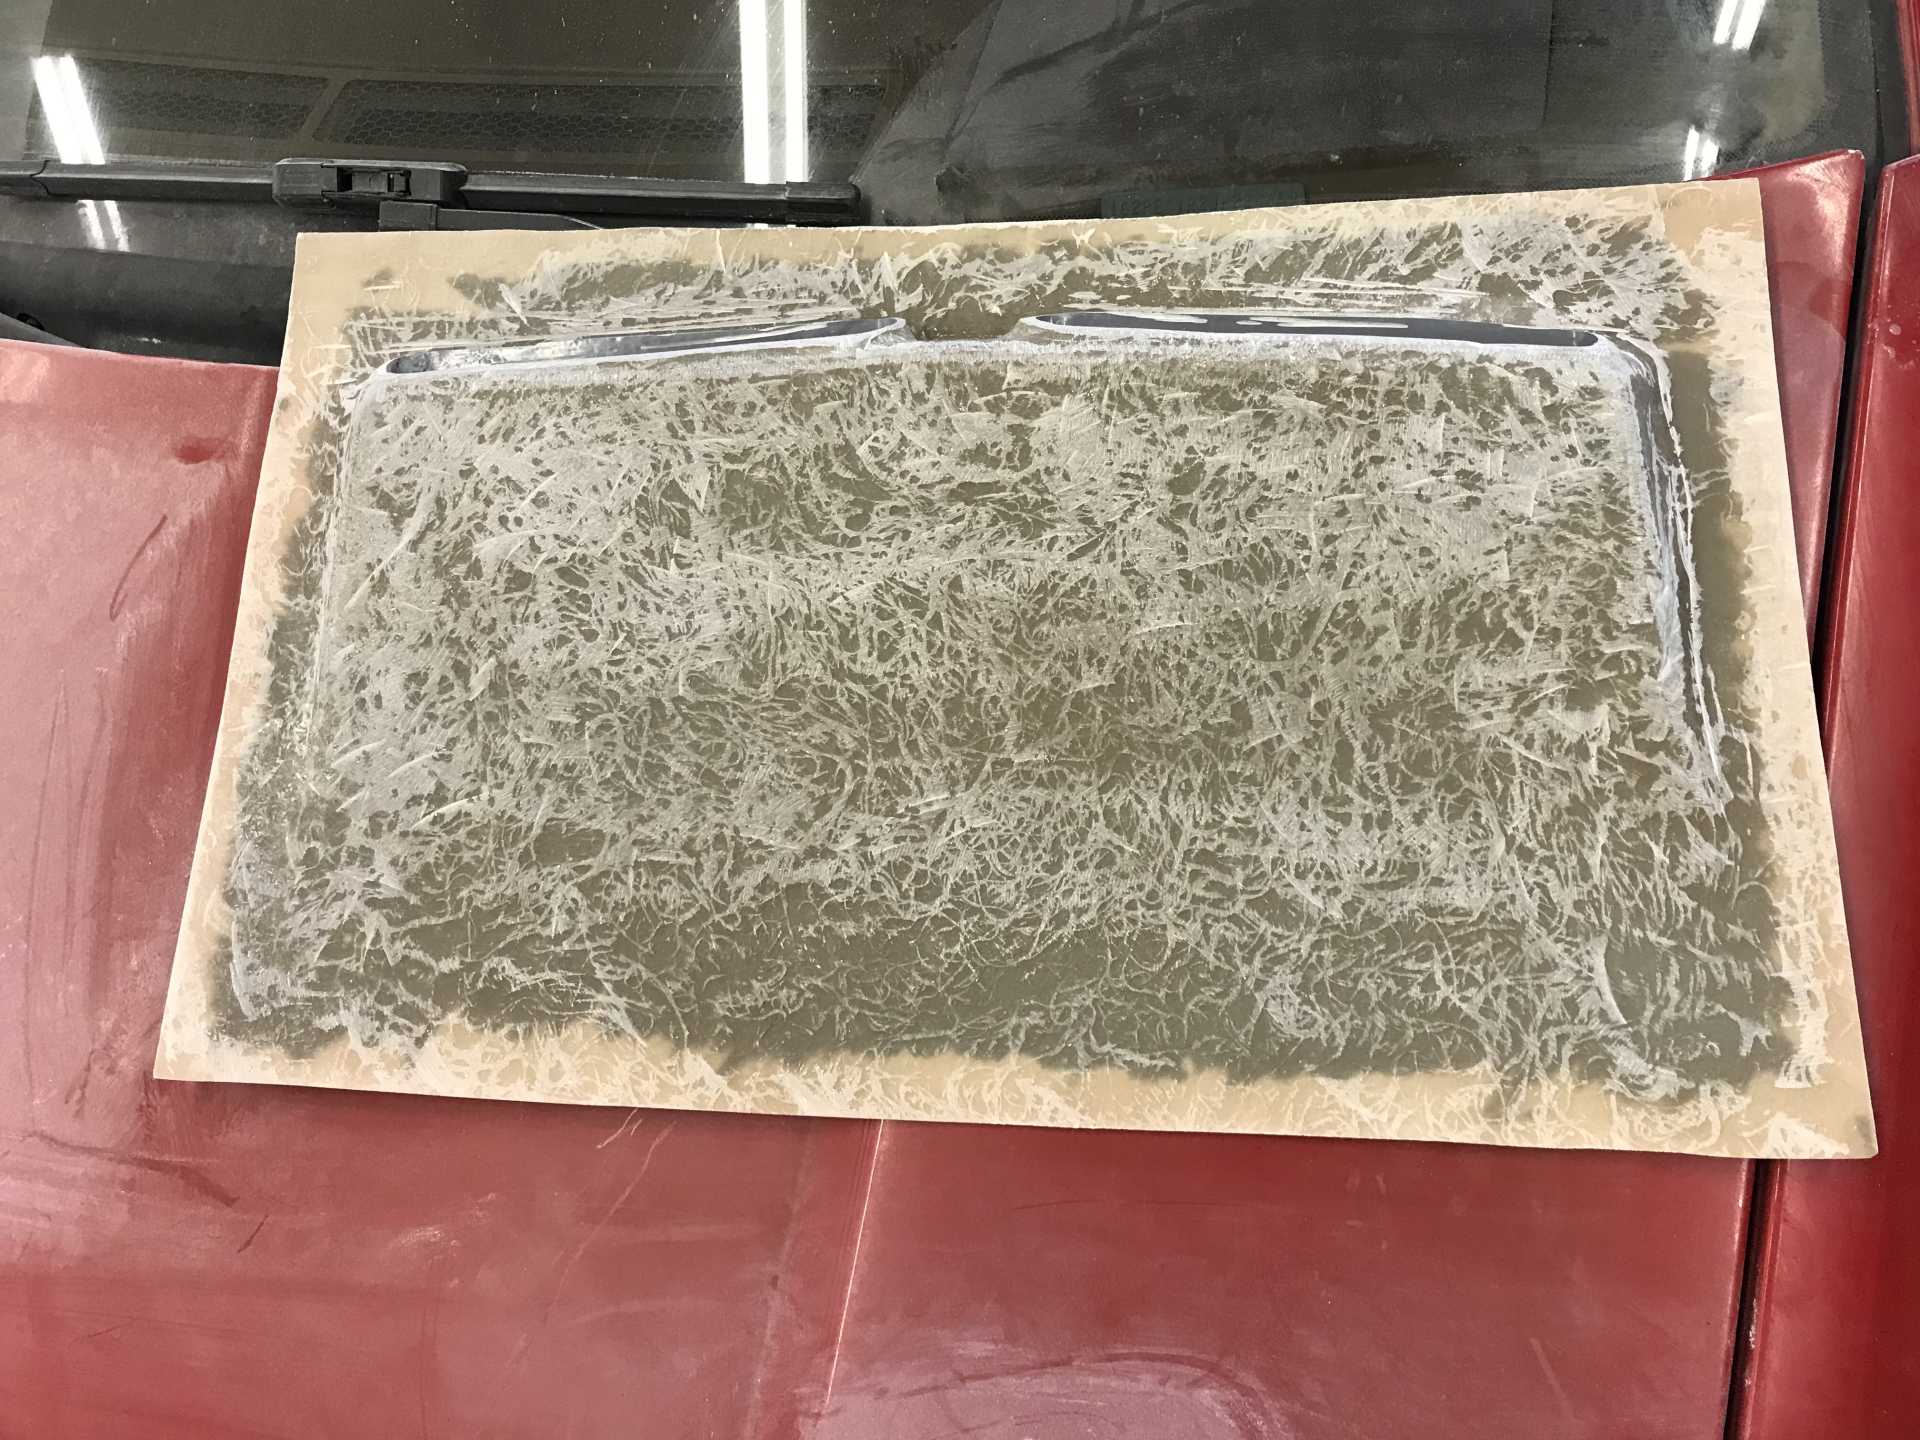
On goes the first coat of filler. It hardens in 5-10 minutes depending on the amount of hardener used.
I waited overnight and then sanded the primer using 120 grit on the orbital.
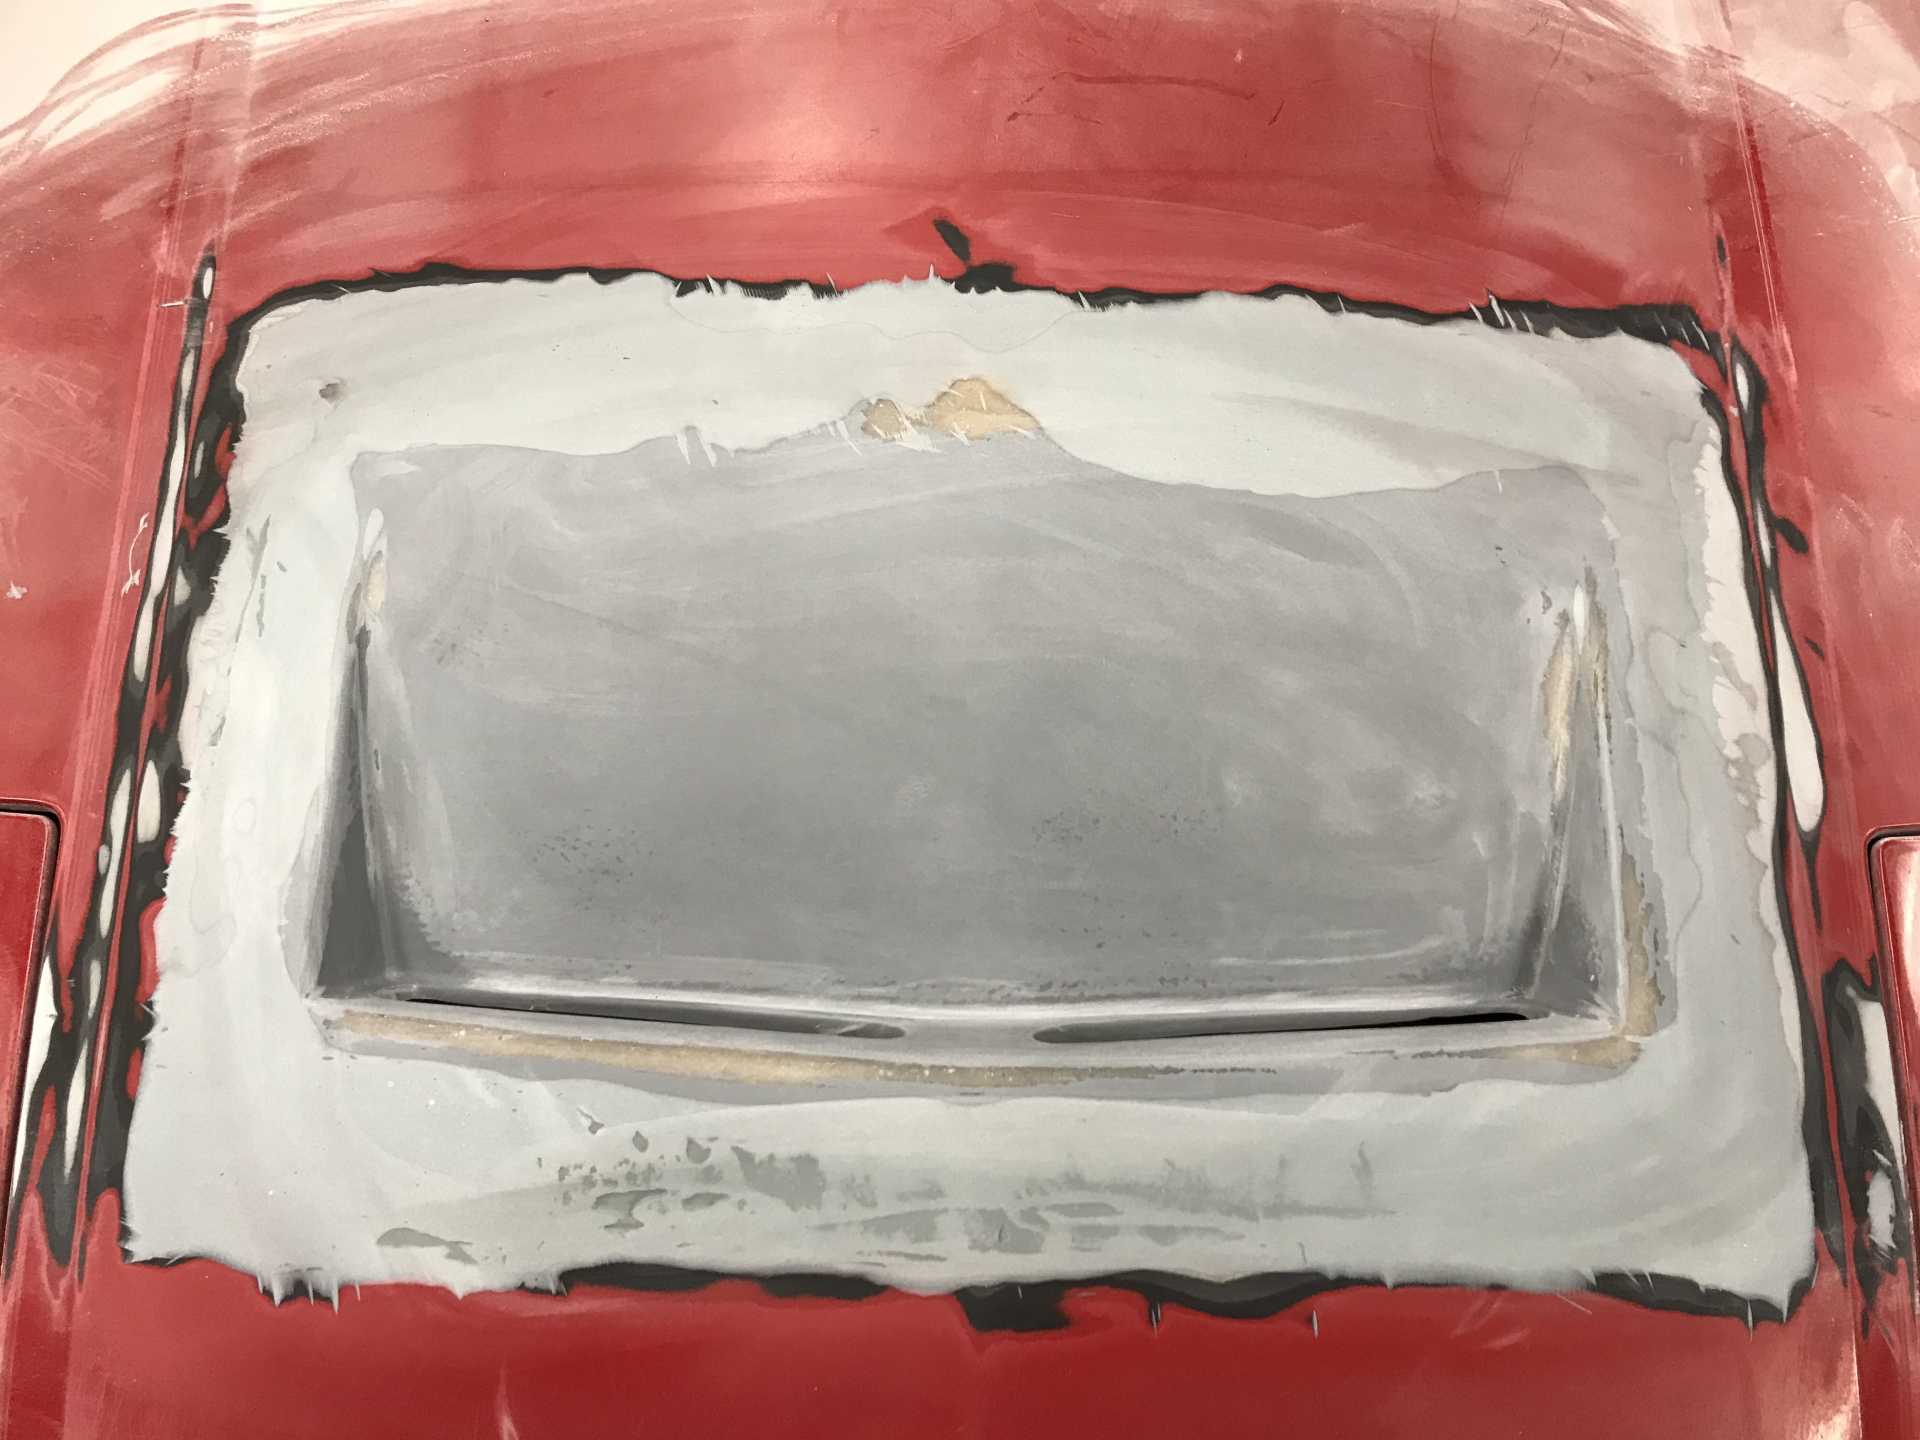
Then a coating of good primer (from an auto body supply, NOT Rustoleum) was applied to show the problems.
Next was to prep the inside for a layer of glass cloth. This was applied in three strips. In this photo the rearmost section was sanded and the voids around the vent were filled using expanding foam. This foam was then cut off and profiled to make a transition from the vent to the frame.
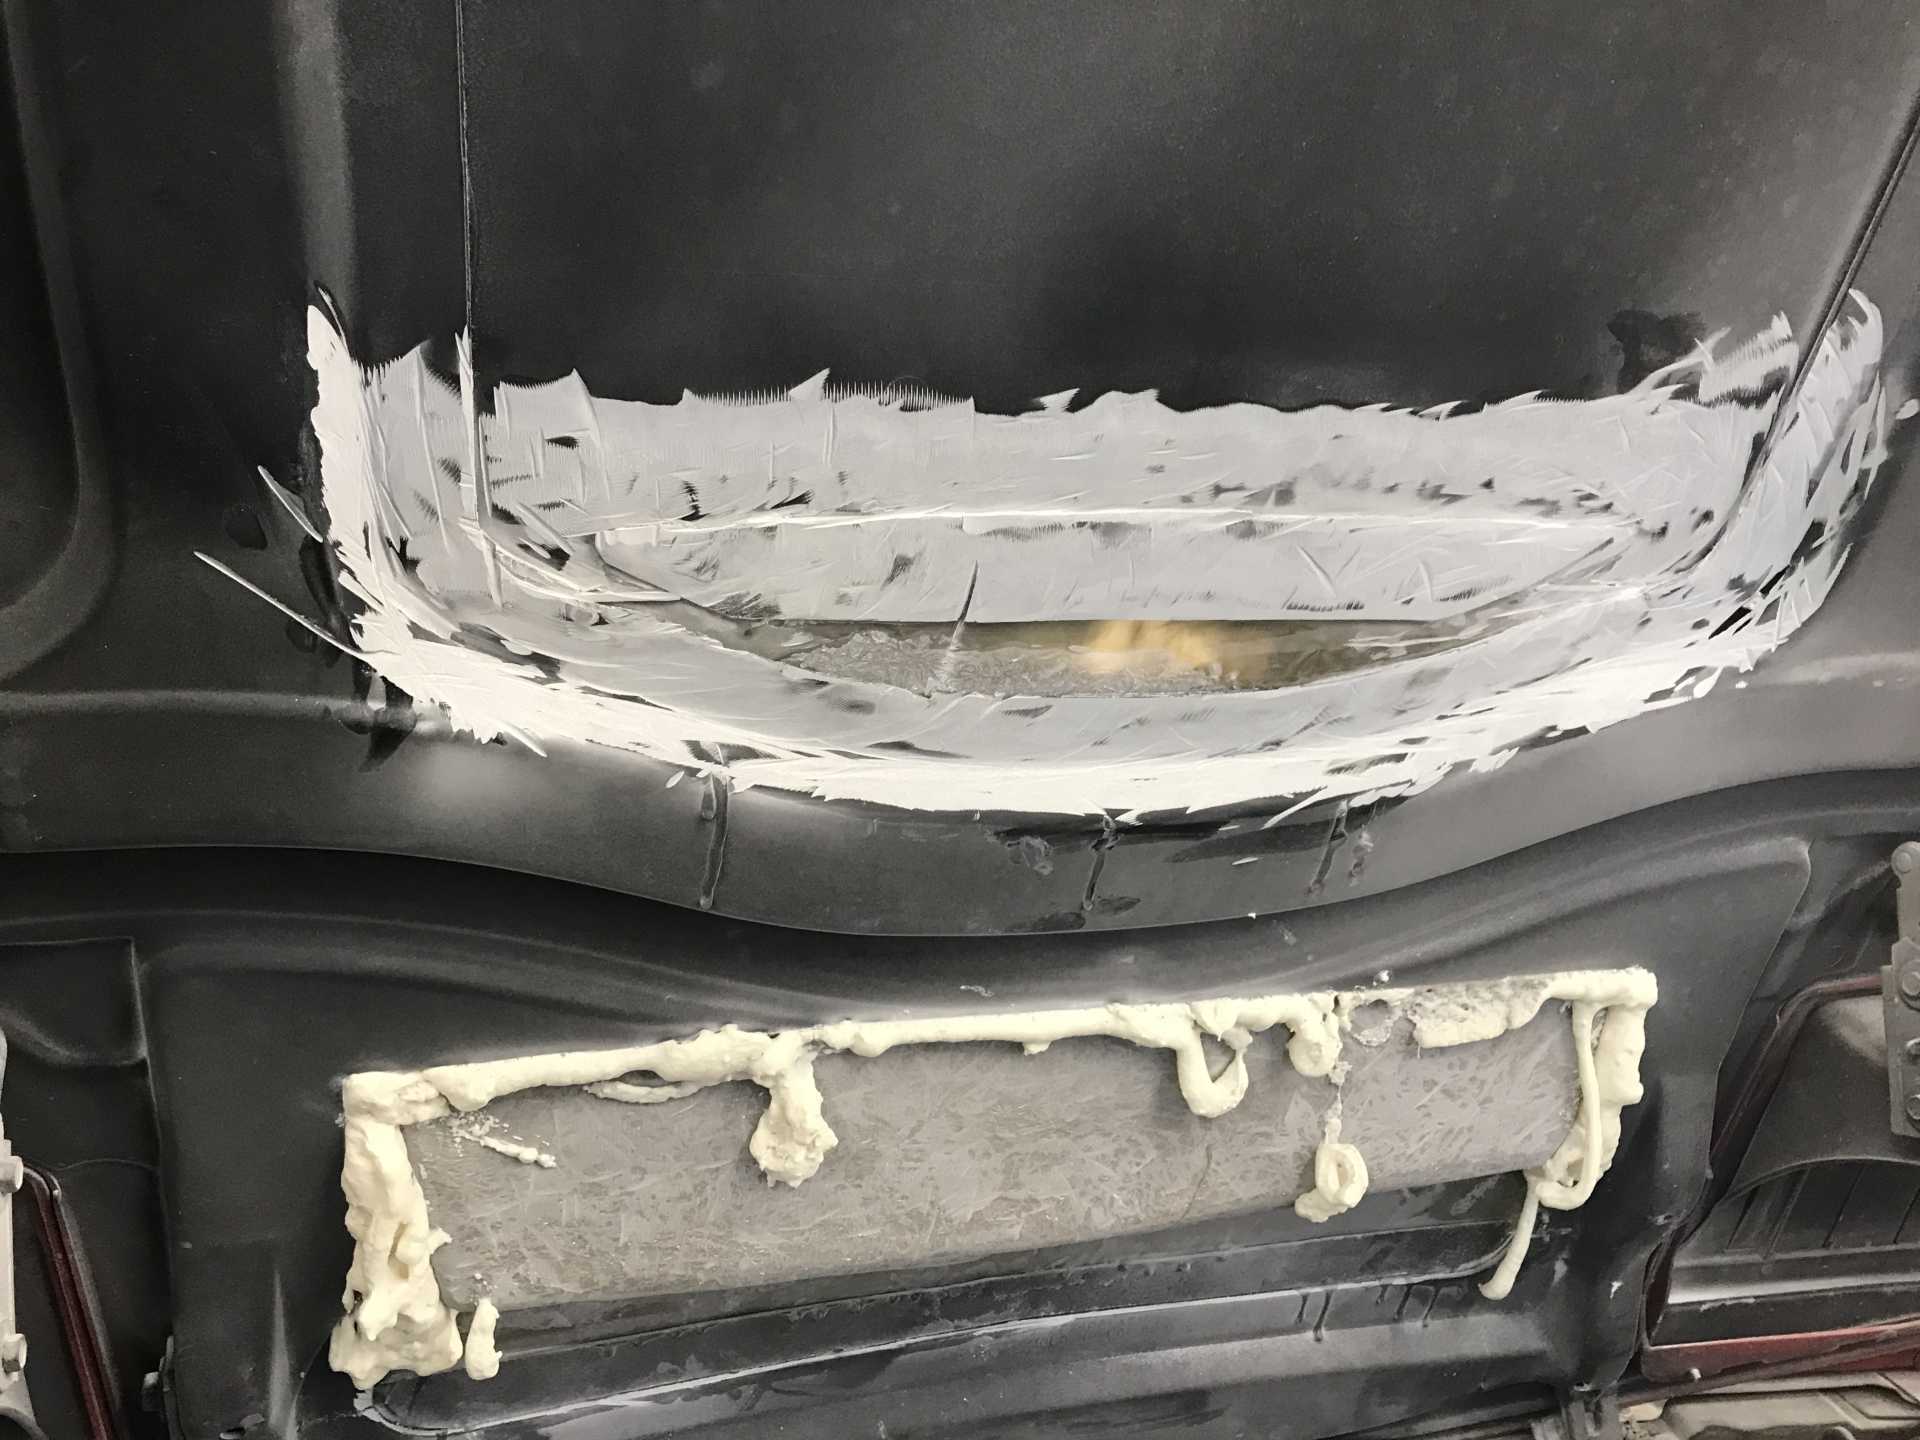
The first strip of cloth is on place and allowed to harden before trimming the foam and applying the remaining two strips.

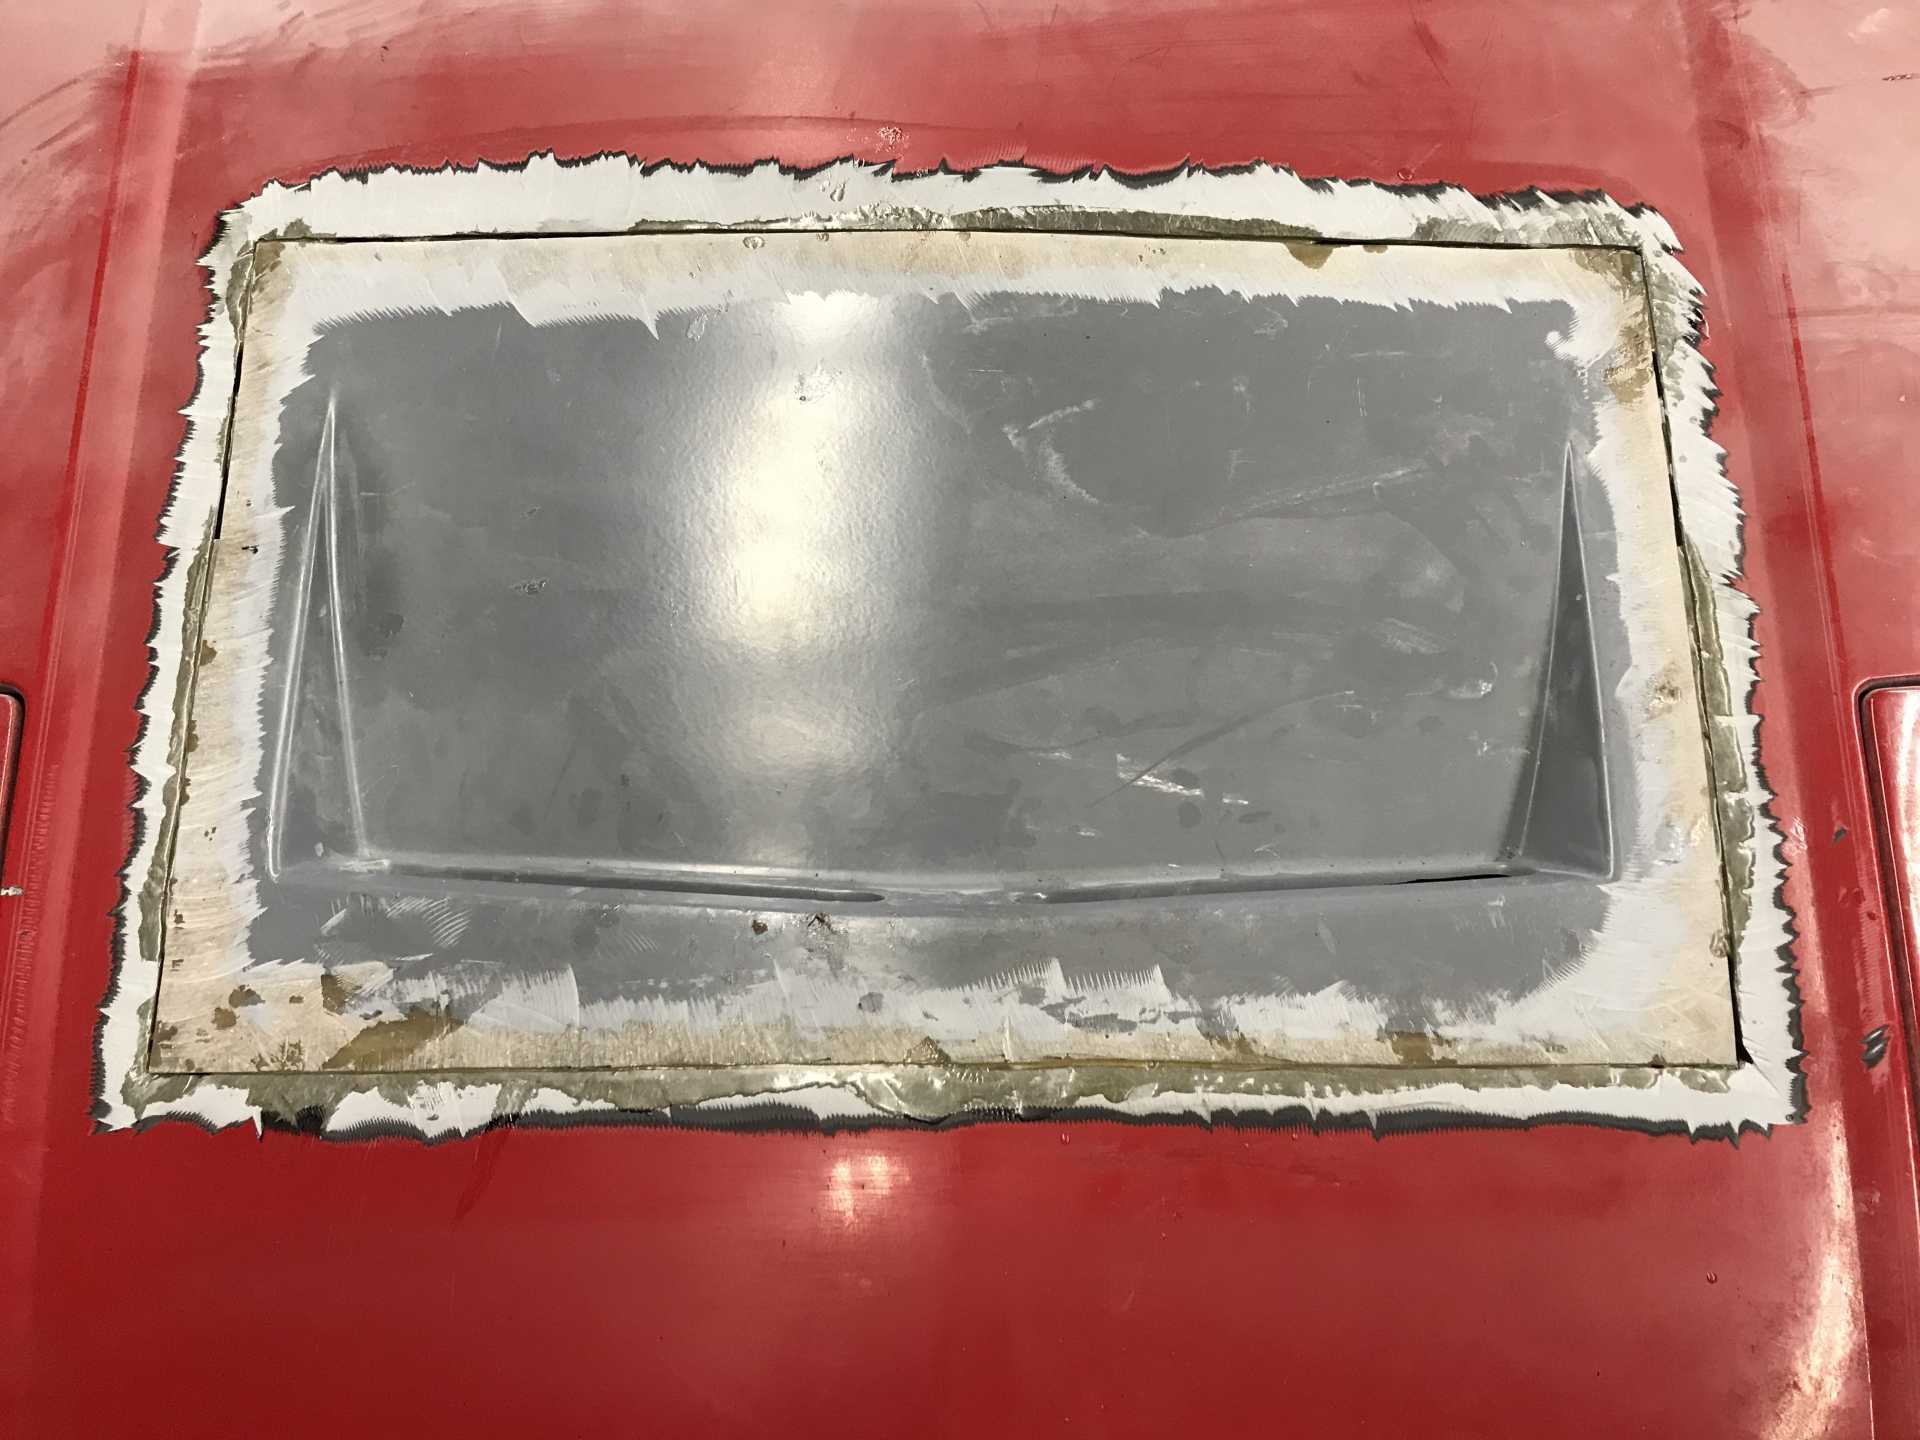
After sanding and cleanup the interior was shot with a satin black (same as used on the cradle). It will need more cleanup when I remove the hood for overall painting.
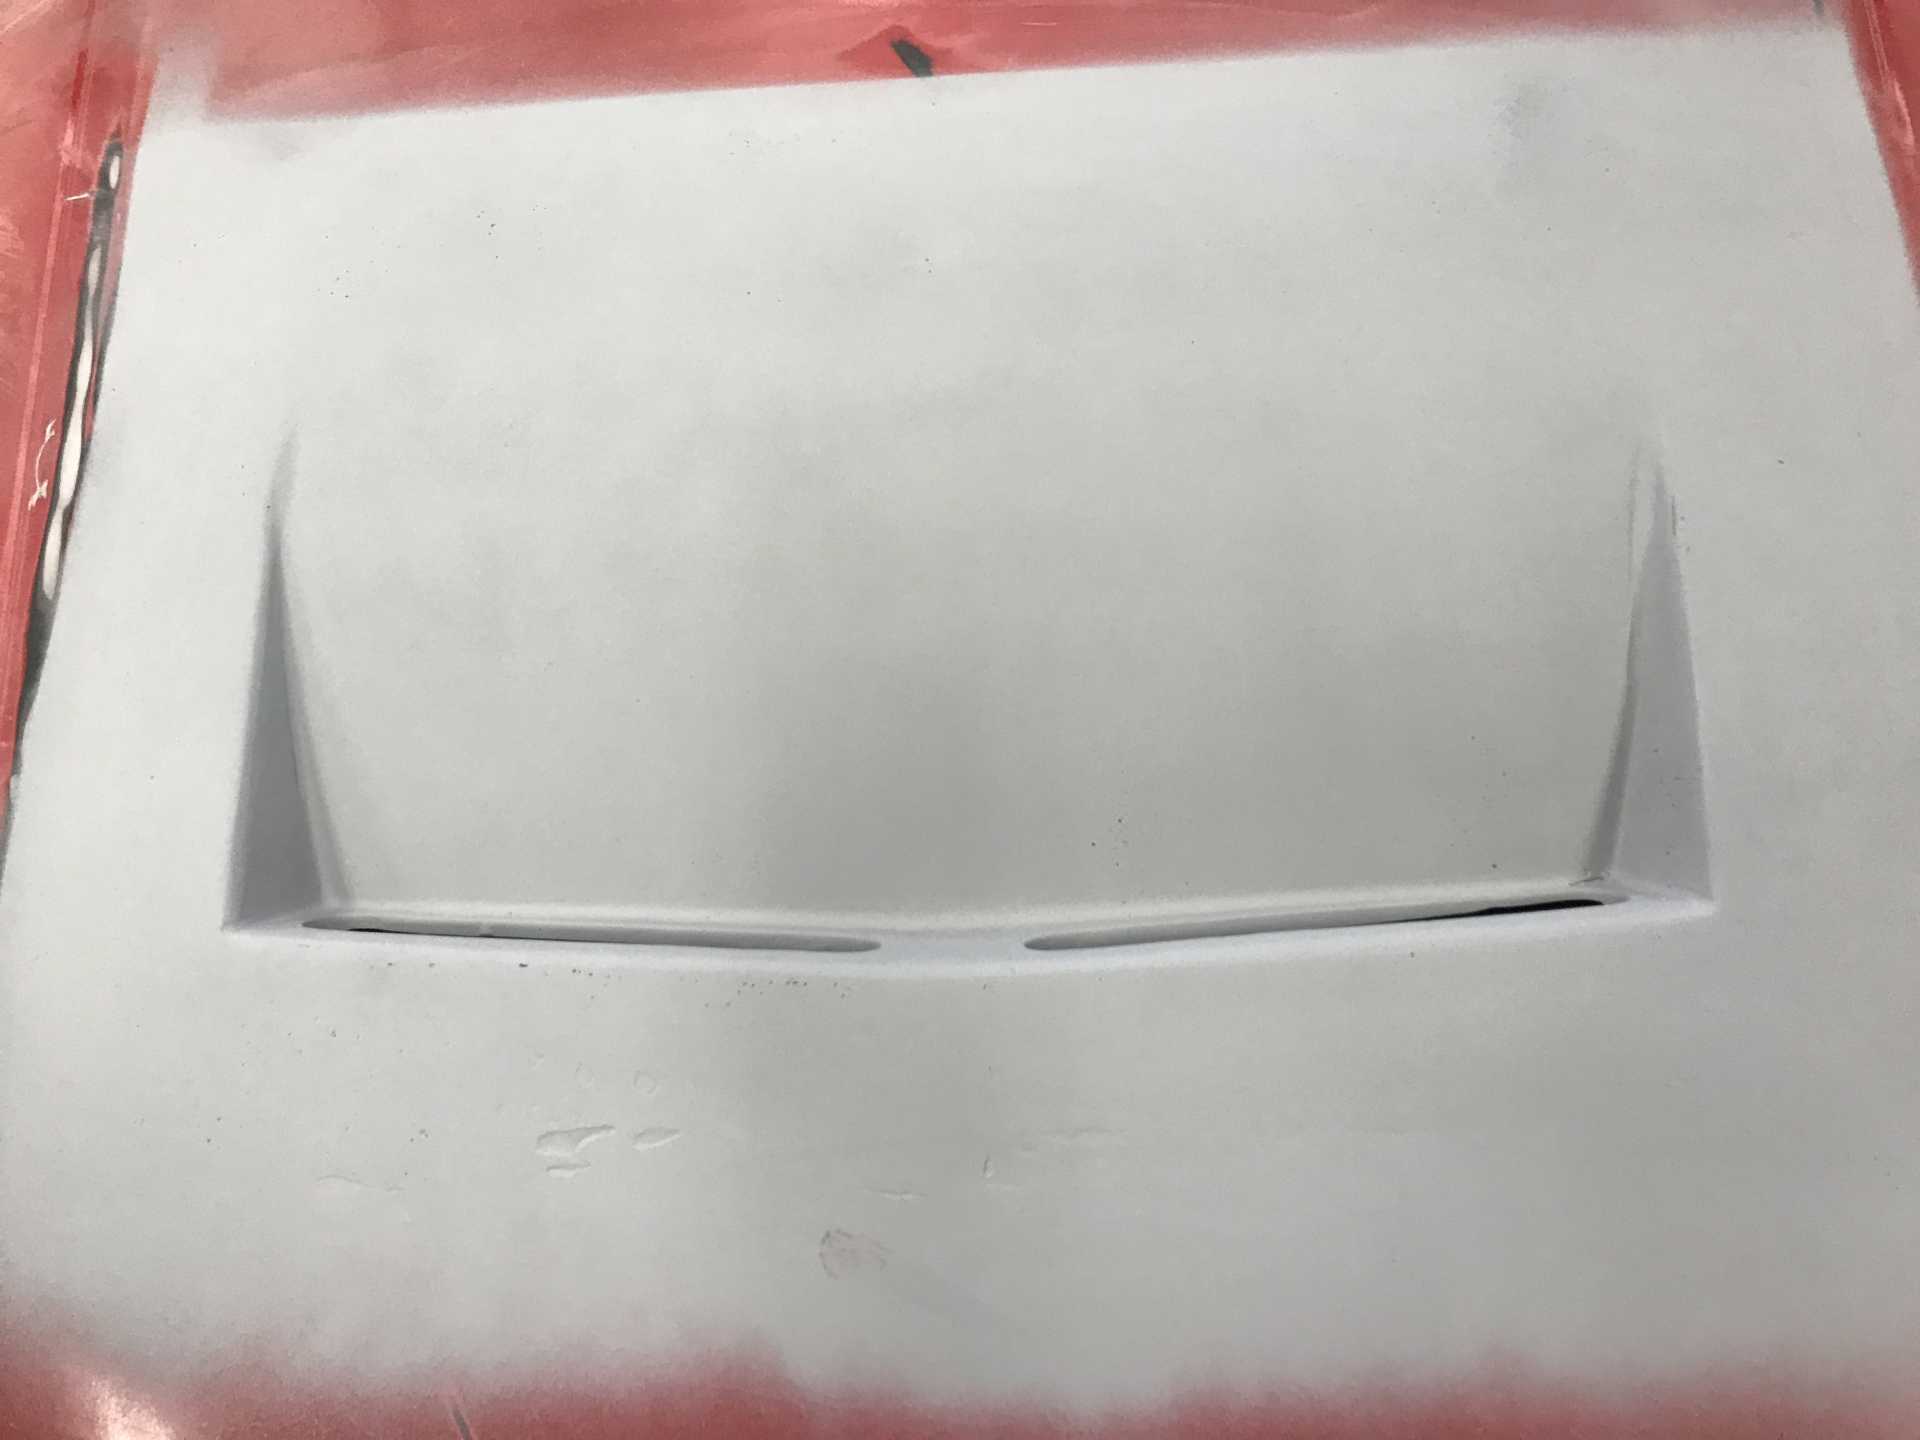
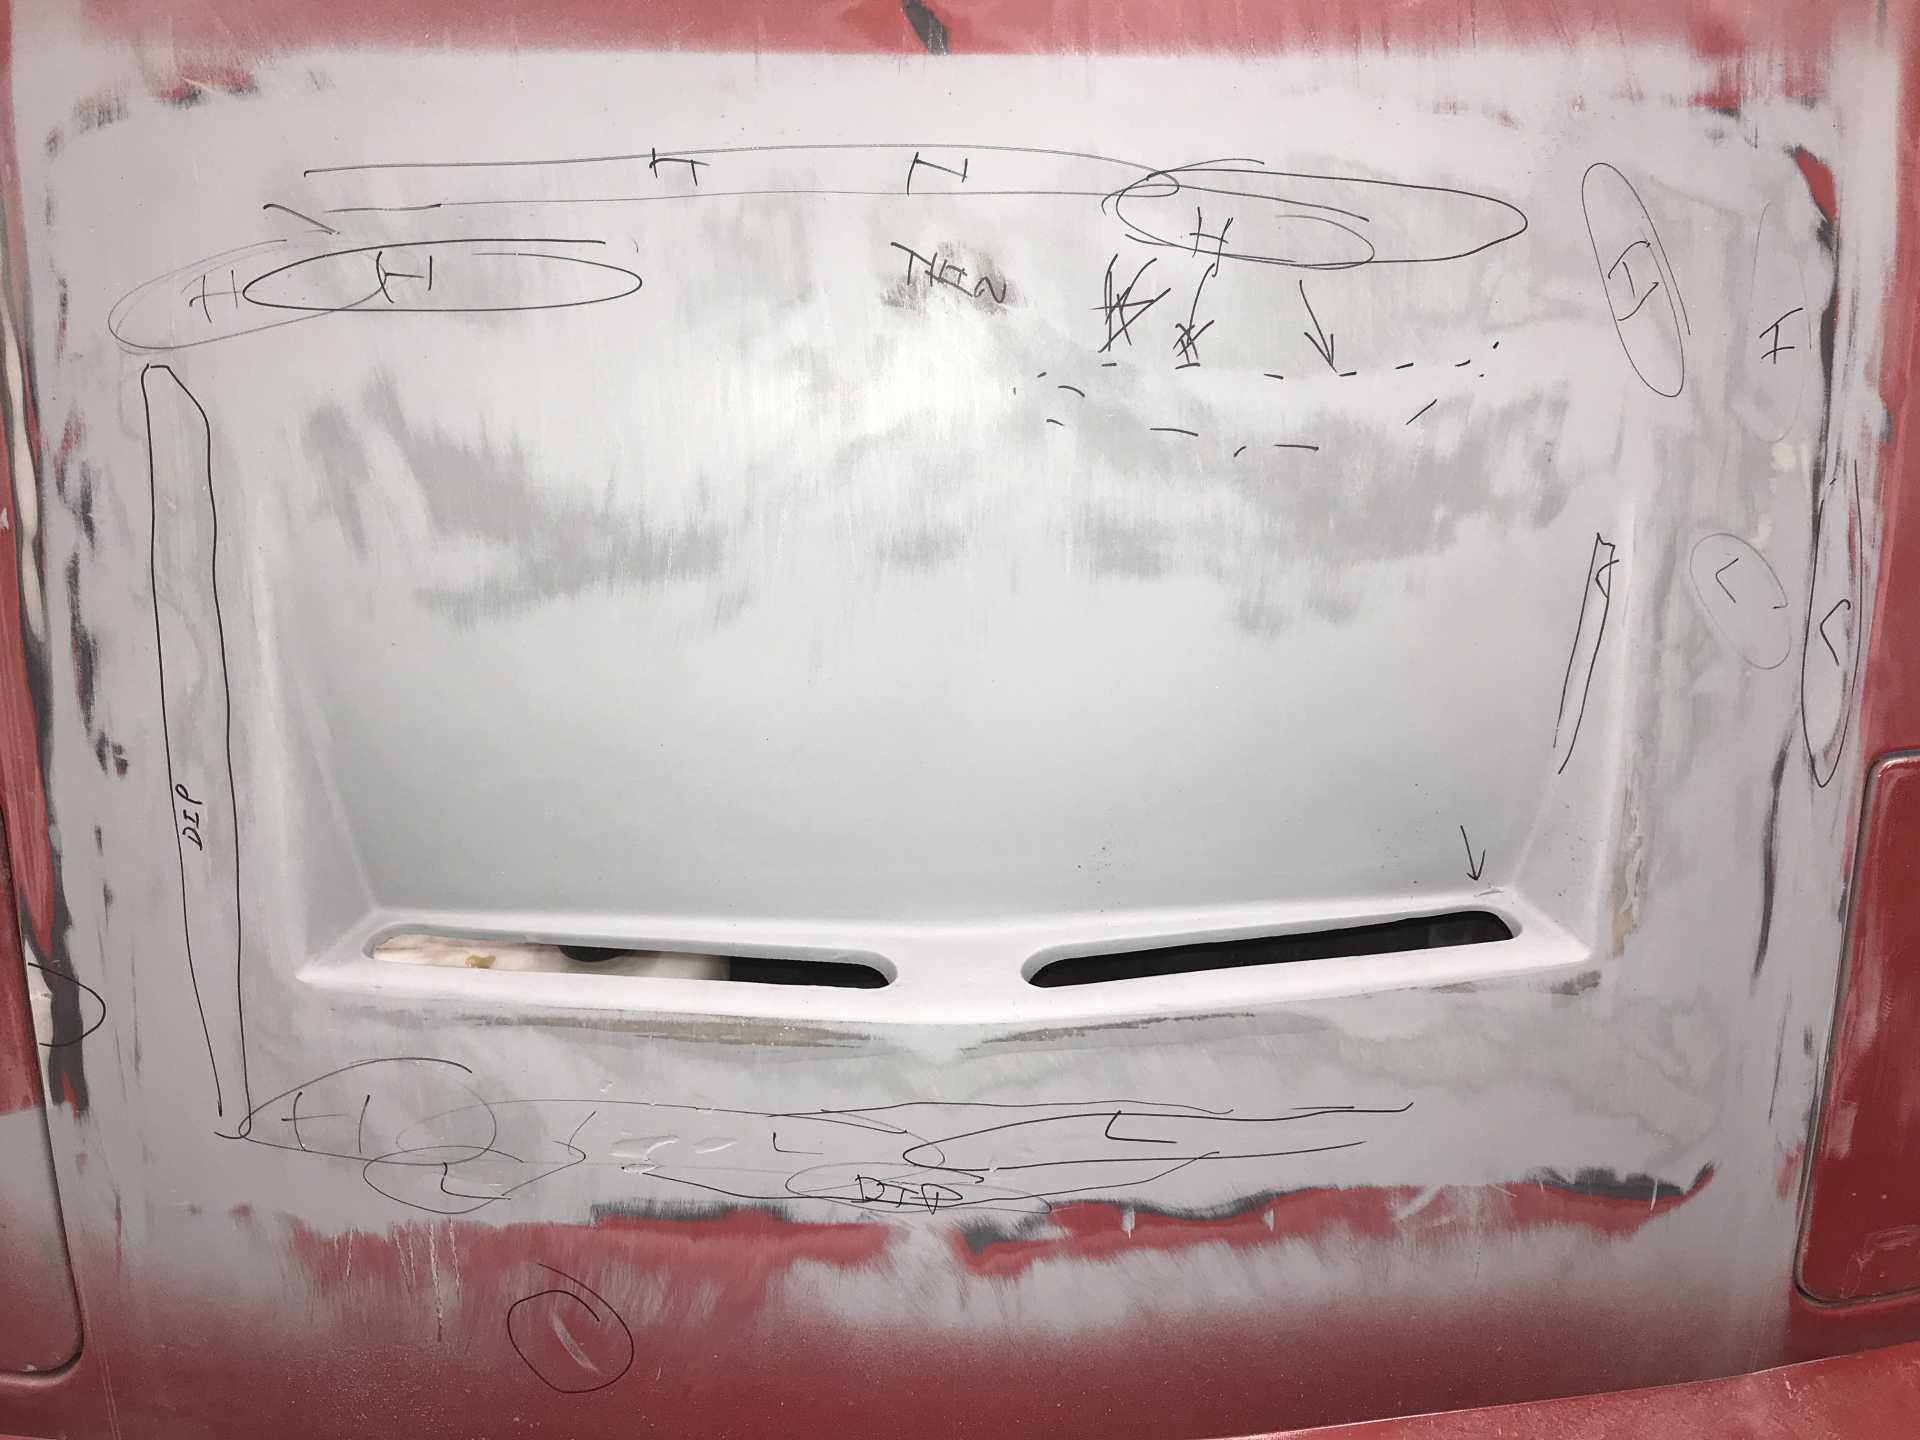
The surface of the hood was marked up for filling in the low spots and sanding the high spots. Actually this was done in two steps with the last one to contour the front of the hood and vent for better appearance. The place marked "dip" needed more than I used to look & feel right. To do this sanding a "flat" sander is used. Just a hard rubber tool or piece of wood to back the paper will sand only the high points. And your fingers will elp you in feeling the highs & lows too.
A few hours of sanding later the second coat begins to look & feel better. This has had a coating of adhesion enhancer that gives it the glossy look.
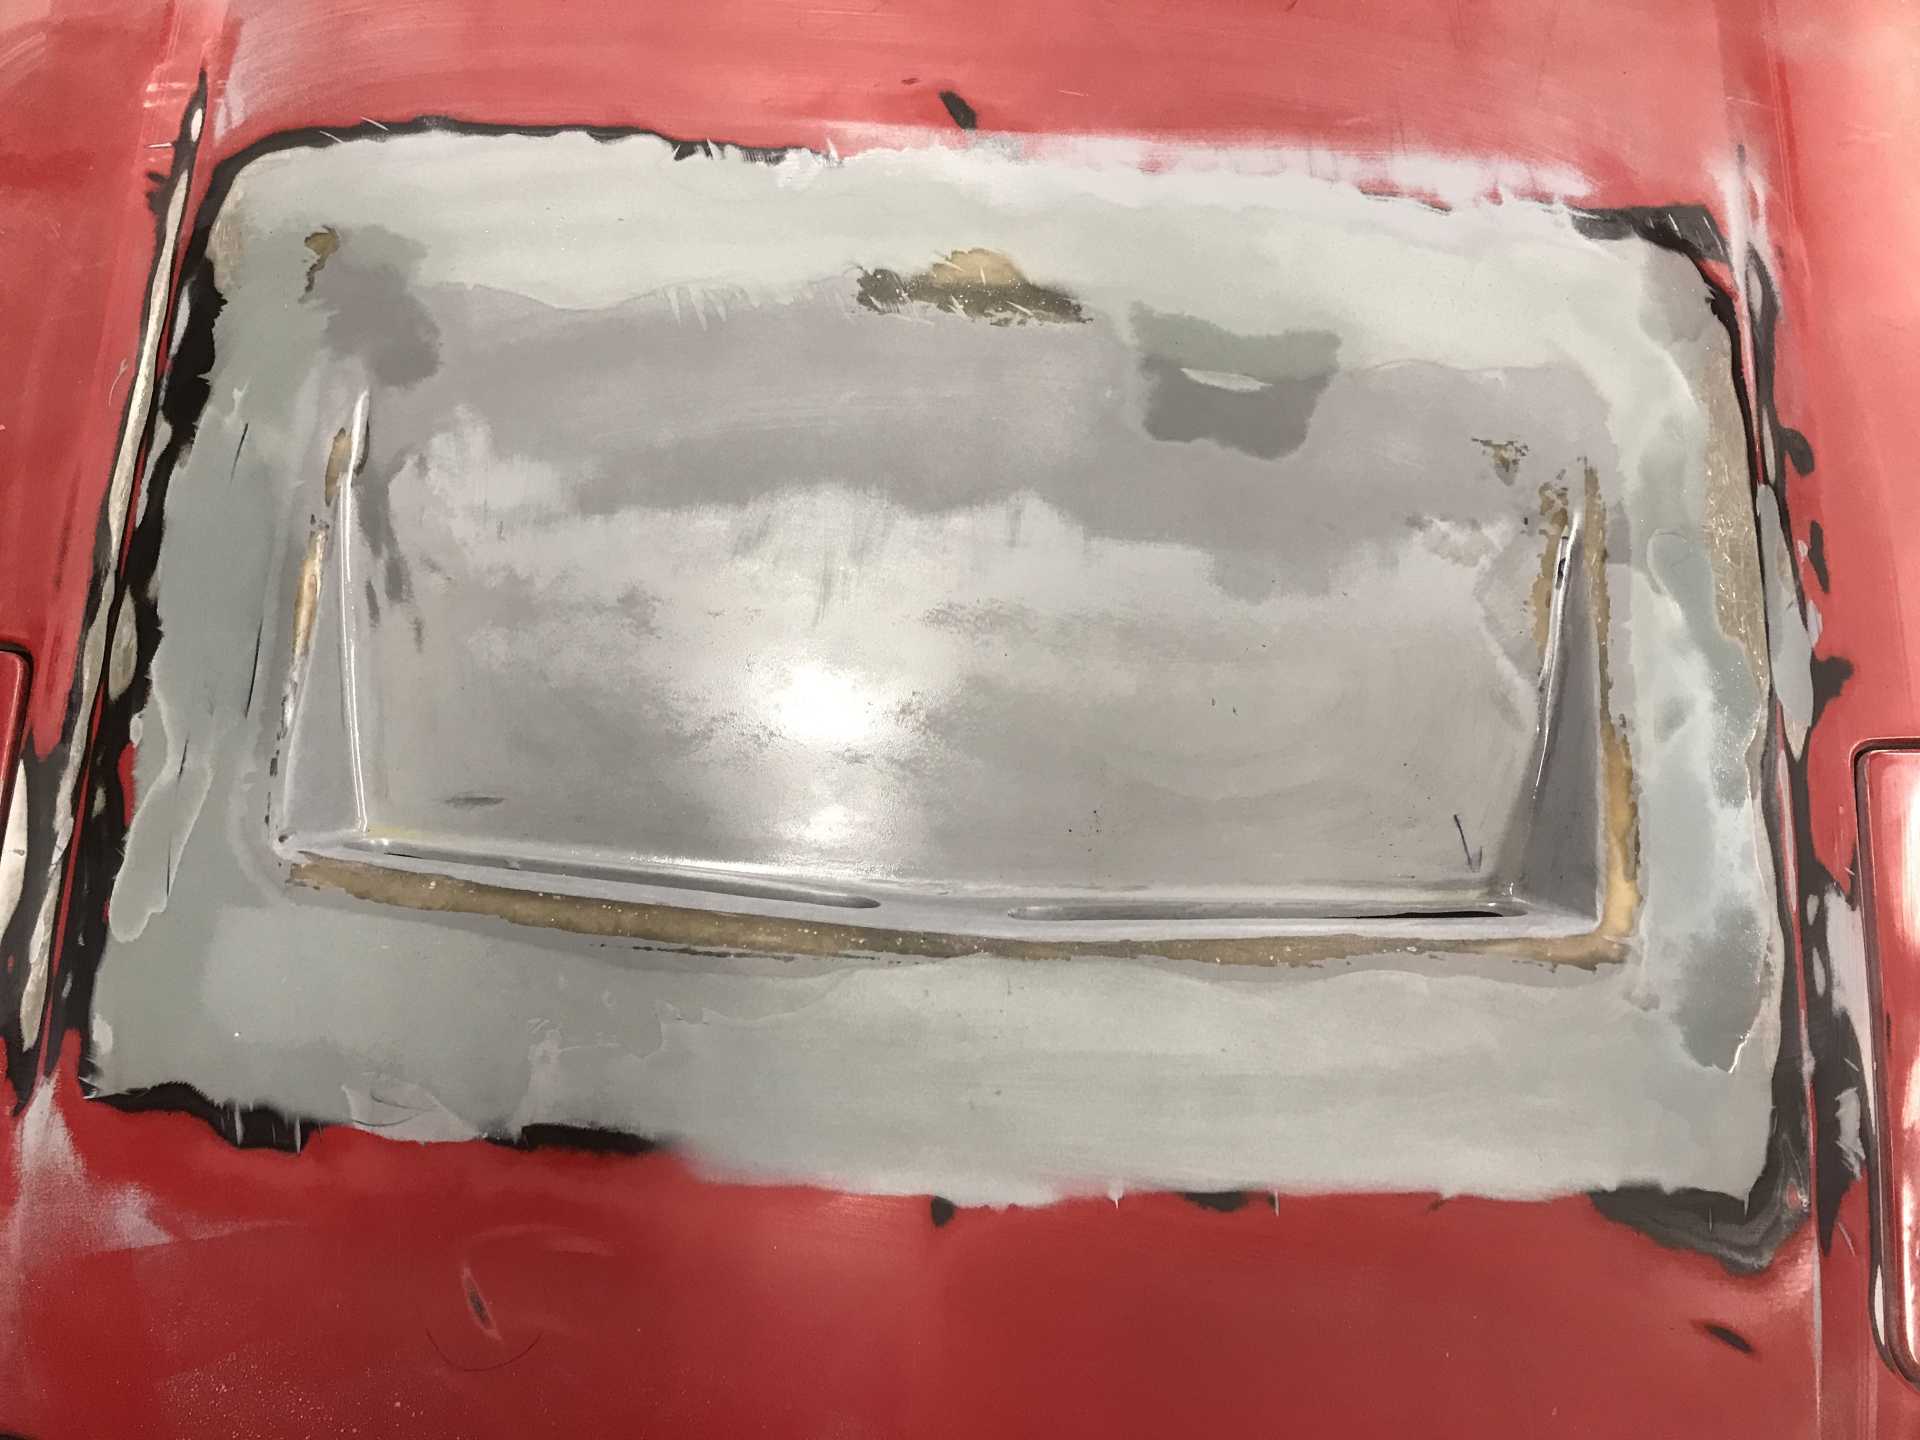
Another coat of primer brings out all the imperfections that will be dealt with later, but it is beginning to look like it should.
Still have more cleanup to do, but this will wait for the final body prep.
This is the filler I used it is a bit more flexible than others and is similar hardness as the panel materinal so it sands evenly and feathers very well.
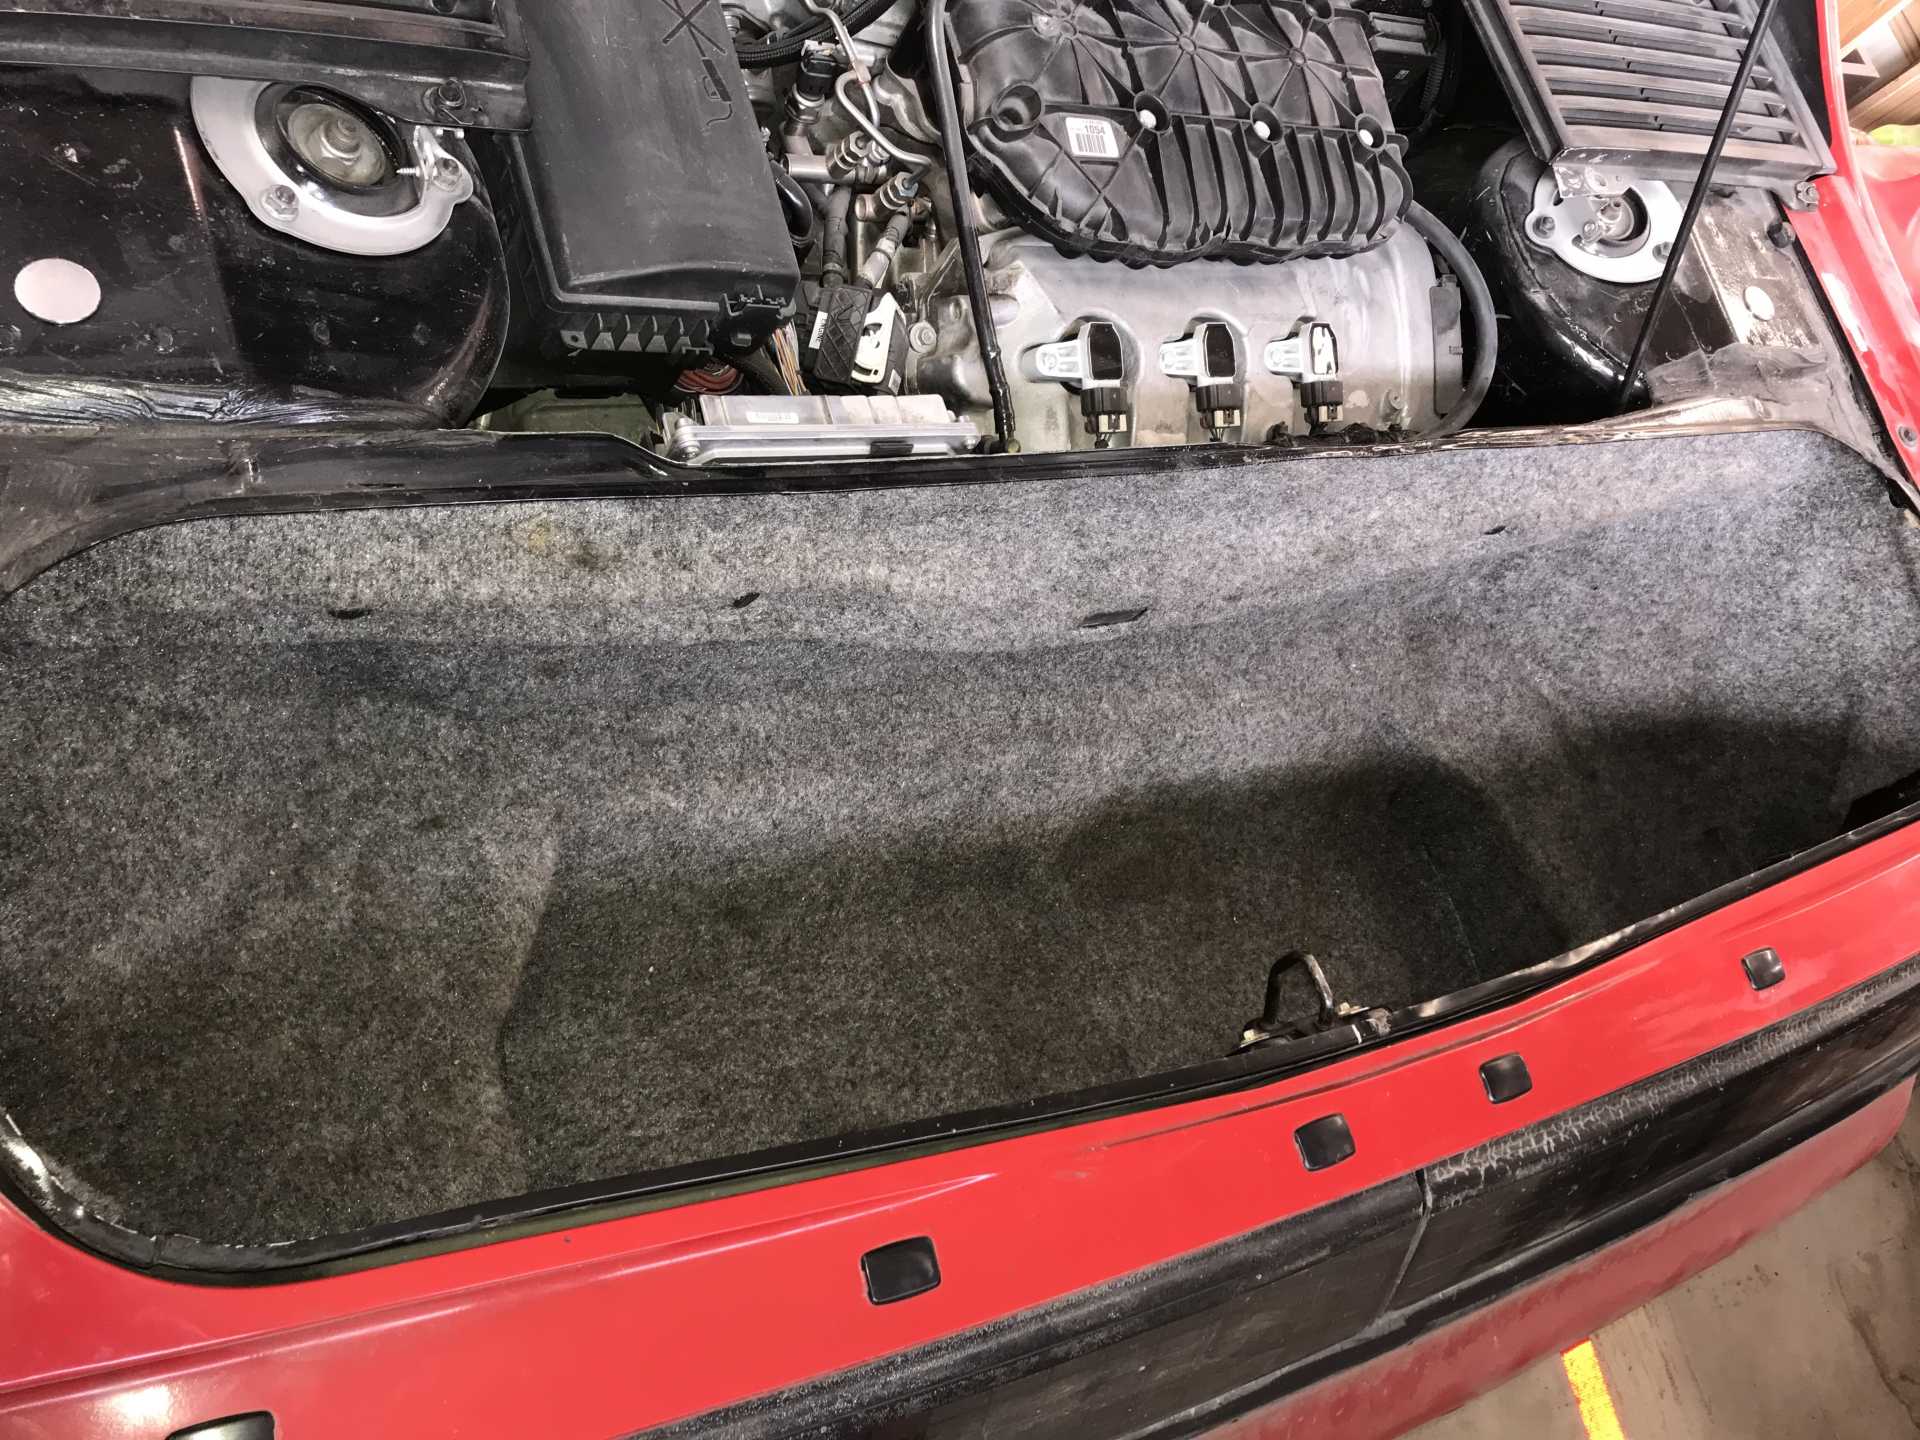
I've also trimmed and installed the trunk carpet to fit the shallower rear trunk and it looks ok.
Finally I am making progress on the misfire. I bought three new plug coils and installed them a few days ago. That made a big difference in the performance. I decided to buy another three which should show up next week. They are Spectra Premium C-761 exact replacements. Bought 3 from Amazon and they were $22 each, total with tax was $72 (I'm a Prime member so no shipping charge). Went back to buy the remainder and the price had jumped to $92! All I can say is beware of greedy Amazon sellers. I found the same exact parts on RockAuto for $61 including shipping.[This message has been edited by MikesFirstFiero (edited 01-21-2022).]
|
|
|
|
MikesFirstFiero
|
JAN 27, 05:48 PM
|
|
Installing the last three spark coils did help but didn't solve the issue. It is more driveable than before but... Today i made a change to the fuel pump power feed as an experiment. On the impala the fuel pump is used to operate the Evap, Gas gauge and Fuel pump. The pump is driven by a Pulse Width Modulation scheme in the Chassis Control Module. It switches the pump on and many times per second. The amount of time On-vs-Off determines the output pressure. Measuring pump voltage it shows 3.6VAC and 4.8V DC. This means the pump is powered less than 50% of the time. With PWM control you can achieve extremely fine control of the motor. It is similar the method I used to operate 75HP elevator motors.
The pump pressure typically runs about 45PSI no matter what. this car has a pressure sensor after the Corvete fuel filter that includes a pressure regulator (I used a Wix). The first step was to cut the wire feeding the pump from the CCM and connect the pump to the +12V Hot-in-Run power temporarily. That made an immediate improvement. The pressure to the fuel injection pump on the engin under all conditions ranges between 57 an 59 PSI.
It now idles and runs much better but it's still not completely right at high RPM and full throttle. Next step will be to have the injectors cleaned or replaced. Depends on the cost. Bill at Mr.Injector in Coeur D'Alene has the equipment to test and clean the Direct Injection parts. I'll stop by and see what he can do. In the mean time I'll find an unused fuse in the block and run a power wire to the fuel pump directly. For my test i used an inline 15A 3AG fuse that worked fine.
One thing seems to be true about these new electronic controlled engines is that they produce lutstanding good power for their size but they require much closer control of the operating parameters of air, spark, fuel and timing. From what I read the latest engine and transmission controls are even more locked down and it is not easy for anyone to work on them other than putting in a factory exact replacement part (which needs the car VIN in it or no go). In a few years tuning an engine will be a lot more difficult and costly.[This message has been edited by MikesFirstFiero (edited 01-27-2022).]
|
|
|
|
Skybax
|
JAN 27, 06:59 PM
|
|
The hood looks great.
I agree, future tuning is going to be challenging.
|
|
|
|
Zefyr
|
FEB 02, 07:33 AM
|
|
My donor vehicle is a low mileage 2013 Impala LTZ
It does not have the manual shift option as far as I can tell. It also does not have push button start or a FOB. I am hoping that it will be easier to work with than the later years.
|
|
|
|