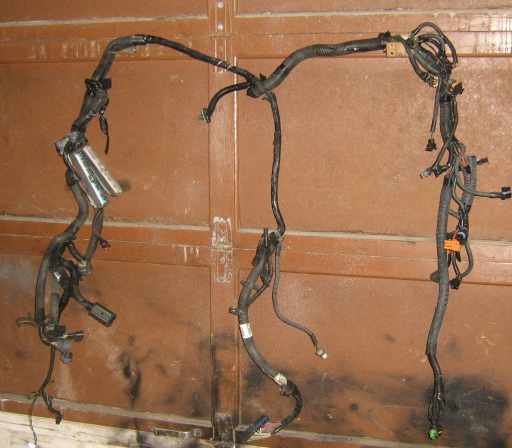
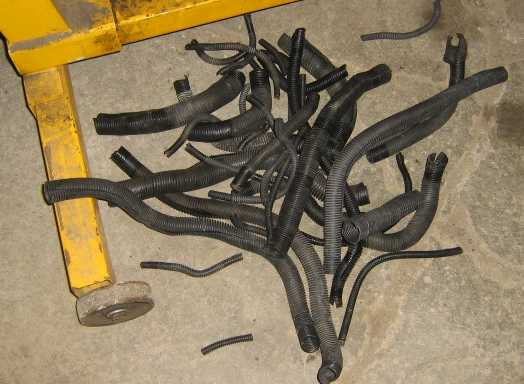
I am finally caught up on my harnes building so first my appologies to those who have had to wait all harnesses will be going out first thing Monday morning. Second is I made a promise a while ago to do a build thread on a 3800SC swap harness and I now finally have the time to do it. What I would like to do is have some input on what options to run on this harness for example is it for a manual or auto swap and should emissions be kept or removed. I ask this because this harness is an extra that will be auctioned off when finished and all the money going to PFF the purchaser will need to pay Cliff not me. Not quite sure how to auction it off so a little help there would be appreciated. The harness build first remove the complete engine harness from the donor 3800SC engine. I have hooks on my garage door that I use to hang harnesses on for stripping.
Next is to remove all the loom and tape from the harness, you will find on some that the wires all stick together which will require some extra work to pull them all apart.
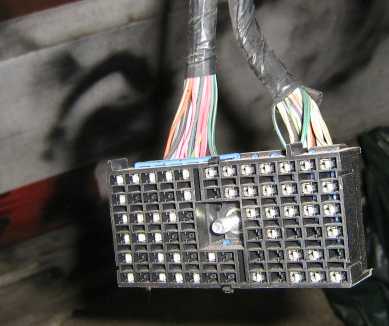
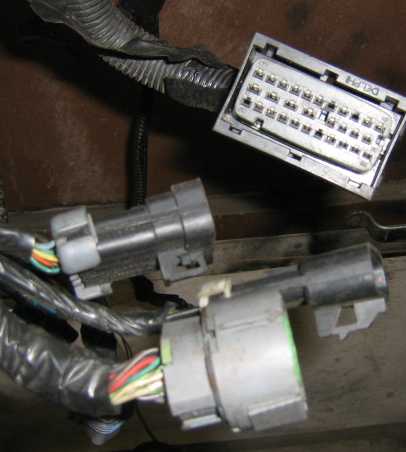
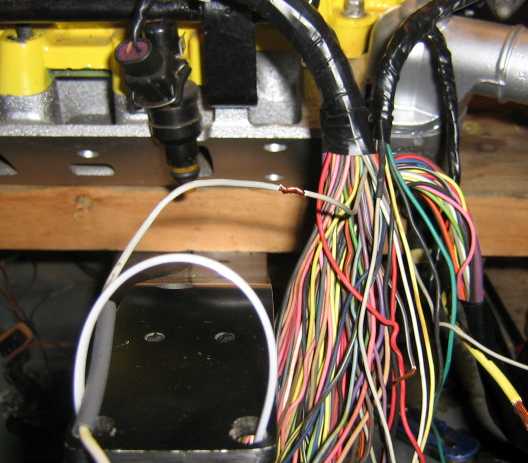
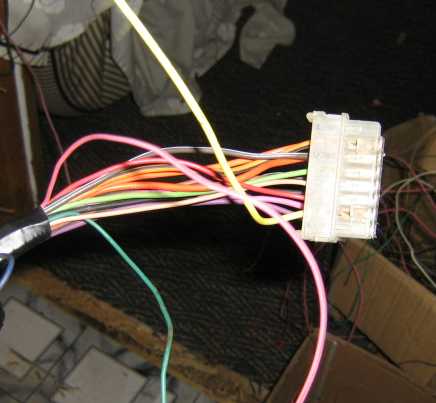
These are a few connectors from the harness that can be cut off to free up the wires, they are the main firewall connector and the connectors for the ABS sensors and others for feeding wires into the car.
Next I remove carefully each pin from both PCM connectors, this is done by first removing the plastic covers then gently bending back the clip above the pin and lift the pin slightly then pull the pin back out of the connector by the wire.
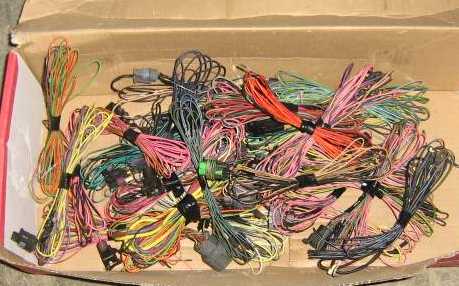
With all the pins removed from the PCM connector I now seperate all the wiring from the harness and set aside each sensor connector with its wiring.
And of course save all the removed loom for sealing up the harness once assembled. A good idea is to go to a wreckers and remove extra loom from other cars as you will need more loom to finish off the harness.
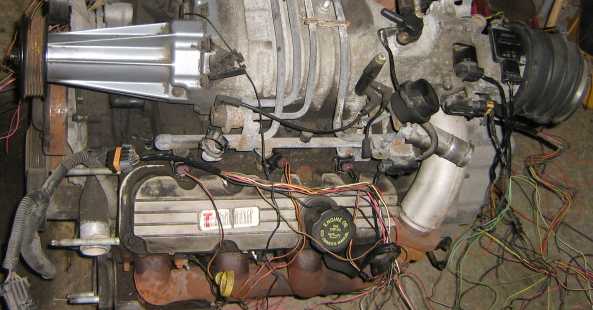
Now I will pull out one of my spare engines to start reassembling the harness. At this point input would be nice on which tranny to make this harness up for the 4T65E HD that comes with the 3800SC engine or one of the manual trannies that come with the Fiero. Dan
I would like to see it done with a manual tranny. If that will be the one chosen I would say to make it for the getrag. Though it would not be much diff. for the other manuals
I would say do an automatic, and then along the way make **NOTE** remove this plug for manual... Change VSS here to longer for VSS on GETRAG.. like that...
I've looked at alot of swaps and I vote for the 4t65eHD that's the trans it mostly came with and seems like it would be more complicated than doing a manual trans...
I will offer to take the harness and pay cliff I was going to buy one from you any way but i dont need the extra emission stuff but it will not kill me if its there
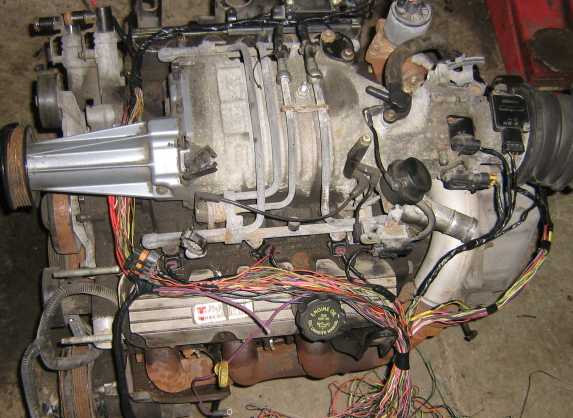
A little more progress I have inspected and repaired any bad spots on the wiring and started to reassemble the harness on the engine. This is the wires for the trunk side which includes the EGR, O2 number 1, MAP sensor and injectors 6,4and 2.
Now the firewall side which is the ignition module connector, the boost bypass solenoid and injectors 5,3 and 1.
Now for the trunk side again with the wires all taped up and the wires from the speed sensor, oil pressure sensor and the knock sensor added on from below as well as the alternator wiring made long enough to reach either the stock location or down lower on this side.
Now for the tranny wiring which includes the main tranny electrical connector as well as the neutral start switch, reverse lights and gear selection switch.
Now time to start combining the different portions of the harness together along with the wiring from the starter, oil level sensor, knock sensor and the A/C compressor clutch. I run the wires from the trunk side under the supercharger to clean things up a bit. Also joined in is the wiring from the throttle body which is the MAF, IAC, TPS and IAT. I find this is a good location for joining all the portions together to feed off to the PCM which on this harness will be mounted in the stock Fiero location.
Does everyone else do theirs like this? I have always just taken the loom off a couple sections, lengthened and moved some stuff around and re-wrapped it.
Does everyone else do theirs like this? I have always just taken the loom off a couple sections, lengthened and moved some stuff around and re-wrapped it.
I've rebuilt a harness that was made that way, and it was HORRIBLE. It did work, but there were so many wires that were not needed in the harness that I lost count. The other thing I found was that the person that made the harness lengthened wires that did not need to be made longer, if they had taken the time to unwrap the loom, they would have had enough wire to go to where it was needed. Lastly, by taking the entire harness apart, it will look MUCH neater when you put it all back together.
Depends on what harness you use. I have always used the ones from Rivieras, the wiring to the engine is a complete and extremely obvious separate section of the harness. The rest is just excess you can pull right from the two plugs to the pcm.
All this terminal has is the injector and sensor wires and that is it, plug it into the other side and just wrap the hunk of wire that leads to the pcm. Everything else can be pulled from the harness
And the new project that it's getting installed on:
I prefer my way for a few reasons, 1 it makes for a much cleaner instal, 2 you can make the harness pretty much any way the customer wants for things like alt, ignition module or PCM mounting location. and 3 because I meter every wire as I assemble the harness it limits or even removes the chances of missing broken wires or putting pins in the wrong spot. This way does require more work and more time but is worth it in the end or atleast is in my opinion. Now if you would like to take over this build thread go ahead I can always put my time to better use. Dan
FieroFlyer I for one appreciate you putting this info on here. I agree with you. If you are going to go to the trouble of doing a swap why not check everything out including the wiring harness. Why depend on wiring that may have been smashed or put under stress when someone pulled the engine. But then again I disagree with someone else on here about putting in a 3800SC without going through the simple act of replacing the main and rod bearings that might have been subject to neglect in the oil change department.
Depends on what harness you use. I have always used the ones from Rivieras, the wiring to the engine is a complete and extremely obvious separate section of the harness. The rest is just excess you can pull right from the two plugs to the pcm.
Its the same on every wbody/hbody harness I have used for swaps. Very easy to cut and pull the body connector wires, basically just stuff going from the fuse box to the body connectors that you take out, very obvious..... Yes you have to take the tape and sheeting off, but still I didnt hardly ever cut a wire while getting everything mounted on the motor.
The advantages that dan outlines are very clear, and I fully agree, I just dont usually care about making everything EXTREMELY clean, I have sheeting over all my wires, and noone complains that it looks out of place. Also its fairly easy to re-combobulated the wiring still without cutting it. Although..
quote
3 because I meter every wire as I assemble the harness it limits or even removes the chances of missing broken wires or putting pins in the wrong spot.
I have never worked with a harness that had problems in this area, so I would have t disagree, and honestly I think that it only increases error for the "first timer" that doesnt have a full grasp on whats going on.
There is NOTHING WRONG and in most cases it is much "better" to do it this way if you are looking for a specific look or something, but Z and I are only saying this because a newbie (like I was 2 years ago) might read this thread and decide that it is too hard to do the harness, or that it is too much work, for him not to attempt it himself.
I at no time said or even suggested in any way that this is the only way to do a swap harness. I did state that this is how I do a swap harness and with many years of experience in wiring aircraft for both the Canadian Air Force and civilian aviation as a liscenced avionics tech I like to think I know atleast a little about wiring. With that all I have to say to the ones who can not help themselves when it comes to budding into things they know little or nothing about is go crawl back under a rock and keep telling your self your work is not the **** that it really is and leave people alone who are trying to help others by sharing their knowledge and time.
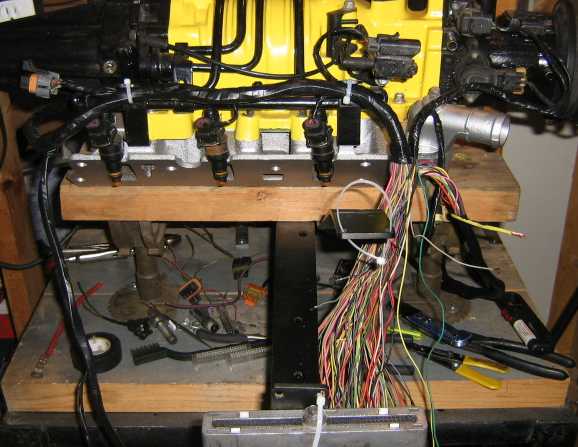
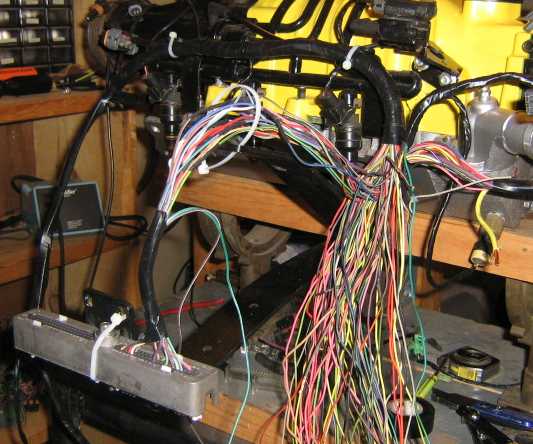
For reasons of comfort and warmth I have brought the harness into the house and installed it onto my jig to finish. I have taped up the harness to the point where it feeds off the engine.
On my jig I mount one PCM connector at a time and do one section of each connector at a time one wire at a time. Lenghtening or shortening as needed to keep the harness nice and cleanely run. In this case C2 clear connector is first as it is closest to the firewall when installed in the car.
First of all you really need to get a life, secondly I have no desire nor do I feel there is a need to prove any thing to you. Nor do I feel that doing harnesses is worth the crap of dealing with people like you. You act like some high school punk trying to prove some thing, or you are some dumb high school punk with out enough brains to shut your own mouth. This is it for me, I will now ignore this post as well as any others your big mouth gets involved with. Dan
quote
Originally posted by FIEROFLYER:
darkhorizon I have sat quiet for too long, for the longest time you were kissing up to me e-mailing me quite often asking for info and trying to get me to send my over flow to you. I had no problem with this although I did not appreciate seeing you trying to come off as some kind of 3800 Guru using other peoples info, because you are far from it. Your work from what I have seen is butcher work at best you take every short cut possible and brag about how fast you get things done. You are basically a parott that just repeats what ever you hear with no concern what so ever if the info is correct or not. At this point I would reccomend you shut your mouth and stop your fingers from typing any more crap before you make any more of a fool of your self. Dan
Isnt dan just the nicest guy out there?
------------------ Losing site of our roots in the cathode rays.
i have met dan in person..i like dan...he is the kind of guy who calls it like he see's it...not enough people like dan in this world if you ask me...i have called dan at all hours of the day with questions and he has always helped me out....i had my car done by dan (as have many others) does he do up threads and brag about it...err no...has he been doing this longer then most..errr yes...while you tend to post and post and post and the more i read your posts i kinda hafta agree with everything dan has said about you darkhorizon...plus just seeing how you and ridezlightening have expressed your opinions and thoughts about why dan does what he does it just confirms your place as a know it all twit.... myself i would want the guy doing my swap to go the extra mile and make DAMN SURE that all the wires in the harness are 100%...that my friend is called good service....if it takes longer so what....we get paid to do the job right the first time...other wise we wouldnt keep our jobs very long now would we??? hope you keep up the good work dan....tim
i have met dan in person..i like dan...he is the kind of guy who calls it like he see's it...not enough people like dan in this world if you ask me...i have called dan at all hours of the day with questions and he has always helped me out....i had my car done by dan (as have many others) does he do up threads and brag about it...err no...has he been doing this longer then most..errr yes...while you tend to post and post and post and the more i read your posts i kinda hafta agree with everything dan has said about you darkhorizon...plus just seeing how you and ridezlightening have expressed your opinions and thoughts about why dan does what he does it just confirms your place as a know it all twit.... myself i would want the guy doing my swap to go the extra mile and make DAMN SURE that all the wires in the harness are 100%...that my friend is called good service....if it takes longer so what....we get paid to do the job right the first time...other wise we wouldnt keep our jobs very long now would we??? hope you keep up the good work dan....tim
WHOA! Hey, why don't you go look at my last post? I said absolutely nothing bad about his work or how he does it, and then I even apologized and explained for the misunderstanding
Seriously man, go back and read my posts. There was not a single thing I said in any of my posts that could be interpreted as rude or that my way is better. I asked is this how everyone else does theirs, and then proceeded to show how I do mine. I even said his way was BETTER! Dan has gotten a lot of flak from some people and I understand how he could have taken it the wrong way though. I don't know enough to make any kind of negative statement about him or his work
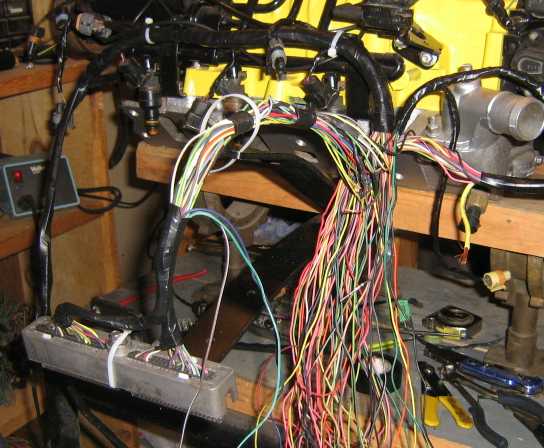
No Z it is not you its the other guy the crap shooter. This photo just shows PCM C1 is also complete the same way C2 was done one wire at a time. Also shows that I have started grouping the wires to feed off to the C500 connector, the C203 and the relays that will run the fuel pump and A/C clutch. Also the grounds will be grouped together and lengthened to reach the one stud on the lower bell housing bolt near the starter. The jig I use has metal plates that stick out so I know where the fire wall will be and where the PCM connectors will be for mounting in the stock Fiero location. For swaps where the PCM will be mounted else where just run all the wires to reach where you wish to mount the PCM and assemble the connector there. Before I made this jig I built all my harnesses on the engine and used a good tape measure to figure out where every thing will need to be located and wired to match. Dan
For wiring the C203 the wires only need to feed a short distance past the PCM connectors for my harnesses I allow 20 inches from the firewall to the C203. C203 pin A is no longer used as the 3800PCM does not have a shift light option C203 pin B this is power from the furl pump fuse to the fuel pump relay and also a good spot to tap off +12 v battery power for the OBD II DLC connector. I also use heavier gauge wire salvaged from the Fiero engine harness for fuel pump wiring. C203 pin C check engine light (MIL) this is from PCM C2 pin 5 C203 pin D this is +12v through the A/C pressure sensors in the front of the Fiero, I use this wire to feed the A/C compressor clutch relay to engage the relay. C203 pin E oil pressure gauge feed from the oil pressure sensor. For this you need to convert over to a 3 pin oil pressure sensor which is for a gauge not an idiot light. The ones from the 88 V6 Fiero work well here. C203 pin F this is 12v ignition from the ECM fuse for PCM C1 pin 19 C203 pin G this is the speed sensor high feed to the speedometer. This must be connected to the PCM C1 pin 55 through a buffer circuit on auto swaps C203 pin H this is no longer used
C203 pin J this is 12v ignition from TBI inj 1 fuse this is where the pink wires from all six injectors is connected then the fuse replaced with a 15 amp fuse. C203 pin K this is where all the other ignition feeds from the engine are to be connected and the fuse also replaced with a 15 amp fuse C203 pin L this is power from the fuel pump relay to the fuel pump and also is a larger gauge wire than the one used in the 3800SC cars C203 pin M this is ground which is connected to chassis ground MAKE SURE PIN M IS NOT CONFUSED WITH PIN N WHICH IS 12V C203 pin N this is 12v feed for the A/C clutch relay which is switched through the relay to the clutch solenoid green wire C203 pin P this is the TCC feed from the brake pedal and goes to PCM C1 pin 30 C203 pin R is speed sensor low which with auto swaps goes to ground, on manual swaps gets connected to the purple wire on the speed sensor.
I have not met Dan in person, but what I have seen here on PFF and his photos that he list in his signature, is great for a person that is a DIY, like me. I have saved a lot of money and have been able to use that money on other parts of the swap, because of him. Dan, I thank you. I have been watching this thread and the harness that you are making. This is pretty much the same way I do my harnesses. Only now, I am making a harness for me and I am going the extra mile to make sure, to hide the wires, plumbing, or cables from showing, when you open the hood. I like that jig that you have there. That is alot more compact than "the engine on a cradle with a false firewall design" that I use. As for the trolls- GO AWAY AND LEAVE US ALONE!!!
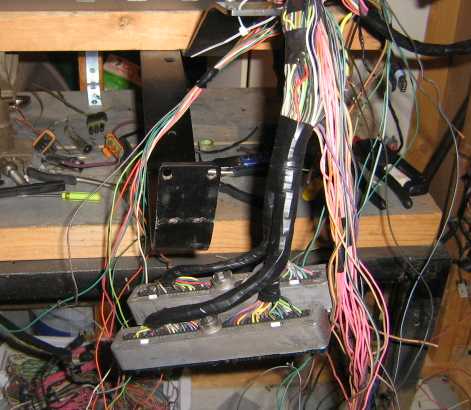
This the completed C203 with three wires hanging out of the harness the green one is from the PCM C1 pin 55 which is VSS out, the second is pink which is tapped off C203 pin F the ECM ignition and the third is yellow which is from C203 pin G VSS high to speedo. These wires are for the speedo buffer circuit which consists of two resistors, one capacitor and a diode to adapt the PCM VSS out to work on the Fiero speedo.
The C500 takes a little more wire to be able to reach it connection point over above the battery, I have found a measurement of 50 inches from the harness where it goes through the firewall. C500 pin A2 is ground connect to chassis ground C500 pin A4 is for starter ignition on auto tranny cars this wire goes to the neutral switch on the tranny C500 pin B3 is from the charge indicator on the gauge pod it can either be connected directly to the alternator pin L or to the PCM C1 pin 36 then PCM C2 pin 61 connects to the alt pin L. Going through the PCM just gives the PCM control of the alt charging. C500 pin C1 is the +12v feed to the reverse light switch mounted on the tranny on auto and 5 speed cars it is connected to the tranny switch pin B on the 4T60E and 4T65E trannies. C500 pin C2 this is the feed from the coolant sensor to the coolant gauge C500 pin C3 this is the tach feed and comes from the ignition module harness connector pin E which will have to be added into the harness on most cars. C500 pin D1 is the ground to turn on the cooling fan and comes from PCM C1 pin 6 C500 pin D2 is the ground for two stage cooling fans and comes from PCM C1 pin 5. from my experience only 84 Fiero's with A/C have two stage cooling fans. C500 pin D3 this is the feed from PCM C1 pin 75 to turn on the coolant lamp on the Fiero gaugse C500 pin E1 is the return path from the reverse light switch which is connected to the tranny switch pin F on the 4T60e and 4T65E trannies C500 pin E2 is the ignition feed for the starter on manual tranny cars and goes straight to the starter. C500 pin E3 is the +12v ignition feed for the ignition module
Keep up the great work, I would guess that there is a large but silent majority, such as myself who has been a member for quite a long time and benefited greatly from the information on this board, but for one reason or another choose not to post but rather use this as a resource of information.You and many others who take the time to share your knowledge and experience with us without all of the grandstanding and finger pointing are very under appreciated so PLEASE continue...
"You get what you give and people get what they deserve"
Ok the harness is fully assembled the last thing I did was wire up the relays. For the relays there is the Fuel pump relay, the fuel pump speed control relay and of course the A/C clutch solenoid relay. For the fuel pump you can wire it up the same way the Fiero did using the oil pressure switch to keep the pump going once the engine is started which will work just fine. I prefer to wire it up using the 3800SC relays that way the PCM controls the fuel pump, either way it is best to have the wiring diagrams right in front of you to make sure it gets done right. At this point is there any thing I have missed that needs explaining or photos of shown to help explain how I build a swap harness. As mentioned numerous times above this is not the easiest or fastest way too build a harness there are many ways to do so this is just how I like to build a harness and how I build the ones I sell to those who either do not have the time to make their own or just want to buy one to save the trouble of building one. Dan
I lack the time to do the wiring, and when the time comes will prob. be buying a new harness. This thread is most appreciated. It's a nice, professional looking install!
You showed C203. But, you might want to show what C500 looks like and how to remove it, for the folks that are not wire handy. This way they will know what connectors to send you. Great write-up!
Don Z.
[This message has been edited by 3.8 SC (edited 11-24-2007).]