Pennock's Fiero Forum
  FAQs & HowTos
  How to make rear coil-overs using factory struts, with pics. (Page 1)

Post New Topic  Post A Reply
Email This Page to Someone! | Printable Version

This topic is 13 pages long:  1   2   3   4   5   6   7   8   9   10   11   12   13 
Previous Page | Next Page
next newest topic | next oldest topic
How to make rear coil-overs using factory struts, with pics. by fierohoho
Started on: 02-11-2004 03:17 PM
Replies: 488 (81833 views)
Last post by: fieroguru on 02-07-2020 07:19 PM
fierohoho
Member
Posts: 3494
From: Corner of No and Where
Registered: Apr 2001


Feedback score: (3)
Leave feedback


Total ratings: 221
Rate this member

Report this Post02-11-2004 03:17 PM Click Here to See the Profile for fierohohoSend a Private Message to fierohohoEdit/Delete MessageReply w/QuoteDirect Link to This Post
What I offer here is for Fiero owners who want to do the work themselves to try and keep the costs down.

I welcome any comments from others to help cover any mistakes I make or to offer an easier or cheaper way for this to be done.
I will start with the assumption that you allready have the struts removed from the car.

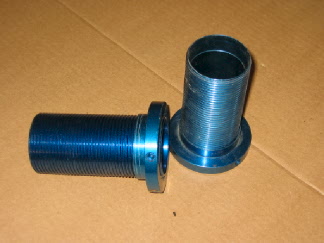
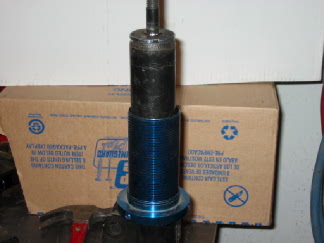
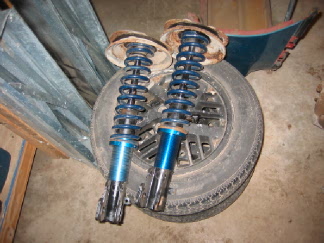
The first pic shows the adjusters you will need, they are 5" aluminium and can usually be found used on Ebay for $? or new at this link: www.rpmnet.com for about $47.00 each, they are called C-O Hardware Kit-AFCO Aluminium Shock w/5" sleeve, part number 20126.

I purchased mine at a racing swap meet for $25.00.

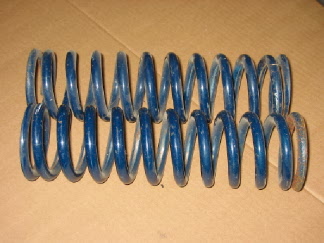
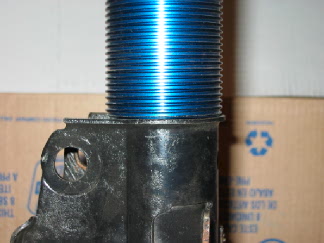
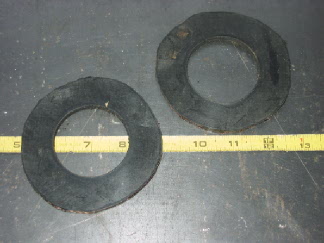
The next pic shows a set of 12" coil springs with a 2 5/8" ID, you'll need a pair with about a 250Lb spring rate.

I got mine used for $30.00 at the swap meet, they can also be found used on Ebay for $? or new at this link: www.rpm.net.com for about $67.00 each, they are called AFCOIL-12" Coil-Over 250Lb Rate 2 5/8" ID.

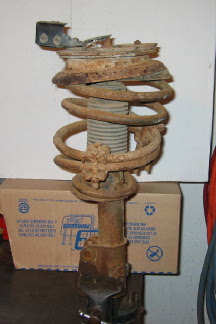
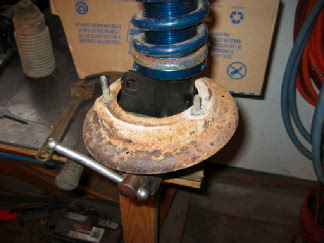
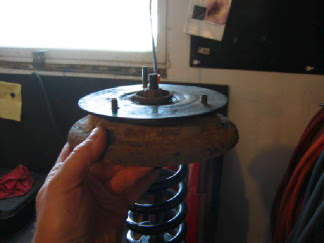
Now to start...The next pic shows a factory strut from a 85GT, it has clamps on it from the previous owners lowering attempt.

This worked to my advantage as I didn't have to compress the spring or have it done by someone else so it could be removed safely.

CAUTION!!! Don't remove the spring youself if you don't know what you're doing, it's under tension and you could get HURT/KILLED. Take it to a service shop and have them do it.

You'll notice I had put the louver bracket and retainers back on it after I removed it from the car so I wouldn't misplace them.

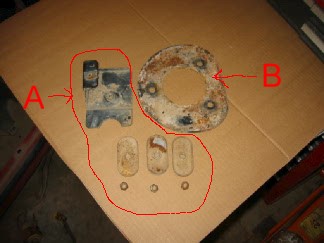
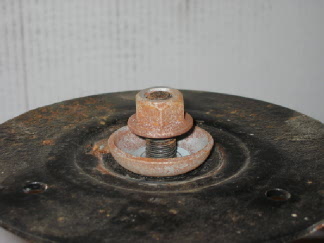
Remove the items in the next pic, items "A" are what you see on top of the strut tower, item "B" is on the underside of the tower.

[This message has been edited by fierohoho (edited 02-11-2004).]

IP: Logged
PFF
System Bot
fierohoho
Member
Posts: 3494
From: Corner of No and Where
Registered: Apr 2001


Feedback score: (3)
Leave feedback


Total ratings: 221
Rate this member

Report this Post02-11-2004 03:33 PM Click Here to See the Profile for fierohohoSend a Private Message to fierohohoEdit/Delete MessageReply w/QuoteDirect Link to This Post
At this point you now have the spring removed by someone else unless you had the correct equipment/skills to do it yourself.

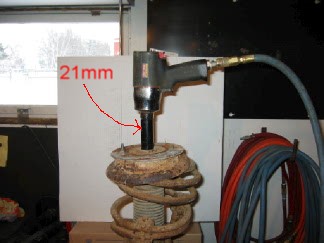
I tried using an impact with a 21mm socket to remove the top nut that holds the upper retainer plate to the strut shaft, I then had to use a 21mm wrench on the nut and a 10mm wrench on the shaft to remove the nut as the shaft spun with the impact.

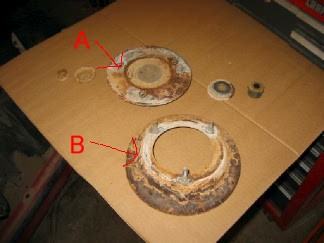
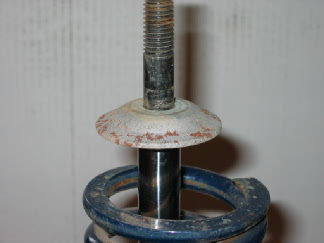
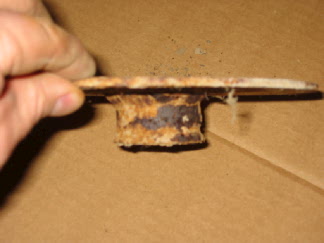
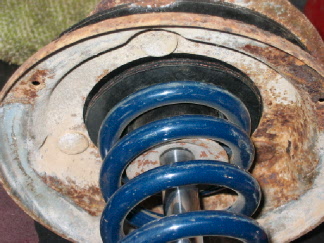
The next pic shows the coil retainer "A" and upper spring perch "B" along with 2 washers and the 21mm nut.

The small bushing on the right is actually the center of the dust boot, it had seperated from the boot.

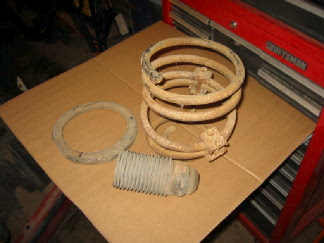
The next pic shows the spring, rubber cushion from the upper spring perch and the dust boot, all of which are no longer needed.

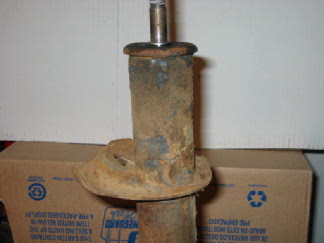
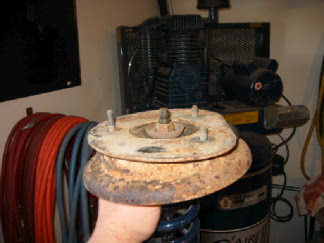
The next pic shows the bare strut.

You need to remove the lower spring perch from the tube and grind the top of the strut to the same diameter as the tube.

Just Dremel, file or grind the weld away to remove the perch, try not to put too much heat into the tube just to be safe and don't grind a hole through the side of the tube.

IP: Logged
fierohoho
Member
Posts: 3494
From: Corner of No and Where
Registered: Apr 2001


Feedback score: (3)
Leave feedback


Total ratings: 221
Rate this member

Report this Post02-11-2004 03:42 PM Click Here to See the Profile for fierohohoSend a Private Message to fierohohoEdit/Delete MessageReply w/QuoteDirect Link to This Post

fierohoho

3494 posts
Member since Apr 2001
This pic shows the finished strut.

The next 2 pics show you've got it right when the adjuster slides over the strut and seats at the bottom.

Now slide the coil spring on, see next pic.

IP: Logged
fierohoho
Member
Posts: 3494
From: Corner of No and Where
Registered: Apr 2001


Feedback score: (3)
Leave feedback


Total ratings: 221
Rate this member

Report this Post02-11-2004 03:54 PM Click Here to See the Profile for fierohohoSend a Private Message to fierohohoEdit/Delete MessageReply w/QuoteDirect Link to This Post

fierohoho

3494 posts
Member since Apr 2001
In the next pic you can see one of the washers I put back on the strut shaft, in hind sight you can probably leave it off though.

The next pic shows I've put the upper spring perch over the strut, the hole isn't big enough to put it on over the bottom later, you could also trim this piece down a little if you want.

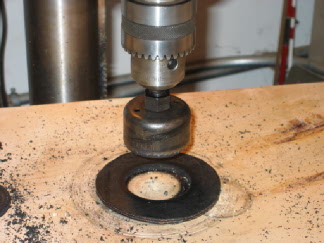
Now you need to make a bushing for the top of the coil spring so there is no metal-to-metal contact with the retainer plate.

You could go with a piece of garden hose split lengthwise and wrapped around the top of the coil.

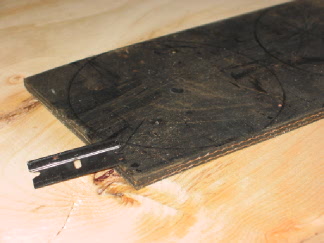
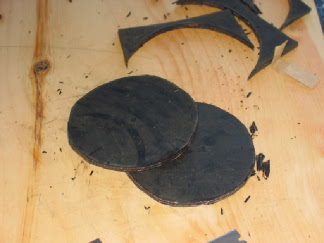
I made a bushing using some flat farm belt material I had.

I traced a 4" diameter circle using a compass, see next pic.

Then I cut the circle out with a single edge razor blade, see next pic.

IP: Logged
fierohoho
Member
Posts: 3494
From: Corner of No and Where
Registered: Apr 2001


Feedback score: (3)
Leave feedback


Total ratings: 221
Rate this member

Report this Post02-11-2004 03:59 PM Click Here to See the Profile for fierohohoSend a Private Message to fierohohoEdit/Delete MessageReply w/QuoteDirect Link to This Post

fierohoho

3494 posts
Member since Apr 2001
The next pic shows how I cut out the center, I used a 2 1/8" hole saw in the drill press.


Here's a pic of the finished bushings.


The next pic is a side view of the spring retainer plate.

[This message has been edited by fierohoho (edited 03-12-2007).]

IP: Logged
fierohoho
Member
Posts: 3494
From: Corner of No and Where
Registered: Apr 2001


Feedback score: (3)
Leave feedback


Total ratings: 221
Rate this member

Report this Post02-11-2004 04:05 PM Click Here to See the Profile for fierohohoSend a Private Message to fierohohoEdit/Delete MessageReply w/QuoteDirect Link to This Post

fierohoho

3494 posts
Member since Apr 2001
The next 3 pics show where to put the bushing and placing it on the strut shaft.


Now it's time to put the washer and nut on the shaft, see next pic, and tighten them down.

[This message has been edited by fierohoho (edited 02-11-2004).]

IP: Logged
fierohoho
Member
Posts: 3494
From: Corner of No and Where
Registered: Apr 2001


Feedback score: (3)
Leave feedback


Total ratings: 221
Rate this member

Report this Post02-11-2004 04:11 PM Click Here to See the Profile for fierohohoSend a Private Message to fierohohoEdit/Delete MessageReply w/QuoteDirect Link to This Post

fierohoho

3494 posts
Member since Apr 2001
The next 3 pics show the spring perch in position and the top pieces in place for safe keeping until install.


The next pic is an underside view of the assembled strut.

IP: Logged
fierohoho
Member
Posts: 3494
From: Corner of No and Where
Registered: Apr 2001


Feedback score: (3)
Leave feedback


Total ratings: 221
Rate this member

Report this Post02-11-2004 04:16 PM Click Here to See the Profile for fierohohoSend a Private Message to fierohohoEdit/Delete MessageReply w/QuoteDirect Link to This Post

fierohoho

3494 posts
Member since Apr 2001
The last pic shows my completed coil-over struts.


That's it in a nutshell, buying new parts and using the old struts you'll have about $228.00 into this project.

A little searching for used stuff can really knock the price down as I have about $55.00 or so into this project.

NOTE: See page 2 of this thread for additional info I added to deal with the metal-to-metal potential when bottoming out on rough roads.

Special thanks to Bruce L. who really did all the work here.

Wrench on dudes.

------------------

Where will the road take you today?

[This message has been edited by fierohoho (edited 07-20-2007).]

IP: Logged
twentyeight
Member
Posts: 946
From: Grand Rapids, MI
Registered: Aug 2003


Feedback score: N/A
Leave feedback

Rate this member

Report this Post02-11-2004 04:24 PM Click Here to See the Profile for twentyeightClick Here to visit twentyeight's HomePageSend a Private Message to twentyeightEdit/Delete MessageReply w/QuoteDirect Link to This Post
wow...
IP: Logged
Master Tuner Akimoto
Member
Posts: 2267
From: South Florida,USA
Registered: Jul 2003


Feedback score: N/A
Leave feedback


Total ratings: 271
User Banned

Report this Post02-11-2004 04:35 PM Click Here to See the Profile for Master Tuner AkimotoClick Here to visit Master Tuner Akimoto's HomePageSend a Private Message to Master Tuner AkimotoEdit/Delete MessageReply w/QuoteDirect Link to This Post
Great documentation+ for ya.

------------------
Quickest 4.5 Fiero Supercar
85 Fastback SE/GT
4.5 (RSR)Hi Perf. Caddi-V8 Blueprint&Balanced.
Sub 12sec1/4 mile (to be track verified)
Undergoing Custom Restoration

IP: Logged
Fiero STS
Member
Posts: 2045
From: Wyoming, MN. usa
Registered: Nov 2001


Feedback score: (1)
Leave feedback


Total ratings: 67
Rate this member

Report this Post02-11-2004 05:00 PM Click Here to See the Profile for Fiero STSSend a Private Message to Fiero STSEdit/Delete MessageReply w/QuoteDirect Link to This Post
Nice job. only thing you forgot is to replace the rubber snubber on the shaft. this protects the shock when it bottoms out. just cut the plastic protector from snubber and reinstall.

------------------

Signiture courtesy of MinnGreen.

IP: Logged
PFF
System Bot
fierohoho
Member
Posts: 3494
From: Corner of No and Where
Registered: Apr 2001


Feedback score: (3)
Leave feedback


Total ratings: 221
Rate this member

Report this Post02-11-2004 05:59 PM Click Here to See the Profile for fierohohoSend a Private Message to fierohohoEdit/Delete MessageReply w/QuoteDirect Link to This Post
Thanks Tim, that must be the bushing that I mentioned in reference to the sixth pic that at one time was attached to the dust boot.

Does that sound right?

I'll have to disassemble another junk set as I think I threw those bushings away, oops!

[This message has been edited by fierohoho (edited 02-11-2004).]

IP: Logged
rubyredfiero
Member
Posts: 720
From: Belle River, Ontario, Canada
Registered: Jul 2003


Feedback score: (1)
Leave feedback


Total ratings: 58
Rate this member

Report this Post02-11-2004 06:32 PM Click Here to See the Profile for rubyredfieroSend a Private Message to rubyredfieroEdit/Delete MessageReply w/QuoteDirect Link to This Post
That's very well documented for anyone to follow. Very descriptive and effective. I was thinking of purchasing the coil over package, but your methodology is very doable and most important, cost effective. If I should screw it up, it will only be my own fault. Thank you for the input. You earned the positive rating from me.
IP: Logged
Blacktree
Member
Posts: 20770
From: Central Florida
Registered: Dec 2001


Feedback score:    (12)
Leave feedback


Total ratings: 350
Rate this member

Report this Post02-11-2004 07:09 PM Click Here to See the Profile for BlacktreeClick Here to visit Blacktree's HomePageSend a Private Message to BlacktreeEdit/Delete MessageReply w/QuoteDirect Link to This Post
You got a + from me, too.
IP: Logged
Darth Fiero
Member
Posts: 5919
From: Waterloo, Indiana
Registered: Oct 2002


Feedback score: (5)
Leave feedback


Total ratings: 361
Rate this member

Report this Post02-11-2004 07:15 PM Click Here to See the Profile for Darth FieroClick Here to visit Darth Fiero's HomePageSend a Private Message to Darth FieroEdit/Delete MessageReply w/QuoteDirect Link to This Post
Very good write-up. You definately get a + from me. Now my only question is I wonder if anyone sells a strut without the spring perch that will work on a Fiero and with this coilover setup...

------------------
power corrupts. absolute power corrupts absolutely.

Custom GM Chip Burning | Fiero Engine Conversions | Turbocharging | dtcc.cz28.com

IP: Logged
avengador1
Member
Posts: 35467
From: Orlando, Florida
Registered: Oct 2001


Feedback score:    (7)
Leave feedback


Total ratings: 571
Rate this member

Report this Post02-11-2004 07:19 PM Click Here to See the Profile for avengador1Send a Private Message to avengador1Edit/Delete MessageReply w/QuoteDirect Link to This Post
Good write up. I can't believe I hadn't given you a plus before, that has been rectified.
IP: Logged
Fiero STS
Member
Posts: 2045
From: Wyoming, MN. usa
Registered: Nov 2001


Feedback score: (1)
Leave feedback


Total ratings: 67
Rate this member

Report this Post02-11-2004 07:26 PM Click Here to See the Profile for Fiero STSSend a Private Message to Fiero STSEdit/Delete MessageReply w/QuoteDirect Link to This Post
Yes the piece in the 6th picture that goes over the shaft.

------------------

Signiture courtesy of MinnGreen.

IP: Logged
Tina
Member
Posts: 2858
From: At an elevation of 8564 feet.
Registered: Nov 2000


Feedback score: N/A
Leave feedback


Total ratings: 119
Rate this member

Report this Post02-11-2004 08:04 PM Click Here to See the Profile for TinaSend a Private Message to TinaEdit/Delete MessageReply w/QuoteDirect Link to This Post
So that what you been up tp lately

Very nice.

Tina
BTW You gotta let me know next time there is one of these swapmeets.
Sounds like you you hit the "motherload" on the last one

------------------

IP: Logged
qwikgta
Member
Posts: 4658
From: Virginia Beach, VA
Registered: Jan 2001


Feedback score:    (21)
Leave feedback


Total ratings: 84
Rate this member

Report this Post02-11-2004 09:14 PM Click Here to See the Profile for qwikgtaSend a Private Message to qwikgtaEdit/Delete MessageReply w/QuoteDirect Link to This Post
So this set up is fully adjustable right... do you have them all the way up? Would a 7" sleave work better?

Let us know how they work

Rob

IP: Logged
fierohoho
Member
Posts: 3494
From: Corner of No and Where
Registered: Apr 2001


Feedback score: (3)
Leave feedback


Total ratings: 221
Rate this member

Report this Post02-11-2004 10:24 PM Click Here to See the Profile for fierohohoSend a Private Message to fierohohoEdit/Delete MessageReply w/QuoteDirect Link to This Post
Thanks for the +'s everyone.

Hey Tina, been doing some home projects lately, the swap meet was at the end of January, it was -26 degrees when I went, it started at 8:03am and was outside. I had to go through every booth there before I found the adjusters, one was used but you could hardly tell, the other was still in the package and brand new. There were plenty of springs to choose from though, you just had to sort through to find the right rate spring. I'll try and remind you about the swap meet next year.

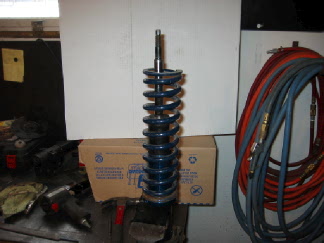
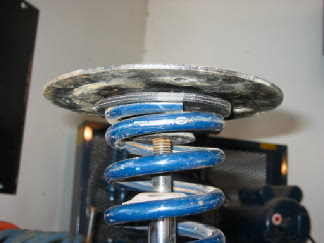
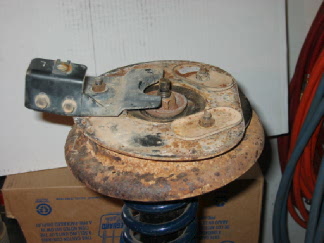
Rob, the last pic has the adjusters all the way up just to keep everything snug and the strut shaft is fully extended, if the stock coil spring was still on there it would be the same length overall. The only thing a 7" sleeve would do is to allow you to make the car sit up higher than stock. When I install them I'll put the wheels on and drop the car to the ground then start to lower the bottom perch until the car sits where I like it, most likely about a 1-2" drop for the rear. I don't anticipate getting the project car to the point where I can install them for a while yet but I'll post a pic when I do.

IP: Logged
1MohrFiero
Member
Posts: 4363
From: Paducah, Ky
Registered: Apr 2003


Feedback score:    (37)
Leave feedback


Total ratings: 157
Rate this member

Report this Post02-11-2004 10:37 PM Click Here to See the Profile for 1MohrFieroSend a Private Message to 1MohrFieroEdit/Delete MessageReply w/QuoteDirect Link to This Post
Steve, that's terrific. I wish I could double your positive rating. You are fast reaching guru status. Great documentation too.

------------------

IP: Logged
PFF
System Bot
GSXRBOBBY
Member
Posts: 3122
From: Southern Indiana USA
Registered: Aug 2003


Feedback score: N/A
Leave feedback


Total ratings: 105
Rate this member

Report this Post02-11-2004 10:58 PM Click Here to See the Profile for GSXRBOBBYClick Here to visit GSXRBOBBY's HomePageSend a Private Message to GSXRBOBBYEdit/Delete MessageReply w/QuoteDirect Link to This Post
Ok it looks good but I want to hear how it preforms? Give us a road result!

------------------
Bobby from NW Indiana
86 Fiero GT, Getting a custom look
88 Fiero GT Getting a 93 Northstar
219customs@verizon.net

[This message has been edited by GSXRBOBBY (edited 02-17-2005).]

IP: Logged
Capt Fiero
Member
Posts: 7657
From: British Columbia, Canada
Registered: Feb 2000


Feedback score: N/A
Leave feedback


Total ratings: 260
Rate this member

Report this Post02-11-2004 11:03 PM Click Here to See the Profile for Capt FieroClick Here to visit Capt Fiero's HomePageSend a Private Message to Capt FieroEdit/Delete MessageReply w/QuoteDirect Link to This Post
That looks awesome. Seeing as I was thinking about doing this mod, I think you just made up my minde, I want rear coilovers.

------------------
85GT 2.9 4spd MSD Everything, Big Cam and Nitrous. www.captfiero.com

IP: Logged
qwikgta
Member
Posts: 4658
From: Virginia Beach, VA
Registered: Jan 2001


Feedback score:    (21)
Leave feedback


Total ratings: 84
Rate this member

Report this Post02-11-2004 11:11 PM Click Here to See the Profile for qwikgtaSend a Private Message to qwikgtaEdit/Delete MessageReply w/QuoteDirect Link to This Post
thanks, glad to hear that they are all the way up for a reason.

I like it. Looks like i have a new project.

Rob

IP: Logged
Rickady88GT
Member
Posts: 10648
From: Central CA
Registered: Dec 2002


Feedback score: N/A
Leave feedback


Total ratings: 202
Rate this member

Report this Post02-12-2004 02:24 AM Click Here to See the Profile for Rickady88GTSend a Private Message to Rickady88GTEdit/Delete MessageReply w/QuoteDirect Link to This Post
fierohoho good job
I did not see any spring retainer at the top of the spring. Dont you need some type of holding device to keep the spring centered? You said you have the adjusting nut high to keep everything snug, but when you lower the nut in the car to get the hight you want the top of the spring will be free to move around if the car ever "jumped" over rail road tracks or bad roads at speed or when lifted by a jack. When the car comes down will the springs be seated properly? I have seen custom spring perches to prevent this condition. That is why both the top and bottom spring pirches on the stock system have a rolled edge, to "hug" the spring and keep it firmly in place. And there should always be a little tention on the spring to help prevent the "unseating" of the spring.
Thanks for the help. I like your step by step pics and posts.

------------------

Rickady88GT QuadCam 3.5 V6

IP: Logged
spearce
Member
Posts: 257
From: Delaware, Ontario,Canada
Registered: Nov 2002


Feedback score: N/A
Leave feedback

Rate this member

Report this Post02-12-2004 08:00 AM Click Here to See the Profile for spearceClick Here to visit spearce's HomePageSend a Private Message to spearceEdit/Delete MessageReply w/QuoteDirect Link to This Post
Fierohoho, What is the I.D. of the threaded sleve ( or the O.D of the strut )?

Great writeup this is just the info I've been looking for.


Steve

IP: Logged
RCR
Member
Posts: 4397
From: Shelby Twp Mi
Registered: Sep 2002


Feedback score:    (7)
Leave feedback


Total ratings: 102
Rate this member

Report this Post02-12-2004 08:32 AM Click Here to See the Profile for RCRSend a Private Message to RCREdit/Delete MessageReply w/QuoteDirect Link to This Post
Great job. I've read about how to do it before, but never with the pictures. A plus for you.

Bob

IP: Logged
dguy
Member
Posts: 2416
From: Beckwith Township, ON, Canada
Registered: Jan 2003


Feedback score: N/A
Leave feedback


Total ratings: 97
Rate this member

Report this Post02-12-2004 10:15 AM Click Here to See the Profile for dguySend a Private Message to dguyEdit/Delete MessageReply w/QuoteDirect Link to This Post
Nice write-up, fierohoho. A+4U.

One question though--how do you stop the sleeve from spinning when you turn the adjuster? Are there set screws or something similar which pins the sleeve against the strut's body?

-d.

IP: Logged
MinnGreenGT
Member
Posts: 11545
From: Lakeville, MN 55044
Registered: Jul 2001


Feedback score: (1)
Leave feedback


Total ratings: 274
Rate this member

Report this Post02-12-2004 11:30 AM Click Here to See the Profile for MinnGreenGTClick Here to visit MinnGreenGT's HomePageSend a Private Message to MinnGreenGTEdit/Delete MessageReply w/QuoteDirect Link to This Post
Excellent write up Steve! And photographs to match!

The only thing I've got to add is that I purchased the sleeve from SCP for a bit less than the site you mentioned... just don't tell 'em your using it on a street car (they don't like that).

Are you going to be available to come down on the 21st? //www.fiero.nl/forum/Forum1/HTML/037930.html

------------------

Looking for Fiero posters?

IP: Logged
cancerkazoo
Member
Posts: 672
From: MI, USA
Registered: Aug 2001


Feedback score: N/A
Leave feedback

Rate this member

Report this Post02-12-2004 11:45 AM Click Here to See the Profile for cancerkazooClick Here to visit cancerkazoo's HomePageSend a Private Message to cancerkazooEdit/Delete MessageReply w/QuoteDirect Link to This Post
Which kit works with our struts BRP606 or BRP617?

Steve

------------------

IP: Logged
fierohoho
Member
Posts: 3494
From: Corner of No and Where
Registered: Apr 2001


Feedback score: (3)
Leave feedback


Total ratings: 221
Rate this member

Report this Post02-12-2004 11:47 AM Click Here to See the Profile for fierohohoSend a Private Message to fierohohoEdit/Delete MessageReply w/QuoteDirect Link to This Post
Just to answer a few questions:

dguy-there are no set screws to pin the sleeve to the strut tube. To adjust it I plan on jacking the car up to take the load off the spring, give the lower perch a few turns and drop it back down to see how I did, not the fastest way but when you're done I doubt there would be much need to readjust later. There may be enough pressure on the sleeve to keep it from spinning but I'm not sure. The lower perch does have an allen head set screw in it so when you get everything set where you want it you can lock it down and forget it.

spearce-the ID of the sleeve is about 2.035 and the OD of the strut tube is about 1.985

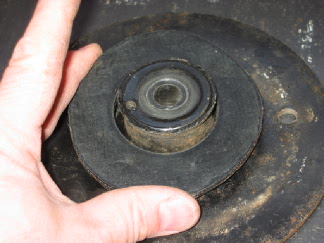
Rickady88GT-it looks like the knob that sticks down from the spring retainer plate that the bushing I made sits around should be adequate enough to keep the spring centered, if you look at the pic of the underside of the assembled strut you can see the washer I put back on, that washer seats on the underside of the knob, I guess that and the washer will keep it centered good enough for me.

It would be fairly easy to find a piece of tube with an ID a little bigger than the OD of the spring and figure out how long it needs to be and then weld it to the underside of the spring retainer plate, I will definately look into this in the future though.

My guess for the rolled lips on the stock spring perchs is due to the fact it's so big in diameter and sits so far from the strut tube whereas this upgrade has the spring very close to the strut tube.

Fiero STS- I looked and found the bushings you mentioned and the dust boots, I took some pics and will throw together some additional info on the snubber later today hopefully.

cancerkazoo-here's the links for the parts I mention:
The springs- http://www.secureperformanceorder.com/onlinestore/get product.cfm?CategoryID=17&ClassID=223&SubclassID=1058&ProductID=1241
The adjusters- http://www.secureperformanceorder.com/onlinestore/getp roduct.cfm?CategoryID=16&ClassID=207&SubclassID=1016&ProductID=830

I hope that helps you.

Everyone-this in not the only source for these parts, MNGreenGT found a link for cheaper than I found, shop around and I bet you can do even better.

Rob-PM sent

[This message has been edited by fierohoho (edited 02-12-2004).]

IP: Logged
PFF
System Bot
MinnGreenGT
Member
Posts: 11545
From: Lakeville, MN 55044
Registered: Jul 2001


Feedback score: (1)
Leave feedback


Total ratings: 274
Rate this member

Report this Post02-12-2004 05:28 PM Click Here to See the Profile for MinnGreenGTClick Here to visit MinnGreenGT's HomePageSend a Private Message to MinnGreenGTEdit/Delete MessageReply w/QuoteDirect Link to This Post
 
quote
Originally posted by cancerkazoo:

Which kit works with our struts BRP606 or BRP617?

I used the BRP 617-7 (the 7" tower) on mine...

IP: Logged
Chicken McNizzle
Member
Posts: 1310
From: Valencia, CA
Registered: Jan 2004


Feedback score: N/A
Leave feedback


Total ratings: 108
Rate this member

Report this Post02-12-2004 07:00 PM Click Here to See the Profile for Chicken McNizzleClick Here to visit Chicken McNizzle's HomePageSend a Private Message to Chicken McNizzleEdit/Delete MessageReply w/QuoteDirect Link to This Post

If you had inverted the bumpstop plate you would have saved yourself from constant bottoming-out, also - find some tubing that has a 1/2" larger ID than the spring OD and weld to the plate you fabricated - this will be far more effective in centering the spring rather than relying on the rusty, decomposing bumpstop to "center" the spring.

Also, didnt see if you did or didnt reinstall the dust boots around the strut shaft, DONT, they just trap moisture that will soon rust through the chrome finish on the strut shaft which will make your new struts worthless by allowing the nitrogen ( assuming that they are N charged ) gas to escape past the seals.

IP: Logged
Posthumane
Member
Posts: 742
From: Calgary, Ab
Registered: Apr 2001


Feedback score: N/A
Leave feedback

Rate this member

Report this Post02-12-2004 07:14 PM Click Here to See the Profile for PosthumaneClick Here to visit Posthumane's HomePageSend a Private Message to PosthumaneEdit/Delete MessageReply w/QuoteDirect Link to This Post
Someone please take the info from this thread and turn it into a more friendly format so that Cliff can put this up in the 'Tech Articles' section on the main page. This info is GOLD! I would do it myself, but I'm very busy lately. If nobody does it by next week, i will.

Btw, thanks for the awesome writeup!

IP: Logged
fierohoho
Member
Posts: 3494
From: Corner of No and Where
Registered: Apr 2001


Feedback score: (3)
Leave feedback


Total ratings: 221
Rate this member

Report this Post02-12-2004 07:48 PM Click Here to See the Profile for fierohohoSend a Private Message to fierohohoEdit/Delete MessageReply w/QuoteDirect Link to This Post
Rob, what do you think would be better, the 5" sleeve or the 7" sleeve, I can't think offhand that one would be better than the other.

Posthumane- thanks for the compliment, I allways thought Cliff should have a tech article section that these types of threads could be posted in where they don't eventually fall off and then drop into the archives.

IP: Logged
MinnGreenGT
Member
Posts: 11545
From: Lakeville, MN 55044
Registered: Jul 2001


Feedback score: (1)
Leave feedback


Total ratings: 274
Rate this member

Report this Post02-12-2004 08:15 PM Click Here to See the Profile for MinnGreenGTClick Here to visit MinnGreenGT's HomePageSend a Private Message to MinnGreenGTEdit/Delete MessageReply w/QuoteDirect Link to This Post
 
quote
Originally posted by fierohoho:

Rob, what do you think would be better, the 5" sleeve or the 7" sleeve, I can't think offhand that one would be better than the other.

The only real benefit to using the 7" sleeve is that you could possibly get by with a shorter spring (10" - which might even be what I have)... that and it covers the whole shock body, so it's visually a bit nicer.

IP: Logged
filthyscarecrow
Member
Posts: 637
From: minneapolis, MN USA
Registered: Jul 2000


Feedback score: N/A
Leave feedback

Rate this member

Report this Post02-13-2004 03:57 AM Click Here to See the Profile for filthyscarecrowSend a Private Message to filthyscarecrowEdit/Delete MessageReply w/QuoteDirect Link to This Post
i had been thinking about this since january of last year when i got coilovers for my integra.

i just measured the ID of the sleeve for my integra C/O's (pulled them in favor of H&R sports) and it's 2 1/16 inch. these are the cheap ebay coilovers. they cost <$80 shipped for a set of 4. yes, 4 sleeves/springs/hats. meaning you could buy them, do your conversion and sell the leftover parts. they also come with upper spring hats to better center the springs. the springs they come with are generally in the 450-500lb/in rate, but new C/O springs can be had for as little as $30/ea from various online vendors (i think i got mine at race tech fab).

as for securing the threaded tube to the strut body, large diameter o-rings actually work very well. they hold it secure and center it at the same time. make sure you put one at the very top of the threaded tube though, or water will get in and rust out the strut body. to install them this way, basically you just put 3 or 4 o-rings on the strut body, about 3" above where the very bottom of the sleeve will end up, spray the inside of the sleeve with hairspray and slide it over the o-rings. they'll slide down the strut body a little bit. once the sleeve is in place, use one last o-ring to seal the very top of it so water can't get in. once the hairspray dries up, the sleeves will not turn on the strut at all. you will need a solvent to remove the sleeves in the future.

a quick search on ebay for "integra coilovers" gave me a page of results with sets as low as $40 before shipping.
integra sets should all be slightly over 2" ID for the tube and should work with stock shocks, but aftermarket shocks like KYB may have a larger diameter (the ones for my integra were about 3/16" larger diameter).

hope this is useful info..

[This message has been edited by filthyscarecrow (edited 02-13-2004).]

IP: Logged
Lambo nut
Member
Posts: 4442
From: Centralia,Missouri. USA
Registered: Sep 2003


Feedback score: (2)
Leave feedback


Total ratings: 262
Rate this member

Report this Post02-13-2004 11:21 AM Click Here to See the Profile for Lambo nutSend a Private Message to Lambo nutEdit/Delete MessageReply w/QuoteDirect Link to This Post
In the middle of doing this very thing. I did not like the clearance between the coil and the upper plate's center piece, so I slide a piece of 2" schd 40 pipe, 2" in length over the snub on the upper spring plate, and tack welded into place. Won't move around much any more, and allows for a 2" unload, before the spring tries to relocate itself ( I don't plan on jumping anything anyway! ). Also, I did not reuse the big piece of the upper assembly, with the studs on it. I just took some 3/8", grade 8 bolts, 3/4" long, and tacked to the bottom of the smaller plate. they fit right in these holes, but will need to drill the ones on the car slightly larger, as they are closer to the 5/16" size. I did reuse the washer on the strut though, and had to turn it down to fit in the 2" pipe. This piece appears to keep the strut from extending through the top plate if the rubber were to fail in the upper piece. Might keep the rod from going through the deck lid. And it does go as in the picture, if installed the other way, it will not allow the rubber in the upper piece to do it's thing. Like I said, still in the middle of this, but so far so good. I am using the 7" sleeves to cover the strut body as well, and went with 300#, 12" coils. Sleeves and nuts from Coleman racing, and coils from Summit Racing.

Kevin

IP: Logged
watts
Member
Posts: 3256
From: Coaldale, AB, Canada
Registered: Aug 2001


Feedback score: N/A
Leave feedback


Total ratings: 117
Rate this member

Report this Post02-13-2004 01:06 PM Click Here to See the Profile for wattsSend a Private Message to wattsEdit/Delete MessageReply w/QuoteDirect Link to This Post
With regards to securing the tube to the strut...

When I got my Held coilovers for my 88cradle->87body kit, they simply have you smear a film of silicone on the inside of the tube. Slide it in place, clear off the squished out mess, and you're golden!

It's a minor PITA to get them off if you need new struts (already upgraded mine once), but it's totally do-able.

IP: Logged
Deezlfitr
Member
Posts: 176
From: Thousand Oaks, CA
Registered: Sep 2003


Feedback score: N/A
Leave feedback

Rate this member

Report this Post02-13-2004 01:24 PM Click Here to See the Profile for DeezlfitrSend a Private Message to DeezlfitrEdit/Delete MessageReply w/QuoteDirect Link to This Post
 
quote
Originally posted by Master Tuner Akimoto:

Great documentation+ for ya.

Ditto from me... and very timely! I just received new struts and want to go to coil-overs! Thanks

------------------
Deezlfitr
"Life is just a bowl of cherries... ya just gotta watch out for the pits!"

1986 GT/Auto (my first)

IP: Logged
Previous Page | Next Page

This topic is 13 pages long:  1   2   3   4   5   6   7   8   9   10   11   12   13 
next newest topic | next oldest topic

All times are ET (US)

Post New Topic  Post A Reply
Hop to:

Contact Us | Back To Main Page

Advertizing on PFF | Fiero Parts Vendors
PFF Merchandise | Fiero Gallery | Ogre's Cave
Real-Time Chat | Fiero Related Auctions on eBay


Copyright (c) 1999, C. Pennock