Distributor replacement with pictures and tips for a V-6
It’s fairly simple to replace a Fiero distributor in a V-6 engine but for the benefit of all of us, here is the procedure.
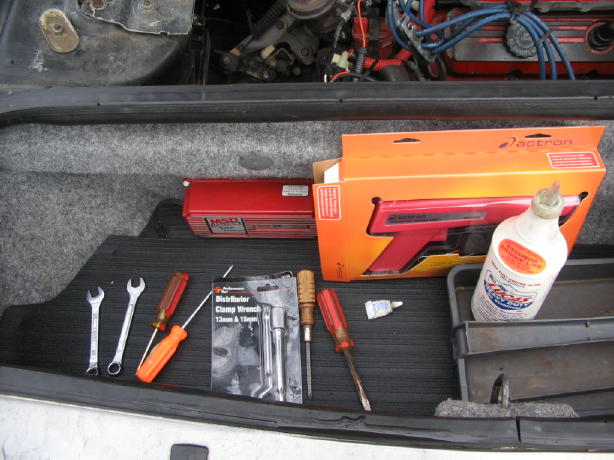
Tools needed.
Philips screwdriver, either 13MM wrench or an 8MM or 5/16-inch battery wrench, regular screwdriver, T-15 torx, dielectric grease, timing light, paper clip, 7MM nut driver, break-in lube, a drop of white paint or chalk for timing mark, 15MM distributor wrench and a 3/8 ratchet.
This is the procedure.
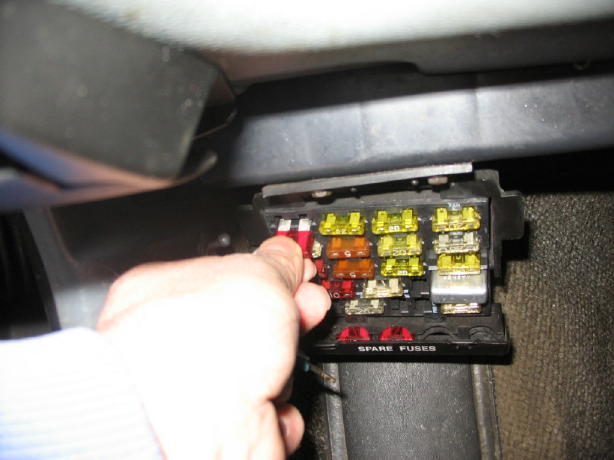
Pull ECM fuse.
Remove distributor cap with philips screwdriver.
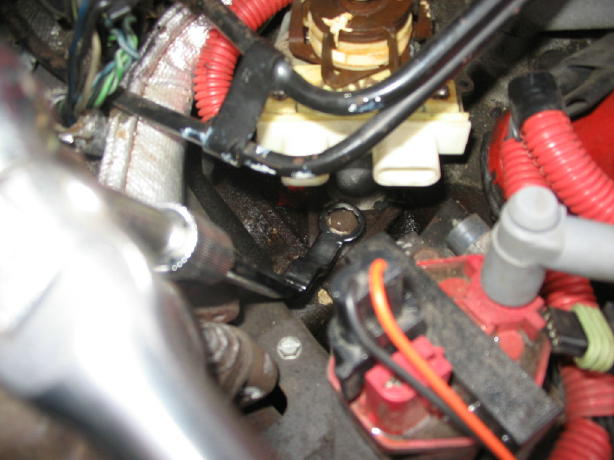
Now turn the engine over until you have the rotor at a known position in relation to the distributor body to the engine. Many folks use the #1 cylinder / plug terminal position, that’s your choice. We want to install the new distributor in the exact position as the old one came out. It helps to take a picture so that there is no mistake later.
Disconnect the negative battery cable with the 13MM wrench or your 8MM battery post wrench depending on which battery connections you have. Remove distributor wires to the ignition module.
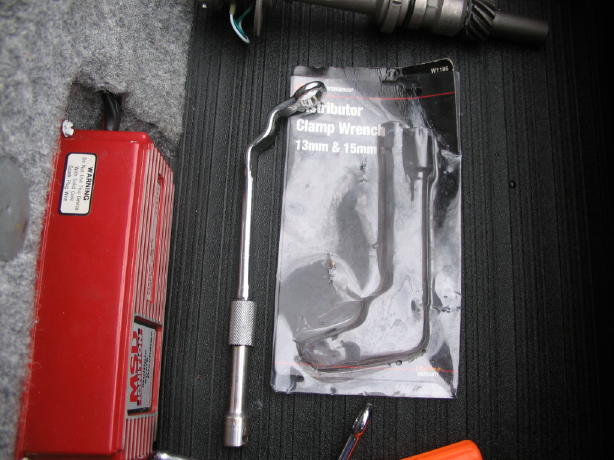
This is a "Performance Tool" distributor clamp wrench, part number W1186, inexpensive and indespensible.
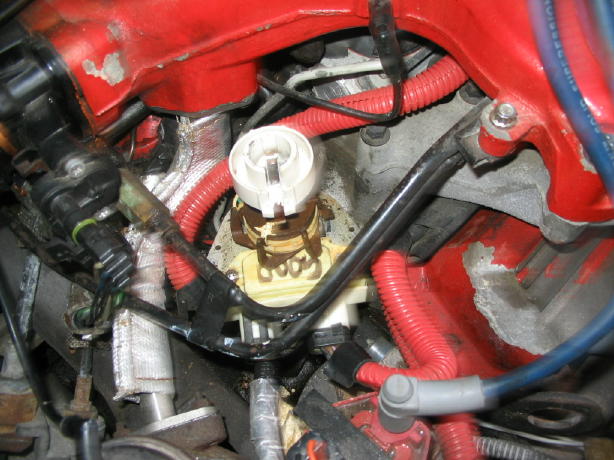
Remove the 15MM distributor hold down bolt.
Remove the ignition module. You can remove the distributor with the module attached but removal makes it easier. Twist the distributor counter clockwise while pulling up.
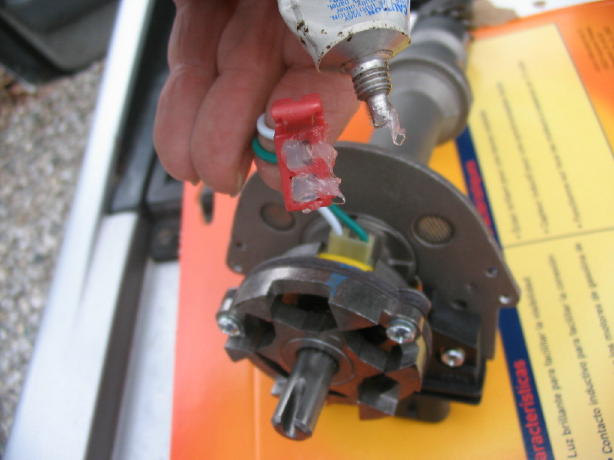
Apply dielectric grease to the pick-up coil connector on new distributor. The re-manufacture doesn’t do this, they evidently don’t know much about corrosion on Fiero distributors! Go ahead and slather it on!
- - - continued in next post - - -
------------------ jetman Silver 86 SE 2M6 4-speed, with "check wallet light"
[This message has been edited by jetman (edited 01-01-2007).]
Lubricate the new distributor with break-in lube including the O-ring, I used Lucas treatment. I didn't have any official break-in lube, hopefully this will work as well.
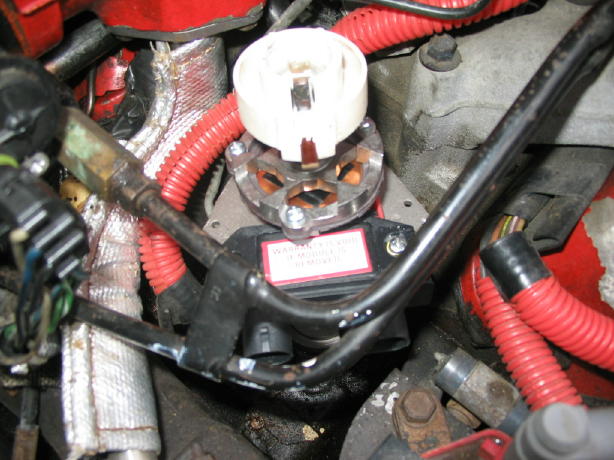
Install new distributor with a clockwise motion. You need to get the distributor in the exact position that the old one came out so it might take a couple of tries to get it correct.
Now stop and take a look. Note the position of the old distributor, rotor and its relation to the engine and notice how the new distributor was installed almost exactly in the same orientation. The new rotor, distributor is in the same position as the old one prior to removal. This is the whole key and why I did this picture story. You do this correctly and you're home free.
Reinstall the ignition module wires, hold down bolt (snug not tight), distributor cap, negative battery cable and ECM fuse.
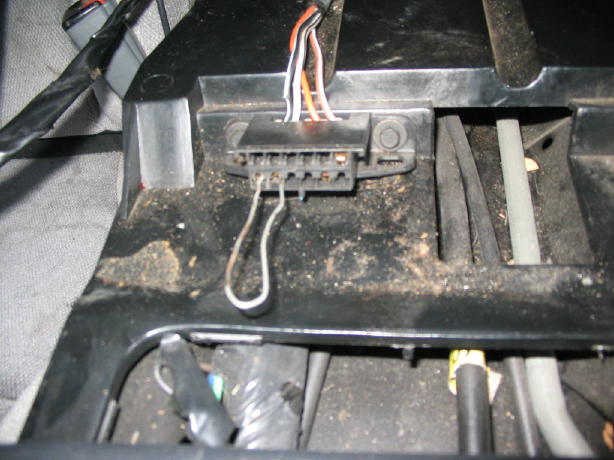
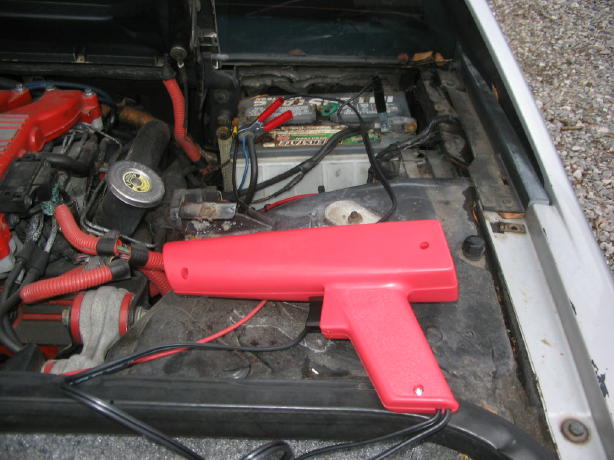
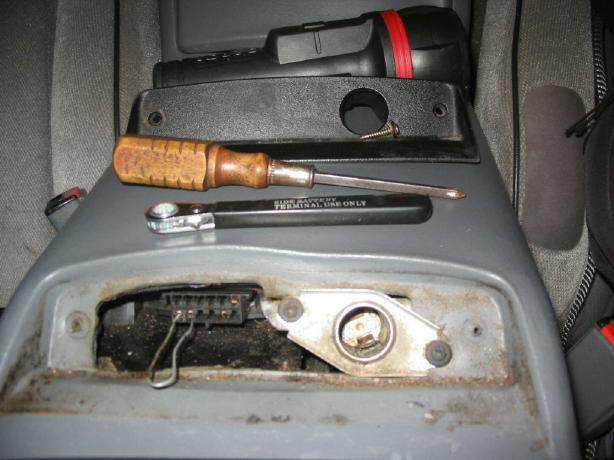
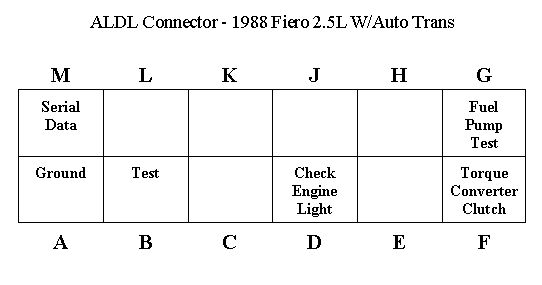
Start car and let it fully warm up. Turn off ignition, use a T-15 torx to remove two torx bolts holding ciggy-butt lighter cover, use a paper clip and ground out your ADL connection. In this picture I did use a 7MM and removed the entire arm rest.
Hook up your timing light to #1 plug wire, timing light power connectors to your battery and start engine.
Rotate your distributor until you have the timing set to 10 * then hook up to #4 plug wire, you want to set the timing at the average of these two readings. I'm a little chicken, I wear a glove while rotating the distributor. Tighten the hold down bolt and button everything up.
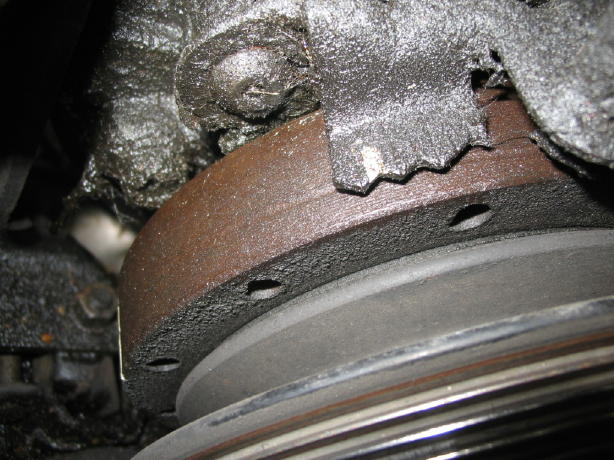
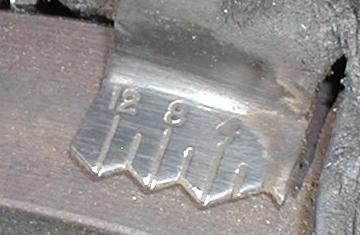
Here is a picture of the timing mark scale mounted next to the harmonic balancer, I used a little paint so I could see it.
Go for a drive over 35 MPH so the ECM can re-learn the idle.
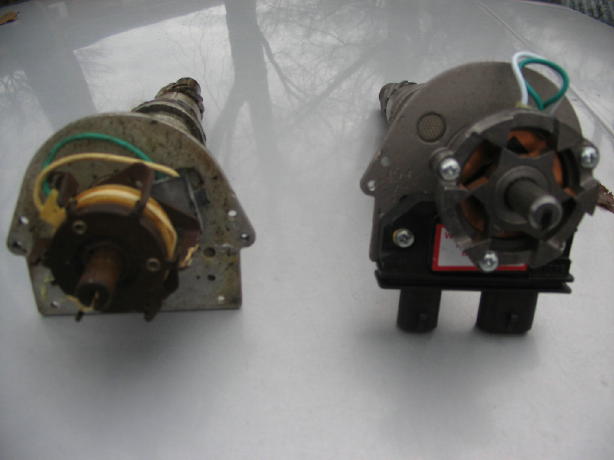
I took a picture of the two distributors side by side, a picture tells a thousand words, the old is on left, new is on right. Much nicer quality and I believe that you don’t have to pull the distributor to replace the pick up coil. The remanufacture is 700-3703 Cardone Ignition Distributor part number 30-1633.
This little picture story actually took much longer than original replacement job did but its worth it if helps out just one of my PFF friends. Oh yeah, I was within three degrees of timing so I really did get the new distributor very close upon installation.
As usual, any comments, critiques or encouragement is appreciated.
------------------ jetman Silver 86 SE 2M6 4-speed, with "check wallet light"
[This message has been edited by jetman (edited 01-01-2007).]
Nice write up, but I'd make one change. You don't have to pull the center arm rest to get to the ALDL port. Just take out the 2 T15 torx that hold the cigar lighter plate on and you can get to it from there.
Nice write up, but I'd make one change. You don't have to pull the center arm rest to get to the ALDL port. Just take out the 2 T15 torx that hold the cigar lighter plate on and you can get to it from there.
and most of us still have the factory side post batterys so we need a 8mm or 5/16" wrench
Nice write up, but I'd make one change. You don't have to pull the center arm rest to get to the ALDL port. Just take out the 2 T15 torx that hold the cigar lighter plate on and you can get to it from there.
Oh my gosh, I didn't know that it was that easy to get to, all these years, all those bolts, it was just two screws. I went back out and took a picture of that procedure too.
Curly Howard says,,,,"Thats sabatoogy!"
Ok thanks, I'll go back and make the edit and include the 8MM or 5/16-inch battery wrench too.
Oh my gosh, that's a dirty looking console, this picture looks better.
[This message has been edited by jetman (edited 11-07-2010).]
Great write up. One thing I have learned is that in your picture of the two distributors, you will notice that the wires from the PU coil to the module in the remanufactured distributor are longer than stock. Be carefull when you put the cap back on so as not to pinch those wires.........Paul
Jetman...Great write-up and pictures!!! I bought a dist just like that from a local Checker, but with the holidays, haven't had time to install it yet. I have a stupid question, however. (This will be first time for me to do this.) That paperclip in the connector...do you just put it in momentarily to ground out, or do you just leave it in until you finish with the timing light procedure, then remove it?
Shucks...I bought a distributor wrench set, but not metric! Its a set of 9/16 and 1/2 I think...Hope I can return at Sears. Good-to-know info before I started this project!
The only thing different that I'll be doing in replacing the black O-ring with a Rodney's high temp dist O-ring.
Originally posted by Fiero-in-Paradise: That paperclip in the connector...do you just put it in momentarily to ground out, or do you just leave it in until you finish with the timing light procedure, then remove it?
Put the paperclip in before you turn the ignition on (same way for checking codes) and leave it in while you are adjusting the timing, turn off ignition before removing the paper clip.
- - - - - - - - - - - - - - - - -
Just wanted to do a little update on the distributor thread and post a couple of pictures of the timing tab with the timing marks. If I had questions and difficulties seeing the numbers on mine, I’m sure that others may have also.
This first picture I lifted from Dodgerunner, he posted such a good picture with the numbers, I just had to post it again. Thank Dodgerunner the next time you see him.
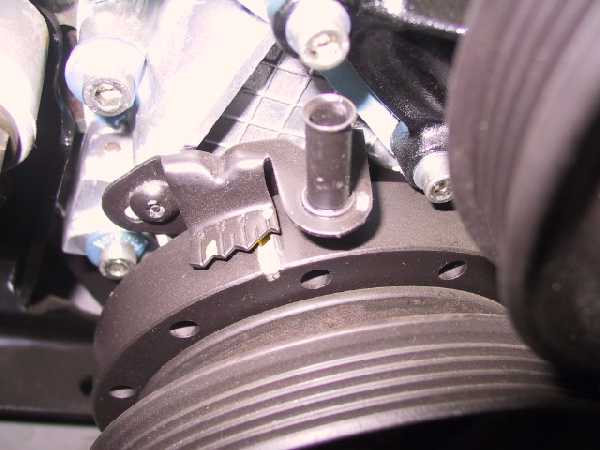
Second picture I found in a post by rubyredfiero in the archives, give rubyredfiero credit for this nice shot.
Thanks again everyone!
edit [img] tags
[This message has been edited by jetman (edited 01-04-2007).]
Second picture I found in a post by rubyredfiero in the archives, give rubyredfiero credit for this nice shot.
Thanks so much for the write-up. I've been scared to replace mine and now I feel I can do it, you made it look easy. In this picture, what is the round tube thingy for? I've never done timing, so that part still seems a little daunting to me.
The round thingy, from what I have read on the forum, is an obsolete adapter for some kind of timing sensor used by GM service dept. to time the car, no longer used.
The Cardone rebuilt distributor uses a superior pickup method than the GM distributor. However, I would have concerns that the ignition module that they use would hold up to the high heat that the Fiero distributor sees.
One word of caution from someone who learned the hard way: The loop of wire from the pickup coil can be captured by the distributor cap. Tightening the cap crushes the wires and can - as I found out - thin the insulation to the point where you have hard starting and intermittent misfire. Just be careful.
One word of caution from someone who learned the hard way: On the "better" distributor, the loop of wire from the pickup coil can be captured by the distributor cap. Tightening the cap crushes the wires and can - as I found out - thin the insulation to the point where you have hard starting and intermittent misfire. Just be careful.
If anyone can give me a hint to where to buy the wrench I would appreciate it. I just wanted to know if any local stores carry it, or any Performance Tools. I found one online but I do not want to pay $10 handling fee for a $5 part if I can get it locally.
I purchased that distributor wrench at the local Murrays Auto Parts Store. I honestly didn't think that it was all that exotic, rather an "el-cheapo" wrench, you would think that it would be widely available.
I performed a rebuild on my older distributor, lots of pictures here at my photopage, "distributor rebuild". I specifically thought ahead for everyone, I use smugmug for my photos, tons of bandwidth so download reference pictures to your hearts content.
[This message has been edited by jetman (edited 06-23-2009).]
I have a wrench not unlike that one. What I have is a black oxide box end that has 2 90* bends in it. But, what my older friends from back when I was first really getting into this(They were about 50-60 years old when I was 14-15), did is they'd go buy a wrench in the size they needed from the swap meets or wherever, and heat it then put the bends in themselves.
The one I have is a 9/16ths for the old Malibu I used to have. The timing never felt right and I was always trying to fix it. I used a timing light, but at speed, it never sounded right. I found out later the vacuum and mechanical advance was rusted still. haha
Ok so if I didn't get the distributor back in perfect how can I adjust it, or get the engine back in the right place to slide the distributor back in?
1. Don't turn the engine over while the distributor is out. If you do, you'll have to find #1 TDC on the compression stroke to find your reference.
Otherwise, you can just pull the distributor out and put it back in one tooth in either direction. If you're close, chances are you're not more than 1 or 2 teeth off. From there you time it by turning the distributor before fully tightening the hold down clamp.
Nice writeup. I only have one comment to add. If you're removing & replacing the same distributor, the rubber o-ring must be replaced with a new one. Unless you just enjoy oil leaks.
I'm at TDC for #1 where does the distributor need to to be pointing. here is a diagram I have and where the distibutor is pointing. where is #1 on here or should I just plug up the #1 plug wire to this spot and go around from there with the other spark plug wires?
I'm at TDC for #1 where does the distributor need to to be pointing. here is a diagram I have and where the distibutor is pointing. where is #1 on here or should I just plug up the #1 plug wire to this spot and go around from there with the other spark plug wires?
ok this is where I'm at, I shaded the area for the cap and I'm at TDC #1 , think I need to pull up the distributor and move it a little to the left making the arrow point to what I have labeled as #1, is this correct? This is location 1
It should be number 5 in your first picture. You can actually make it any one you want but it will confuse you and the next owner of the car as it is shown differently in the manuals. Here is a picture from one of the manuals.
If you have a good induction timing light, hook it up to your coil wire and you will be timing for both your #1 cylinder and your #4 cylinder at the same time. I just tried it myself and it worked like a charm. For years I've taken the difference between #1 and #4 as I set the timing, this is so much simpler.
I wish that I could remember the forum member that had suggested this idea, I really wanted to give credit where credit is due for this teriffic idea.