ECM = Engine Control Module (ONLY controls the engine - used on the LS4) TCM = Transmission Control Module (ONLY controls the transmission - used on this transmission when mated to a LS4)
PCM = Powertrain Control Module (controls BOTH the engine and transmission - used in 3800 applications and others)
BCM = Body Control Module (controls functions relating to the body of the car such as lighting, power distribution, secondary functions, etc)
I am a Cadillac Tech. I will be World Class certified in about 1 month. I have over 350 training corses. BCM is a BCM TCM's have been more than just Trans controllers. The T can mean other modules ECM can mean ANY Electronic Control Module. This is from GM VCM's, PCM's, ECM's are similar, but not the same. I did call your ECM a PCM, but I have been doing this so long and they have been PCM's for so long it is habit.
A PZM, DIM, IPM are all BCM's I work on cars with 20 to 30+ modules every day. It is hard to keep them straight.
Originally posted by AJxtcman: I am a Cadillac Tech. I will be World Class certified in about 1 month. I have over 350 training corses. BCM is a BCM TCM's have been more than just Trans controllers. The T can mean other modules ECM can mean ANY Electronic Control Module. This is from GM VCM's, PCM's, ECM's are similar, but not the same. I did call your ECM a PCM, but I have been doing this so long and they have been PCM's for so long it is habit.
A PZM, DIM, IPM are all BCM's I work on cars with 20 to 30+ modules every day. It is hard to keep them straight.
The post I made concerning those acronyms was in context to the 2005 Grand Prix GXP and what GM is calling modules used in this car. I realize those acronyms can be used to describe other things but I just wanted to clarify what I was using them for in this thread to help cut down on the confusion. Nothing against you personally.
Originally posted by Darth Fiero: So to answer your questions above no, the ECM that is going to be used in this swap did not come from the same vehicle everything else did; and it is not new either. So it will have to be re-linked to the BCM/PK3 system. Now I have already read ALL of the VTD/VATS/PK3 articles in the service manual for this vehicle; so I understand what has to be done in order to relink/relearn the PK3 system to the BCM and ECM. The HP Tuners software I have also says it has a feature included in it that "relinks vats" between the ECM and BCM; so hopefully that will do what I need it to. If that doesn't work, I have access to a Tech II scanner so I can command a VATS relearn/relink in both the BCM and ECM.
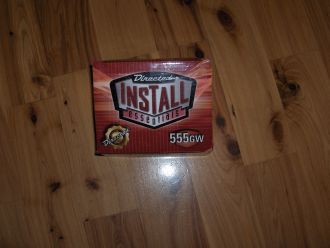
At this point I would be willing to hear how much those 555GW bypass modules you have are selling for; just in case for some reason I can't get ahold of another PK3 transponder module and key. But I don't think I am going to need to send the ECM & BCM off to you because I should be able to get that relearn done here. But thanks for the offer anyway.
-ryan
The 555GW cost $35. You will not need a BCM after that.
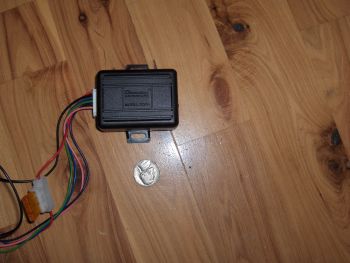
The Tech II will not allow you to overide or relink any VTD system. . . . . . . Just so you know how big this is and how much room you will need compared to the BCM
The post I made concerning those acronyms was in context to the 2005 Grand Prix GXP and what GM is calling modules used in this car. I realize those acronyms can be used to describe other things but I just wanted to clarify what I was using them for in this thread to help cut down on the confusion. Nothing against you personally.
Okay, then! I'd like to have a station break to allow a message from a paying sponsor!!
I don't know if I'm jealous because I have NO IDEA what you two are talking about, with all the electric engineer jargon, and PhD level electronics rewiring and reconfiguration slang...or impressed. Either or, as long as this "interesting" conversation is concluded with a twist of a small 3 inch metal fob, commonly known as a key that initiates the awakening and roar of +350 little eager ponies all tucked in the form of a new Fiero power source...I'm good!
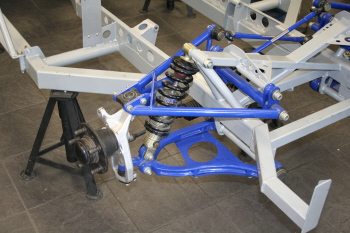
SUSPENSION UPDATE In between the time Ryan has spent lecturing with his cohort professor AJxtcman on the finer aspects of GM ECM/TCM/BCM/PZM/DIM He's also managed to somehow continue to assemble my rear suspension! I told you guys he was good!
Anyhow, here's the latest pictures of the rear 12" Corvette rotors installed (Compliments of Rockcrawl) with the rear sway bar and struts from The Fiero Store, and coilover springs from West Coast Fiero. You can see the media blasted and powdercoated control arms and rear knuckles I did myself, as well as the poly bushings and new tie rods...also from The Fiero Store. I should really invest in stock in that place. I know I'm personally paying someone's salary over there. I don't know what we'd do without TFS. They have EVERYTHING. The only thing I'm not happy with is the red paint I used on the 88' Fiero Calipers. I think it looks better in person, but we'll see when it's all installed. I may try to powder coat these at a later time. I would like to give a personal 4STAR rating to both the service and quality of brake kit from Rockcrawl. He's up there with Ryan in terms of someone who stands 100% behind their product and passion for what they do. I can't wait to see how the kit performs, but if it's any way near the level of craftsmanship and support from Rockcrawl, I know I won't be disappointed. From all the pictures, you can also see the 4TE65hd transmission safely tucked away inside. Which means it's in there for good!! I haven't seen any final pictures of the engine installed in the bay, but I'm sure that's coming once Ryan makes his way from the underside of the car and back into all the HARD stuff.
Oh, I also had to make a tire/wheel purchase this week. Based on the size of the rotors and using the brake calipers from an 88' Fiero, there's no way my OEM 15s were going to fit. Ryan tried, but he would have had to drastically alter the rims. I'll have these up for sale somewhere, as I can't use them at all with the new 'vette rotors.
I ended up going with a 17/18 staggered wheel setup using the Motegi SP7 wheels and I read up on the pros of the new Nexen N3000 tires, and went with those as well. These are big in the UK and starting to get a fan club here in the US as well. As soon as their delivered, I'll ask for Ryan to take a few pictures to see how they look. In the meantime, here's the stock photos.
Okay, back to the Master lecture on the finer art and science of harness wiring! I'm not knocking it...it's just wayyyy over my head! I'm just glad they love it!!
SUSPENSION UPDATE In between the time Ryan has spent lecturing with his cohort professor AJxtcman on the finer aspects of GM ECM/TCM/BCM/PZM/DIM He's also managed to somehow continue to assemble my rear suspension! I told you guys he was good!
Ha ha. ya I hear ya. You're not the only one who's getting dizzy, but as long as they understand it, that's all that matters.
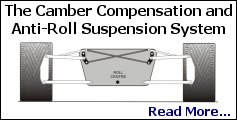
I don't know why, but I had been under the impression this was to be 88 suspension. now I see it's early suspension however. is there at least some anti bump steer correction in there somewhere?? It can make a HUGE difference in the handling of the early style suspension and sure will increase the fun factor for you.
Originally posted by Russ544: I don't know why, but I had been under the impression this was to be 88 suspension. now I see it's early suspension however. is there at least some anti bump steer correction in there somewhere?? It can make a HUGE difference in the handling of the early style suspension and sure will increase the fun factor for you.
Say more. I've got all poly mounts and 400lb performance springs, with the rear sway bar. Do I still need an application for bump steer? What would that look like?
Say more. I've got all poly mounts and 400lb performance springs, with the rear sway bar. Do I still need an application for bump steer? What would that look like?
I'm using the Held system myself, and there is another, cheeper, system (the name escapes me at the moment) available as well. I'm still trying to make my lightly modified, but fully rebuilt, 88 IMSA suspension work as well as the 86 with HD springs, sway bars, poly, and the Held anti bumpsteer kit. my 86 is sbc also, and the extra weight really likes the best suspension you can provide for it. http://www.heldmotorsports....Fiero-bump-steer.htm
your ride is looking awsome, and it appears to me that Ryan has his part well in hand. he'd be my choice as well for the options you're going with power-wise.
The Tech II will not allow you to overide or relink any VTD system.
Well I figured it wouldn't allow me to "override" or disable the VTD system because there is no reason why the factory would need to allow for such a function. But as far as a "relink" or "relearn"; this is what I have found in the GM service manual...
quote
Programming Theft Deterrent System
Important: When replacing a body control module (BCM) with an GM Service Parts Operation (SPO) replacement part, set up the replacement BCM prior to the 10-Minute Relearn Procedure or the 30- Minute Relearn Procedure. Refer to Body Control Module (BCM) Programming/RPO Configuration in Programming and Setup.
Important: 10-Minute Relearn Procedure Use this procedure after replacing the following components:
- The PASS-Key III (PK3) keys - The BCM - The PCM
Important: If replacing a BCM with a GM SPO replacement part, perform the procedure to setup a new BCM prior to the 10-Minute Relearn Procedure. Refer to Diagnostic System Check - Vehicle in Vehicle DTC Information.
1. Connect a scan tool to the vehicle. 2. Turn ON the ignition, with the engine OFF. 3. Insure that all power consuming devices are turned OFF on the vehicle. 4. With a scan tool, select Request Info. under Service Programming System and follow the scan tool on-screen instructions. 5. Disconnect the scan tool from the vehicle and connect the scan tool to a Techline Terminal with the current Service Programming System (SPS) software. 6. On the Techline Terminal, select Service Programming System and follow the Techline Terminal on-screen instructions. 7. Disconnect the scan tool from the Techline Terminal and re-connect the scan tool to the vehicle. 8. With a master PASS-Key III key, turn ON the ignition with the engine OFF. 9. With a scan tool, select Program ECU under Service Programming System. 10. At this point the scan tool must remain connected for the duration of the 10-Minute Relearn Procedure. 11. Observe the scan tool, after approximately 10 minutes the scan tool will display "Programming Successful, Turn OFF Ignition". The vehicle is now ready to relearn the key information and/or the passwords on the next ignition switch transition from OFF to ON. 12. Turn OFF the ignition and wait 5 seconds. 13. With a master PASS-Key III key, start the vehicle. The BCM has now learned the key transponder information and the PCM has now learned the fuel continue password. Important: Perform this step ONLY on vehicles with EXPORT configured BCMs. 14. Turn OFF the ignition and wait 15 seconds minimum. Important: Perform this step ONLY on vehicles with EXPORT configured BCMs. 15. With a second master PASS-Key III key, start the vehicle. The BCM has now learned the second master PASS-Key III key transponder information 16. With a scan tool, clear any DTCs.
- When replacing a BCM with an GM SPO replacement part, the module will learn the keys immediately. The existing powertrain control module (PCM) must learn the new fuel continue password when you replace the BCM. - When replacing a PCM with a GM SPO replacement part, the new PCM will learn the incoming fuel enable password immediately after programming and upon receipt of a password message. A PCM which had been installed in another vehicle would have learned the fuel enable password of the other vehicle's BCM. Perform either the 10-Minute Relearn Procedure or the 30-Minute Relearn Procedure to learn the fuel enable password of the current vehicle's BCM. - When performing either relearn procedure, all previously learned keys will be erased from the BCM memory.
30-Minute Relearn Procedure Use this procedure after replacing the following components:
- The PASS-Key III (PK3) keys - The BCM - The PCM
Important: This procedure is not available on vehicles equipped with option code (Z49). If replacing a BCM with an GM SPO replacement part, perform the procedure to setup a new BCM prior to the 30-Minute Relearn Procedure. 1. With a master PASS-Key III key, rotate the ignition to the CRANK position. 2. Observe the SECURITY telltale. After approximately 10 minutes, the telltale will turn OFF. 3. Turn OFF the ignition, and wait 5 seconds. 4. Repeat steps 1-3 two more times for a total of 3 cycles or 30 minutes. Important: The vehicle learns the key transponder information and/or passwords on the ignition switch transition from OFF to CRANK. You must turn the ignition OFF before attempting to start the vehicle. 5. With a master PASS-Key III key, start the vehicle. The vehicle has now learned the key transponder information and the PCM has now learned the fuel continue password. 6. With a scan tool, clear any DTCs.
Sounds like the 10min method requires a "Scan tool" (which I assume is the Tech II) and access to the GM SPS system in order to perform -- which I have thru a 3rd party. Sounds like the 30min procedure doesn't even require a scan tool.
when i first did my ecotec swap i did it the simple way : low tech at its best .later i installed a few relays and hid the cavalier switch under the consule and now the fiero key works everything .i just got HP tuners and for my drivetrain , it does allow me to turn off all the antitheft features of the 2004 cavalier drivetrain .but i dont feel like changing the wiring around so it stays the way it is .great looking build, i have been following from the start .hope it is running soon .
i dont see any tire roll with that set up .but it would not fit in a fiero .now back to that LS4 swap .
I clicked on the link to Held's and it reminded me of DAX. I had to post it. I will start a new thread for ideas.
Now back to my point.
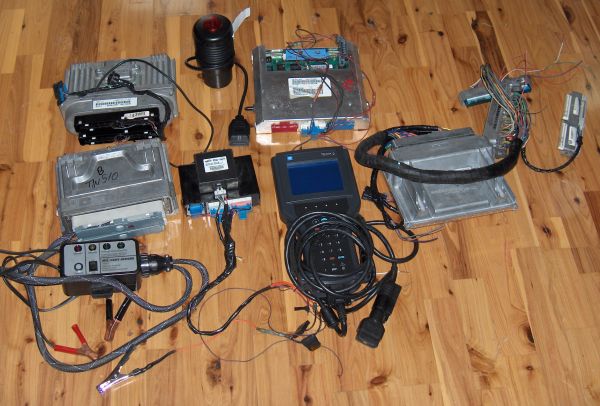
This is what I have at home today for programing. I have a stack of PCM's in the garage and at work. Top row Left to right 96 to 99 Northstar PCM and programing harness VDR Vehicle Data Recorder 93 to 95 Northstar PCM Bottom row Left to right 00 to 03 Northstar PCM and stand alone programing adapter PK3 programing adapter. Used to reset 00 to 03 Northstar PCM's Tech II LS1 PCM and jumper harness. This correctly fits 96 to 99 Northstars with manual trans. I have 5 wires left and it will run a 4T80E. I use this harness with the 96 to 99 programing harness to program the LS1 PCM.
Originally posted by Russ544: I'm using the Held system myself, and there is another, cheeper, system (the name escapes me at the moment) available as well. I'm still trying to make my lightly modified, but fully rebuilt, 88 IMSA suspension work as well as the 86 with HD springs, sway bars, poly, and the Held anti bumpsteer kit. my 86 is sbc also, and the extra weight really likes the best suspension you can provide for it. http://www.heldmotorsports....Fiero-bump-steer.htm Russ544
Thanks Russ, but seeing that I've already invested in cleaning up my control arms and bought new tie rods, I'm pretty much past considering anything like the Held kit. I will keep searching to see if anyone offers anything that addresses the 'bump' by using OEM Fiero parts. At this point, I'm not at a point where I would consider changing my knuckles, control arms, bushings, and tie rods...as I just replaced them. I should probably just wait to drive the car to see if I really need to do anything at all.
The long post of the system that doesn't work on any car in this forum has me at a lost. It looked cool, but didn't really serve a purpose for the thread, swap, or the potential issue you've raised about bump steer. I'll keep looking, but I think I'm fine at this point.
whoooooo. back up the bus there blkcofy. I didn't post that crap about the oddball suspension. I would not do that to your thread, and was just trying to give the thread some new dirrection, after the train wreak, when I mentioned the bumpsteer issue previous to that...... but I see that didn't happen. hope it all works out for you.
[This message has been edited by Russ544 (edited 12-23-2007).]
Originally posted by Russ544: whoooooo. back up the bus there blkcofy. I didn't post that crap about the oddball suspension. I would not do that to your thread, and was just trying to give the thread some new dirrection, after the train wreak, when I mentioned the bumpsteer issue previous to that...... but I see that didn't happen. hope it all works out for you.
I'm sorry Russ544. You took my comments wrong. I appreciated your input on bumpsteer alot, as its led me to figure out what other options I have to think about. I can't/won't go the held route, but that's because I'm too far gone in one direction. My reference to the other...what did you call it? Was NOT directed to you. It was just my way of attempting to nicely say "WTF?"! Sorry if you thought that was directed to you...it was not.
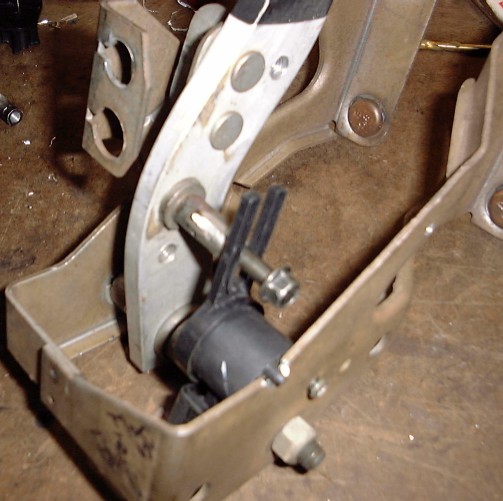
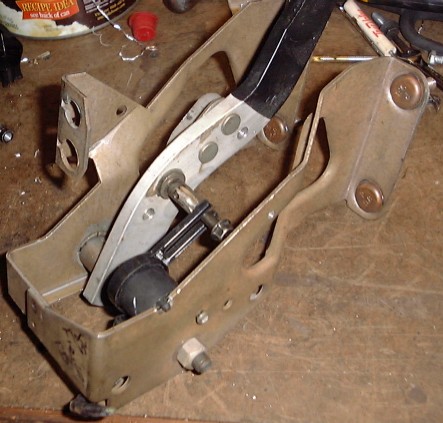
Installed the APP (accel pedal position) sensor and gas pedal assy...
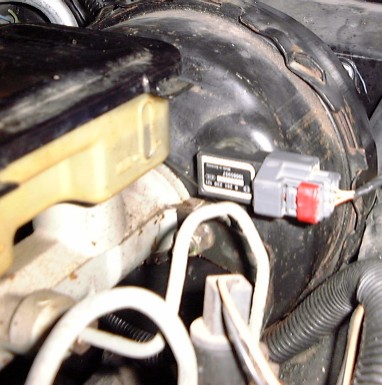
The ECM on this engine also wants to see a BVB (brake vacuum booster) pressure sensor. I presume it is primarily used for the flight recorder function present in these newer GM vehicles. The brake booster had to be removed from the car so I could drill the hole for it and make sure the metal shavings didn't fall down inside the booster.
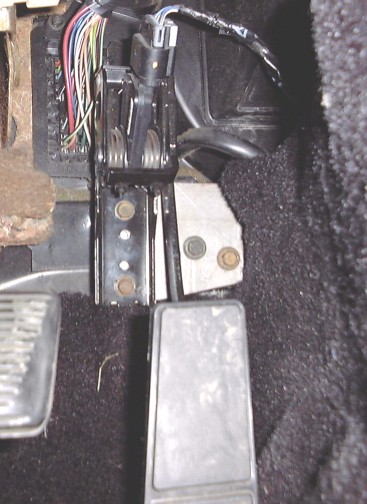
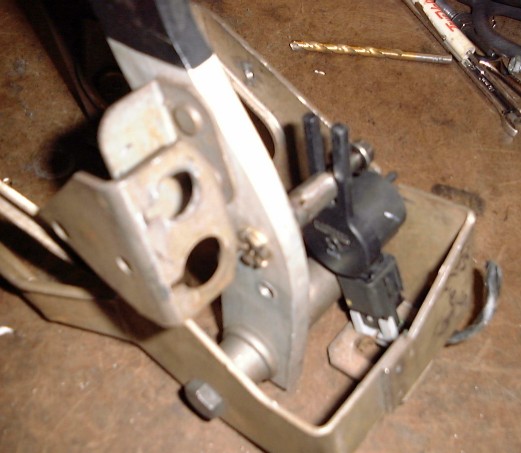
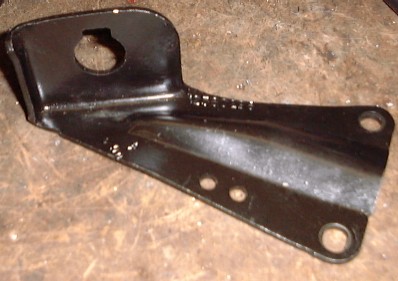
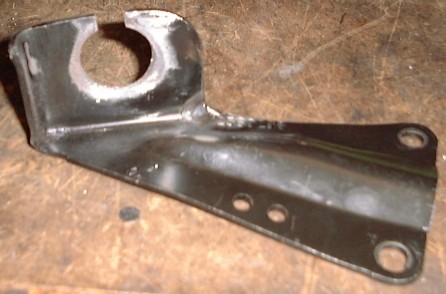
The ECM and TCM receive a stop lamp switch signal directly from the BCM. The BCM activates the stop lamp switch output to turn on the brake lights when a certain signal is seen coming from a sensor mounted on the brake pedal assy. The brake pedal position (BPP) sensor works much the same as a throttle position sensor in that it has a lever actuated by movement of the brake pedal. Mating the BPP sensor to the Fiero brake pedal is easy as long as you can find a location where it won't interfere with the brake linkage or steering column which passes very close to the brake pedal hardware. I found such as location as noted in the pictures below...
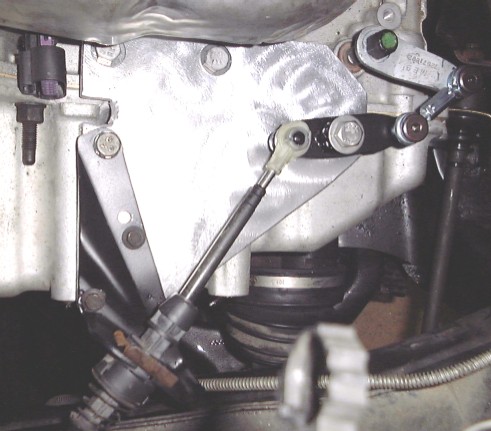
The OE exhaust crossover pipe used on this engine is routed very close to the transmission gear shifter shaft and lever; similar to 3800 Series 2 applications. The Pontiac Fiero uses a reverse actuating shifter and cable vs. what is normally found in GM front-drive cars. On the LS4's 4T65-E, the OE shift lever arm faces away from the exhaust crossover pipe. But in the Fiero application, this arrangement will work in reverse due to the inverted shifter workings.
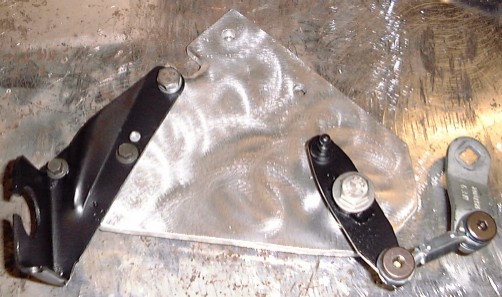
There is not enough room to use a shift lever arm on the opposite side of the shifter shaft (facing the exhaust). The OE Fiero shifter cable is not long enough to loop it around and make it come in behind the shifter shaft so it would work properly with the OE shift arm. So the solution would be to revert the shift cable actuation by building a pivot plate as seen below...
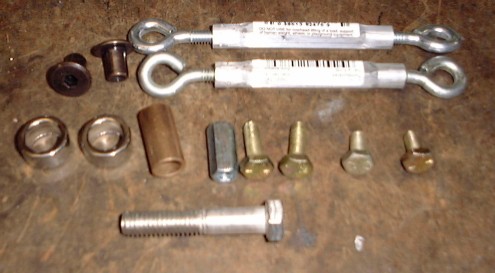
The major components used to build this pivot plate are 5/16" thick aluminum plate, pivot material (I used 3/16" steel), and some items from a local hardware store (as shown below):
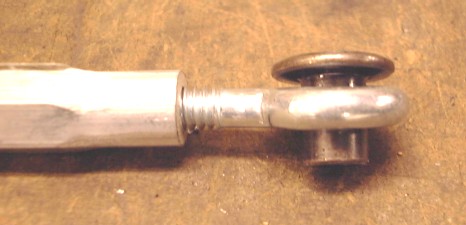
What's pictured above are 2x 1/4" turnbuckles (only used one end out of each turnbuckle; has 1/4-20 thread), 2x 1/2" ID x 3/8" L spacers, 1x 3/8" ID x 1" L brass bushing sleeve, 1x 1/4-20 coupler, 4x 1/4-20 bolts (only needed 2 for my application), 1x 3/8-16 x 2" stainless bolt, and 2x 1/4-20 "end lugs". The end lugs are probably going to be the hardest part to find but my ACE Hardware had them. Basically what they are is a threaded sleeve with a shoulder on one end. It is very important that you get something like this that fits nicely in the end of your turnbuckle eyelets as shown below:
You don't want the lug end fitting tight into the eyelet because it needs to be able to turn in there; but you don't want a lot of slop either. These eyelets aren't welded so I was able to bend them to fit my needs. Make sure you lube up these connections on final assembly to reduce wear. What isn't pictured above is some of the other hardware I had to use assembling this pivot bracket; of which were some 6mm and 8mm bolts used for mounting, some washers used for spacing the pivot arm and eyelet connections, a locking nut used to tighten down the 3/8 stainless bolt used as the pivot shaft, and the shift cable bracket I used for this application.
The shift cable bracket I used for this application came from the donor GXP. It's cable opening is too small for the Fiero shifter cable I'm using in this swap which means I had to open up the existing hole to 1" diameter and cut a slot in the top so it matches up to the cable correctly.
Stock:
Modified:
When placing the cable bracket and pivot bolt on the baseplate, the key is to keep your geometry of the shifter arm's arc of motion correct so the full range of gear selections can be made. I used the trial and error method of placement using cardboard mock-ups until I found something that worked. Once finished and installed, it looks like this:
The above design I came up with allows for all ranges of gear selections (P-R-N-D-M) to be accessed using the stock Fiero shifter. I also installed a limiting plate on the Fiero shifter (not shown) to prevent the driver from selecting any gear below the "M" range; which can be done without such a limiter. There are no other lower gear ranges that exist in this TAPShift transmission even though the shifter can be moved there (the transmission will just will remain in "M" range). So the limiter was installed to prevent shifter movement into those other gear selections.
I see you have axles installed. Would you mind sharing the combination that you used with us? I have the original gxp axles and a bunch of fiero axles but, i'm not sure if any of those combo,s will work. By the way,, Great thread! Good info. Keep up the great work. Excellent quality!
From all the pictures, you can also see the 4TE65hd transmission safely tucked away inside. Which means it's in there for good!! I haven't seen any final pictures of the engine installed in the bay, but I'm sure that's coming once Ryan makes his way from the underside of the car and back into all the HARD stuff.
Oh, I also had to make a tire/wheel purchase this week. Based on the size of the rotors and using the brake calipers from an 88' Fiero, there's no way my OEM 15s were going to fit. Ryan tried, but he would have had to drastically alter the rims. I'll have these up for sale somewhere, as I can't use them at all with the new 'vette rotors.
I ended up going with a 17/18 staggered wheel setup using the Motegi SP7 wheels and I read up on the pros of the new Nexen N3000 tires, and went with those as well.
BLKCOFY
While Ryan continues to display both his high attention to detail and ridiculous skill level with this swap, I will continue to share the 'easy stuff' that I've asked/persuaded him to do as part of the build...
As you can see above, the 2005 LS4 engine has finally found it's permanent home in the newly tagged Fiero GXP. Ryan still needs to complete the complicated wiring and tuning work and install a custom air induction system before he attempts it's first start, but has managed to keep my anxious nature at bay by squeezing in time to complete Rockcrawl's (Fiero Addiction) 12" Corvette Brake Kit and steel braided brake lines from The Fiero Store and my rim & tire setup...
I ended up going with the staggered 17x8/18x9 setup, using 225/17s up front and 265/18s in back, both using 40mm offset rims. Ryan reports that the back tires have plenty of clearance with my coilover springs and struts...which is making me wonder if I should have gone with 275s instead! The following two pictures show the wheels on the car, but still up on jacks as Ryan still has the exhaust system to complete, where he is doing a custom setup using C5 Corvette exhaust tips. With the lowering springs installed, my expectation is that there will little to no tire/fender gap once the car is lowered.
I was a bit worried about my rim choice at first, but seeing them on the car behind those huge rotors, I'm actually quite pleased...quite pleased indeed!
Looks great! Glad those brakes worked out for you. Should be finishing up mine in a few weeks also. Love the rim choice.
Yep, your advice on the 12" Corvette kit was perfect! I can't imagine how small the OEMs would look with these wheels. I just hope they perform as well as they look!
Yep, your advice on the 12" Corvette kit was perfect! I can't imagine how small the OEMs would look with these wheels. I just hope they perform as well as they look!
If they perform half as good as they look you will be very happy I'm sure. Glad I could help point you in another direction. Even while building my own car I'm very jealous of yours.
I way I figure it even if nothing else they will eliminate any brake fade. That and the the better 88 calipers make it all worth while IMO. What kind of pads are you going to use?
EDIT: I just realized what size and offset wheels you have. That helped me a bunch in making my decisioin. I had been trying to figure out if a 17x8 would fit on the front without a problem. Guess it does.
[This message has been edited by Fieroseverywhere (edited 01-09-2008).]
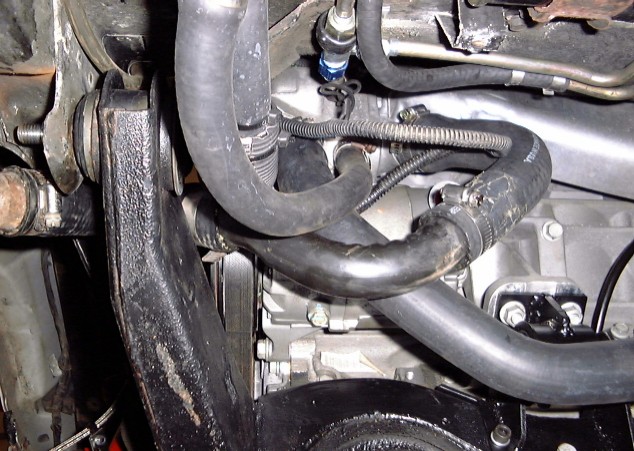
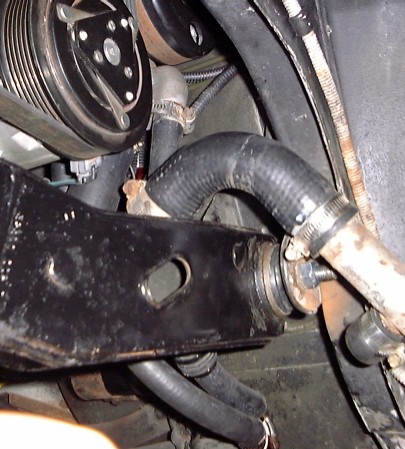
Finished up the cooling system hookup yesterday. Had to use two molded heater hoses, AutoZone p/n's L-4103 and L-4447. These hoses came longer than needed but had the bends molded into them that I needed; so I just cut them to fit. The main coolant feed and return were a little more complicated.
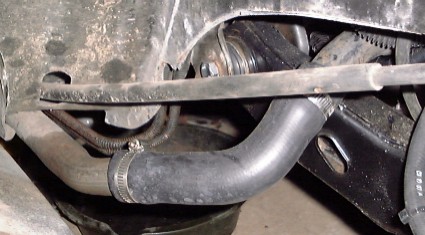
Basically what you will need to do is use the stock Fiero 2.8 coolant crossover pipe that connects the engine to the left side coolant tube. What you will need to do is cut off the 90 deg bend about 2 inches from where the mounting bracket is welded to it so you have just the 90 deg bend and nothing else. Make sure the end you cut is cleaned of sharp edges because a hose will need to be connected to it. Then you will need a GATES brand radiator hose p/n 21758 and cut off the 90 deg section that has the flared end; this flared end will connect to the t-stat housing (inlet) and the other end will connect to the 90 deg portion of the crossover pipe you just cut off. Then all you will need is another 90 deg section of radiator hose to connect the 90 deg section of pipe to the right side coolant tube coming from the radiator as shown in the pictures below...
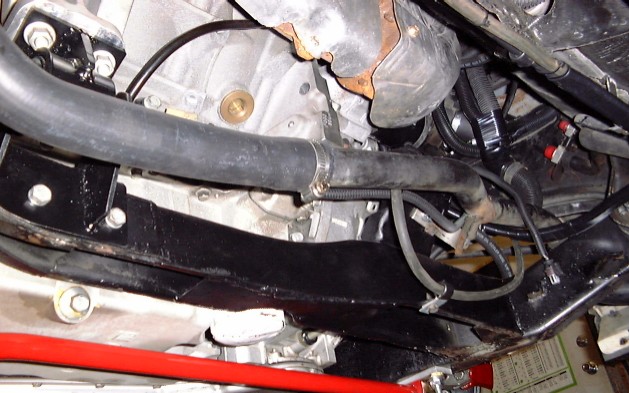
That takes care of the right side coolant tube hookup to the LS4's coolant inlet (t-stat housing). Now what's left is connecting the coolant outlet to the left side coolant tube in the Fiero. What you will need to do is use the remaining section of Fiero crossover coolant pipe you cut the 90deg bend off of and cut about another 3" or so of tubing off the end you cut on previously. The goal is to remove the section with the welded on bracket so you have a clean surface to clamp a hose onto. I found the perfect radiator hose for this application, it's for a 97 Chevy Pickup C1500 4.3L V6; AutoZone p/n: XL-183. Once you get this hose you are going to cut off about 3" from each end. Then you are going to cut it into two pieces a couple of inches from the 45deg bend at the one end of the hose. If you are doing this swap for yourself you might want to mock the pieces up on the engine in the car before you cut the hose to make sure your fitment is right. Once done, you should have something that looks like this:
I feel it is necessary to support the metal section of the coolant crossover tube to the cradle or other surface to help keep it from swinging around while the car is driven. I used the remaining bracket on the coolant tube and fashioned a strip of stainless steel that allowed me to bolt the coolant tube to the trans mount bracket; which you can kind of see in one of the above pics. The left over piece you cut off of the XL-183 hose can be used to connect the coolant crossover tube to the left side coolant tube going up to the radiator.
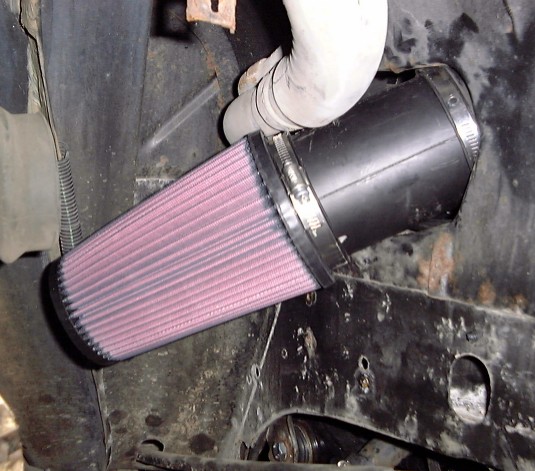
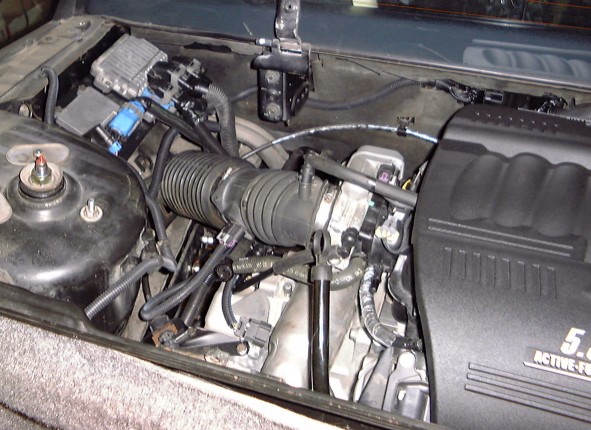
Finished the air induction system and air filter mounting...
Used K&N filter p/n: RU3130 and part of some GM air induction tube p/n: 25176891 as well as the original MAF sensor from the LS4 and the air induction piece that connected it to the throttle body.
Awesome build! Once it's running PLEASE let us know how the brakes are! I am considering this kit as well but there is little if any info out here on it!
Fierofanatic13.... go check out www.fieroaddiction.com where Rockcrawl provides alot of detailed information about the brake kit. You should also be able to find info on his ebay store.
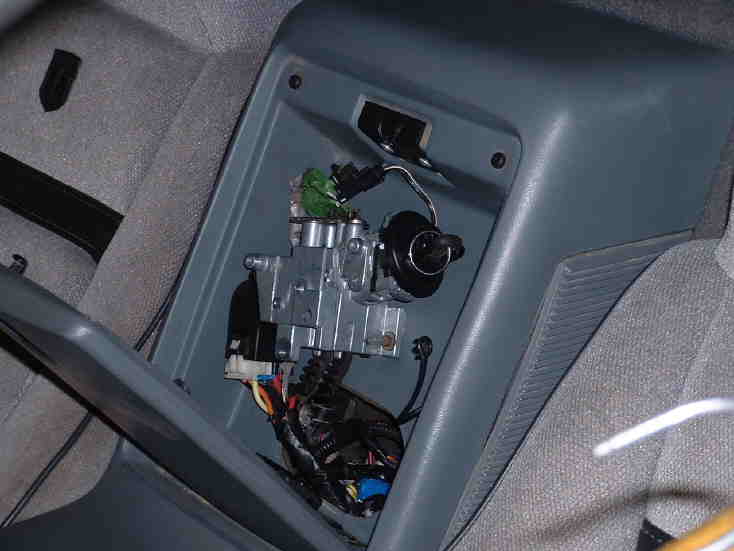
No issues! Great oil pressure and no noises/ticks/knocks, etc. Ryan just hasn't gotten the BCM wired up yet but the engine does start and run, but shuts off after 5 sec because of the missing security system. He's supposed to be getting to the dealership sometime this week to get the correct factory programming put onto the ECM so he can then make changes using the HP Tuners software.
I just wanted to celebrate the good news that the engine runs and from Ryan's reports...sounds awesome!
As Maurice said earlier, I started the engine up the other day -- without reprogramming the ECM. While the engine ran but shut off after 2 sec because of the missing security system/BCM, this confirmed one important thing I was wondering about... The starter crank signal comes from the key and goes only to the BCM. The BCM sends the crank signal out to the ECM via the Class 2 Serial Data link. The ECM activates a starter relay directly to enable engine cranking. There is no direct connection between the ignition switch and the starter on the Grand Prix GXP. I didn't know whether or not the engine would run if it was cranked without BCM intervention. Well now we know.
Another thing I wasn't sure about was the charging system. The alternator is controlled directly by the ECM. But there is a battery current sensor (inductive pickup sensor that goes around the negative battery cable) that connects directly to the BCM. When I started the engine, before it shut off due to the theft system the charging system wasn't working. So the question came up: Will the charging system work without the BCM being present?
Today I was able to go to the dealership to get the correct factory programming flashed onto this replacement ECM. Once I got back to the shop, I used the HP Tuners software to disable the VATS functions within the ECM. Then it was time to confirm another unknown that was debated in this thread....
IT RUNS!!! No theft shutoff or other issues! The HP Tuners software WORKS AS ADVERTISED for this application (in being able to disable the VATS). The BCM isn't even installed in the car yet. Also, the charging system came to life after the engine ran for about 4 seconds and maintained a 14.4 volt charge while the engine ran. The car is not drivable yet due to a missing wheel and tire (supplier/vendor) which I hope shows up early next week. I am going to see if I can get an audio recording posted to the internet of the exhaust note later.
Now, moving on there is still a lot left to do on the interior. The tach doesn't work but there are some different settings for the tach output in this ECM that I am going to try before I try some things electronically at the tach. I also want to get the paddleshifters installed and hooked up to the TCM so I can see if those work as intended. Then there's still much more BCM wiring. But at least it runs.
In the meantime, I got some items from Ed Morad...
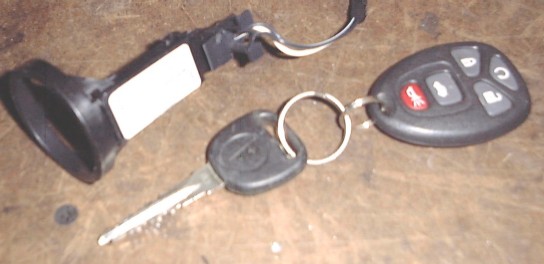
Pictured above is a PK3 module taken off an ignition cylinder, a PK3 master key, and a remote entry/start fob which is supposed to be compatible with the BCM I am installing in this application. As you can see, the PK3 module is quite small in size which means it could be mounted virtually anywhere in a Fiero. As I said earlier I am going to research the option of installing this module in a swap should someone wish to have this security feature.
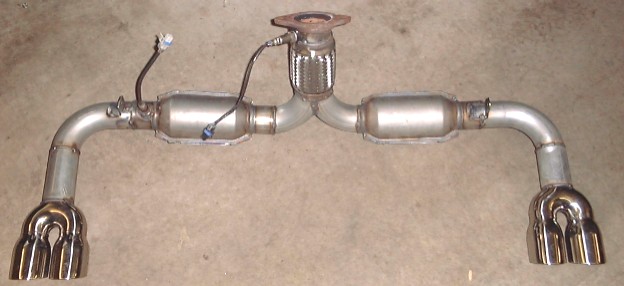
Here is a picture of the finished exhaust system before I installed it into the car...
Today I was able to go to the dealership to get the correct factory programming flashed onto this replacement ECM. Once I got back to the shop, I used the HP Tuners software to disable the VATS functions within the ECM. Then it was time to confirm another unknown that was debated in this thread....
IT RUNS!!! No theft shutoff or other issues! The HP Tuners software WORKS AS ADVERTISED for this application (in being able to disable the VATS). The BCM isn't even installed in the car yet.
This is what I have been waiting to hear and it is what I was wanting to hear. This makes the swap even better for those not using all the extra parts and the wiring alot less of a hazzle.


 He's also managed to somehow continue to assemble my rear suspension! I told you guys he was good!


 I'm just glad they love it!!


 It's only a matter of time now before Ryan puts it on the road!!